Minimally Invasive Percutaneous Osteotomy for Ankle Malunion with Gradual External Fixation: An Intraoperative Masterclass
Key Takeaway
This masterclass details a minimally invasive approach to correct complex ankle malunions following arthrodesis. We utilize a percutaneous Gigli saw osteotomy and gradual external fixation to achieve multiplanar realignment. Fellows will learn comprehensive anatomy, meticulous intraoperative steps, critical pearls to avoid pitfalls, and robust postoperative management strategies for successful patient outcomes.
Comprehensive Introduction and Patho-Epidemiology
Welcome, colleagues, to this advanced operative masterclass. The management of a malunited ankle arthrodesis represents one of the most formidable challenges in reconstructive foot and ankle surgery. These are rarely straightforward revisions; they are complex, multiplanar deformities frequently complicated by severely compromised soft tissue envelopes, altered vascularity, and distorted anatomical landmarks. Our preferred approach—a minimally invasive percutaneous Gigli saw osteotomy combined with gradual external fixation—is designed to optimize soft tissue preservation, respect the tenuous biology of the previously operated field, and achieve precise, multiplanar correction through the principles of distraction osteogenesis.
Ankle arthrodesis has long served as the gold standard for end-stage painful arthroses, profound instability, severe paralytic malalignment, and as a salvage procedure following devastating joint sepsis or massive trauma. However, despite its widespread application and historical efficacy, the complication profile remains significant. Contemporary literature demonstrates nonunion rates approaching 30% in high-risk cohorts, with overall complication rates—including infection, hardware failure, and malalignment—reaching up to 60%. Among these sequelae, malunion stands out as particularly detrimental due to its profound, cascading impact on the functional biomechanics of the entire lower extremity.
A malaligned ankle fusion mass acts as a rigid, non-compliant lever arm that transmits pathologic forces to adjacent articulations. This leads to a predictable cascade of biomechanical failures: accelerated subtalar and midtarsal joint degeneration, drastically reduced overall foot flexibility, the development of rigid compensatory forefoot deformities, and persistent, debilitating pain during the stance phase of gait. Correcting these deformities is paramount not only for immediate pain relief but also for the long-term preservation of functional mobility in neighboring joints, which bear exponentially increased stress in the presence of coronal, sagittal, or axial malalignment.
The technique detailed in this chapter specifically addresses these complex, rigid deformities through a meticulously executed subperiosteal Gigli saw osteotomy. By confining our dissection to the subperiosteal envelope, we drastically limit extra-periosteal soft tissue compromise, which is the critical limiting factor in previously operated, heavily scarred surgical fields. This approach optimizes the local biological environment for bone healing. The subsequent application of a circular external fixator (such as a Taylor Spatial Frame or traditional Ilizarov apparatus) allows for accurate, gradual multiplanar realignment—simultaneously addressing rotation, angulation, translation, and any concomitant limb-length discrepancies without acutely tensioning the neurovascular structures.
Detailed Surgical Anatomy and Biomechanics
Thorough preoperative planning and intraoperative execution demand an intimate, three-dimensional understanding of the surgical anatomy of the distal tibia and ankle region. We are operating in an exceptionally tight anatomical cylinder, often encased in dense, non-yielding scar tissue from prior interventions, with vital neurovascular structures running in perilous proximity to our intended osteotomy path.
The anterior compartment of the distal leg houses structures that are highly vulnerable during the anterior subperiosteal dissection. The deep peroneal nerve and the anterior tibial artery and veins descend closely along the interosseous membrane, eventually resting directly on the anterior aspect of the distal tibia. Our subperiosteal dissection in this region must be meticulously performed; the periosteal elevator must never lose contact with the cortical bone, as straying into the anterior compartment will inevitably result in catastrophic neurovascular injury. Superficial to this neurovascular bundle lie the crucial tendinous structures: the tibialis anterior, extensor hallucis longus, and extensor digitorum longus. The tibialis anterior tendon is our primary palpable landmark, dictating the placement of our initial anteromedial incision to ensure we remain in a safe surgical corridor.
Transitioning to the lateral compartment, the surgical anatomy is dominated by the peroneal tendons and the superficial peroneal nerve. The peroneus longus and brevis tendons lie superficial to the lateral malleolus (or the lateral aspect of the fusion mass). During the lateral passage of our instruments and the Gigli saw, extreme care must be taken to maintain the subperiosteal plane to avoid fraying, transecting, or thermally injuring these tendons. Furthermore, the superficial peroneal nerve, which typically pierces the deep crural fascia in the middle to distal third of the leg, provides critical sensation to the dorsum of the foot. Its variable branching pattern puts it at significant risk during lateral skin incisions and any subcutaneous dissection required to retrieve the Gigli saw sutures.
The posterior and medial compartments contain the most critical structures at risk during the circumferential passage of the saw. The posterior tibial artery, posterior tibial veins, and the tibial nerve run within the tarsal tunnel, posterior to the medial malleolus, deep to the flexor retinaculum. Our posterior subperiosteal sweep must remain deep to the flexor tendons (tibialis posterior, flexor digitorum longus, and flexor hallucis longus) but strictly superficial to the bone. If the elevator breaches the periosteum posteriorly, the saw will inevitably ensnare the posterior neurovascular bundle. Medially, the saphenous nerve and great saphenous vein run superficially; our medial incisions and the final stages of the osteotomy must be thoughtfully managed and shielded to prevent iatrogenic transection of these structures.
Exhaustive Indications and Contraindications
Patient selection is the absolute cornerstone of success when employing percutaneous osteotomies and fine-wire external fixation. The decision to proceed with this highly technical intervention must be based on a rigorous assessment of the patient's deformity, soft tissue viability, and psychosocial capacity to manage an external fixator for several months.
The primary indication for this procedure is a symptomatic malunited ankle arthrodesis characterized by multiplanar deformity (e.g., equinovarus, severe valgus, or combined translational deformities) where acute correction via internal fixation would result in unacceptable soft tissue tension or neurovascular compromise. It is particularly indicated in the presence of significant limb-length discrepancies (greater than 1.5 cm) that cannot be managed with shoe lifts, as distraction osteogenesis allows for simultaneous realignment and lengthening. Furthermore, patients with a history of deep infection, compromised local vascularity, or poor anterior soft tissue envelopes (e.g., prior skin grafting or rotational flaps) are ideal candidates, as the percutaneous technique avoids large, devascularizing extensile exposures.
Conversely, absolute contraindications include active, untreated deep soft tissue or bone infection at the planned osteotomy site, although the external fixator itself can be used for bone transport once the infection is resected. Severe peripheral vascular disease that precludes adequate bone healing or soft tissue recovery is an absolute contraindication; a preoperative vascular surgical consultation and non-invasive arterial studies (ABI, TCOM) are mandatory in dysvascular patients. Relative contraindications revolve heavily around patient compliance. The management of a circular frame requires meticulous pin site care, daily strut adjustments, and a high degree of psychological resilience. Patients with severe cognitive impairment, uncontrolled psychiatric disorders, or documented non-compliance are at exceptionally high risk for catastrophic complications and should be offered alternative, albeit potentially less optimal, salvage procedures.
| Parameter | Indications for Percutaneous Osteotomy & Ex-Fix | Contraindications (Absolute and Relative) |
|---|---|---|
| Deformity Type | Multiplanar malunion, severe angulation/translation | Simple, single-plane deformity amenable to acute internal fixation |
| Soft Tissue Status | Severely compromised, heavily scarred, prior flaps | Healthy, robust soft tissue envelope (relative contraindication for ex-fix over internal) |
| Limb Length | Concomitant LLD requiring >1.5cm lengthening | No significant LLD, or LLD manageable with orthotics |
| Infection | History of prior infection (healed), osteomyelitis requiring transport | Active, untreated fulminant sepsis at the osteotomy site |
| Patient Factors | Highly compliant, strong psychosocial support system | Severe cognitive impairment, active substance abuse, documented non-compliance |
| Vascularity | Adequate perfusion (ABI > 0.8, good capillary refill) | Severe peripheral arterial disease, non-reconstructable vascular tree |
Pre-Operative Planning, Templating, and Patient Positioning
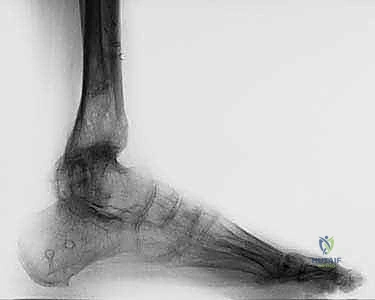
Thorough preoperative planning is the non-negotiable foundation of this procedure. The complexity of a malunited fusion mass demands a rigorous, multi-modal imaging approach. Standard weight-bearing radiographs—including anteroposterior (AP), lateral, and mortise views of the ankle, along with full-length standing long-leg alignment films—are essential to quantify the mechanical axis deviation and calculate the true magnitude of the multiplanar deformity.
For highly complex deformities, or to delineate the precise morphology of the fusion mass and identify any insidious areas of nonunion or cystic degeneration, a high-resolution CT scan with 3D reconstruction is invaluable. This allows for detailed virtual templating of the osteotomy. We utilize these images to determine the exact Center of Rotation of Angulation (CORA) and to plan the level of the osteotomy. Ideally, the osteotomy is placed through the previous fusion site, provided the bone is viable and not excessively sclerotic. Our target final alignment is a plantigrade foot, with the calcaneal bisection line parallel or in slight valgus (0° to 2°) relative to the mid-diaphyseal line of the tibia in the axial plane. We specifically aim for a final limb length that is approximately 1 cm shorter than the contralateral, unaffected limb; this intentional slight shortening helps prevent catastrophic over-tensioning of the Achilles tendon and neurovascular structures, providing a functional advantage during the swing phase of gait.
Patient positioning in the operating theater must be executed with precision to facilitate unhindered fluoroscopic access and seamless application of the circular frame. The patient is placed supine on a fully radiolucent operating table under general or regional anesthesia. Crucially, we place a substantial ipsilateral hip bump. This externally rotates the hip slightly, bringing the foot from its naturally externally rotated resting posture into a true "foot-forward" (patella straight up) position. This maneuver is critical; it allows for optimal, orthogonal C-arm access for both true AP and lateral fluoroscopic views without requiring the surgical team to constantly reposition the patient's leg or the heavy C-arm base.
A nonsterile thigh tourniquet is applied high on the proximal thigh. We adhere to a strict protocol of inflating this tourniquet only during the critical subperiosteal dissection and Gigli saw passage to minimize blood loss and maximize visualization in the tiny percutaneous incisions. Once the osteotomy is complete, the tourniquet is immediately deflated prior to the application of the external fixator. The entire lower extremity, from the tips of the toes up to the level of the tourniquet, is meticulously prepped with a chlorhexidine-alcohol or povidone-iodine solution and draped in a standard sterile fashion, ensuring the iliac crest is accessible if autologous bone graft is anticipated for concurrent nonunion management. Under live video fluoroscopy, using a sterile marking pen, we carefully indicate the desired level of the osteotomy on both the AP and lateral planes, confirming our trajectory avoids retained hardware and targets viable bone.
Step-by-Step Surgical Approach and Fixation Technique
The percutaneous subperiosteal Gigli saw osteotomy is an exercise in tactile feedback and anatomical spatial awareness. The overarching objective is to completely transect the malunited bone mass while maintaining an unbroken subperiosteal sleeve, thereby shielding the surrounding neurovascular and tendinous structures from thermal and mechanical injury.
Incision 1: Anteromedial Approach and Dissection
We begin with the primary anteromedial access portal. Using a #15 blade, a precise 1.5 to 2 cm transverse incision is made on the anteromedial aspect of the distal tibia, at the exact fluoroscopically confirmed level of the planned osteotomy. This incision is strategically placed immediately medial to the palpable tibialis anterior tendon. The surgeon must physically palpate this tendon and retract it slightly laterally to ensure the incision provides a safe entry point. Through this incision, a small, curved Cobb elevator or a specialized narrow periosteal elevator is introduced. The dissection proceeds directly down to the anterior tibial cortex. Once the periosteum is incised, the elevator is used to meticulously create a subperiosteal tunnel across the entire anterior face of the tibia, advancing from medial to lateral. The surgeon must utilize a firm, sweeping, rocking motion, keeping the tip of the elevator undeniably engaged with the rough cortical bone. This subperiosteal plane is the only barrier protecting the deep peroneal nerve and anterior tibial vessels; any loss of contact with the bone risks devastating anterior compartment injury.
Incision 2: Anterolateral Exit and Anterior Saw Passage
As the periosteal elevator successfully traverses the anterior tibia and reaches the lateral border of the fusion mass, the surgeon will observe the lateral skin tenting under the pressure of the elevator tip. This tenting serves as the precise anatomical guide for the second incision. A small, 1.5 to 2 cm vertical incision is made directly over the tented skin. The vertical orientation here is deliberate, as it better accommodates the subsequent reciprocating motion of the Gigli saw without tearing the skin edges.
Next, a heavy, curved tonsil hemostat is introduced through the first (anteromedial) incision. Grasping a heavy No. 2 Ethibond suture (or similar braided, high-tensile suture), the hemostat is passed through the newly created anterior subperiosteal tunnel and retrieved through the second (anterolateral) incision. One end of the wire loop of the Gigli saw is then securely passed through the Ethibond suture. Applying gentle, steady traction on the suture from the lateral side, the Gigli saw is pulled from medial to lateral, seating it perfectly within the anterior subperiosteal tunnel. Before proceeding further, orthogonal fluoroscopic imaging is mandatory to confirm the saw is positioned exactly at the planned osteotomy level.
Incision 3: Posterolateral Approach
With the anterior half of the saw positioned, attention turns to the more perilous posterior passage. From the second (anterolateral) incision, the periosteal elevator is re-introduced. The trajectory now curves posteriorly, navigating behind the fibula (or the lateral aspect of the fusion mass), aiming for the posterolateral corner of the ankle. The tactile feedback here is critical; the elevator must hug the bone tightly, sweeping the peroneal tendons laterally and posteriorly away from the danger zone. As the elevator reaches the posterolateral aspect, it will again tent the skin. A third, vertical 1.5 to 2 cm incision is made at this precise point, and the elevator is temporarily removed.
Incision 4: Posteromedial Exit and Circumferential Completion
To advance the saw, the curved tonsil hemostat is passed from the third (posterolateral) incision, subperiosteally, to retrieve the Ethibond suture from the second incision. The suture and attached Gigli saw are pulled through to the posterolateral portal. The final, and most dangerous, subperiosteal sweep is then performed. The elevator is passed from the third incision, sweeping across the posterior aspect of the distal tibia. This trajectory passes directly deep to the flexor hallucis longus, flexor digitorum longus, and tibialis posterior tendons, and critically, deep to the posterior tibial neurovascular bundle. The elevator must exit medially, just anterior to the posterior tibialis tendon. The skin tenting medially dictates the location of the fourth and final transverse incision. The hemostat is used one last time to pull the suture and saw from the third to the fourth incision. The Gigli saw is now positioned circumferentially around the ankle malunion, entirely within a protective subperiosteal envelope.
Executing the Osteotomy
With the saw handles securely attached, the osteotomy commences. The surgeon utilizes a controlled, broad, reciprocating motion, cutting from lateral to medial. The hands must be kept wide to prevent the saw from binding and generating excessive thermal necrosis. As the saw bites through the dense fusion mass, the surgeon must anticipate the completion of the cut.
Crucially, as the saw approaches the medial cortex—just before the bone is completely transected—the cutting must halt. A fresh, wide periosteal elevator or a smooth retractor is inserted between the fourth (posteromedial) and first (anteromedial) incisions, passing deep to the skin bridge but superficial to the bone, effectively crossing the path of the Gigli saw. This instrument acts as a physical shield. As the final strokes of the saw complete the osteotomy, the saw blade will strike the metal elevator rather than violently erupting through the medial soft tissues, thereby preserving the saphenous nerve, saphenous vein, and the fragile medial skin bridge.
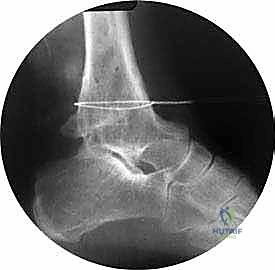
TECH FIG 2A: Lateral intraoperative radiographic view showing the Gigli saw passed at the level of the ankle malunion.
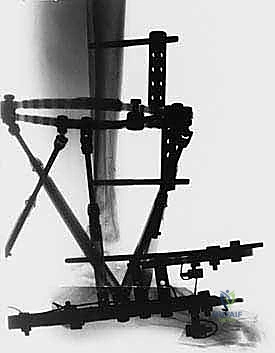
Following the completion of the cut, the saw is removed, and final fluoroscopic images are obtained to confirm complete biplanar transection. The tourniquet is immediately deflated, hemostasis is achieved, and the surgical team transitions to the application of the pre-constructed circular external fixator, utilizing standard safe-zone wire and half-pin placement techniques to secure the proximal and distal segments for subsequent distraction.
Complications, Incidence Rates, and Salvage Management
Despite the minimally invasive nature of this technique, the inherent complexity of ankle malunion correction carries a distinct and unforgiving complication profile. The surgeon must be acutely aware of these risks, actively work to mitigate them during the procedure, and have clear salvage pathways established.
The most catastrophic intraoperative complication is neurovascular injury during the passage or operation of the Gigli saw. If the subperiosteal plane is violated, the saw can easily transect the anterior or posterior tibial arteries, or the respective nerves. Incidence of major neurovascular injury in percutaneous tibial osteotomies is reported at 1-3% in the literature. Immediate recognition requires vascular surgical intervention and potential conversion to an open approach for repair. Thermal necrosis of the bone or surrounding soft tissues is another significant risk if the saw is operated too rapidly or binds within the bone; this can lead to deep infection or intractable nonunion. Copious irrigation during sawing and utilizing long, smooth strokes minimizes this risk.
Postoperatively, pin tract infections are ubiquitous in circular external fixation, occurring in up to 80% of patients. While most are superficial and resolve with local care and oral antibiotics, deep pin tract infections can lead to ring sequestrum, osteomyelitis, and loss of fixation stability. Premature consolidation of the osteotomy site can occur if the latency period is too long or the distraction rate is too slow, necessitating a return to the operating room for a repeat osteotomy. Conversely, delayed union or nonunion of the regenerate bone occurs in 5-10% of cases, particularly in patients with compromised vascularity or those who smoke.
| Complication Category | Specific Complication | Estimated Incidence | Prevention & Salvage Management |
|---|---|---|---|
| Intraoperative | Neurovascular Transection | 1 - 3% | Strict subperiosteal technique; immediate vascular repair, open conversion |
| Intraoperative | Thermal Bone Necrosis | 2 - 5% | Slow, wide sawing strokes; immediate irrigation; debridement if identified |
| Postoperative (Soft Tissue) | Superficial Pin Tract Infection | 60 - 80% | Meticulous pin care protocols; oral antibiotics, pin release if skin is tethered |
| Postoperative (Soft Tissue) | Deep Pin Infection / Osteomyelitis | 3 - 7% | Pin removal, curettage of tract, IV antibiotics, frame modification |
| Postoperative (Bone) | Premature Consolidation | 4 - 8% | Strict adherence to distraction schedule; re-osteotomy if consolidated |
| Postoperative (Bone) | Delayed Union / Nonunion | 5 - 10% | Optimize nutrition, smoking cessation; autologous bone grafting, dynamization |
Phased Post-Operative Rehabilitation Protocols
The postoperative management following a percutaneous osteotomy and circular frame application is highly protocol-driven and requires intense patient education and compliance. The rehabilitation is divided into three distinct phases: latency, distraction, and consolidation.
The Latency Phase begins immediately postoperatively. During this period, which typically lasts 7 to 10 days depending on the patient's age and the biological quality of the bone, no distraction is performed. This crucial window allows for the initial inflammatory response to subside and for the multipotent mesenchymal stem cells to populate the hematoma at the osteotomy site, laying the groundwork for the regenerate bone. Pain management and aggressive edema control (elevation) are the primary clinical focuses during this week.
The Distraction Phase commences after the latency period. The patient, or their caregiver, is instructed to adjust the struts of the external fixator to achieve a distraction rate of approximately 1.0 mm per day, typically divided into four increments of 0.25 mm (the Ilizarov rhythm). This gradual distraction stretches the callus, stimulating osteogenesis. The patient is seen in the clinic every 10 to 14 days during this phase for clinical examination and radiographic assessment to monitor the quality of the regenerate bone, ensure the correction is tracking according to the preoperative software plan, and assess for any pin tract complications or joint contractures. Physical therapy is mandatory to maintain range of motion in the toes and knee.
The Consolidation Phase begins once the desired multiplanar correction and length have been achieved. The frame is "locked" to prevent further movement. This phase is typically twice as long as the distraction phase. The regenerate bone must mature from a radiolucent fibrous matrix into solid, corticated bone. Progressive weight-bearing is encouraged during this phase to stimulate cortical hypertrophy through micromotion and Wolff's law. The frame is only removed once orthogonal radiographs demonstrate solid bridging cortices on at least three out of four sides of the regenerate bone. Following frame removal, the patient is transitioned to a controlled ankle motion (CAM) boot or a total contact cast for an additional 4 to 6 weeks to protect the newly formed bone from shear forces.
Summary of Landmark Literature and Clinical Guidelines
The foundation of this technique rests on the monumental work of Gavriil Ilizarov, whose pioneering research in the mid-20th century elucidated the biological principles of distraction osteogenesis. Ilizarov demonstrated that tension stress applied to living tissues—particularly a meticulously preserved periosteal and endosteal envelope—stimulates profound regenerative pathways.
Modern clinical guidelines and landmark papers have refined these principles for the specific application of ankle malunion. Paley's extensive work on deformity planning and the center of rotation of angulation (CORA) provides the mathematical framework necessary for accurate multiplanar correction using circular frames. Literature specifically addressing the percutaneous Gigli saw technique, such as studies by Fragomen and Rozbruch, consistently highlight its superiority over open osteotomies in preserving the tenuous vascular supply of the distal tibia, thereby significantly reducing the rates of nonunion and deep infection in revision arthrodesis scenarios.
Current consensus among orthopedic deformity surgeons dictates that while acute correction with internal fixation may be suitable for mild, single-plane malunions, the percutaneous osteotomy combined with gradual external fixation remains the most biologically sound and mechanically powerful technique for managing severe, multiplanar ankle arthrodesis malunions, particularly those complicated by soft tissue compromise or limb-length discrepancy. Mastery of this surgical technique and the subsequent postoperative protocols is an essential component of the advanced reconstructive surgeon's armamentarium.
