Masterclass in Orthopaedic Splinting and Contracture Management
Key Takeaway
Splinting serves three primary orthopaedic purposes: immobilizing the hand to promote healing, correcting existing deformities, and dynamically compensating for peripheral nerve palsies. Successful application requires a deep understanding of hand biomechanics, meticulous attention to skin pressure points, and tailored designs for specific deficits such as median, ulnar, or radial nerve injuries. This guide details evidence-based splinting protocols and surgical contracture releases.
FUNDAMENTALS OF ORTHOPAEDIC SPLINTING
In the realm of operative orthopaedics and hand surgery, splinting is not merely an adjunct to surgical intervention; it is a critical, biomechanically driven modality essential for optimizing functional outcomes. The application of a splint must be as meticulously planned as the surgical incision itself.
Splinting serves three primary, distinct purposes in orthopaedic practice:
1. Immobilization and Healing: To immobilize all or part of the hand in a physiological position that promotes tissue healing, minimizes edema, and prevents secondary deformity.
2. Deformity Correction: To apply sustained, low-load stretch to viscoelastic tissues, thereby correcting an existing contracture and promoting functional restoration.
3. Dynamic Compensation: To supply external power to compensate for focal muscle weakness, most notably in the setting of peripheral nerve palsies, allowing the kinematic chain of the hand to function despite denervation.
Splints are broadly categorized into static splints (which prevent motion and provide rigid support) and dynamic splints (which assist motion using elastic components like rubber bands or springs). Immobilizing static splints are frequently utilized in the immediate postoperative phase to ensure the correct positioning of joints (e.g., the "intrinsic plus" or "safe" position) and to relax repaired musculotendinous units. Conversely, dynamic splints are deployed to prevent progressive deformity, such as in the rheumatoid hand, or to substitute for paralyzed muscles.
Clinical Pearl: A well-designed splint must permit unaffected parts of the extremity to function as normally as possible. Over-immobilization is a frequent pitfall that leads to iatrogenic stiffness, joint contractures, and prolonged rehabilitation.
Principles of Splint Construction and Patient Compliance
The efficacy of any orthosis is directly proportional to patient compliance. Splints must be lightweight, low-profile, and comfortable. Meticulous care must be taken to avoid excessive skin pressure, particularly over bony prominences and superficial joints. Ischemic pressure sores can develop rapidly, necessitating the cessation of the therapy program and severely delaying functional recovery.
While a certified hand therapist (CHT) or orthotist should be available for complex technical adjustments, the splint must be designed so that the patient can independently apply, remove, and make minor adjustments to it. Comprehensive patient education is paramount; the patient must thoroughly understand the biomechanical rationale for the splint to ensure faithful adherence to the wearing schedule.
SURGICAL MANAGEMENT OF WEB SPACE CONTRACTURES
Before dynamic splinting can be effective, severe structural contractures often require surgical release. Web space contractures, particularly of the first web space, severely limit thumb abduction and opposition, crippling hand function. When these contractures are secondary to a narrow linear scar but surrounded by normal, elastic tissue, Z-plasty techniques are highly effective.
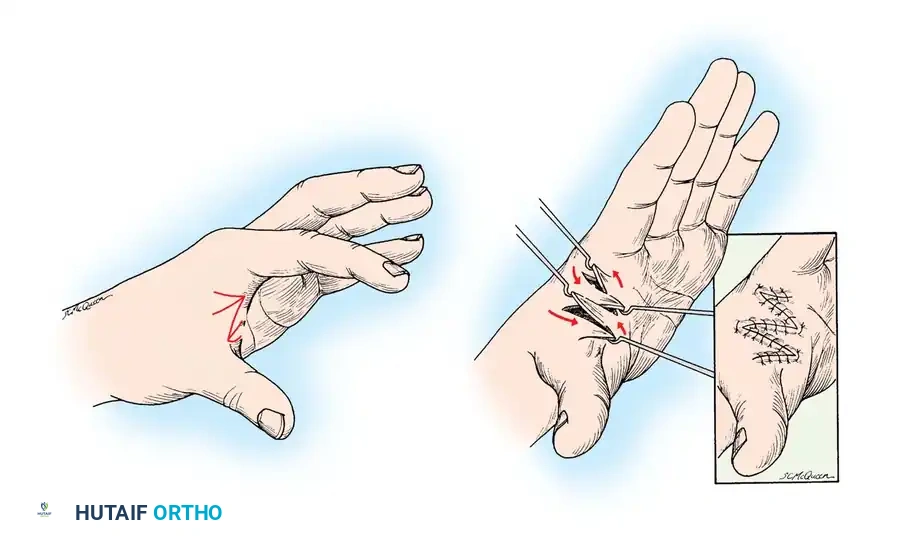
The Four-Flap Z-Plasty for First Web Contractures
The first web space is critical for grasp and pinch kinematics. A linear scar contracture here can be effectively released using a four-flap Z-plasty, which provides a greater increase in length and deepens the web space more effectively than a standard two-flap Z-plasty.
Surgical Technique:
1. Incision and Design: Outline the four flaps (A, B, C, D) centered over the linear contracture band. The angles of the flaps are typically designed at 90 degrees to the central limb, subdivided into 45-degree angles to create the four flaps.
2. Elevation: Elevate the flaps at the subdermal level, ensuring preservation of the delicate subdermal vascular plexus. Meticulous hemostasis is required to prevent postoperative hematoma.
3. Release: Release any underlying fascial or muscular contractures (e.g., adductor pollicis fascia) if the contracture extends beyond the skin.
4. Transposition: Rotate and interdigitate the flaps. Flap A transposes with B, and Flap C transposes with D, effectively breaking up the linear scar and deepening the commissure.
5. Closure: Suture the flaps in their new positions using fine non-absorbable sutures (e.g., 5-0 nylon) with minimal tension.
Dorsal Flap Technique for Lesser Web Contractures
Linear contractures of the second, third, or fourth web spaces, caused exclusively by narrow scarring, can be corrected using a tailored dorsal flap technique.
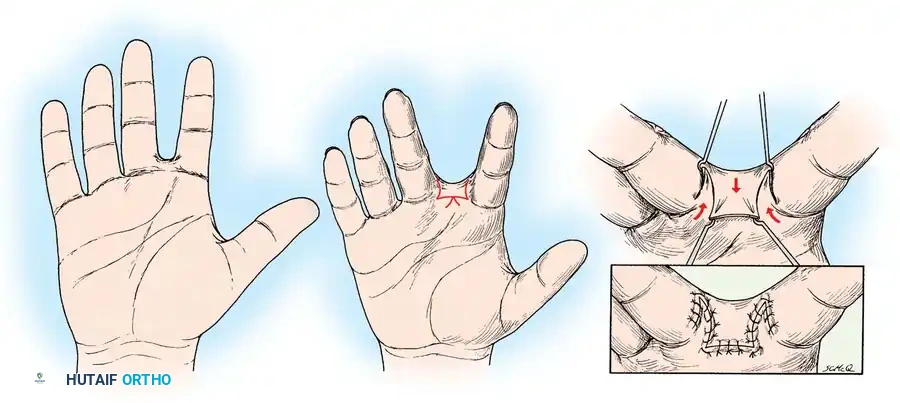
Surgical Technique:
1. Outline: Design a proximally based dorsal flap over the affected web space, incorporating the linear scar into the margins of the release.
2. Elevation and Rotation: Elevate the dorsal flap and release the tethering scar tissue. The adjacent volar skin edges are mobilized.
3. Inset: Rotate the dorsal flap into the depth of the web space to recreate the normal dorsal-to-volar slope of the commissure. Suture the flap in place, ensuring no tension is placed on the tip of the flap to avoid necrosis.
POSTOPERATIVE ELEVATION AND IMMOBILIZATION
Postoperative edema is the enemy of hand surgery. It increases interstitial pressure, compromises microvascular perfusion, and leads to fibroplasia and subsequent joint stiffness. Strict elevation is mandatory.
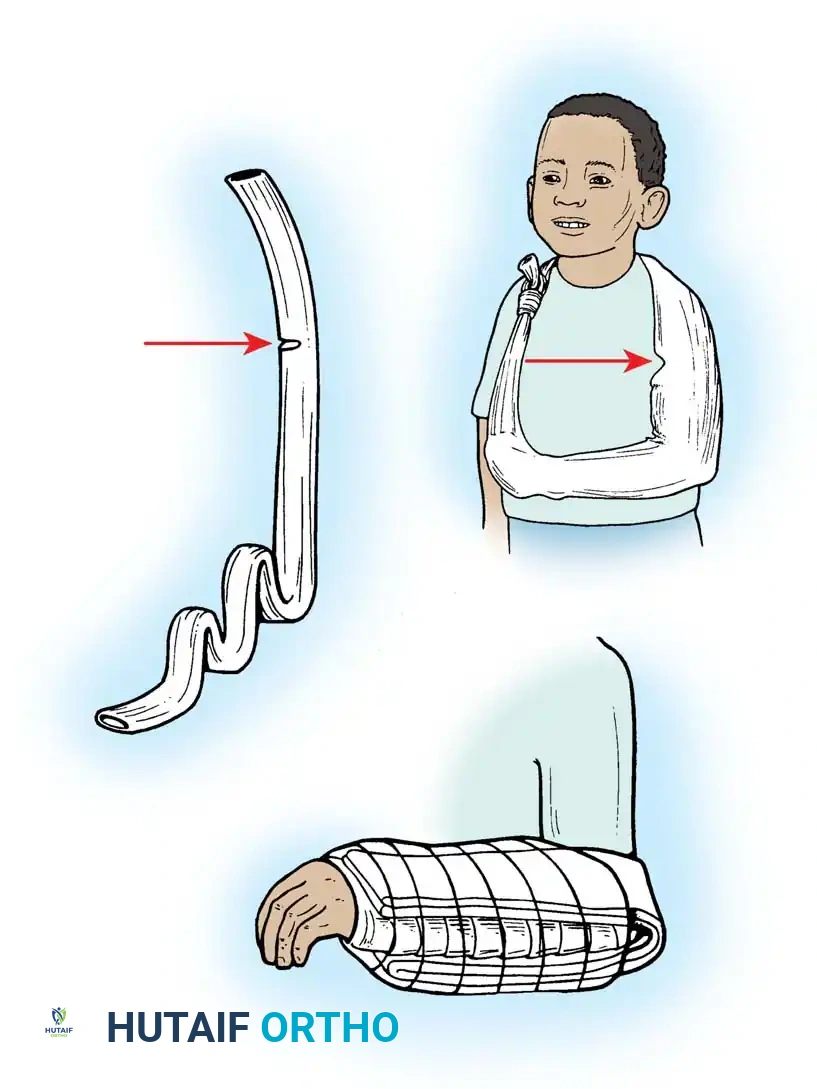
Pediatric Immobilization Techniques
Children present a unique challenge in postoperative care due to their high activity levels and potential for contaminating dressings. A simple, highly effective method utilizes a tubular stockinette.
Application:
1. A long tube of stockinette is opened at specific intervals.
2. It is slipped over the entire surgically treated extremity.
3. The proximal end is tied securely but comfortably around the child's neck, acting as a custom sling.
4. To prevent a plaster splint (used to immobilize the forearm and wrist) from slipping distally, the splint and stockinette must include the elbow joint, locking the immobilization apparatus in place.
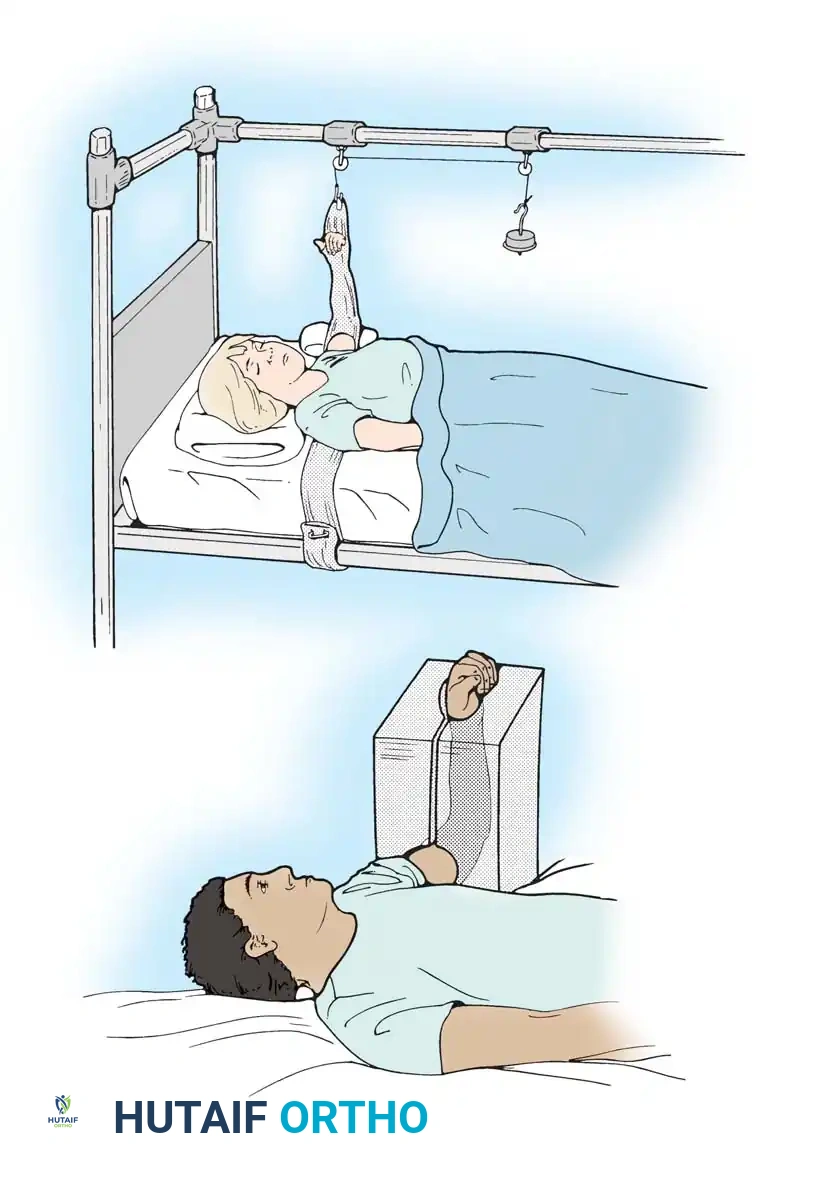
Adult Elevation and Traction Techniques
For adults confined to bed postoperatively, continuous elevation can be achieved using a modified stockinette attached to a traction apparatus.
Stockinette Traction:
The stockinette is slipped onto the extremity and carried across the bed beneath the patient's shoulders. At the level of the palm, it is opened to allow active motion of the digits—a critical step to pump edema fluid proximally. One end is secured to the mattress frame, and the other to an overhead traction apparatus, maintaining the hand in strict elevation above the level of the right atrium.
Rubber Sponge Block:
Alternatively, a preformed rubber sponge block is an excellent tool for postoperative elevation. Originally designed for foot protection, it has been adapted for the upper extremity. The hand, forearm, and elbow rest within the block without constriction. Its primary advantage is mobility; the patient can easily transition from the hospital bed to home, continuing nighttime elevation without complex rigging.
SPLINTING FOR PERIPHERAL NERVE PALSIES
Peripheral nerve injuries result in predictable patterns of motor loss and subsequent postural deformities due to unopposed antagonist muscle action. Dynamic splinting is the cornerstone of conservative management and preoperative optimization, preventing fixed contractures while awaiting nerve regeneration or tendon transfer surgery.
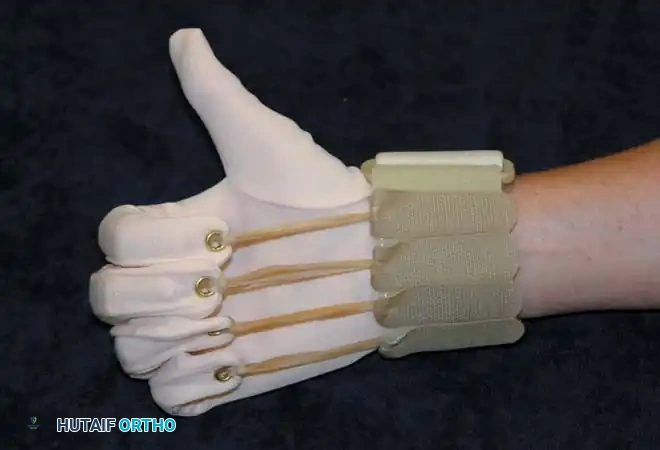
Combined Median-Ulnar Nerve Palsy
A combined high median and ulnar nerve palsy is devastating, resulting in a complete loss of intrinsic hand function, clawing of all four digits, and a severe loss of thumb opposition and pinch.
Orthotic Management:
The splint must be comfortable and maintain a very low profile to encourage continuous wear during the prolonged recovery phase.
* Mechanism: It blocks metacarpophalangeal (MCP) joint hyperextension, effectively preventing the claw deformity. By stabilizing the MCP joints in slight flexion, the force of the intact extrinsic extensors (innervated by the radial nerve) is transmitted to the proximal interphalangeal (PIP) and distal interphalangeal (DIP) joints, allowing active digit extension.
* Function: It positions the thumb in opposition, permitting rudimentary pinch and grasp functions essential for activities of daily living (ADLs).
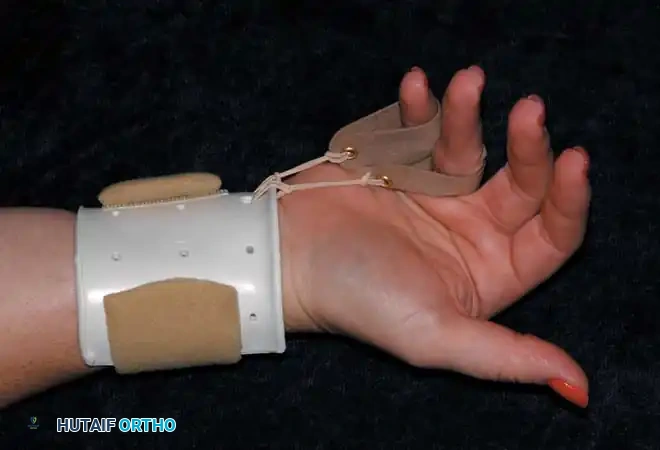
Median Nerve Palsy
Low median nerve palsy primarily affects the thenar musculature (abductor pollicis brevis, opponens pollicis, and the superficial head of the flexor pollicis brevis), leading to an "ape hand" deformity and a profound adduction contracture of the thumb due to the unopposed action of the adductor pollicis (ulnar innervated).
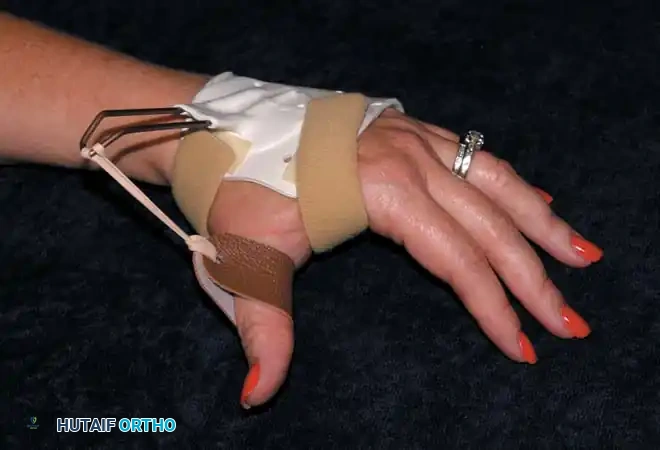
Orthotic Management:
* Mechanism: A lightweight, compact dynamic splint is utilized to hold the thumb in palmar abduction, extension, and opposition.
* Objective: This dynamic positioning prevents the dreaded first web space adduction contracture, maintaining the soft tissue compliance necessary for future tendon transfers (e.g., an opponensplasty) if nerve recovery fails.
Ulnar Nerve Palsy
Ulnar nerve palsy results in the classic "claw hand" (intrinsic minus posture), most pronounced in the ring and little fingers. The loss of the interossei and lumbricals leads to unopposed MCP hyperextension by the extensor digitorum communis (EDC) and PIP/DIP flexion by the flexor digitorum profundus (FDP) and superficialis (FDS).
Surgical Warning: Failure to splint an ulnar nerve palsy early will result in fixed volar plate contractures at the PIP joints, which are notoriously difficult to correct surgically.
Dynamic Flexion Splinting:
One approach utilizes a splint that dynamically forces the MCP joints of the ring and little fingers into flexion using elastic tension. However, a significant disadvantage of this specific design is that part of the palm is covered by rubber bands, which interferes with tactile feedback and grasping mechanics.
Anti-Hyperextension Splinting (Lumbrical Bar):

A superior biomechanical design is the anti-hyperextension splint.
* Mechanism: It provides a rigid dorsal block to prevent hyperextension deformity of the MCP joints of the ring and little fingers.
* Advantage: By stabilizing the MCP joints in slight flexion, the EDC can effectively extend the PIP and DIP joints. Furthermore, this design conforms perfectly to the shape of the transverse metacarpal arch and leaves the volar palm completely free, ensuring no attachments hinder the functional use of the hand.
Radial Nerve Palsy
High radial nerve palsy results in a profound "wrist drop" and an inability to extend the MCP joints or retropulse the thumb. The loss of wrist extension severely compromises the mechanical advantage of the extrinsic flexors, weakening grip strength significantly.

Orthotic Management:
* Mechanism: A dynamic extension splint is required. It typically features a volar or dorsal forearm base with an outrigger system. Elastic bands or springs dynamically suspend the digits and thumb in extension.
* Function: This allows the patient to actively flex their fingers to grasp objects (overcoming the elastic tension). When the flexors relax, the dynamic splint automatically extends the digits, releasing the object and preparing the hand for the next functional task.
SPECIALIZED SPLINTING MODALITIES
Beyond nerve palsies, splinting is heavily utilized for trauma, fracture management, and the correction of isolated joint stiffness.
The Dynamic Flexor Glove
Stiffness in extension is a common complication following crush injuries, complex fractures, or prolonged immobilization.
Application:
The flexor glove is designed to dynamically force the fingers into flexion. It exerts a continuous, low-load elastic force on the PIP and MCP joints.
* Biomechanics: The tension must be carefully calibrated. If the proximal eyelets are positioned too far proximally on the forearm, the glove will inadvertently flex the wrist rather than the digits, negating the tenodesis effect.
* Modification: When desirable, to isolate digit flexion and prevent wrist flexion, the flexor glove may be applied directly over a rigid volar wrist splint.
Preformed Plastic Gutter Splints
For isolated phalangeal fractures, ligamentous sprains, or soft-tissue injuries, rigid immobilization of a single digit is often required.
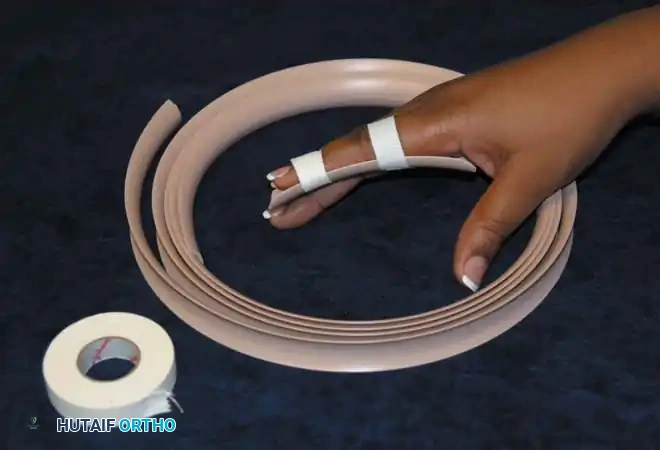
Application:
Preformed plastic gutter splints are highly versatile. They are easily adjustable in length (can be trimmed with heavy scissors) and provide excellent support for fracture healing. They can be applied dorsally or volarly and secured with cohesive bandages or tape, allowing adjacent digits to remain free and mobile to prevent sympathetic stiffness.
Proximal Interphalangeal (PIP) Extension Splints
PIP joint flexion contractures are notoriously stubborn, often resulting from volar plate injuries, flexor tendon repairs, or Dupuytren's fasciectomy.
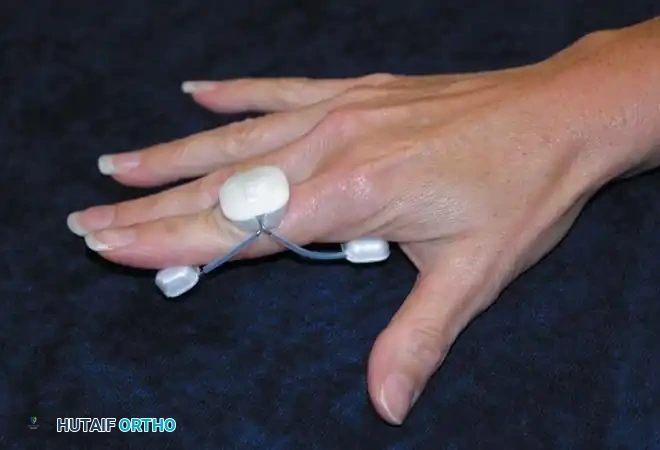
Application:
A dedicated PIP extension splint (often a three-point pressure splint like a Capener or a dynamic spring splint) applies continuous dorsal-directed force to the middle phalanx while supporting the proximal phalanx and distal phalanx volarly.
* Protocol: These are often worn continuously or as part of a rigorous nighttime regimen. The viscoelastic properties of the volar structures require prolonged, low-grade tension to achieve permanent plastic deformation and lengthening without causing micro-tearing and subsequent inflammatory scarring.
POSTOPERATIVE PROTOCOLS AND REHABILITATION
The prescription of a splint is only the first step in a comprehensive rehabilitation protocol.
- Initial Assessment: The splint must be evaluated within 24-48 hours of application to assess for pressure erythema, nerve compression, or vascular compromise.
- Weaning Protocol: As tissue healing progresses or nerve regeneration occurs (evidenced by advancing Tinel's sign and returning motor function), the reliance on the splint should be systematically reduced.
- Functional Integration: The ultimate goal of any splinting regimen is to facilitate active, unassisted motion. Therapists must guide patients through active range of motion (AROM) and strengthening exercises during periods when the splint is removed, ensuring that the musculotendinous units do not atrophy from over-reliance on dynamic orthotic assistance.
By adhering to these strict biomechanical principles and utilizing the appropriate static or dynamic modalities, the orthopaedic surgeon can effectively guide tissue healing, prevent debilitating contractures, and restore maximum function to the compromised upper extremity.
You Might Also Like