Arthroscopic Lateral Retinacular Release: An Intraoperative Masterclass

Key Takeaway
Join us in the OR for an arthroscopic lateral retinacular release. This masterclass details the procedure for excessive lateral pressure syndrome, covering crucial anatomy, patient positioning, meticulous surgical steps, and critical intraoperative decision-making. Learn to identify and manage potential complications, ensuring optimal outcomes for patients suffering from chronic patellofemoral pain and lateral patellar tilt.
Comprehensive Introduction and Patho-Epidemiology
Arthroscopic lateral retinacular release is a highly specific, targeted surgical intervention that has undergone a significant paradigm shift over the last several decades. Historically utilized as a panacea for a myriad of patellofemoral disorders—ranging from frank patellar dislocation to vague anterior knee pain—the procedure is now understood to have a narrow and strictly defined set of indications. The primary and most appropriate indication for this procedure is isolated Excessive Lateral Pressure Syndrome (ELPS). ELPS is characterized by chronic, recalcitrant anterior knee pain stemming directly from a pathologically tight and unyielding lateral retinacular complex, which chronically compresses the lateral patellar facet against the lateral femoral trochlea. Understanding the nuanced distinction between ELPS and true patellar instability is the fundamental prerequisite for achieving excellent patient outcomes and avoiding catastrophic iatrogenic complications.
The epidemiology of ELPS typically skews toward active adolescents and young adults, with a slightly higher predilection in females, though it can present in any demographic subjected to repetitive patellofemoral loading. The pathophysiology is driven by adaptive shortening and fibrotic thickening of the lateral fascial structures, often exacerbated by biomechanical malalignment, muscular imbalances (such as vastus medialis obliquus dysplasia or gluteal weakness), or repetitive microtrauma. Over time, this unyielding lateral tether prevents the patella from centralizing optimally within the trochlear groove during early knee flexion. This results in a drastically reduced contact area and a subsequent exponential increase in focal articular contact pressures on the lateral facet. If left untreated, this chronic mechanical overload inevitably precipitates chondral degradation, leading to chondromalacia patellae and, ultimately, advanced patellofemoral osteoarthritis.
Clinically, the presentation of ELPS is insidious. Patients rarely report a distinct traumatic event or a history of the patella "giving way" or dislocating. Instead, they describe a deep, aching anterior knee pain that is predictably exacerbated by activities requiring loaded knee flexion. Classic aggravating factors include prolonged sitting with the knees flexed (the "theater sign"), descending stairs, squatting, and running. An effusion may be present intermittently, particularly if secondary articular cartilage damage has already begun to manifest. The absence of mechanical instability symptoms is the critical historical differentiator; a patient describing a sensation of the knee buckling or the patella slipping out of place is describing instability, not isolated ELPS, and is generally not a candidate for an isolated lateral release.
The physical examination is paramount in establishing the diagnosis of ELPS. The pathognomonic finding is a positive patellar tilt test. With the patient supine and the knee in full extension and quadriceps relaxed, the examiner attempts to elevate the lateral edge of the patella. In a normal knee, the patella can be tilted above the horizontal plane (a positive angle). In ELPS, the lateral retinaculum is so contracted that the patella cannot be tilted even to a neutral, horizontal position (a negative angle). Furthermore, the medial patellar glide is often restricted to less than one quadrant of displacement. The "J-sign" may be observed during active extension, where the patella abruptly shifts laterally as it exits the trochlear groove, indicating an imbalance in the extensor mechanism. Crucially, the patellar apprehension test must be negative; apprehension indicates medial soft tissue incompetence and lateral instability, which represents an absolute contraindication to an isolated lateral release.
Detailed Surgical Anatomy and Biomechanics
The patellofemoral joint is a sophisticated biomechanical articulation designed to optimize the efficiency of the extensor mechanism. The patella, the largest sesamoid bone in the human body, functions primarily as a dynamic fulcrum. By displacing the quadriceps tendon anteriorly away from the femorotibial axis of rotation, the patella significantly increases the moment arm of the quadriceps muscle group. This mechanical advantage is vital, as the patellofemoral joint is subjected to extraordinary joint reaction forces. During level walking, the joint experiences forces equivalent to half of the individual's body weight; this escalates to roughly three times body weight during stair climbing, and can exceed twenty times body weight during deep squats or explosive jumping. To withstand these immense compressive loads, the posterior surface of the patella is endowed with the thickest articular cartilage found anywhere in the human body, reaching up to 6 millimeters in depth.
The stability and tracking of the patella are governed by a complex interplay of static and dynamic restraints. As the knee moves from full extension into flexion, the patella is drawn inferiorly and engages the trochlear groove. In full extension and early flexion (0 to 20 degrees), the patella is largely unconstrained by bony anatomy. During this critical arc, the medial patellofemoral ligament (MPFL) acts as the primary static soft-tissue restraint against lateral translation, contributing over 50% of the restraining force. As flexion progresses beyond 20 to 30 degrees, the patella deeply engages the trochlea, and the lateral trochlear ridge becomes the dominant osseous restraint. The dynamic stability is provided by the quadriceps muscle group, with the vastus medialis obliquus (VMO) providing a crucial medial vector to counterbalance the dominant lateral pull of the vastus lateralis and the iliotibial band.
The lateral retinaculum, the specific anatomical target of our intervention, is not a simple, homogenous sheet of tissue, but rather a complex, multi-layered fascial expansion. It is anatomically divided into superficial and deep layers. The superficial layer is composed of the oblique fibers from the vastus lateralis aponeurosis and expansions from the iliotibial band. The deep layer is more structurally significant and consists of the deep transverse retinaculum, the epicondylopatellar band, and the patellotibial band. The most critical component within this deep layer is the lateral patellofemoral ligament (LPFL), which connects the lateral patella to the lateral femoral epicondyle. In ELPS, it is the fibrotic contracture of these deep transverse fibers and the LPFL that creates the unyielding lateral tether, restricting medial glide and causing the negative patellar tilt.
A thorough understanding of the regional neurovascular anatomy is absolutely critical to avoid the most common postoperative complications. The superior lateral geniculate artery (SLGA) and its accompanying vein course transversely through the lateral retinaculum, typically passing just superior to the lateral femoral epicondyle and proximal to the lateral patellar pole. This vascular bundle is almost invariably transected during a comprehensive lateral release. Failure to meticulously identify and electrocoagulate these vessels under direct arthroscopic visualization will invariably lead to a massive postoperative hemarthrosis. Additionally, the inferior lateral geniculate artery runs near the lateral meniscus and must be protected during the distal extent of the release. While the common peroneal nerve lies posterior and distal to the surgical field, maintaining an awareness of its course is a fundamental tenet of lateral knee surgery.
Exhaustive Indications and Contraindications
The success of an arthroscopic lateral retinacular release is entirely dependent on stringent patient selection. The modern orthopedic consensus dictates that this procedure should be utilized sparingly and only when specific clinical and radiographic criteria are met. The primary indication is a confirmed diagnosis of Excessive Lateral Pressure Syndrome (ELPS) that has proven refractory to a comprehensive, prolonged course of nonoperative management. This conservative regimen must include targeted physical therapy focusing on VMO strengthening, iliotibial band stretching, core and gluteal strengthening, non-steroidal anti-inflammatory medications, and potentially patellar taping or bracing. Only when a minimum of three to six months of diligent conservative therapy fails should surgical intervention be considered.
Contraindications to isolated lateral release are numerous and must be rigorously respected. The most absolute contraindication is true patellar instability. Performing a lateral release on a patient with a history of patellar dislocation or a positive apprehension test will catastrophically exacerbate their instability, potentially leading to iatrogenic medial patellar subluxation or recurrent lateral dislocations due to the unmasking of MPFL incompetence. Furthermore, patients with profound generalized ligamentous laxity (e.g., Ehlers-Danlos syndrome, Marfan syndrome) are poor candidates. Severe, bone-on-bone patellofemoral osteoarthritis is also a relative contraindication; while a release may alter contact pressures, it will not regenerate cartilage and is unlikely to provide significant, long-lasting pain relief in the setting of end-stage degenerative joint disease.
It is crucial to differentiate between a tight lateral retinaculum causing pain (ELPS) and a tight lateral retinaculum acting as a secondary stabilizer in a dysplastic knee. In knees with severe trochlear dysplasia or patella alta, the lateral retinaculum may have adaptively tightened to prevent lateral dislocation. Releasing it in this scenario removes a vital stabilizing structure. Therefore, advanced imaging and a meticulous physical examination are required to ensure the lateral tightness is the primary pathology and not a compensatory mechanism for underlying bony or medial soft-tissue incompetence.
| Parameter | Indications for Lateral Retinacular Release | Contraindications for Lateral Retinacular Release |
|---|---|---|
| Primary Diagnosis | Isolated Excessive Lateral Pressure Syndrome (ELPS) | Patellar Instability (Subluxation or Dislocation) |
| Physical Exam | Negative patellar tilt; Restricted medial glide; Negative apprehension | Positive apprehension test; Medial retinacular laxity |
| Conservative Care | Failed >3-6 months of targeted physical therapy | Inadequate trial of non-operative management |
| Imaging | Excessive lateral tilt on CT; Lateral facet overload | Severe trochlear dysplasia; Patella alta; Severe OA |
| Systemic Factors | Normal collagen/ligamentous profile | Generalized hypermobility syndromes (e.g., Ehlers-Danlos) |
Pre-Operative Planning, Templating, and Patient Positioning
Preoperative planning relies heavily on a comprehensive radiographic evaluation to confirm the diagnosis of ELPS, quantify the degree of malalignment, and rule out concomitant pathologies. Standard weight-bearing anteroposterior (AP), 45-degree flexion posteroanterior (PA) tunnel, and true lateral radiographs are obtained to assess overall joint space, patellar height (using the Insall-Salvati or Caton-Deschamps ratios), and the presence of trochlear dysplasia. The Merchant view (axial radiograph taken at 45 degrees of knee flexion) is particularly valuable for assessing lateral patellar subluxation and the congruence angle.
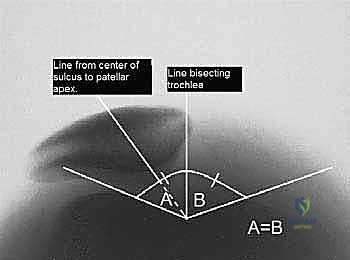
FIG 1 • A. Merchant radiograph of right knee showing measurement of lateral patellar subluxation.
While plain radiographs are helpful, Computed Tomography (CT) is considered the gold standard for quantifying patellar tilt. Axial CT images, typically taken at 15 to 20 degrees of knee flexion (where the patella should be engaged in the trochlea), allow for the precise measurement of the patellar tilt angle. This is calculated by drawing a line parallel to the posterior femoral condyles and a second line along the lateral patellar facet. If these lines are parallel or converge laterally, it confirms excessive lateral tilt and supports the diagnosis of ELPS.
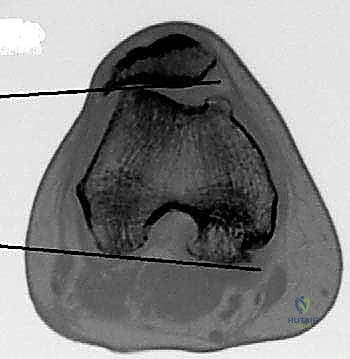
FIG 1 • B. Axial CT image of a right knee demonstrating how to measure patellar tilt.
Magnetic Resonance Imaging (MRI) is routinely utilized not only to assess the retinacular structures but also to evaluate the integrity of the articular cartilage. In chronic ELPS, MRI often reveals focal chondral thinning, fissuring, or subchondral edema on the lateral patellar facet or lateral trochlea. Furthermore, MRI is essential for identifying concomitant intra-articular pathology, such as meniscal tears or occult ligamentous injuries, which may require concurrent surgical addressing. The thickness and fibrotic nature of the lateral retinaculum can also be directly visualized on axial MRI sequences.
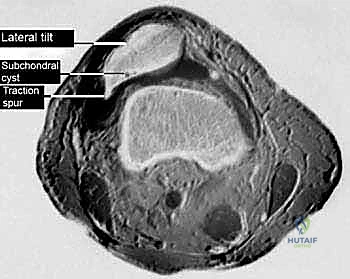
FIG 1 • C. Axial MRI scan of the right knee of a patient with excessive lateral pressure syndrome.
In the operating theater, anesthetic considerations typically involve general anesthesia, often supplemented with a regional block (such as an adductor canal block) to optimize postoperative analgesia while preserving quadriceps motor function for early rehabilitation. The patient is positioned supine. The operative leg is placed in a standard arthroscopic leg holder or a lateral post positioner. It is imperative that the setup allows for unhindered, full range of motion of the knee from 0 to 120 degrees to permit dynamic intraoperative assessment of patellar tracking. A nonsterile pneumatic tourniquet is applied to the proximal thigh. Prior to prepping and draping, an Examination Under Anesthesia (EUA) is mandatory. With the patient fully paralyzed, the surgeon re-evaluates the patellar tilt, glide, and tracking, confirming the preoperative physical examination findings without the confounding variable of patient muscle guarding.
Step-by-Step Surgical Approach and Release Technique
The procedure commences with the establishment of standard arthroscopic portals. Meticulous portal placement is critical for optimal visualization and instrumentation. The inferomedial portal serves as the primary viewing portal and is established approximately 1 cm medial to the patellar tendon at the level of the inferior patellar pole. The inferolateral portal, which will serve as the working portal for the electrocautery device, is placed symmetrically on the lateral side. A superolateral inflow portal is established approximately 2 to 3 cm proximal to the superolateral pole of the patella, just lateral to the vastus lateralis obliquus muscle belly. This portal not only provides excellent fluid distension but also serves as a crucial anatomical landmark for the proximal extent of the retinacular release.
TECH FIG 1 • Standard arthroscopic portal placement for lateral retinacular release.
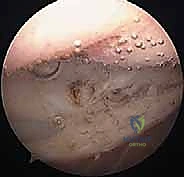
A comprehensive diagnostic arthroscopy is performed first. The 30-degree arthroscope is introduced through the inferomedial portal, and a systematic eight-point survey of the knee is conducted. The surgeon must meticulously evaluate the suprapatellar pouch, medial and lateral gutters, medial and lateral compartments (assessing menisci and chondral surfaces), and the intercondylar notch. Particular attention is paid to the patellofemoral joint. The articular surfaces of the patella and trochlea are probed for softening, fissuring, or full-thickness defects. With the fluid pressure lowered, the knee is cycled through a full range of motion. The surgeon observes the dynamic tracking of the patella from the inferomedial portal, noting the degree of lateral overhang and the point of engagement into the trochlear groove.
Once the diagnosis is confirmed and concomitant pathologies are addressed, the lateral release is initiated. The tourniquet is typically inflated at this stage to ensure a bloodless field, though some surgeons prefer to operate without a tourniquet to identify bleeding vessels in real-time. The arthroscope remains in the inferomedial portal, and an insulated, hooked electrocautery device is introduced through the inferolateral portal. The release begins proximally, utilizing the superolateral inflow cannula as a landmark. The initial cut is made just distal to this cannula, ensuring the vastus lateralis muscle tendon is preserved.
TECH FIG 1 • A. The proximal starting point for lateral retinacular release is just distal to the superolateral inflow cannula.
The release must be performed in a meticulous, layered fashion under direct visualization. The surgeon first incises the delicate, vascularized synovial layer. Once the synovium is parted, the dense, white, transversely oriented fibers of the deep lateral retinaculum and the lateral patellofemoral ligament are exposed. Using the hooked electrocautery, these fibers are systematically transected from proximal to distal. The surgeon will often feel and hear a distinct "crunching" or "popping" sensation as these tight fascial bands release. The release is carried distally parallel to the lateral border of the patella, maintaining a distance of approximately 1 to 2 cm lateral to the patellar edge to avoid thermal injury to the articular cartilage.

TECH FIG 1 • B. Arthroscopic view of the electrocautery device transecting the deep fibers of the lateral retinaculum.
The distal extent of the release terminates at the level of the inferolateral portal, taking extreme care to avoid violating the lateral border of the patellar tendon or the infrapatellar fat pad excessively. Throughout the procedure, the surgeon must be hyper-vigilant in identifying the superior lateral geniculate artery. This vessel typically crosses the release path horizontally near the proximal third of the patella. When encountered, it must be thoroughly electrocoagulated. After the structural release is complete, the knee is again taken through a range of motion. The patella should now sit centrally within the trochlea, and the patellar tilt test should be easily correctable to a neutral or positive angle. Before concluding, the tourniquet is deflated while maintaining arthroscopic visualization. The release site is meticulously inspected for any active arterial bleeding, and pinpoint electrocoagulation is applied to ensure absolute hemostasis.
Complications, Incidence Rates, and Salvage Management
While arthroscopic lateral retinacular release is generally considered a safe, minimally invasive procedure, it is not without significant risks. Complications can range from minor postoperative nuisances to catastrophic biomechanical failures requiring complex reconstructive salvage operations. A thorough understanding of these potential pitfalls is mandatory for any surgeon undertaking this procedure.
The most frequent complication, occurring in up to 5% to 10% of cases, is postoperative hemarthrosis. This is almost exclusively due to inadequate hemostasis of the superior lateral geniculate artery or its venous counterparts. A massive hemarthrosis causes severe pain, limits range of motion, delays rehabilitation, and can predispose the joint to arthrofibrosis. Prevention through meticulous electrocoagulation, particularly after deflating the tourniquet intraoperatively, is the best strategy. If a tense hemarthrosis develops postoperatively, it may require sterile aspiration in the clinic. In rare, recalcitrant cases involving active arterial pumping, an arthroscopic washout and secondary electrocoagulation may be necessary.
The most devastating complication is iatrogenic medial patellar subluxation or frank medial instability. This occurs due to an overzealous release (extending too proximally into the vastus lateralis tendon or too distally into the patellar tendon) or, more commonly, performing the procedure on a patient with unrecognized preoperative instability or hypermobility. Patients with medial instability present with profound disability, reporting that the knee feels like it is "giving way" medially, often accompanied by severe pain and apprehension with medial patellar translation. This is a biomechanical disaster that conservative management cannot fix.
Other complications include persistent anterior knee pain, which is often indicative of incorrect patient selection (e.g., performing a release for advanced patellofemoral arthritis rather than isolated ELPS). Complex Regional Pain Syndrome (CRPS) is a rare but debilitating potential outcome, characterized by disproportionate pain, allodynia, and autonomic dysregulation. Infection and deep vein thrombosis are standard surgical risks but occur at very low incidences (<1%) in isolated arthroscopic knee procedures.
| Complication | Estimated Incidence | Etiology / Risk Factors | Salvage Management / Treatment |
|---|---|---|---|
| Hemarthrosis | 5% - 10% | Inadequate coagulation of Superior Lateral Geniculate Artery | Observation; Therapeutic aspiration; Rarely arthroscopic washout |
| Medial Instability | 1% - 3% | Over-release; Pre-existing hypermobility; Incorrect indication | Open lateral retinacular closure or formal lateral retinacular reconstruction |
| Persistent Pain | 10% - 20% | Advanced PFJ arthritis; Misdiagnosis of ELPS; Inadequate release | Re-evaluation; Injections; Cartilage restoration; Rarely tibial tubercle osteotomy |
| Arthrofibrosis | 1% - 2% | Prolonged immobilization; Unresolved hemarthrosis | Aggressive physical therapy; Manipulation under anesthesia; Arthroscopic lysis of adhesions |
| CRPS | < 1% | Unclear; Exaggerated neuroinflammatory response | Multidisciplinary pain management; Sympathetic nerve blocks; Gabapentinoids |
Phased Post-Operative Rehabilitation Protocols
The postoperative rehabilitation following an arthroscopic lateral retinacular release is as critical to the final clinical outcome as the surgical execution itself. The protocol is designed to achieve a delicate balance: it must aggressively prevent the raw, cut edges of the lateral retinaculum from scarring back together (which would result in a recurrence of the tether), while simultaneously protecting the joint from excessive shear forces as the periarticular tissues heal.
Phase I: Immediate Postoperative Period (Weeks 0-2)
The primary goals in the initial phase are the control of pain and effusion, the restoration of full passive knee extension, and the initiation of early, controlled motion. Patients are generally allowed to bear weight as tolerated with crutches, utilizing a hinged knee brace locked in extension for ambulation to prevent buckling due to quadriceps inhibition. Cryotherapy and elevation are utilized aggressively. The hallmark of Phase I is frequent, aggressive manual patellar mobilization. The physical therapist and the patient must perform medial patellar glides multiple times daily to stretch the healing lateral tissues and prevent fibrotic readhesion. Passive and active-assisted range of motion (ROM) exercises are initiated, aiming for 0 to 90 degrees of flexion by the end of the second week.
Phase II: Intermediate Rehabilitation (Weeks 2-6)
As the effusion subsides and soft tissue healing progresses, the focus shifts to restoring full range of motion and initiating quadriceps re-education. The crutches and brace are typically weaned as normal gait mechanics are restored. Closed kinetic chain exercises, such as mini-squats (0 to 45 degrees), leg presses within a pain-free arc, and stationary cycling, are introduced. These exercises provide safe, co-contractive loads that stimulate the quadriceps without placing excessive shear stress on the patellofemoral articular cartilage. While isolated VMO strengthening is biomechanically controversial, global quadriceps control and biofeedback techniques are heavily emphasized to optimize dynamic patellar tracking.
Phase III: Advanced Strengthening (Weeks 6-12)
During this phase, patients progress to more demanding strengthening and functional activities. Exercises are advanced in resistance and complexity. Proprioceptive training, utilizing balance boards and unstable surfaces, is incorporated to enhance neuromuscular control. Core and hip/gluteal strengthening are intensified, as proximal stability is essential for distal biomechanical alignment. Patients may begin light, straight-line jogging on a treadmill or soft surface if they have achieved symmetrical, pain-free range of motion and adequate quadriceps strength (typically >80% of the contralateral limb). Deep, loaded flexion activities (such as deep squats or heavy leg extensions) are still generally avoided or carefully monitored.
Phase IV: Return to Sport/Activity (Months 3-6)
The final phase focuses on sport-specific or occupation-specific training. Progression to this phase requires the absence of pain or effusion, full range of motion, and near-normal strength profiles. Agility drills, plyometrics, and cutting maneuvers are gradually introduced. Return to competitive play or heavy manual labor is dictated by the successful completion of functional testing, such as single-leg hop tests and isokinetic dynamometry, ensuring the operative limb performs symmetrically to the uninjured side. Psychological readiness is also assessed before full clearance is granted.
Summary of Landmark Literature and Clinical Guidelines
The evolution of the lateral retinacular release is a fascinating study in orthopedic history, reflecting a journey from widespread overuse to highly targeted application. The concept of Excessive Lateral Pressure Syndrome was first comprehensively detailed by Ficat and Hungerford in the late 1970s. They described the precise clinical and radiographic findings of lateral facet overload and popularized the open lateral release as a mechanical solution to decompress the joint. As arthroscopic technology advanced in the 1980s, the procedure was rapidly adapted to a minimally invasive technique, leading to a massive surge in its popularity. During this era, it was frequently performed for almost any presentation of anterior knee pain or instability.
However, the subsequent decades brought a critical re-evaluation of the procedure's efficacy. Landmark studies by Fulkerson and others in the 1990s highlighted the disastrous consequences of performing a lateral release in the setting of true patellar instability. Fulkerson's work clearly delineated the difference between ELPS and instability, demonstrating that while a release could relieve pressure, it fundamentally destabilized the lateral side of the joint. Long-term outcome studies further revealed that when indications were loose, the initial positive results of a lateral release predictably degraded over a 5 to 10-year period, often culminating in progressive patellofemoral arthritis or chronic pain.
Today, the clinical guidelines established by major orthopedic societies (such as the American Academy of Orthopaedic Surgeons and the Arthroscopy Association of North America) are unequivocal. Arthroscopic lateral retinacular release is considered a highly effective, definitive procedure, but only for the strictly defined patient population suffering from isolated, recalcitrant ELPS with a documented negative patellar tilt. It is no longer considered a standalone treatment for patellar dislocation. When combined with other procedures, such as a medial patellofemoral ligament (MPFL) reconstruction or a tibial tubercle osteotomy, a lateral release or lengthening may be utilized as an adjunctive measure to balance soft tissues, but its use as an isolated, primary intervention requires rigorous diagnostic justification and meticulous surgical execution.
