Distal Biceps Tendon Repair & Reconstruction: An Intraoperative Masterclass
Key Takeaway
Join us in the OR for an immersive masterclass on distal biceps tendon repair. We'll meticulously cover acute and chronic ruptures, detailing patient positioning, comprehensive anatomy, and step-by-step execution of single-incision (EndoButton, suture anchor) and two-incision techniques. Learn critical pearls, pitfalls, and postoperative protocols to achieve optimal patient outcomes.
Comprehensive Introduction and Patho-Epidemiology
The distal biceps tendon rupture represents a quintessential orthopedic challenge, demanding both a profound understanding of complex regional anatomy and meticulous surgical execution. This injury, while common, is unforgiving of technical errors. Complete avulsions at the radial tuberosity insertion point result in profound functional deficits, particularly in supination power and endurance. As orthopedic surgeons, our goal is to restore the native biomechanics of the elbow, a task that requires precision in both acute repair and, when necessary, chronic reconstruction. The evolution of surgical techniques—from historically morbid two-incision approaches to modern, single-incision cortical button fixations—has revolutionized patient outcomes, though the procedure remains fraught with potential neurovascular pitfalls.
Definition and Pathogenesis
A true distal biceps tendon disruption is defined as a complete avulsion of the tendon from its anatomic footprint on the radial tuberosity. It is imperative to differentiate this classic avulsion from more proximal injuries occurring at the myotendinous junction, or from partial intrasubstance tears. The anatomical location of the tear dictates the therapeutic algorithm; proximal myotendinous junction injuries possess a robust vascular supply and heal predictably with non-operative management, whereas complete avulsions at the relatively avascular insertion site require surgical reattachment to restore physiological function.
The pathogenesis of this injury is almost universally linked to a sudden, violent eccentric muscle contraction. The classic mechanism involves an unexpected extension force applied to a flexed and actively supinating forearm. This mechanism is overwhelmingly seen in a specific demographic: active, middle-aged males, typically in their fourth or fifth decades of life. This mirrors the demographic profile for other major tendinous avulsions, such as pectoralis major and Achilles tendon ruptures, suggesting an underlying age-related tendinopathy or structural degradation that predisposes the tissue to failure under peak eccentric loads.
Several anatomical and physiological factors contribute to this vulnerability. A well-documented hypovascular zone exists approximately one to two centimeters proximal to the tendon's insertion on the radial tuberosity. Furthermore, mechanical impingement of the tendon within the interosseous space between the radial tuberosity and the proximal ulna during forearm rotation has been implicated in chronic tendinopathic degeneration. Partial tears, while less dramatic in their acute presentation, are part of this degenerative continuum. They lack the classic proximal retraction and extensive ecchymosis of a complete rupture but present with insidious, activity-limiting pain during resisted flexion and supination. If left unaddressed, these partial tears frequently progress to complete avulsions upon subsequent eccentric loading.
Clinical Presentation and Diagnostic Approach
The clinical diagnosis of an acute distal biceps tendon rupture is predominantly reliant on a thorough history and a targeted physical examination. Patients invariably report a distinct "pop" or tearing sensation in the antecubital fossa during a heavy lifting event. In the acute setting, the physical examination is characterized by significant ecchymosis and edema tracking distally across the antecubital fossa and into the proximal medial forearm. The normal contour of the distal biceps muscle belly is altered, often retracting proximally to create the classic "Popeye" deformity, though severe swelling can occasionally mask this visual cue.
Palpation is a critical diagnostic step. In a complete rupture, the prominent, cord-like distal biceps tendon will be absent in the antecubital fossa when compared to the contralateral extremity. The most sensitive and specific clinical maneuver is the "hook test," originally described by O'Driscoll. To perform this test, the examiner stands adjacent to the patient, who actively flexes the elbow to 90 degrees and fully supinates the forearm. The examiner then attempts to hook their index finger under the lateral edge of the biceps tendon. In a normal elbow, the tendon is easily hooked and pulled anteriorly; in a complete rupture, the finger sweeps through the antecubital space without encountering the tendinous cord. This test boasts a sensitivity and specificity approaching 100% in acute settings.
While the diagnosis is primarily clinical, advanced imaging can be an invaluable adjunct in equivocal cases. Magnetic Resonance Imaging (MRI) is the gold standard for differentiating between severe tendinosis, partial tears, complete avulsions, and myotendinous junction injuries. MRI is particularly useful when severe edema limits the physical examination, or in chronic presentations where the tendon stump may be tethered by the lacertus fibrosus (bicipital aponeurosis), giving a false impression of continuity. Furthermore, MRI aids in preoperative templating by quantifying the degree of proximal tendon retraction, thereby allowing the surgeon to anticipate the necessity of an allograft reconstruction.
Detailed Surgical Anatomy and Biomechanics
A masterful repair of the distal biceps tendon is predicated upon an intimate knowledge of the antecubital anatomy. The surgical approach navigates a densely packed corridor of critical neurovascular structures. A superficial understanding of this region is insufficient; the surgeon must conceptualize the anatomy in three dimensions, particularly as it changes dynamically with forearm rotation.
Osteology and Tendon Insertion
The distal biceps tendon is not a simple, uniform cord; it is a complex structure composed of distinct contributions from the short and long heads of the biceps brachii muscle. These two components remain relatively distinct as they travel distally, ultimately inserting onto the radial tuberosity with a specific spatial orientation. The short head, primarily responsible for elbow flexion, inserts more distally and anteriorly on the tuberosity. The long head, the primary motor for forearm supination, inserts more proximally and posteriorly.
The radial tuberosity itself acts as a biomechanical cam. As the forearm pronates, the tuberosity rotates posteriorly, wrapping the distal biceps tendon around the radial shaft. This cam effect maximizes the mechanical advantage and moment arm of the biceps during the initiation of active supination from a fully pronated position. Surgical repair must aim to restore this exact anatomical footprint. Placing the tendon too anteriorly on the radius diminishes the cam effect, resulting in a permanent, measurable deficit in peak supination torque.
Neurovascular Considerations
The anterior surgical approach to the elbow is fraught with neurovascular hazards. Superficially, the lateral antebrachial cutaneous nerve (LABCN) and the superficial radial nerve (SRN) must be identified and protected. The LABCN, the terminal sensory branch of the musculocutaneous nerve, exits the deep fascia lateral to the biceps tendon and is highly vulnerable during the initial skin incision and superficial dissection. Injury to this nerve results in frustrating paresthesias or painful neuromas over the radial aspect of the forearm.
Deep to the superficial fascia, the brachial artery and the median nerve lie medial to the biceps tendon. The bicipital aponeurosis (lacertus fibrosus) crosses superficially over these structures, providing a layer of protection. However, when the tendon retracts proximally, it can drag the surrounding fascial sleeves with it, distorting normal anatomical relationships.
The most critical nerve at risk during the preparation of the radial tuberosity is the posterior interosseous nerve (PIN). The PIN is a branch of the radial nerve that wraps around the radial neck within the supinator muscle. Its proximity to the radial tuberosity is highly dependent on forearm rotation. In pronation, the PIN is brought dangerously close to the anterior surgical field and the tuberosity. In full supination, the nerve is rotated posteriorly and away from danger. Therefore, full, unyielding supination of the forearm is an absolute, non-negotiable requirement during any drilling or instrumentation of the radial tuberosity.
Biomechanical Implications of Rupture
The biomechanical consequences of a complete distal biceps tendon rupture are profound and well-documented. The biceps brachii is the primary supinator of the forearm and a secondary flexor of the elbow. Biomechanical studies, notably those by Morrey and colleagues, have demonstrated that non-operative management of a complete rupture results in a permanent 40% to 50% loss of sustained supination strength and a 20% to 30% loss of peak elbow flexion strength.
Beyond absolute strength deficits, patients frequently experience a significant loss of endurance. Activities requiring repetitive supination, such as turning a screwdriver, turning a doorknob, or operating heavy machinery, provoke rapid fatigue and deep, aching cramping within the retracted biceps muscle belly. For the manual laborer, the athlete, or any patient requiring full upper extremity function, these biomechanical deficits are functionally unacceptable, establishing the clear rationale for acute surgical intervention.
Exhaustive Indications and Contraindications
The decision to proceed with operative repair versus non-operative management must be highly individualized, taking into account the patient's physiological age, occupational demands, functional expectations, and medical comorbidities. While surgical repair is the gold standard for restoring native biomechanics, it is not universally indicated for every patient presenting with a rupture.
Operative vs Nonoperative Decision Making
Operative repair is strongly indicated for acute, complete ruptures in young, active patients, manual laborers, and athletes who require maximum flexion and supination strength. The optimal window for primary repair is within the first 2 to 3 weeks following the injury. During this acute phase, the tendon stump is easily identifiable, proximal retraction is minimal, and the tendon can typically be mobilized to the radial tuberosity without undue tension.
Delayed presentations (greater than 4 weeks) pose a significant challenge. The tendon undergoes myostatic contracture, the tract fills with dense scar tissue, and primary repair becomes increasingly difficult. While primary repair has been successfully achieved up to 3 months post-injury by aggressively releasing the lacertus fibrosus and mobilizing the muscle belly, the surgeon must be prepared for a reconstruction using an autograft or allograft.
Non-operative management is a viable, and sometimes preferable, option for elderly, low-demand patients, or those with severe medical comorbidities that preclude safe anesthesia. It is also the standard of care for proximal myotendinous junction injuries and is often the first-line treatment for low-grade partial tears. Patients opting for non-operative management must be thoroughly counseled regarding the permanent functional deficits and the potential for chronic fatigue-type pain in the arm.
Table: Indications and Contraindications
| Category | Operative Management (Repair/Reconstruction) | Non-Operative Management |
|---|---|---|
| Primary Indications | Acute, complete avulsions in active patients; Manual laborers; Athletes; Failure of conservative care for partial tears. | Elderly, low-demand patients; Proximal myotendinous junction injuries; Severe medical comorbidities. |
| Relative Indications | Chronic ruptures (>4 weeks) with significant functional deficits (requires reconstruction); High-grade partial tears. | Low-grade partial tears; Patients willing to accept a 40% loss of supination strength. |
| Absolute Contraindications | Active local or systemic infection; Medically unstable for anesthesia. | None (Default pathway if surgery is contraindicated). |
| Relative Contraindications | Severe skin compromise over the antecubital fossa; Non-compliant patient (unable to follow post-op rehab). | High-demand occupation requiring repetitive, forceful supination. |
Pre-Operative Planning, Templating, and Patient Positioning
Meticulous preoperative preparation is the foundation of a successful surgical outcome. The surgeon must anticipate potential intraoperative difficulties, particularly in delayed presentations, and ensure that all necessary equipment, grafts, and fixation devices are readily available before the patient enters the operating theater.
Graft Selection for Chronic Tears
When evaluating a patient with a chronic distal biceps rupture, the surgeon must have a concrete plan for tendon reconstruction. If the native tendon cannot be mobilized to the radial tuberosity with the elbow flexed at 30 to 40 degrees, a graft is mandatory to bridge the defect. Attempting to repair a severely retracted tendon under extreme tension will inevitably lead to flexion contractures or catastrophic failure of the repair.
Autograft options include the semitendinosus, gracilis, or the flexor carpi radialis (FCR). Autografts eliminate the risk of disease transmission and promote rapid biological incorporation, but they carry the burden of donor site morbidity. Allograft options, such as an Achilles tendon allograft (with or without a calcaneal bone block) or a semitendinosus allograft, are excellent alternatives. The Achilles allograft is particularly favored for massive defects, as the robust tendinous tissue can be tubularized to match the native biceps footprint, and the associated bone block can be press-fit into the radial tuberosity for rigid immediate fixation.
Operating Room Setup and Positioning
Patient positioning and operating room configuration must facilitate seamless access to the anterior elbow and allow for unhindered fluoroscopic imaging.
- Supine Position: The patient is positioned supine on a standard operating table. The head is secured, and the contralateral arm is padded and tucked.
- Armboard and Tourniquet: The operative extremity is extended onto a radiolucent hand table or a dedicated armboard. A sterile pneumatic tourniquet is applied high on the brachium. The arm is exsanguinated, and the tourniquet is inflated to 250 mmHg to ensure a completely bloodless surgical field, which is an absolute necessity for identifying the delicate neurovascular structures of the antecubital fossa.
- Fluoroscopy Setup: The C-arm fluoroscopy unit is draped sterilely and positioned either parallel to the table or coming in from the head of the bed, depending on the room configuration. The surgeon must verify that clear, unobstructed orthogonal views of the proximal radius can be obtained before making the incision.
Step-by-Step Surgical Approach and Fixation Technique
Historically, the two-incision technique (anterior incision for tendon retrieval, posterior incision for tuberosity fixation) was favored to avoid anterior neurovascular injury. However, this approach carried an unacceptably high rate of radioulnar synostosis and heterotopic ossification. The evolution of cortical button technology has allowed for a safe, biomechanically superior, single-incision anterior approach. Today, we will execute the single-incision anterior approach utilizing the EndoButton technique, which biomechanical studies have proven to yield the highest ultimate tensile strength.
Incision and Initial Dissection
The procedure commences with a precise surgical incision. We utilize a longitudinal, slightly curvilinear incision measuring approximately 4 to 5 centimeters in the anterior antecubital fossa. The incision begins just proximal to the elbow flexion crease and extends distally along the ulnar border of the brachioradialis muscle. This specific trajectory utilizes the internervous plane between the brachioradialis (radial nerve) and the pronator teres (median nerve).
As we incise the skin and subcutaneous tissues, extreme vigilance is required. The lateral antebrachial cutaneous nerve (LABCN) courses through the subcutaneous fat in the lateral aspect of the wound. We utilize fine-tipped tenotomy scissors and careful blunt spreading to identify and mobilize the LABCN, gently retracting it laterally to prevent neurapraxia. Deepening the dissection, we encounter the bicipital aponeurosis (lacertus fibrosus). In acute ruptures, this structure may be torn or severely attenuated; in chronic cases, it may be intact and tethering the retracted muscle belly. We incise the lacertus fibrosus in line with the primary incision, exposing the deeper structures.
Tendon Retrieval and Preparation
Locating the retracted tendon stump can be the most frustrating portion of the procedure. The assistant flexes the elbow to 90 degrees and applies a distal milking maneuver to the biceps muscle belly. We use blunt digital exploration or a sweeping motion with a right-angle clamp to locate the firm, cord-like tendon within the hematoma cavity.
Once retrieved, the tendon is delivered into the wound. We perform a limited tenolysis, excising the degenerated, frayed distal tip of the tendon to expose healthy, parallel collagen fibers. The tendon must be mobilized sufficiently to reach the radial tuberosity. If excursion is inadequate, we bluntly dissect proximally along the muscle belly, releasing fascial adhesions.
Preparation of the tendon stump requires a high-tensile strength, non-absorbable suture. We utilize a #2 FiberWire (Arthrex, Naples, FL) or equivalent ultra-high molecular weight polyethylene suture.
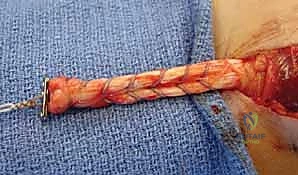
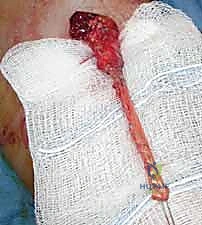
TECH FIG 1 • A. EndoButton attached to the distal end of the biceps tendon, demonstrating the robust locking suture technique.
We weave the suture into the distal 4 to 5 centimeters of the tendon using a locked Krackow or whipstitch technique. It is of paramount importance to leave the most distal 1 centimeter of the tendon free of suture. This "bare area" will be drawn directly into the radial bone tunnel, maximizing circumferential tendon-to-cancellous bone contact and optimizing biological healing.
EndoButton Attachment
The fixation construct relies on the secure attachment of the prepared tendon to the cortical button (EndoButton, Smith & Nephew, Andover, MA). The two free limbs of the #2 locking suture exiting the distal aspect of the tendon are threaded through the two central holes of the EndoButton.
The button is then slid down the suture limbs until it sits perfectly flush against the distal tip of the tendon. The sutures are tied tightly over the central bridge of the button. There must be absolutely no gap or "creep" between the tendon and the button; any laxity at this interface will result in a pistoning effect within the bone tunnel and subsequent failure of biological incorporation. Once the central sutures are secured, we pass our "kite strings"—typically a #2 Orthocord or a distinctively colored passing suture—through the two outer, peripheral holes of the EndoButton. These strings will be used to shuttle and flip the button through the radius.
Radial Tuberosity Preparation
Attention is now directed to the radius. The assistant must place and hold the forearm in maximum, unyielding supination. This is the single most critical step to prevent catastrophic injury to the posterior interosseous nerve (PIN). Supination rotates the radial tuberosity anteriorly into the surgical field while simultaneously wrapping the PIN posteriorly around the radial neck, safely away from our instruments.
We identify the recurrent radial artery and its venae comitantes (the "leash of Henry") crossing the operative field. These vessels are carefully ligated and divided to allow unobstructed access to the tuberosity. We place two small Hohmann or Bennett retractors subperiosteally around the radial neck to expose the anatomic footprint.
Using a high-speed burr, we decorticate the footprint, creating an oval cortical window measuring approximately 8mm by 10mm, matching the diameter of the prepared tendon stump. Once the near cortex is breached, we utilize the specialized 3.2mm EndoButton drill. We place the drill tip centrally within our cortical window and drill across the medullary canal, breaching the far (posterior) cortex of the radius. The surgeon must feel the distinct "give" as the drill passes through the far cortex.
Passing and Securing the EndoButton
With the bicortical pathway established, we proceed with shuttling the construct. We thread the ends of our peripheral "kite strings" through the eyelets of a Beath pin or Keith needles.
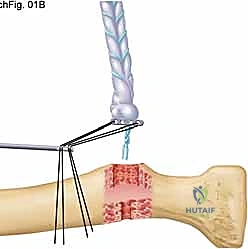
TECH FIG 1 • B. A Keith needle is placed to pass the suture through the far cortex of the radius.
The Keith needles are introduced into the anterior cortical window, passed across the medullary canal, and driven through the 3.2mm hole in the far cortex, exiting the skin on the dorsal aspect of the proximal forearm. The surgeon pulls the needles through, retrieving the kite strings dorsally.
By applying steady, in-line traction to the leading kite string, the EndoButton is drawn into the anterior cortical window.
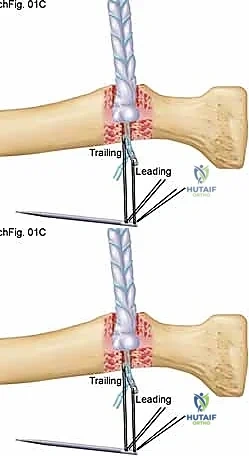
TECH FIG 1 • C. The tendon is pulled into the proximal radial hole as the EndoButton is advanced through the distal hole in a vertical orientation.
The button travels longitudinally through the medullary canal. The surgeon will feel a distinct tactile "pop" as the button clears the far cortex. At this exact moment, traction is transferred to the trailing kite string. This action flips the EndoButton 90 degrees, locking it transversely across the posterior cortex of the radius.
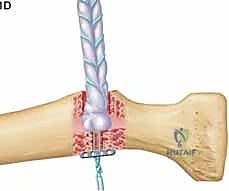
TECH FIG 1 • D. The EndoButton is flipped to secure it on the other side of the radial cortex, providing immense pull-out strength.
We apply firm tension to the proximal biceps muscle belly to ensure the button is rigidly seated and the tendon is fully docked within the anterior cortical window. We immediately bring in the C-arm fluoroscopy to obtain orthogonal views of the proximal radius.
TECH FIG 1 • E. Intraoperative fluoroscopy is mandatory to confirm the EndoButton is deployed flush against the far cortex and not caught within the medullary canal.
Fluoroscopic confirmation is non-negotiable; the button must be seen resting flat against the posterior cortex. If the button is deployed within the medullary canal or soft tissues, the repair will fail. Once confirmed, the kite strings are removed, the wound is irrigated copiously to remove bone debris, and the incision is closed in layers.
Alternative Fixation Techniques
While the EndoButton is our preferred method due to its superior biomechanical profile, alternative techniques exist. Suture anchors can be utilized, though they generally exhibit lower load-to-failure rates compared to cortical buttons and require a larger footprint for multiple anchors. Interference screws provide excellent aperture fixation and stiffness but carry a higher risk of posterior interosseous nerve injury if the screw diverges or breaches the far cortex.
TECH FIG 2 • Alternative reconstruction utilizing an allograft for a chronic, retracted tear where primary repair is impossible.
In cases of chronic rupture requiring reconstruction, the fixation principles remain similar, but the allograft must be securely woven into the native biceps muscle belly proximally, often utilizing a Pulvertaft weave technique to ensure a robust myotendinous integration.
Complications, Incidence Rates, and Salvage Management
Despite advancements in surgical technique, distal biceps repair carries a distinct complication profile. The dense neurovascular anatomy of the antecubital fossa makes this a high-stakes procedure. Meticulous technique mitigates, but does not eliminate, these risks.
Nerve Injuries and Heterotopic Ossification
The most frequent complication is lateral antebrachial cutaneous nerve (LABCN) neurapraxia, occurring in up to 10% to 15% of single-incision anterior approaches. This is typically a transient, traction-related injury that resolves over several months, though permanent numbness or painful neuromas can occur if the nerve is lacerated.
Posterior interosseous nerve (PIN) palsy is the most devastating complication. It presents as an inability to actively extend the digits and the thumb. The incidence is generally less than 5% but is catastrophic when it occurs. It is almost exclusively caused by failing to maintain full forearm supination during drilling, or from aggressive posterior retraction. Most PIN palsies are neurapraxias that recover with time and supportive splinting, but iatrogenic laceration requires microsurgical exploration and repair.
Heterotopic ossification (HO) and radioulnar synostosis are severe complications that drastically limit forearm rotation. Historically common with the two-incision technique due to the dissection between the radius and ulna, the incidence has plummeted with the single-incision approach. However, aggressive reaming of the radius without copious irrigation can leave osteoprogenitor bone dust in the interosseous space, leading to HO.
Table: Complications and Management Strategies
| Complication | Estimated Incidence | Etiology / Risk Factor | Management Strategy |
|---|---|---|---|
| LABCN Neurapraxia | 10% - 15% | Traction during anterior exposure; superficial dissection. | Observation; gabapentin for neuropathic pain. Usually resolves in 3-6 months. |
| PIN Palsy | < 5% | Drilling in pronation; aggressive posterior retraction; divergent interference screw. | EMG at 6 weeks if no recovery. Supportive splinting. Surgical exploration if laceration suspected. |
| Heterotopic Ossification / Synostosis | 3% - 5% | Bone dust left in soft tissues; excessive subperiosteal stripping; two-incision technique. | Copious intraoperative irrigation. Indomethacin prophylaxis in high-risk patients. Surgical excision delayed until HO matures (>6 months). |
| Tendon Re-rupture | 1% - 2% | Non-compliance with rehab; inadequate fixation; poor tissue quality. | Revision surgery with allograft reconstruction. |
| Infection | < 1% | Standard surgical risks; hematoma formation. | Irrigation and debridement; culture-directed intravenous antibiotics. |
Phased Post-Operative Rehabilitation Protocols
A biomechanically robust repair is only half the battle; a highly structured, phased rehabilitation protocol is essential to optimize functional recovery and prevent stiffness or catastrophic re-rupture. Communication between the surgeon and the physical therapist is critical.
Early Protective Phase (Weeks 0-2)
Immediately postoperatively, the patient is placed in a well-padded posterior splint with the elbow flexed to 90 degrees and the forearm in neutral to slight supination. The primary goals during this phase are wound healing, edema control, and absolute protection of the repair. Active elbow flexion and active supination are strictly prohibited. The patient is encouraged to perform active range of motion of the shoulder, wrist, and digits to prevent distal edema and stiffness.
Controlled Motion Phase (Weeks 2-6)
At the two-week mark, the surgical splint is removed, wounds are inspected, and sutures are removed. The patient is transitioned to a hinged elbow brace. The brace is initially locked from 30 degrees of extension to 120 degrees of flexion. Passive range of motion (PROM) for flexion and supination is initiated to prevent capsular contracture and adhesions. Active extension and active pronation are permitted within the brace's limits, as these movements do not load the biceps tendon. The extension block on the hinged brace is gradually reduced by 10 degrees each week, aiming for full, symmetric extension by week 6.
Strengthening and Return to Activity (Weeks 6-12+)
By week 6, the hinged brace is discontinued. The patient begins active, unresisted
