Closed Reduction and Percutaneous Pinning of Distal Radial Fractures: A Comprehensive Surgical Guide
Key Takeaway
Closed reduction and percutaneous pinning (CRPP) remains a cornerstone technique for managing specific distal radius fractures. This guide details the biomechanical principles, step-by-step surgical execution, and postoperative protocols for CRPP and external fixation. By mastering precise Kirschner wire placement and frame biomechanics, orthopedic surgeons can achieve stable anatomical reduction, minimize soft tissue compromise, and optimize functional recovery in appropriately selected patients.
INTRODUCTION TO DISTAL RADIUS FRACTURE MANAGEMENT
Distal radius fractures are among the most ubiquitous injuries encountered by orthopedic surgeons, representing approximately 20% of all fractures treated in emergency departments. While the advent of volar locking plate (VLP) osteosynthesis has revolutionized the management of complex, comminuted, and osteoporotic fractures, Closed Reduction and Percutaneous Pinning (CRPP), alongside External Fixation, remains an indispensable pillar of the orthopedic armamentarium.
These minimally invasive techniques are particularly advantageous for extra-articular fractures, simple intra-articular patterns without severe comminution, pediatric physeal injuries, and scenarios involving severe soft-tissue compromise where extensive surgical dissection is contraindicated. The primary objective of these techniques is to restore and maintain radial height, volar tilt, radial inclination, and articular congruity while minimizing iatrogenic soft-tissue trauma.
Clinical Pearl: The success of CRPP and external fixation is entirely dependent on the quality of the initial closed reduction. If an anatomical or highly acceptable reduction cannot be achieved closed, or if severe comminution precludes stable pin purchase, the surgeon must seamlessly pivot to alternative techniques such as Open Reduction and Internal Fixation (ORIF).
BIOMECHANICS AND PRINCIPLES OF FIXATION
The Concept of Ligamentotaxis
External fixation relies heavily on the principle of ligamentotaxis. By applying longitudinal traction across the radiocarpal joint, tension is generated within the intact volar and dorsal radiocarpal ligaments. This tension acts to pull the displaced fracture fragments back into alignment.
However, ligamentotaxis has inherent biomechanical limitations. While linear traction effectively restores radial height and radial inclination, it typically does not fully restore volar tilt. The strong volar radiocarpal ligaments reach maximal tension before the dorsal ligaments, often leaving the distal fragment in a neutral or slightly dorsally angulated position.
The Necessity of Supplemental Fixation
Because external fixation alone can allow for gradual shortening and loss of reduction over time—especially in the presence of metaphyseal comminution—supplemental fixation with percutaneous Kirschner wires (K-wires) is almost universally required. The K-wires provide the necessary rotational and angular stability, while the external fixator acts as a neutralization frame to counteract the axial loads generated by the physiological activity of the forearm musculature (e.g., brachioradialis, wrist flexors/extensors).
CLOSED REDUCTION AND PERCUTANEOUS PINNING (CRPP)
Preoperative Preparation and Positioning
- Anesthesia: The procedure is typically performed under regional anesthesia (supraclavicular or axillary block) or general anesthesia, depending on patient comorbidities and surgeon preference.
- Positioning: The patient is positioned supine with the operative arm extended on a radiolucent hand table.
- Preparation: Standard sterile preparation and draping of the entire upper extremity up to the mid-arm are performed. A sterile tourniquet may be applied but is rarely inflated for isolated CRPP.
Fracture Reduction Maneuvers
Place the patient's thumb and index/long fingers in sterile finger traps. Apply longitudinal traction (typically 10 to 15 lbs of counterweight suspended from the upper arm) to disimpact the fracture fragments.
Allow the arm to suspend for 5 to 10 minutes to overcome muscle spasm and achieve sustained ligamentotaxis. Following this, manual manipulation is performed. The surgeon applies direct pressure with the thumb over the distal fragment, translating it volarly and ulnarly to correct dorsal tilt and radial translation.
Evaluate the reduction fluoroscopically in both the anteroposterior (AP) and lateral planes.
Surgical Warning: If the reduction is not anatomical, or if there is severe comminution that will not support K-wire fixation, abort the percutaneous approach and proceed with ORIF.
Surgical Technique: Step-by-Step Pinning
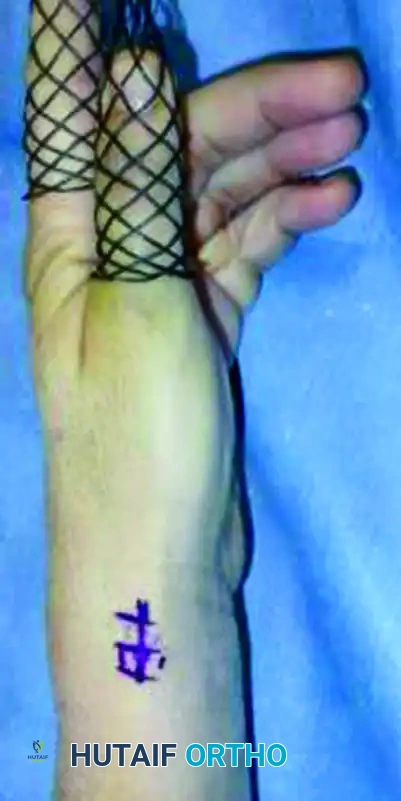
1. The Radial Styloid Incision
Make a 1.5-cm longitudinal incision beginning at the tip of the radial styloid and proceeding distally. A percutaneous approach without an incision is strongly discouraged due to the high risk of iatrogenic injury to the superficial radial nerve (SRN).
2. Soft Tissue Dissection and Nerve Protection
Utilize blunt dissection with a hemostat to spread the subcutaneous tissues. Carefully identify the branches of the superficial radial nerve. Mobilize these branches gently and retract them using small Ragnell or Sen retractors.
Identify the first extensor compartment (containing the abductor pollicis longus and extensor pollicis brevis).
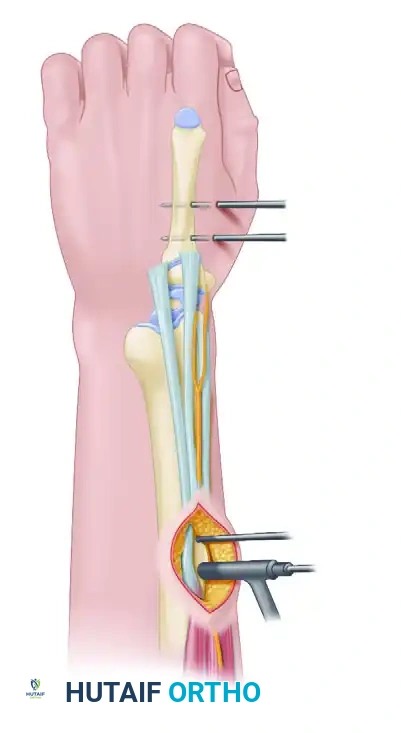
3. Radial Styloid Pin Placement
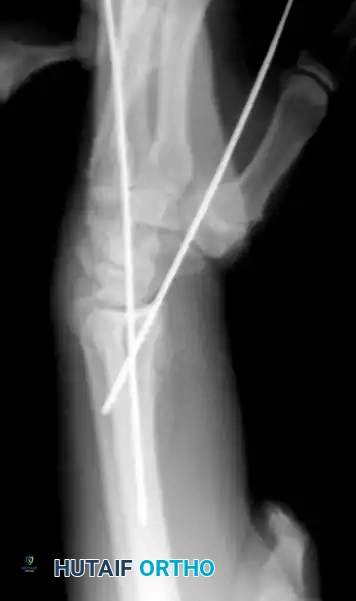
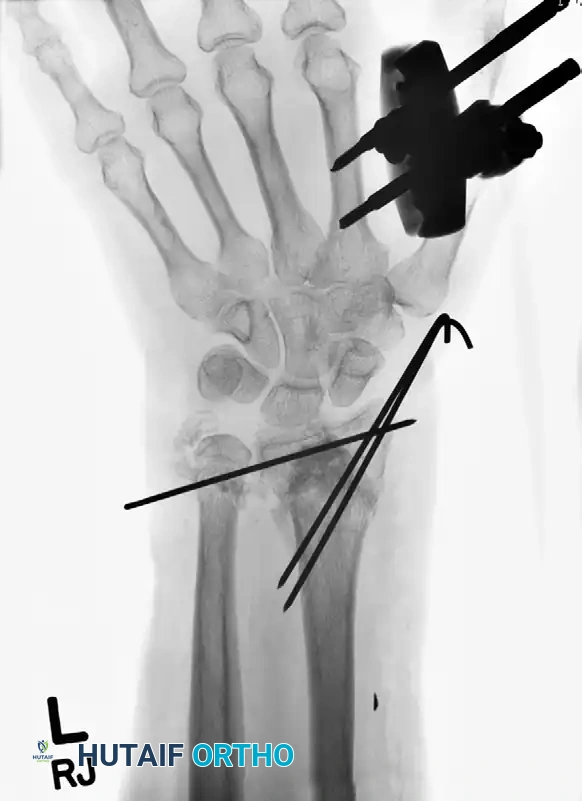
Place two 1.6-mm (0.062-in) Kirschner wires in succession. Start at the radial styloid and drive the wires proximally and ulnarly across the fracture site to engage the intact ulnar cortex of the proximal radial shaft.
* These wires can be placed either dorsal or volar to the first extensor compartment, depending on the specific fracture pattern and the patient's anatomical variations.
* Ensure bicortical purchase for maximum stability.
4. Orthogonal Dorsal Pin Placement
To provide multiplanar stability, place a third 1.6-mm K-wire percutaneously at a 90-degree orthogonal angle to the radial styloid pins.
* Start at the dorsal rim of the distal radius, just distal to Lister's tubercle.
* Confirm the correct starting point with fluoroscopy to avoid intra-articular penetration.
* Drive the wire in a proximal and volar direction across the fracture site to engage the volar cortex of the radius proximal to the fracture.
5. Alternative Pin Configurations
Depending on the fracture morphology, alternative or additional pin configurations may be required:
* Dorsal Comminution: A second dorsal pin can be placed into the dorsal rim, or a pin can be utilized as an intrafocal (Kapandji) pin to buttress the dorsal cortex.
* Radial Comminution: If there is marked radial comminution and pre-reduction radial translation, an additional buttress pin can be placed into the radial aspect of the fracture and driven into the proximal ulnar cortex.
* Crossed-Pin Configuration: Pins can be placed from the distal ulnar corner of the radius and passed to engage the intact radial cortex proximally, creating a stable crossed construct.
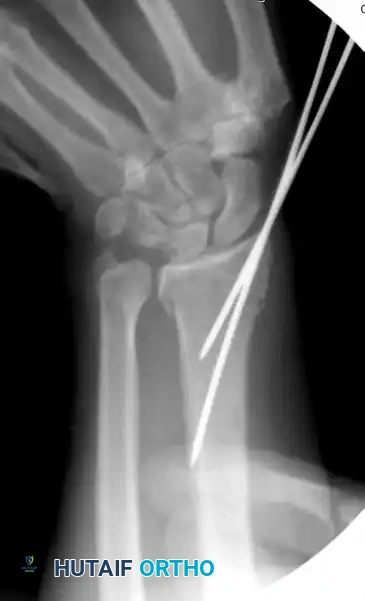
6. Final Evaluation and Closure
Place additional wires as necessary to secure any remaining unstable fracture fragments. Confirm final reduction and extra-articular pin placement with dynamic fluoroscopy through a full range of motion.
Bend the K-wires and cut them, leaving them superficial to the skin to facilitate easy removal in the clinic. Close the radial styloid incision with interrupted absorbable sutures (e.g., 4-0 Monocryl or Vicryl). Apply sterile dressings and a well-molded sugar-tong splint.
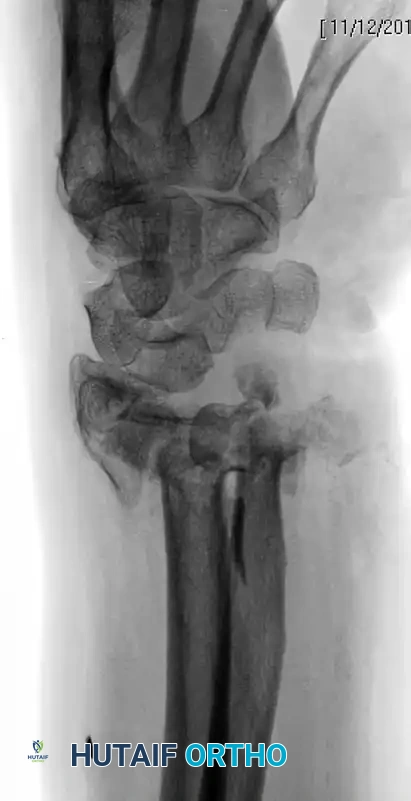
EXTERNAL FIXATION OF THE DISTAL RADIUS
External fixation serves as an excellent primary or adjunctive treatment for specific distal radial fractures, particularly those with severe soft tissue injury, highly comminuted intra-articular extensions (spanning fixation), or in damage-control orthopedics.
Bridging vs. Non-Bridging External Fixation
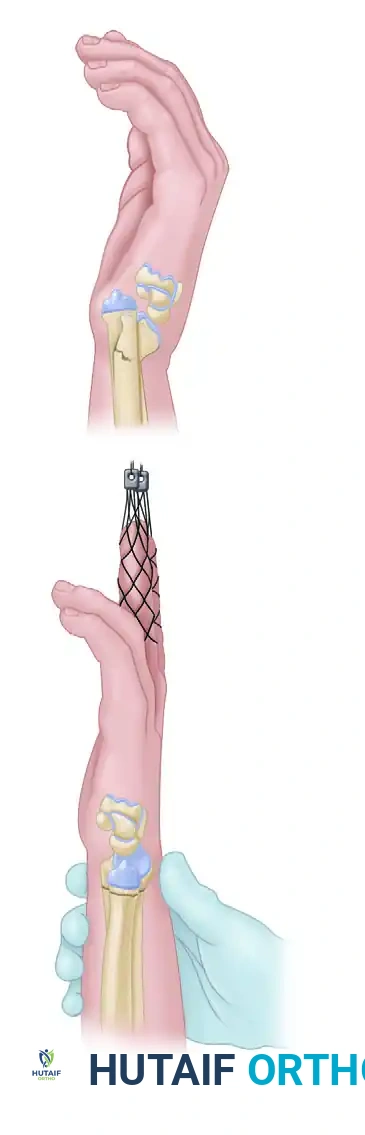
- Bridging External Fixation: The frame spans the radiocarpal joint, with pins placed in the radius proximally and the second metacarpal distally. This utilizes ligamentotaxis to maintain reduction.
- Non-Bridging External Fixation: Consists of a distal pin cluster inserted directly into the distal radial fragment without crossing the wrist joint. McQueen has reported extensively on this technique for extra-articular fractures that demonstrate enough distal bone stock to accept the pins. While results are excellent in properly selected patients, it requires a relatively large, intact distal fragment, limiting its widespread use.
Surgical Technique: Bridging External Fixation
- Metacarpal Pin Placement: Make two small incisions over the dorsoradial aspect of the second metacarpal. Bluntly dissect to the bone to protect the dorsal sensory branches of the radial nerve and the extensor tendons. Insert two 3.0-mm or 3.2-mm half-pins into the base and midshaft of the second metacarpal, ensuring bicortical purchase.
- Radial Pin Placement: Make two incisions over the dorsoradial aspect of the radius, approximately 10 cm proximal to the fracture site (between the extensor carpi radialis longus and brachioradialis). Bluntly dissect to the bone, use a drill sleeve, and insert two 3.0-mm or 4.0-mm half-pins bicortically.
- Frame Assembly: Connect the pins using a single-bar or double-bar carbon fiber frame.
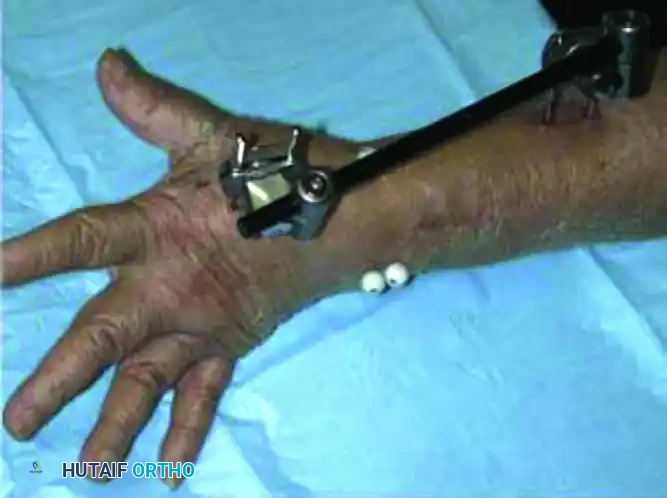
- Reduction and Locking: Apply longitudinal traction to the hand to achieve ligamentotaxis. Correct volar tilt manually. Once the reduction is confirmed fluoroscopically, tighten the clamps to lock the frame.
The Critical Role of Supplemental Fixation
As previously noted, linear traction typically does not fully restore volar tilt; however, a neutral tilt is clinically acceptable. Wei et al. reported good functional results with external fixation provided satisfactory reduction is obtained and maintained.
Because the external fixator alone cannot prevent micromotion and subsequent shortening in comminuted fractures, supplemental fixation with percutaneous K-wires is strongly recommended. The K-wires secure the articular fragments and maintain radial height, while the fixator neutralizes the deforming forces of the forearm musculature.
Clinical Pearl: We rarely apply definitive external fixation without the use of supplemental Kirschner wires. In cases of severe metaphyseal void, the addition of bone graft or bone graft substitutes can also be highly beneficial to prevent late collapse.
POSTOPERATIVE CARE AND REHABILITATION
A meticulous postoperative protocol is vital to prevent stiffness and ensure optimal functional recovery.
Phase 1: Immobilization (Weeks 0–2)
- The patient is placed in a sugar-tong splint immediately postoperatively to control forearm rotation and minimize irritation at the pin sites.
- Strict elevation and active range of motion (ROM) of the fingers, thumb, elbow, and shoulder are initiated immediately to prevent edema and stiffness.
- Pin site care is performed daily using sterile saline or chlorhexidine solution.
Phase 2: Transition (Weeks 2–6)
- At 2 weeks, the sugar-tong splint is removed. Sutures are removed if non-absorbable.
- A short-arm soft cast or a custom-molded thermoplastic splint is applied, leaving the metacarpophalangeal (MCP) joints completely free.
- The cast and K-wires are typically removed in the clinic between 5 and 6 weeks postoperatively. The exact timing depends on the fracture pattern, the patient’s age, bone quality, and the extent of bridging callus observed on follow-up radiographs.
Phase 3: Mobilization and Strengthening (Weeks 6–10+)
- Once clinical healing is confirmed (lack of tenderness over the fracture site) and radiographic healing is evident, supervised hand therapy is formally initiated.
- The patient is transitioned to a removable wrist splint, worn primarily for protection during high-risk activities and at night for an additional 1 to 2 weeks.
- As edema and pain decrease, aggressive soft tissue and joint mobilization protocols are instituted. Active and active-assisted ROM exercises for the wrist and forearm are prioritized.
- Functional use and activities of daily living (ADLs) are strongly encouraged. Progressive strengthening begins at 8 weeks, with a return to full, unrestricted activity typically achieved by 10 to 12 weeks after surgery.
EVIDENCE-BASED OUTCOMES AND LITERATURE REVIEW
The choice between CRPP, External Fixation, and ORIF remains a topic of extensive academic debate, heavily influenced by patient demographics and fracture morphology.
- External Fixation vs. Cast Immobilization: In a comparative study of 46 patients aged 65 years or older, Aktekin et al. demonstrated that patients treated with external fixation achieved significantly better wrist extension, ulnar deviation, palmar tilt, and radial height compared to those treated with cast immobilization alone.
- External Fixation vs. ORIF: A comprehensive meta-analysis of comparative clinical trials concluded that ORIF yields significantly better functional outcomes, forearm supination, and restoration of volar tilt. However, external fixation was found to result in better grip strength and wrist flexion in certain cohorts.
- The Ultimate Determinant: Across all studies, the literature consistently emphasizes one paramount conclusion: The quality of the anatomical reduction appears to be the single most critical determining factor in long-term functional outcome, regardless of the specific fixation modality chosen.
By adhering to strict biomechanical principles, executing precise surgical techniques, and respecting the soft tissue envelope, orthopedic surgeons can leverage CRPP and external fixation to achieve excellent, reproducible outcomes in the management of distal radius fractures.
You Might Also Like
