Distal Femoral Condyle Fractures: ORIF Surgical Guide
Key Takeaway
Open reduction and internal fixation (ORIF) of posterior medial and lateral femoral condyle fractures requires meticulous surgical technique to restore articular congruity. This guide details the biomechanical principles, surgical approaches—including the posteromedial Henderson and modified anterior swashbuckler approaches—and advanced fixation strategies using lag screws and locking plates. Anatomical reduction is paramount to prevent osteonecrosis, post-traumatic arthritis, and long-term disability, ensuring optimal functional recovery and early knee mobilization.
INTRODUCTION TO DISTAL FEMORAL CONDYLE FRACTURES
Fractures involving the distal femoral condyles, particularly coronal shear fractures of the posterior aspect (commonly referred to as Hoffa fractures, AO/OTA type 33-B3), present a formidable challenge to the orthopaedic surgeon. These intra-articular injuries are typically the result of high-energy trauma, such as motor vehicle collisions, or low-energy falls in osteoporotic individuals. The mechanism of injury usually involves axial loading transmitted through the tibial plateau to a flexed knee, resulting in a tangential shearing force that fractures the posterior aspect of one or both femoral condyles.
Because these fractures are intra-articular and involve the primary weight-bearing axis of the lower extremity, the fundamental goals of treatment are the anatomical restoration of the articular surface, rigid internal fixation, and the institution of early, active range of motion. Failure to achieve these goals inevitably leads to post-traumatic osteoarthritis, joint stiffness, axial malalignment, and profound long-term disability.
Clinical Pearl: Coronal shear fractures of the posterior femoral condyle can be notoriously difficult to identify on standard anteroposterior (AP) radiographs. They are often only visible on a true lateral radiograph or, more definitively, on a computed tomography (CT) scan. A high index of suspicion must be maintained, and a preoperative CT scan is mandatory for all intra-articular distal femur fractures to fully characterize fracture morphology and plan screw trajectories.
FRACTURE FIXATION OF THE POSTERIOR PART OF THE MEDIAL CONDYLE
Pathoanatomy and Biomechanics
If the posterior part of the medial femoral condyle is sheared off, open reduction and internal fixation (ORIF) with interfragmentary lag screws is the gold standard of care. Although this fracture may appear deceptively harmless on initial radiographs, it possesses a high potential for producing marked disability.
Initially undisplaced fractures frequently displace if treated conservatively due to the powerful shear forces exerted by the gastrocnemius muscle and the normal kinematics of the knee joint during flexion and extension. As visualized on the lateral radiographic view, the loose fragment typically consists of approximately the posterior half of the condyle.
The vascularity of this fragment is a critical surgical consideration. The fragment has minimal soft tissue attachments and may be entirely devoid of blood supply. Almost its entire surface is covered with articular cartilage. Consequently, if the fragment is not reduced anatomically and stabilized rigidly, roughening of the articular surface, nonunion, and osteonecrosis (avascular necrosis) will rapidly ensue.
Surgical Warning: Ordinarily, the posterior condylar fragment should never be excised. It constitutes a vital portion of the articular surface, particularly when the knee is flexed at 90 degrees. Excision will lead to profound instability and rapid joint degeneration. Treatment must consist of anatomical reduction and rigid fixation.
Surgical Approach: The Posteromedial Henderson Incision
Adequate exposure of a medial Hoffa fracture often requires a dual-incision technique, utilizing both anteromedial and posteromedial approaches to ensure anatomical reduction of the articular surface.
- Positioning: The patient is placed supine on a radiolucent operating table. A bump may be placed under the contralateral hip to allow the operative leg to externally rotate, facilitating access to the medial aspect of the knee. A sterile tourniquet is applied to the proximal thigh.
- Incision: The posteromedial Henderson approach is utilized to directly visualize the posterior medial condyle. The incision is made anterior to the medial head of the gastrocnemius.
- Deep Dissection: The interval between the medial head of the gastrocnemius and the semimembranosus is developed. The medial head of the gastrocnemius is retracted posteriorly and laterally, protecting the neurovascular bundle in the popliteal fossa. Occasionally, a portion of the medial head of the gastrocnemius may require reflection laterally from its femoral origin to achieve adequate exposure of the fracture site.
Step-by-Step Surgical Technique
- Joint Debridement: Open the capsule and thoroughly irrigate the joint to remove fracture hematoma and osteochondral debris. Inspect the menisci for concomitant tears.
- Fracture Reduction: Anatomically reduce the posterior portion of the medial femoral condyle. This often requires the use of a dental pick or a small periosteal elevator.
- Provisional Fixation: Temporarily secure the reduced fragment with multiple smooth Kirschner wires (K-wires). Ensure these wires are placed peripherally so they do not interfere with the planned trajectory of the definitive lag screws.
- Definitive Fixation: Depending on the size of the fragment, insert two 3.5-mm or 4.5-mm cortical screws using a standard lag technique (overdrilling the near cortex) from anterior to posterior.
- Alternatively, cannulated differential thread headless compression screws can be utilized, which provide excellent interfragmentary compression without leaving a prominent screw head.
- Place the screws medial to the patellofemoral articulation if possible, directing them perpendicular to the fracture plane to maximize compression.
- Countersinking: It is imperative to countersink all screws that are placed through the anterior articular surface to prevent impingement with the patella during knee flexion.
- Verification: Inspect the posterior aspect of the condyle to ensure that the screw tips do not penetrate the posterior articular surface. Check the reduction and the position of the screws using multi-planar intraoperative fluoroscopy.
- Closure: Remove the transfixing K-wires. Thoroughly irrigate the wound and close the capsule, subcutaneous tissues, and skin in a standard layered fashion.
FRACTURE OF THE LATERAL CONDYLE
The lateral femoral condyle is more frequently involved in coronal shear fractures than the medial condyle due to the physiological valgus alignment of the lower extremity, which places higher shear stresses on the lateral compartment during axial loading.
Surgical Technique and Fixation
The surgical principles for treating fractures of the lateral femoral condyle are identical to those used for the medial condyle. Exposure is typically achieved through a direct lateral or anterolateral approach. If the fracture extends proximally or involves significant comminution, a more extensile approach may be required.
Fixation is achieved using anterior-to-posterior interfragmentary lag screws. In cases of comminution or when the shear fracture is part of a more complex supracondylar/intercondylar fracture pattern, small fragment plates or lateral distal femoral locking plates may be required to buttress the construct.
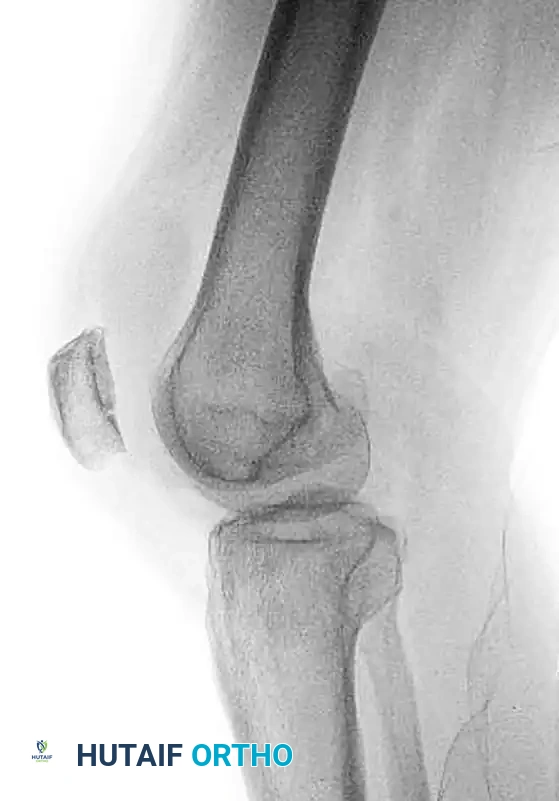
FIGURE 54-73 A: Lateral radiograph demonstrating a lateral femoral condyle fracture with a component of a coronal shear fracture of the posterior lateral femoral condyle.
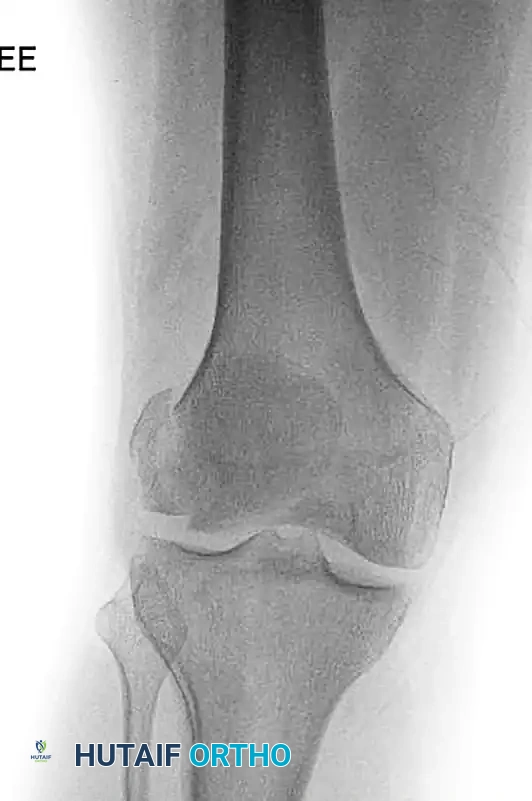
FIGURE 54-73 B: Anteroposterior (AP) radiograph of the same lateral femoral condyle fracture, highlighting the difficulty in fully appreciating the posterior shear component on an AP view.
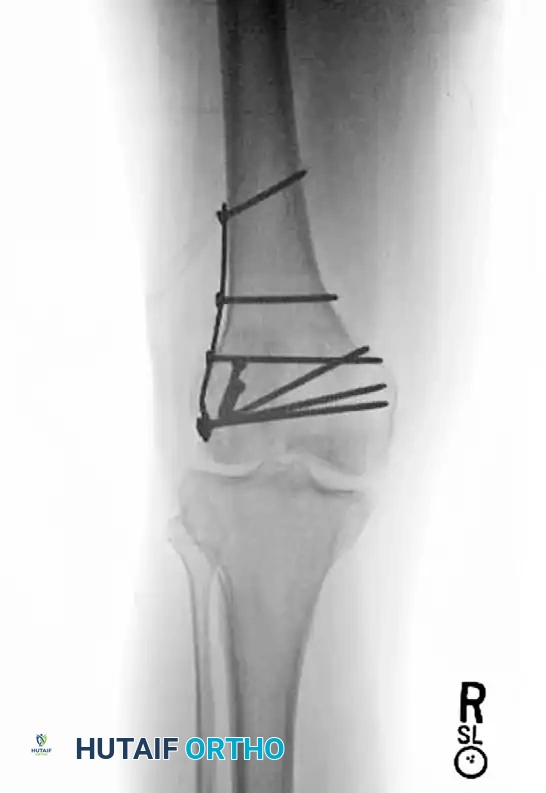
FIGURE 54-73 C: Postoperative lateral radiograph after ORIF with small fragment fixation. Note the anteroposterior interfragmentary lag screws utilized for the stabilization of the posterior femoral condyle coronal fracture.
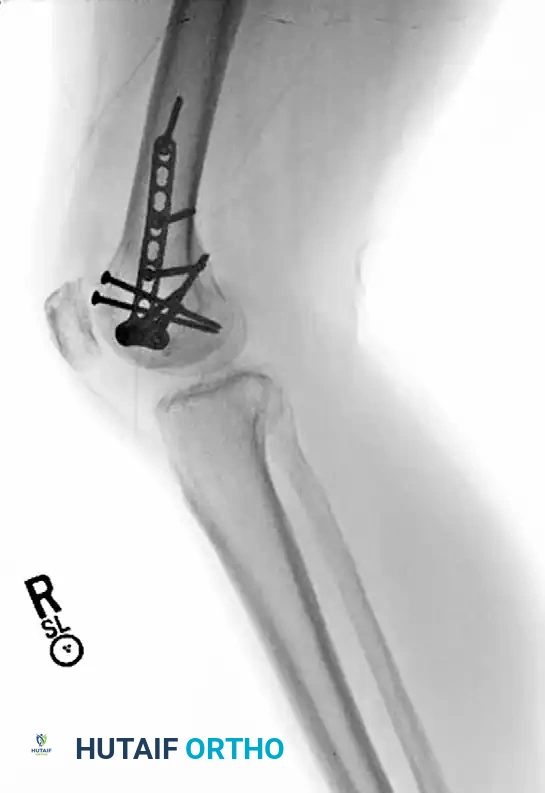
FIGURE 54-73 D: Postoperative AP radiograph demonstrating restoration of the articular surface and appropriate hardware placement.
INTERCONDYLAR AND SUPRACONDYLAR FRACTURES OF THE FEMUR
ORIF of comminuted intercondylar and supracondylar fractures of the femur (AO/OTA type 33-C) demands extensive experience, meticulous preoperative planning, and advanced surgical skill. A complete set of instruments, including modern locking plate systems and targeting guides, and familiarity with their use are absolute prerequisites for this method of fixation.
Principles of Fixation
Strict adherence to basic AO principles and technique is required to prevent unsatisfactory results. ORIF of these difficult fractures is justified only if the following criteria are met:
1. The joint surfaces can be restored anatomically.
2. Fixation is sufficiently rigid that external immobilization (e.g., casting) is not required.
3. Rigidity of fixation is sufficient to allow early and active motion of the knee joint.
4. The skin and soft tissues are satisfactory for a major surgical intervention.
Evolution of Implants
Historically, the insertion of a 95-degree condylar blade plate was the standard of care. However, this technique is technically demanding and unforgiving. While the broad surface area of the plate provides excellent fixation and resistance to bending and torsional forces, incorrect insertion of the blade into the condyles inevitably leads to coronal or sagittal malalignment of the femur.
Difficulty in application and rapid design advancements have largely eliminated the use of blade plates and dynamic condylar screws (DCS) as first-line fixation devices. The evolution of fracture fixation devices for the distal femur has led to the widespread adoption of pre-contoured, anatomically designed condylar locking plates.
These modern extramedullary implants offer the capability for locking screws—often polyaxial—which provide superior fixation in osteoporotic bone. Furthermore, they are typically paired with radiolucent targeting instrumentation that allows for minimally invasive plate osteosynthesis (MIPO), resulting in considerably less soft tissue stripping and preservation of the fracture hematoma.
ADVANCED SURGICAL APPROACHES: THE SWASHBUCKLER APPROACH
Fracture morphology dictates the required surgical approach for appropriate reduction and fracture stabilization. While the need for significant proximal extensile exposure is rare with modern targeting instrumentation, complex intra-articular fractures necessitate direct visualization.
Supracondylar fractures or simple intercondylar fractures often can be treated through direct lateral surgical approaches distally. However, those with extensive articular comminution necessitate direct exposure to ensure anatomical reduction. This is most frequently accomplished through an anterior approach with a lateral parapatellar arthrotomy.
To provide superior exposure of the distal articular surface of the femur, Starr, Jones, and Reinert popularized a modified anterior approach they termed the "swashbuckler" approach.
Advantages of the Swashbuckler Approach
- Unparalleled Exposure: Provides a panoramic view of the entire distal femoral articular surface.
- Muscle Sparing: Spares the quadriceps muscle bellies from transection, leading to faster rehabilitation.
- Future Arthroplasty Compatibility: The surgical scar and arthrotomy do not interfere with subsequent total knee arthroplasty (TKA), should post-traumatic arthritis develop in the future.
Step-by-Step Swashbuckler Technique
- Incision and Fascial Dissection: A midline or slightly lateral anterior longitudinal incision is made. The fascia overlying the quadriceps is incised longitudinally and lifted laterally off the underlying muscle belly.
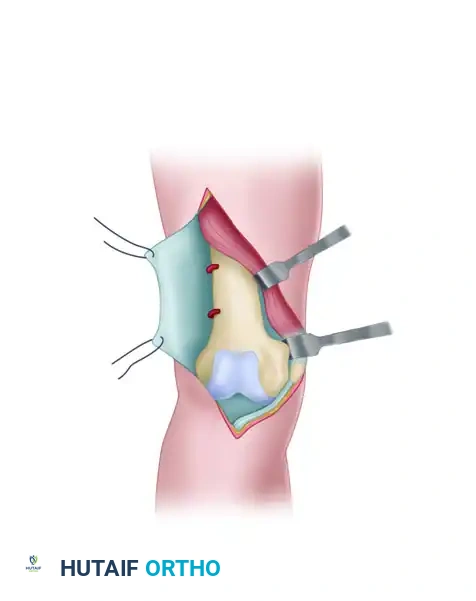
FIGURE 54-74 A: Swashbuckler technique. The fascia overlying the quadriceps is incised longitudinally and lifted laterally off the underlying muscle.
- Arthrotomy: Farther laterally, the fascia over the quadriceps becomes confluent with the iliotibial band. A lateral parapatellar arthrotomy is performed. Proximally, the arthrotomy incision is carefully developed between the vastus lateralis muscle and the lateral retinaculum of the knee.

FIGURE 54-74 B: Swashbuckler technique. The lateral parapatellar arthrotomy is performed, separating the vastus lateralis from the lateral retinaculum.
- Proximal Release and Eversion: Proximal release of the vastus lateralis fibers from the lateral intermuscular septum allows for further mobilization of the quadriceps mechanism. The patella is everted medially, exposing the entire distal femur.
- Surgical Pearl: During the proximal release, perforating vessels from the profunda femoris artery will be encountered. These must be meticulously identified and controlled with electrocautery or suture ligation to prevent postoperative hematoma.
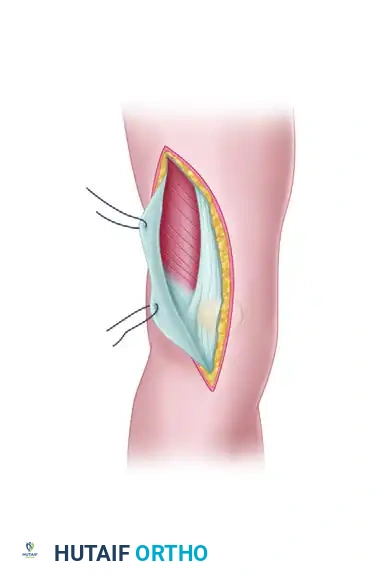
FIGURE 54-74 C: Swashbuckler technique. Proximal release of the vastus lateralis fibers from the lateral intermuscular septum allows further mobilization. Perforating vessels are controlled with cautery, and the patella is medially everted.
In highly complex, fracture-specific cases, a small accessory medial incision may still be required in conjunction with the swashbuckler approach to facilitate fracture manipulation or the placement of medial-to-lateral interfragmentary screws.
POSTOPERATIVE CARE AND REHABILITATION
The postoperative management of distal femoral condyle fractures is as critical as the surgical execution. The protocol must balance the need to protect the fixation construct with the imperative to initiate early joint mobilization to prevent arthrofibrosis.
Phase 1: Immediate Postoperative (Weeks 0-6)
- Immobilization: The knee is typically placed in a hinged knee brace locked in extension for weight-bearing transfers, but unlocked for range of motion (ROM) exercises.
- Weight-Bearing: Patients are strictly non-weight-bearing (NWB) or toe-touch weight-bearing (TTWB) on the operative extremity to protect the articular reduction and lag screw fixation.
- Range of Motion: Continuous passive motion (CPM) machines or active-assisted ROM exercises are initiated immediately postoperatively, provided the fixation is deemed rigidly stable by the operating surgeon. The goal is to achieve 90 degrees of flexion by week 4.
- Strengthening: Isometric quadriceps sets and straight leg raises are encouraged to prevent muscle atrophy.
Phase 2: Intermediate Rehabilitation (Weeks 6-12)
- Clinical and Radiographic Review: At 6 weeks, clinical healing and radiographic evidence of callus formation are assessed.
- Weight-Bearing: If radiographic progression of union is evident, weight-bearing is gradually advanced from partial weight-bearing (PWB) to full weight-bearing (FWB) over a 4-to-6-week period.
- Range of Motion: Aggressive physical therapy is continued to achieve full, symmetrical ROM.
- Strengthening: Closed kinetic chain exercises are introduced as weight-bearing status allows.
Phase 3: Advanced Rehabilitation (Months 3-6)
- Return to Function: Focus shifts to proprioception, gait normalization, and advanced strengthening. Return to heavy labor or high-impact sports is generally delayed until 6 to 9 months postoperatively, contingent upon complete radiographic union and the restoration of near-normal quadriceps strength.
Pitfall: Premature weight-bearing in the setting of a posterior coronal shear fracture (Hoffa fracture) can lead to catastrophic failure of the lag screw fixation, displacement of the articular fragment, and the rapid onset of severe post-traumatic arthritis. Strict adherence to the non-weight-bearing protocol during the initial 6 weeks is mandatory.
You Might Also Like