Masterclass in Ligament Reconstruction for Recurrent Thumb CMC Dislocation
Key Takeaway
The Eaton-Littler ligament reconstruction is the gold standard for recurrent carpometacarpal joint dislocation of the thumb. Utilizing a distally based strip of the flexor carpi radialis tendon, this technique anatomically reconstructs the volar beak ligament. It restores stability across the volar, dorsal, and radial aspects of the joint while preserving mobility, making it highly effective for symptomatic instability without advanced arthrosis.
Introduction and Biomechanical Principles
Recurrent dislocation or symptomatic subluxation of the thumb carpometacarpal (CMC) joint is a profoundly debilitating condition that compromises the pinch and grip strength of the hand. The thumb CMC joint is a highly mobile, biconcave saddle joint that relies heavily on its capsuloligamentous complex for stability. Among the 16 distinct ligaments supporting this articulation, the anterior oblique ligament (AOL)—often referred to as the volar beak ligament—and the dorsoradial ligament (DRL) are the primary static stabilizers preventing dorsal and radial translation of the first metacarpal on the trapezium.
When these ligaments become attenuated through repetitive microtrauma, acute traumatic dislocation, or systemic hypermobility disorders (e.g., Ehlers-Danlos syndrome), the first metacarpal subluxates dorsally. If left untreated, this altered kinematic pathway inevitably leads to accelerated articular wear and pantrapezial osteoarthritis.
The Eaton and Littler Ligament Reconstruction is the gold-standard joint-sparing procedure designed to halt this degenerative cascade. By utilizing a distally based slip of the flexor carpi radialis (FCR) tendon, the surgeon anatomically reconstructs the volar beak ligament. The ingenious routing of the tendon graft reinforces the volar, dorsal, and radial aspects of the joint, restoring multi-planar stability while preserving the essential mobility of the thumb ray.
Indications and Patient Selection
Careful patient selection is paramount for the success of an Eaton-Littler reconstruction. The procedure is strictly a soft-tissue stabilization technique; therefore, the articular cartilage must be pristine or exhibit only minimal degenerative changes.
Primary Indications:
* Recurrent, symptomatic thumb CMC joint dislocation or subluxation.
* Post-traumatic instability following an acute dislocation that fails conservative management.
* Symptomatic hypermobility of the CMC joint impairing pinch strength.
* Eaton-Littler Stage I or early Stage II CMC joint disease (hypermobility with normal articular contours and no significant joint space narrowing).
Contraindications:
* Advanced CMC joint osteoarthritis (Eaton-Littler Stage III or IV). In these cases, ligament reconstruction alone will fail to relieve pain, and arthroplasty (e.g., trapeziectomy with ligament reconstruction and tendon interposition - LRTI) or arthrodesis is required.
* Fixed adduction contracture of the first web space.
* Active joint infection.
Clinical Pearl: Always obtain true AP (Robert's view), lateral, and stress radiographs of the thumb CMC joint to accurately stage the degree of arthrosis and quantify the extent of radial subluxation before committing to a joint-sparing ligament reconstruction.
Preoperative Planning and Positioning
- Anesthesia: Regional anesthesia (supraclavicular or axillary brachial plexus block) combined with intravenous sedation is preferred, offering excellent intraoperative muscle relaxation and postoperative analgesia.
- Positioning: The patient is positioned supine with the operative arm extended on a radiolucent hand table.
- Tourniquet: A well-padded pneumatic upper arm tourniquet is applied and inflated to 250 mm Hg after exsanguination with an Esmarch bandage.
- Equipment: A mini-C-arm fluoroscopy unit must be available in the surgical field. Small joint retractors, a 3.2 mm or 3.5 mm drill bit, and 1.14 mm (0.045 inch) Kirschner wires (K-wires) are required.
Surgical Technique: The Eaton-Littler Reconstruction
1. Incision and Exposure
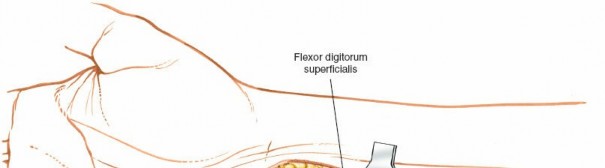
The surgical approach must provide expansive access to the base of the first metacarpal, the trapezium, and the distal forearm while meticulously protecting the sensory branches of the radial nerve.
- Make a dorsoradial (Wagner-type) incision along the proximal half of the first metacarpal.
- Curve the proximal end of the incision ulnarward, passing around the base of the thenar eminence parallel to the distal flexor crease of the wrist.
- Carefully dissect through the subcutaneous tissues. Identify, mobilize, and protect the superficial branches of the radial nerve and the lateral antebrachial cutaneous nerve using vessel loops.
- Expose the CMC joint of the thumb. Perform a subperiosteal dissection along the base of the first metacarpal to preserve the soft tissue sleeve.
- Proceed with an extraperiosteal dissection over the volar aspect of the trapezium. This preserves the remaining capsular structures, which will be imbricated during closure.
2. Isolation and Harvest of the FCR Tendon
The flexor carpi radialis (FCR) tendon is the workhorse graft for this reconstruction. It lies in a distinct fibro-osseous tunnel adjacent to the trapezial crest.
- Isolate the distal portion of the FCR tendon from its position on the ulnar aspect of the trapezial crest.
- Make a separate longitudinal incision in the distal forearm over the FCR musculotendinous junction.
- Identify the FCR tendon and split it longitudinally. Harvest a strip from its radial side that is approximately 6 cm in length. Harvesting the radial half ensures the ulnar half remains robustly attached to its insertion at the base of the second metacarpal, preserving wrist flexion and radial deviation power.
- Free the radial strip proximally at the musculotendinous junction.
- Continue the longitudinal split distally under the skin bridge (or connect the incisions if necessary) down to the trapezial crest.
- Crucial Step: Leave the distal end of the harvested tendon strip firmly attached to its anatomical insertion at the base of the second metacarpal.
3. Joint Reduction and Provisional Fixation
Before routing the tendon graft, the subluxated first metacarpal must be anatomically reduced and provisionally stabilized.
- Apply longitudinal traction, palmar abduction, and slight pronation to the thumb to reduce the first metacarpal anatomically onto the saddle of the trapezium.
- Verify the reduction under direct vision and fluoroscopy.
- Pass a 1.14 mm (0.045 inch) Kirschner wire across the CMC joint to hold it in this optimal orientation.
Surgical Warning: Extreme care must be taken when placing this K-wire. It must be positioned dorsally or centrally enough so that it does not interfere with the planned trajectory of the transverse drill hole at the base of the first metacarpal, through which the tendon transfer will eventually pass.
4. Metacarpal Preparation and Tendon Routing
This phase is the biomechanical crux of the Eaton-Littler procedure, creating a robust checkrein against dorsal and radial subluxation.
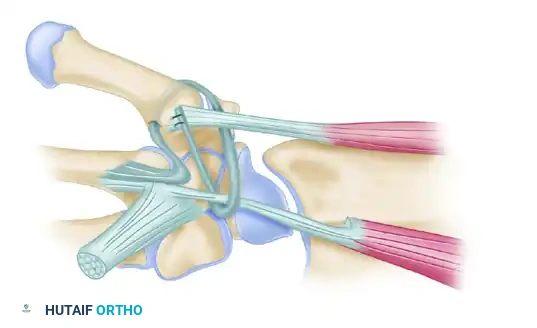
- Reroute the 6 cm tendon strip, which was previously raised, from behind the crest of the trapezium. Pass it directly from its base at the second metacarpal toward the base of the first metacarpal.
- Using a 3.2 mm drill bit, create a transverse hole through the base of the first metacarpal.
- The drill entry point should be on the dorsal-ulnar aspect of the metacarpal base, just ulnar to the extensor pollicis brevis (EPB) tendon.
- The drill must emerge extra-articularly at the volar beak region of the thumb metacarpal base.
- Pass the FCR tendon strip through this osseous tunnel from volar to dorsal.
FIGURE 67-18: Volar and radial ligament reconstruction utilizing a strip from the tendon of the flexor carpi radialis, which is left attached at its insertion at the base of the second metacarpal. The complex routing of the tendon strip creates a dynamic and static reinforcement of the volar, dorsal, and radial aspects of the joint.
5. Graft Tensioning and Fixation
- Once the tendon strip exits the dorsal aspect of the first metacarpal, loop it back deep to the abductor pollicis longus (APL) tendon.
- Draw the graft under strict tension while maintaining the thumb in palmar abduction and opposition.
- Suture the graft securely to the periosteum near its dorsal exit hole using non-absorbable braided sutures (e.g., 2-0 Ethibond or FiberWire). The robust bony insertion of the APL serves as an excellent, unyielding anchor for these sutures.
- Finally, take the remaining tail of the tendon strip, loop it around the intact FCR tendon near its insertion, and suture it back onto the base of the first metacarpal. This final loop acts as a secondary stabilizer, effectively recreating the dorsal ligamentous complex.
- Close the capsule, imbricating it if redundant. Deflate the tourniquet, achieve meticulous hemostasis, and close the skin with non-absorbable monofilament sutures.
Postoperative Protocol and Rehabilitation
The success of the ligament reconstruction relies heavily on strict adherence to postoperative immobilization to allow for biological graft incorporation.
- Weeks 0-4: The thumb is immobilized in a rigid, well-molded thumb spica cast. The thumb must be held in palmar abduction and extension to remove tension from the reconstructed volar beak ligament. The K-wire remains in place during this phase.
- Week 4: The cast is removed in the clinic. The transarticular K-wire is extracted. The patient is transitioned to a custom-molded thermoplastic thumb spica splint. Active range of motion (AROM) exercises for the thumb IP and MCP joints are encouraged. Gentle, gravity-eliminated AROM of the CMC joint begins.
- Weeks 6-8: The splint is weaned for light activities. Passive range of motion (PROM) and gentle strengthening exercises (e.g., isometric pinch) are initiated under the guidance of a certified hand therapist.
- Weeks 8-12: Progressive resistance exercises are introduced. Unrestricted heavy gripping and pinching are generally permitted after 12 weeks, provided the joint remains stable and asymptomatic.
Management of Concurrent Proximal Phalanx Base Fractures
High-energy trauma to the first ray can result in complex injury patterns. While isolated CMC dislocations require ligamentous reconstruction, axial loading forces can simultaneously or independently cause severe intra-articular fractures of the thumb proximal phalanx. Recognizing and anatomically reducing these fractures is critical to preserving the functional kinematics of the thumb.
When a comminuted, displaced fracture of the base of the thumb proximal phalanx is encountered, closed reduction is often insufficient due to the deforming forces of the intrinsic thenar musculature. Open reduction and internal fixation (ORIF) is mandated.
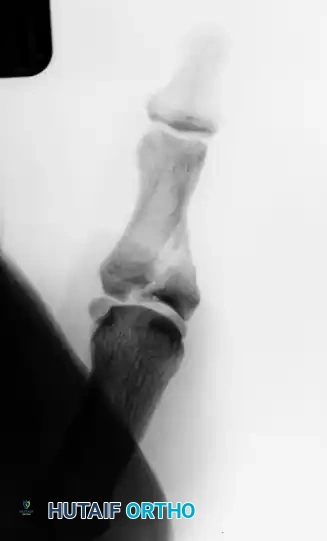
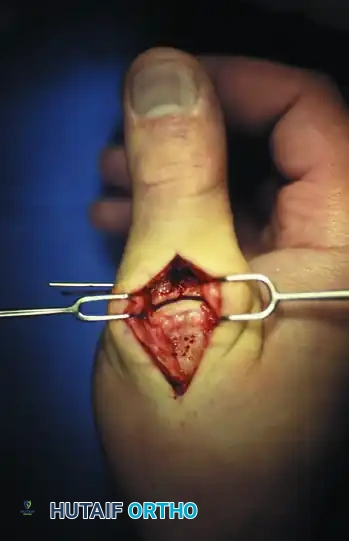
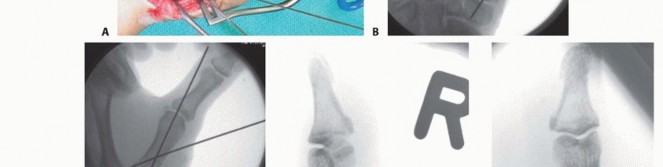
FIGURE 67-19 A and B: Preoperative anteroposterior and lateral radiographs demonstrating a highly comminuted, displaced intra-articular fracture of the base of the thumb proximal phalanx in a young male patient.
Surgical Approach for Phalanx Fractures
- Incision: A dorsal longitudinal incision is made over the metacarpophalangeal (MCP) joint of the thumb.
- Interval: Deep dissection is carried out through the interval between the extensor pollicis longus (EPL) and the extensor pollicis brevis (EPB) tendons.
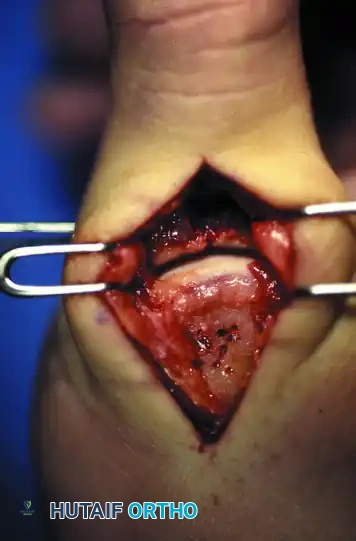
FIGURE 67-19 C: Exposure of the dorsal joint through the EPL and EPB interval, revealing the displaced articular fragments.
- Joint Inspection: The dorsal capsule is incised to allow for direct visualization of the articular surface. Direct joint inspection is the only reliable method to ensure absolute anatomical reduction of the articular step-off.
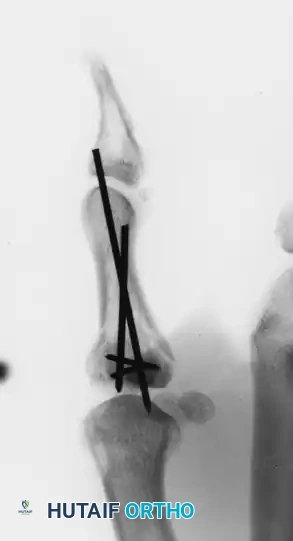
FIGURE 67-19 D: Direct joint inspection permits precise anatomical reduction of the comminuted fragments, restoring the articular congruity.
Fixation Strategy
Given the small size and comminution of the fragments, bulky plates are often contraindicated as they can cause tendon irritation and stiffness. Simple, strategically placed Kirschner wires provide excellent, low-profile fixation.
- Once reduced, the fragments are provisionally held with reduction forceps.
- Multiple 0.035-inch or 0.045-inch K-wires are driven across the fracture site to capture the articular fragments and secure them to the diaphyseal shaft.
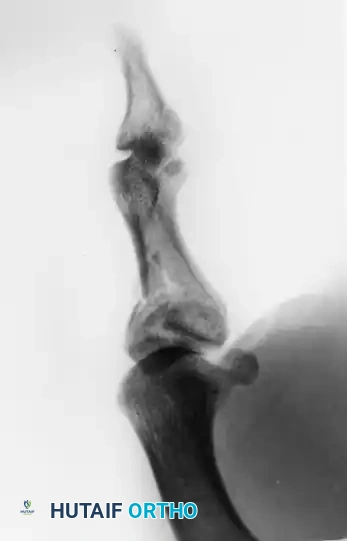
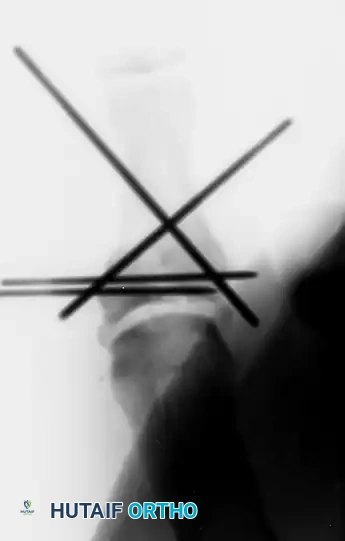
FIGURE 67-19 E and F: Postoperative radiographs confirming anatomical fracture fixation with simple, crossed Kirschner wires.
- Wire Management: To facilitate easy removal in the outpatient clinic without the need for a secondary anesthetic procedure, the K-wires are left protruding through the skin. They are bent and capped to prevent migration and protect the patient.

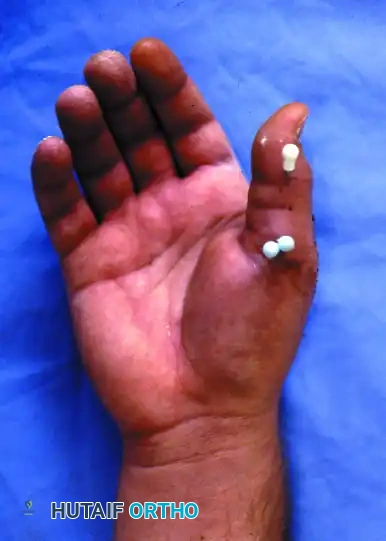
FIGURE 67-19 G and H: Clinical photographs demonstrating the K-wires capped outside the skin. This allows for straightforward removal 4 weeks after surgery once early clinical union is achieved.
Complications and Pitfalls
While highly successful, the Eaton-Littler reconstruction and associated first ray trauma management carry specific risks:
- Superficial Radial Nerve Neuritis: The most common complication. Meticulous soft-tissue handling and the use of blunt retractors are essential. If a neuroma develops, it can be severely debilitating.
- Graft Failure/Recurrent Instability: Usually stems from inadequate graft tensioning, failure to place the metacarpal drill hole accurately at the volar beak, or premature removal of the transarticular K-wire before 4 weeks.
- Metacarpal Base Fracture: Drilling a 3.2 mm hole in a small first metacarpal creates a stress riser. Multiple drill passes must be avoided. If the cortical bridge breaks during drilling, the surgeon must be prepared to use a suture anchor technique at the volar beak instead of a transosseous tunnel.
- Progression of Arthrosis: If the procedure is mistakenly performed on a patient with unrecognized Eaton Stage III disease, the altered joint mechanics will rapidly exacerbate pain, necessitating a salvage trapeziectomy. Strict adherence to preoperative radiographic staging is mandatory.
You Might Also Like