Surgical Correction of Calcaneal and Ankle Malunions
Key Takeaway
The surgical correction of extraarticular calcaneal malunions requires a meticulous approach to restore hindfoot biomechanics. This involves lateral wall exostectomy, peroneal tendon decompression, and often subtalar arthrodesis with corrective osteotomies. Addressing concurrent axial deformities, such as valgus or varus malalignment, is critical for optimal outcomes. Proper graft contouring and rigid cannulated screw fixation ensure stability, while tailored postoperative protocols dictate successful fusion and functional recovery.
Introduction to Calcaneal Malunions
The management of malunited extraarticular calcaneal fractures presents a formidable challenge to the orthopedic surgeon. When a calcaneal fracture heals in a non-anatomic position, the resulting pathoanatomy typically involves a loss of calcaneal height, an increase in heel width, and severe axial malalignment—most commonly varus or valgus deformities. This three-dimensional distortion drastically alters hindfoot kinematics, leading to subfibular impingement, peroneal tendon pathology, and debilitating subtalar arthrosis.
In the context of malunited extraarticular fractures, Aly described a laterally based opening wedge osteotomy specifically designed for symptomatic valgus calcaneal deformity. In a cohort of 34 patients, this technique yielded good or excellent results in 91% of cases, with only 9% reporting poor outcomes at a mean follow-up of 56.2 months. The mean American Orthopaedic Foot and Ankle Society (AOFAS) hindfoot and ankle score demonstrated dramatic improvement, rising from a preoperative baseline of 57 to a highly functional postoperative level.
Successful surgical reconstruction demands a comprehensive understanding of hindfoot biomechanics, meticulous preoperative planning, and precise execution of osteotomies, arthrodesis, and soft-tissue balancing.
Pathoanatomy and Classification
Calcaneal malunions are generally classified based on the presence of lateral wall exostosis, subtalar joint arthrosis, and axial malalignment (often utilizing the Stephens and Sanders classification):
- Type I Malunion: Characterized by a lateral wall blowout (exostosis) causing subfibular impingement and peroneal tendon subluxation or stenosis, but without significant subtalar arthrosis or axial deformity.
- Type II Malunion: Involves lateral wall exostosis combined with symptomatic, post-traumatic subtalar arthritis, requiring arthrodesis.
- Type III Malunion: The most complex presentation, featuring lateral wall exostosis, subtalar arthritis, and significant axial malalignment (varus or valgus) that requires corrective osteotomy in addition to arthrodesis.
Clinical Pearl: Always evaluate the peroneal tendons dynamically during the preoperative clinical examination. Subfibular impingement often masks underlying peroneal tendon tears, stenosis, or superior peroneal retinaculum (SPR) incompetence.
Surgical Technique: Step-by-Step Correction
Patient Positioning and Surgical Approach
The patient is placed in the lateral decubitus position on a radiolucent table, ensuring the operative leg is well-padded and secured. A standard extensile lateral approach to the calcaneus is utilized. This approach provides unparalleled access to the lateral wall, the subtalar joint, and the calcaneocuboid joint while minimizing the risk to the sural nerve and the lateral calcaneal artery.
A full-thickness subperiosteal flap is elevated, taking care to protect the peroneal tendons and the sural nerve within the superior flap.
Lateral Wall Exostectomy and Peroneal Tendon Management
Once the lateral wall is exposed, any retained hardware (such as Kirschner wires or broken plates) from previous surgeries must be removed.
- Exostectomy: Perform a lateral wall exostectomy using an osteotome or oscillating saw. The excised bone should be preserved in a sterile basin, as it serves as an excellent source of autograft for the subsequent subtalar arthrodesis.
- Tendon Examination: Examine the peroneal tendons for dislocation, tears, or stenosis. In many ankles with obvious preoperative tendon subluxation, the simple removal of the lateral wall exostosis allows the tendons to fall back into their anatomic position behind the fibula, requiring no further stabilization.
- Sheath Evaluation: The peroneal tendon sheath must be entered distally with a Freer elevator to evaluate for proximal sheath stenosis.
- Tenolysis: If stenosis is identified, incise the sheath over a length of 2 to 3 cm along the undersurface of the subperiosteal flap to perform a thorough tenolysis.
- Retinaculum Reconstruction: If persistent peroneal tendon dislocation is identified after exostectomy, reconstruct the superior peroneal retinaculum through a small, separate incision in the flap.
Subtalar Joint Preparation and Distraction
For Type II and Type III malunions, a subtalar arthrodesis is required.
- Joint Debridement: Denude the remaining articular cartilage from the posterior, middle, and anterior facets of the subtalar joint.
- Subchondral Drilling: Prepare the inferior talar and superior calcaneal osseous surfaces using a 2.5-mm drill bit. Create multiple perforations within the subchondral bone to promote robust vascular ingrowth and osteogenesis.
- Joint Distraction: Insert a lamina spreader posteriorly within the subtalar joint and expand it fully.
- Fluoroscopic Verification: Verify the distraction under fluoroscopy to determine the exact height restoration required. The talar head must align anatomically with the navicular. This alignment indicates the successful restoration of the medial column, the normal angle of talar declination, and the talocalcaneal angle.
Surgical Warning: Avoid placing a femoral distractor medially. It is cumbersome and significantly less effective than direct intraarticular distraction. Furthermore, strictly avoid incising the deltoid ligament from inside the subtalar joint; doing so renders the joint highly unstable and may result in catastrophic overdistraction of the bone graft.
Bone Grafting and Defect Management
When anatomic alignment is confirmed radiographically, measure the dimensions of the intraarticular defect with a sterile ruler.
- Autograft Contouring: Contour the previously excised lateral wall fragment to match the measured defect.
- Graft Placement: Place this autograft bone block within the distracted joint. The bone can be folded over on itself to obtain additional height if necessary. It is imperative that the graft completely fills the subtalar joint, as the height of the lateral calcaneus (and the graft) is usually equal to the width of the posterior facet.
- Supplemental Grafting: Additional cancellous allograft chips or demineralized bone matrix (DBM) may be packed into the debrided sinus tarsi to assist in achieving a solid fusion mass.
- Medial Tightness: If the joint remains excessively tight medially, place additional lamina spreaders in the sinus tarsi and the posterior facet of the subtalar joint to achieve balanced distraction.
Correction of Axial Malalignment (Type III Malunions)
In patients with a Type III malunion, correction of the axial malalignment is mandatory. Because rotation of the midfoot in the coronal plane around an anteroposterior axis (pronation-supination) will not correct a malpositioned calcaneal tuberosity that has healed in varus or valgus, a formal calcaneal osteotomy must be performed before the placement of definitive fixation for the subtalar arthrodesis.
- For Varus Malalignment: Perform a Dwyer lateral closing wedge osteotomy posterior to the posterior facet. If bone is removed during this closing wedge osteotomy, it should be morselized and used as supplemental graft material.
- For Valgus Malalignment: Perform a medial displacement calcaneal osteotomy with rotation. Alternatively, a laterally based opening wedge osteotomy can be utilized.
When the osteotomy is completed, insert the guide pins in the manner described below. By doing so, the osteotomy and the subtalar fusion can be compressed simultaneously.
Definitive Fixation
Rigid internal fixation is the cornerstone of a successful arthrodesis and osteotomy union.
- Pin Placement: With the subtalar joint held in neutral to slight valgus alignment (approximately 5 degrees of valgus), place two terminally threaded 3.2-mm guide pins percutaneously from the posterior plantar edge of the calcaneus.
- Trajectory: Advance the pins across the subtalar joint, perpendicular to the plane of the posterior facet, and into the talar dome. Angle the guide pins in a divergent fashion into the talar dome to maximize biomechanical stability.
- Avoid Penetration: Strictly avoid placing a pin into the lateral aspect of the ankle joint.
- Radiographic Confirmation: Obtain fluoroscopic anteroposterior (AP), mortise, and axial calcaneal radiographs to verify correct pin placement, screw length, and overall hindfoot alignment.
- Supplemental Fixation: If more stable fixation is required, place a third guide pin from the plantar margin of the anterior process of the calcaneus into the distal aspect of the talar neck and head. Take extreme care to avoid violating the talonavicular joint.
- Screw Insertion: Place large fragment, partially threaded (7.3 mm or 8.0 mm) cannulated screws over the guide wires in lag mode for definitive compression and fixation.
Wound Closure
Meticulous layered closure is critical to prevent wound dehiscence and deep infection, which are notorious complications of the extensile lateral approach.
- Drain Placement: Place a deep closed-suction drain exiting at the proximal tip of the vertical limb of the incision.
- Deep Layer Closure: Close the subperiosteal flap in a layered fashion. Pass interrupted 0 Vicryl sutures in the deep layers of the subperiosteal flap, angling the bites such that the flap is mechanically advanced toward the apex of the incision.
- Suture Management: Clamp the sutures with hemostats until all deep sutures have been placed. When completed, hand-tie the sutures sequentially, starting at the proximal and distal ends and working systematically toward the apex of the incision.
- Superficial Closure: Close the subcuticular layer in a similar fashion with interrupted 2-0 Vicryl. Close the skin with 3-0 nylon sutures, again starting at the ends and progressing toward the apex.
- Flap Shift: If aggressive height restoration prevents tension-free wound closure at the apex, the vertical limb of the incision can be extended proximally. This allows the flap to shift and rotate downward. The resulting proximal wound defect is left open to heal by secondary intention (granulation).
Postoperative Care and Rehabilitation
Postoperative protocols must be strictly tailored to the type of malunion corrected.
- Type I Malunions (Exostectomy/Soft Tissue Only): Patients are kept strictly non–weight bearing until the surgical incision has completely healed (typically 2 to 3 weeks). Once the wound is secure, physical therapy is initiated, focusing on early range-of-motion activities and gait training. Full weight bearing is usually permitted by 3 weeks postoperatively.
- Type II and Type III Malunions (Arthrodesis/Osteotomy): Patients are kept strictly non–weight bearing with the leg immobilized in a cast for a minimum of 12 weeks. Cast changes are performed every 4 to 6 weeks to monitor soft tissues and obtain serial radiographs. Progression to weight bearing and the initiation of physical therapy are permitted only after definitive radiographic evidence of union of the subtalar fusion mass and osteotomy sites is confirmed.
Management of Associated Ankle Malunions
Hindfoot malunions rarely exist in isolation; they are frequently accompanied by, or must be differentiated from, malunions of the ankle mortise. Osteotomies of the medial or lateral malleolus are highly recommended to correct uncomplicated deformities caused by recently malunited fractures of the ankle, primarily to diminish the long-term risk of post-traumatic arthritis.
The timing of intervention is critical. Displacement of the talus within the ankle mortise for more than 3 months may result in irreversible pathological changes in the articular cartilage, leading to a diminished potential for a satisfactory outcome with joint-preserving osteotomies alone. However, several authors have reported significant clinical improvement even in patients with displacement lasting longer than 3 months, provided that adequate, anatomically precise surgery is performed.
There is universal consensus that when the deformity has been of short duration and is corrected with minimal iatrogenic trauma to the articular surfaces, excellent functional outcomes can be obtained. The primary surgical objective is the absolute restoration of the normal weight-bearing alignment of the lower extremity and the precise anatomic relationships between the articular surfaces of the tibia, the fibula, and the talus. Displacement and residual tilt of the talus have been shown to drastically alter contact stresses across the tibiotalar joint, accelerating degenerative arthrosis.
Case Example: Revision of Bimalleolar Ankle Malunion
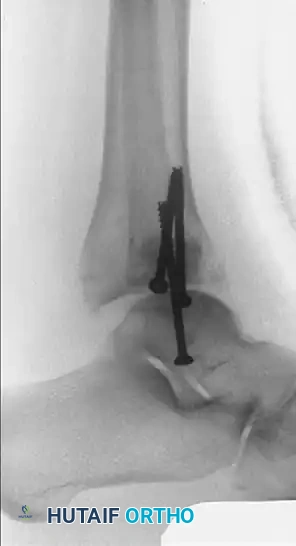
The following imaging sequence demonstrates the revision of a malunited bimalleolar ankle fracture.
Initially, the fracture was managed with interfragmentary screws in an elderly patient, which subsequently failed and progressed to a symptomatic malunion with talar shift.
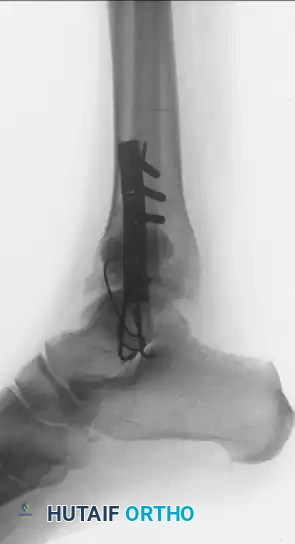
Figure A: Anteroposterior radiograph demonstrating malunion of a bimalleolar ankle fracture previously fixed with interfragmentary screws.
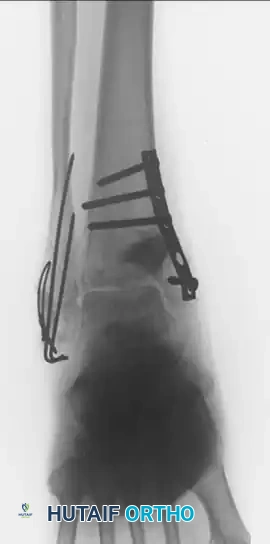
Figure B: Lateral radiograph of the same malunited bimalleolar fracture, highlighting the inadequate fixation and loss of sagittal alignment.
To salvage the joint and restore the mortise, a complex revision fixation was performed. The lateral malleolus was osteotomized, lengthened, and stabilized using a one-third tubular buttress plate combined with tension band fixation. The medial malleolus required structural hydroxyapatite grafting to fill the osseous defect created during the corrective osteotomy.

You Might Also Like
