Vessel Repair in Replantation: Advanced Microsurgical Techniques
Key Takeaway
Successful replantation relies on meticulous microsurgical vessel and nerve repair. This comprehensive guide details the critical steps of arterial and venous anastomosis, adventitial stripping, and tension-free coaptation. It covers advanced salvage techniques, including interpositional vein grafting and vessel shifting, alongside intraoperative spasm management and primary nerve repair protocols essential for restoring viability and functional outcomes in amputated digits.
INTRODUCTION TO MICROVASCULAR REPLANTATION
The success of digit and limb replantation hinges fundamentally on the meticulous execution of microvascular vessel repair. Re-establishing arterial inflow and venous outflow demands not only technical precision but also a profound understanding of vascular biomechanics, the pathophysiology of the "zone of injury," and the pharmacological management of vasospasm.
In the context of amputations—whether sharp, crushing, or avulsing—the visible transection of the vessel rarely represents the true extent of endothelial damage. The primary goal of vessel repair in replantation is to achieve a tension-free, intimal-to-intimal coaptation outside the zone of injury, thereby minimizing the risk of postoperative thrombosis and ensuring the long-term viability of the replanted part.
PREOPERATIVE PREPARATION AND EXPOSURE
Vessel Identification and Dissection
Dissection of the vessels in the palm, on the dorsum of the hand, and in the forearm is generally less tedious than in the digits due to the larger vessel caliber. However, the principles of atraumatic tissue handling remain paramount across all anatomical zones.
- Incision Planning: Dissection frequently requires a midpalmar incision paralleling the skin creases to avoid flexion contractures. On the dorsum of the hand and forearm, curved or zigzag (Brunner-type) incisions are utilized to provide wide exposure while preventing linear scar contracture over joints.
- Vessel Marking: Veins less than 1 mm in diameter may not be suitable for anastomosis and are highly susceptible to thrombosis. Identify and mark viable veins with small, brightly colored sutures (e.g., 8-0 nylon or silk tags) before proceeding to prepare the vessels for anastomosis.
- Mobilization: After all arteries and veins have been identified and marked, mobilize them by dissecting them free from the surrounding connective tissues using gentle, meticulous microsurgical technique.
Surgical Warning: Aggressive traction during mobilization can cause secondary intimal tearing. Always handle vessels by their adventitia, never by grasping the intima with micro-forceps.
Managing Side Branches
To achieve adequate mobilization for a tension-free anastomosis, small side branches and tributaries must be managed appropriately. Transect these branches using fine ligatures, micro-metal clips, or bipolar electrocautery. The choice of hemostasis depends on the size of the branch being sacrificed. When using bipolar cautery, ensure the current is kept low and applied strictly to the branch, avoiding thermal injury to the main vessel trunk.
VESSEL PREPARATION AND THE ZONE OF INJURY
Once the vessels have been mobilized, the surgeon must critically assess the gap between the viable vessel ends. This gap dictates whether the anastomoses can be accomplished primarily, requires additional bone shortening, or necessitates an interpositional vein graft.
Adventitial Stripping
Free the vessel of any adventitia that may be causing constriction. More importantly, excise the adventitia from the cut ends of the vessels for approximately 2 to 3 mm.
Clinical Pearl: The adventitia is highly thrombogenic. If adventitial fibers are dragged into the lumen during suture placement, they will act as a nidus for platelet aggregation and subsequent microvascular thrombosis.
Intimal Inspection and Resection
Irrigate the vessel with heparinized saline (100 U/mL) to clear intraluminal clots and visualize the endothelium. Use high-power magnification (operating microscope) to determine the true extent of the vessel wall injury.
- Thrombosis and Contusion: If evidence of thrombosis is found within the wall, or if the intima appears bruised, damaged, or separated from the media, the damaged segment must be excised.
- The "Telescoped" Intima: In avulsion injuries, the intima is frequently pulled out of the vessel, appearing "telescoped." This indicates severe longitudinal traction injury. Excise this portion of the vessel entirely until healthy, tethered intima is reached.
- Crush Injuries: Extensive avulsing or crushing injuries may cause vessel wall damage that extends centimeters beyond the skin wound. Failure to resect back to healthy intima is the leading cause of anastomotic failure.
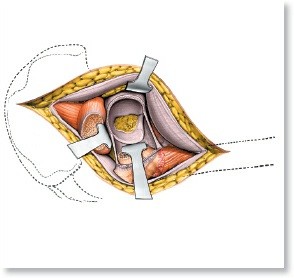
MICROSURGICAL ANASTOMOSIS TECHNIQUE
After vessel preparation is complete, proceed with the anastomoses. The standard order of repair typically follows bone fixation and extensor tendon repair, moving to arterial repair, venous repair, and finally nerve and flexor tendon repair, though this sequence may be modified based on ischemia time.
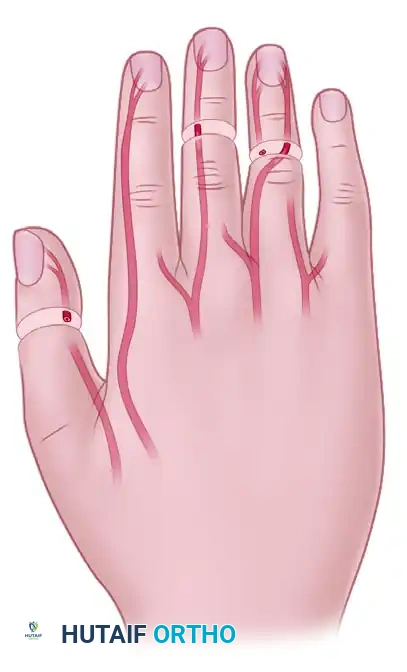
Arterial and Venous Ratios
Attempt to repair both digital arteries to maximize inflow and provide redundancy. For venous outflow, the golden rule is to repair as many veins as possible—preferably a ratio of two veins per artery repaired. Venous congestion is a more common cause of replantation failure than arterial insufficiency.
Microvascular Clamping
Use small vessel-approximating clips (e.g., Acland double micro-clamps) on the digital vessels to stabilize the ends during suturing. Similar, appropriately sized clips are available for larger vessels in the forearm.
Surgical Warning: Be acutely aware of the clamp time. Micro-vascular clips exert pressure on the endothelium. Time elapsed with clips in place should be kept to an absolute minimum—strictly less than 30 minutes—to prevent secondary crush injury to the delicate intima of 1 mm vessels.
Suture Selection and Placement
- Digital Vessels: Use 10-0 or 11-0 monofilament nylon sutures on a taper-point or spatulated micro-needle.
- Hand, Wrist, and Distal Forearm: 7-0 to 9-0 sutures are suitable.
- Proximal Forearm and Elbow: Larger vascular injuries require 6-0 and 7-0 sutures.
Most digital arteries require 6 to 8 interrupted sutures for a secure, leak-free anastomosis. Digital veins, being thinner-walled and more prone to collapse, typically require 8 to 10 sutures, and sometimes more.
Upon releasing the vascular clips, expect a small amount of blood leakage from the suture line. Do not immediately place additional sutures; this leakage usually stops within a few minutes as platelets plug the needle holes.
INTRAOPERATIVE SPASM AND ANTICOAGULATION
Vasospasm is a formidable enemy in microvascular surgery, often triggered by mechanical trauma, thermal changes, or circulating catecholamines.
Managing Vasospasm
After the vascular clips are released, immediately bathe the vessel in warm saline, lidocaine, or bupivacaine to minimize spasm. If persistent spasm is encountered, a multimodal topical approach is required:
* Topical lidocaine (20%)
* Papaverine (a direct smooth muscle relaxant)
* Reserpine
* Magnesium sulfate
Systemic Anticoagulation
While intraoperative and postoperative systemic heparinization has been widely used historically, modern protocols frequently favor a combination of low-molecular-weight dextran (LMWD) and aspirin for anticoagulation. This combination effectively reduces platelet adhesiveness and improves microcirculatory rheology without the severe bleeding risks associated with full systemic heparinization.
ADVANCED REVASCULARIZATION: VESSEL SHIFTING AND GRAFTING
At times, the arteries and veins are so severely damaged that no satisfactory proximal vessel is available to suture to the distal vessel, or adequate vessel débridement leaves a gap too large to correct by simple end-to-end repair. Attempting to close this gap under tension will inevitably lead to anastomotic failure.
In these scenarios, advanced salvage techniques are required to restore a viable digit.
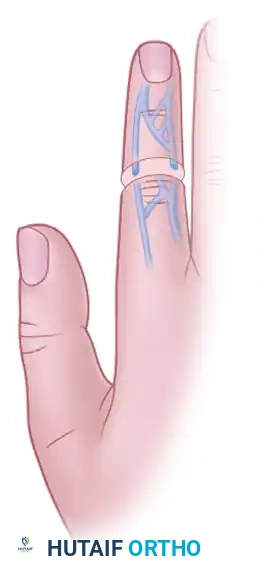
Arterial Transposition and Shifting
Arteries can be mobilized to allow the shifting of an artery from an intact, non-essential digit to vascularize a critical amputated part (e.g., the thumb). Alternatively, within the same digit, a proximal arterial stump can be shifted to vascularize the distal amputated part if the contralateral artery is irreparably damaged.
Arterial shifting techniques. Arteries are mobilized to allow shifting from an intact digit to vascularize the thumb (1), or within the same digit to vascularize the distal amputated part (2).
Venous Mobilization and Shifting
Similarly, dorsal veins can be extensively mobilized to provide additional distal veins for proximal anastomosis. This is particularly useful when the dorsal skin bridge is severely contused, destroying the local venous network.
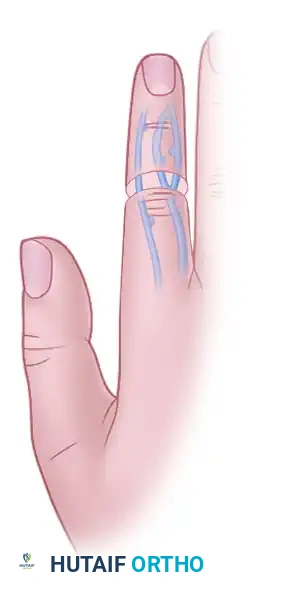
Venous shifting. Dorsal veins are mobilized and shifted to bridge defects and provide adequate venous outflow.
Alternative venous mobilization demonstrating the flexibility of the dorsal venous network in bridging traumatic gaps.
Interpositional Vein Grafting
When shifting is not possible, interpositional grafting with reversed segments of vein or arterial segments is indicated.
* Harvest Sites: Vein grafts are usually harvested from unsalvageable amputated parts, the dorsum of the hand or forearm, or the foot (e.g., saphenous vein branches).
* Sizing: The harvested vein grafts should have approximately the same diameter as the recipient vessel to prevent turbulent flow and thrombosis.
* Orientation: When vein grafts are used, extreme care must be taken to maintain the proper (reversed) flow direction. If placed in the antegrade direction, venous valves will obstruct arterial inflow, leading to immediate failure.
* Configurations: In situations where inflow is limited, a single vein graft anastomosed to a single digital artery proximally may be attached to two digital arteries distally, utilizing side-to-end anastomoses or a constructed Y-configuration of the graft.
NERVE REPAIR IN REPLANTATION
Restoration of perfusion is only the first step; functional recovery relies entirely on successful nerve regeneration.
Preparation of the Nerve Ends
When the proximal and distal ends of the nerve have been mobilized, inspect them using the operating microscope or magnifying loupes. Trim 3 to 5 mm of nerve from each end to remove crushed axoplasm and ensure healthy fascicles are exposed.
Primary Repair Techniques
If the injury has been sharp and clean, the nerves are usually repaired primarily.
* Digital Nerves: Use two to four epineurial stitches of 9-0 or 10-0 monofilament suture material to carefully align and approximate the fascicles.
* Proximal Nerve Trunks: For more proximal injuries (palm, wrist, forearm), dissect the respective nerve trunks using standard palmar incisions paralleling the skin creases. In these larger trunks, use a “group fascicular” or peripheral fascicular stitch to ensure accurate motor and sensory topographical alignment.
Management of Avulsion and Crush Nerve Injuries
If the amputated part has been avulsed, or if significant crushing makes the extent of intraneural injury unclear, primary end-to-end repair is contraindicated.
- Primary Nerve Grafting: Trim the nerve ends proximally and distally until normal-appearing nerve fascicles (exhibiting normal pouting) can be identified. Insert a nerve graft and secure it with microsuture techniques. Common donor sites include unreplantable amputated parts, the lateral antebrachial cutaneous nerve, and the sural nerve.
- Delayed Grafting (Preferred): Because of the additional operating time required for nerve grafting during an already lengthy replantation, and the uncertainty regarding the true extent of intraneural ischemic injury, many surgeons do not include primary nerve grafting in the index procedure. Instead, suture the ends of the avulsed or crushed nerve together with a single 8-0 mattress suture. This prevents retraction and maintains length, anticipating later elective nerve exploration, débridement, and grafting.
- Tissue Tagging: As an alternative, if the nerve ends cannot be brought together at all, secure them to the adjacent soft tissues (using non-absorbable marking sutures) so that they can be easily identified and mobilized during secondary reconstruction.
🔪 Surgical Technique 63-10: Digital Nerve Repair
- Exposure: With the dorsal and palmar skin flaps retracted, locate the digital nerves in the palmar flap. Anatomically, the digital nerves lie superficial (volar) to the digital arteries.
- Timing: Usually, the nerves can be repaired most easily after the arterial anastomoses have been completed and the clamps removed, as the restored bleeding helps identify viable tissue beds.
- Mobilization: Gently dissect the nerves free of the surrounding connective tissue. Mobilize them proximally and distally so that they can be repaired without excessive tension.
- Branch Management: Occasionally, it may be necessary to transect small, non-critical side branches to achieve sufficient mobilization of the main nerve trunk for a tension-free coaptation.
POSTOPERATIVE PROTOCOLS
Following successful vessel and nerve repair, the replanted part must be meticulously monitored. The patient is typically kept in a warm room to prevent environmentally induced vasospasm. Hydration is maintained to optimize intravascular volume.
Postoperative monitoring includes clinical assessment of color, capillary refill, and tissue turgor, often supplemented by objective measures such as continuous surface temperature monitoring or implantable Doppler probes. A drop in temperature of more than 2°C or an absolute temperature below 30°C is highly indicative of vascular compromise and warrants immediate surgical re-exploration. Anticoagulation protocols (aspirin, LMWD, or targeted heparinization) are continued based on the surgeon's assessment of the crush severity and the quality of the intraoperative anastomoses.
You Might Also Like