Coracoacromial Ligament Transfer for Chronic Acromioclavicular Joint Dislocation
Key Takeaway
Chronic, unreduced acromioclavicular (AC) joint dislocations often necessitate surgical reconstruction to restore shoulder biomechanics and alleviate pain. The transfer of the coracoacromial (CA) ligament, popularized by Rockwood and Neviaser, provides a robust biological solution. This procedure involves distal clavicle excision and the transposition of the CA ligament to recreate the stabilizing function of the native coracoclavicular complex, offering excellent long-term functional outcomes for patients with chronic AC instability.
INTRODUCTION AND BIOMECHANICAL RATIONALE
The management of chronic, unreduced acromioclavicular (AC) joint dislocations remains a complex challenge in orthopedic surgery. While acute injuries may often be managed conservatively or with primary repair, chronic dislocations (typically defined as those presenting more than three to four weeks post-injury) are characterized by the retraction, scarring, and biological incompetence of the native coracoclavicular (CC) and acromioclavicular ligaments. In these scenarios, primary repair is no longer viable, and anatomical or non-anatomical reconstruction is mandated to restore the suspensory mechanism of the shoulder girdle.
The transfer of the coracoacromial (CA) ligament serves as a cornerstone in the operative management of chronic AC joint instability. Originally conceptualized by Weaver and Dunn, the procedure utilizes the robust CA ligament as a biological substitute for the ruptured CC ligaments. Over the decades, master surgeons such as Rockwood and Neviaser have introduced critical modifications to optimize biomechanical stability, enhance biological healing, and minimize postoperative complications.
Understanding the distinct biomechanical philosophies of these approaches is essential for the practicing orthopedic surgeon. The Rockwood modification focuses on transferring the acromial attachment of the CA ligament into the medullary canal of the distal clavicle, whereas the Neviaser technique employs a reverse transfer, harvesting the coracoid attachment with a bone block and routing it over the acromion to the clavicle.
PREOPERATIVE EVALUATION AND INDICATIONS
Clinical Indications
Surgical reconstruction via CA ligament transfer is primarily indicated for:
* Chronic Type III Dislocations: In patients who are highly active, perform heavy manual labor, or have failed a rigorous trial of conservative management (minimum 3–6 months) and present with persistent pain and scapular dyskinesia.
* Chronic Type IV, V, and VI Dislocations: These high-grade injuries invariably disrupt the deltotrapezial fascia and result in severe biomechanical derangement, necessitating surgical intervention.
* Symptomatic Post-Traumatic Osteolysis: Cases where chronic instability has led to painful degenerative changes or osteolysis of the distal clavicle.
Contraindications
- Active local or systemic infection.
- Medically unfit patients with severe comorbidities.
- Asymptomatic chronic Type III dislocations in low-demand individuals.
- Previous surgical excision of the CA ligament (e.g., prior subacromial decompression), which precludes its use as a transfer graft.
Clinical Pearl: Always assess the patient for scapular dyskinesia. Chronic AC joint dislocation often leads to a "SICK scapula" syndrome (Scapular malposition, Inferior medial border prominence, Coracoid pain, and dysKinesis). Addressing the AC joint surgically must be coupled with rigorous postoperative scapular rehabilitation.
SURGICAL ANATOMY AND POSITIONING
Anatomic Considerations
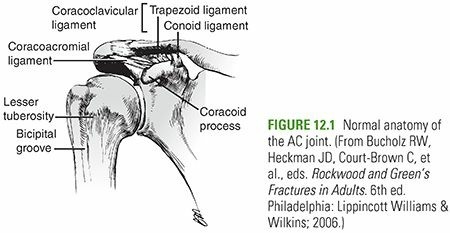
The stability of the AC joint relies on both static and dynamic restraints. The static restraints include the AC ligaments (providing primary resistance to anteroposterior translation) and the CC ligaments—the conoid and trapezoid (providing primary resistance to superior-inferior translation). The CA ligament, extending from the anterolateral undersurface of the acromion to the lateral border of the coracoid process, is a strong, broad band that forms the coracoacromial arch. Its robust nature makes it an ideal local autograft for CC ligament reconstruction.
Anesthesia and Positioning
- Anesthesia: General anesthesia is typically employed, often supplemented with an interscalene regional nerve block for optimal postoperative pain control.
- Positioning: The patient is placed in the beach-chair position with the head secured and the operative arm draped free. This allows for dynamic assessment of the AC joint and unrestricted access to the superior shoulder girdle.
- Preparation: Ensure that the entire forequarter is prepped and draped to allow manipulation of the arm, which aids in reducing the clavicle during fixation.
SURGICAL TECHNIQUE 1: THE ROCKWOOD MODIFICATION
The Rockwood technique builds upon the classic Weaver-Dunn procedure by emphasizing meticulous preparation of the distal clavicle and secure intramedullary fixation of the transferred CA ligament.
Step 1: Incision and Exposure
- Make a skin incision over the distal clavicle, carefully following the lines of Langer around the shoulder to ensure an optimal cosmetic result.
- Carry the dissection down through the subcutaneous tissue to the deltotrapezial fascia.
- Expose the distal clavicle subperiosteally. Meticulous subperiosteal dissection is critical to preserve the fascial sleeves, which will be repaired at the conclusion of the procedure to provide dynamic stability.
Step 2: Distal Clavicle Resection
- Resect approximately 2.5 cm of the distal clavicle.
- Rationale: Resecting this specific amount prevents postoperative impingement between the remaining clavicle and the acromion, a common source of persistent pain in inadequate resections.
Surgical Pitfall: Resecting more than 3 cm of the distal clavicle can compromise the insertion of the trapezius and deltoid muscles, leading to profound weakness and further destabilization of the shoulder girdle. Strictly adhere to the 2.5 cm limit.
Step 3: Preparation of the Medullary Canal
- Utilize a drill and curet to hollow out the medullary canal of the remaining distal clavicle.
- The canal must be adequately widened and smoothed to receive the transferred CA ligament without causing abrasion or strangulation of the graft.
Step 4: Harvest and Transfer of the Coracoacromial Ligament
- Identify the CA ligament. Using a scalpel, carefully detach the acromial attachment of the CA ligament from the anteroinferior aspect of the acromion.
- Mobilize the ligament to ensure adequate excursion.
- Pass heavy, non-absorbable traction sutures through the free end of the CA ligament using a Krackow or whipstitch technique.
- Draw the ligament into the prepared medullary canal of the distal clavicle. Fixation can be achieved via transosseous sutures passed through superior drill holes in the clavicle.
Alternative: The Dewar and Barrington Procedure
If the individual anatomical situation requires a dynamic stabilization approach, the Dewar and Barrington modification may be employed.
* This operation involves an osteotomy of the tip of the coracoid process.
* The coracoid tip, along with its attached conjoint tendon (short head of the biceps and coracobrachialis), is transferred to the inferior surface of the clavicle.
* This transfer utilizes the downward pull of the conjoint tendon muscles to dynamically hold the lateral end of the clavicle in a reduced position. Fixation is typically achieved with a cortical screw.
SURGICAL TECHNIQUE 2: THE NEVIASER TECHNIQUE
The Neviaser technique represents a paradigm shift, utilizing a reverse transfer of the CA ligament. By harvesting the coracoid attachment with a bone block and routing it over the acromion, this technique aims to provide superior biomechanical leverage and bone-to-bone healing.
Step 1: Incision and Deltoid Takedown
- Make a slightly curved incision beginning medially over the lateral half of the clavicle and ending laterally at the lateral border of the acromion.
- Carefully strip the deltoid muscle from the lateral third of the clavicle.
- Note: The deltoid must be elevated as a continuous full-thickness sleeve to facilitate a robust repair during closure.
Step 2: Joint Exposure and Preservation
- Expose the CA ligament and the dislocated AC joint.
- Crucial Instruction: Do not disturb the ruptured acromioclavicular ligaments, the coracoclavicular ligaments, or the intra-articular disc. Preserving this scar tissue provides a scaffold for secondary healing and adds to the ultimate stability of the construct.
Step 3: Reduction and Kirschner Wire Fixation
- Anatomically reduce the AC joint.
- Fix the joint by inserting a 1.6 mm diameter Kirschner wire (K-wire) through the skin, traversing the acromion, and entering the clavicle.
- Technical Tip: This maneuver is often simplified by retrograde insertion. Drive the wire first through the center of the acromial articular surface, out through the lateral skin, reduce the joint, and then drive it antegrade into the clavicle.
- To prevent the wire from working loose or migrating, embed its medial tip firmly into the dense cortex of the clavicle near the apex of its lateral curve.
Surgical Warning: K-wire migration is a historically severe complication in AC joint surgery, with reports of wires migrating into the thoracic cavity, lungs, or mediastinum. Bending the lateral end of the wire beneath the skin and embedding the medial tip into the far cortex are absolute mandatory steps to prevent catastrophic migration.
Step 4: Harvest of the CA Ligament (Coracoid End)
- Identify the medial (coracoid) attachment of the CA ligament.
- Free this medial end by resecting a small piece of bone from the lateral border of the coracoid process that includes the ligamentous attachment. This bone block will facilitate rapid osseous integration at the transfer site.
Step 5: Routing and Fixation of the Ligament
- Turn the CA ligament over the superior surface of the acromion.
- Fix it to the acromion using three absorbable sutures passed through the adjacent soft tissues.
- Bring the transferred ligament over the AC joint to the superior surface of the clavicle.
- Prepare the recipient site on the superior clavicle by aggressively roughening the cortical bone with a burr or rasp to create a bleeding bed for the bone block.
- Drill two vertical holes through the clavicle at the prepared site.
- Fix the ligament and its bone block to the clavicle using heavy absorbable sutures passed through these drill holes.
- Pass an additional suture circumferentially around the ligament and the clavicle to definitively secure the small bone fragment and the new ligament in place.
Step 6: Closure
- Meticulously suture the deltoid muscle back to the clavicle. A secure deltotrapezial fascial repair is paramount; failure to do so will result in a postoperative deltoid hernia and profound weakness.
- Cut off the lateral end of the Kirschner wire just beneath the skin and bend the end sharply to prevent medial migration.
- Close the subcutaneous tissues and skin in a standard layered fashion.
POSTOPERATIVE CARE AND REHABILITATION PROTOCOL
The success of a CA ligament transfer relies as much on strict postoperative adherence to rehabilitation protocols as it does on surgical execution. The transferred ligament requires time to undergo biological incorporation and ligamentization.
Phase I: Maximum Protection (Weeks 0 to 5)
- Immobilization: Immediately postoperatively, apply a modified Velpeau bandage or a high-quality shoulder immobilizer with an abduction pillow. The weight of the arm must be supported to prevent inferior traction on the newly reconstructed ligaments.
- Wound Care: The wound is dressed, and the K-wire site (in the Neviaser technique) is inspected strictly every week for signs of superficial infection or wire migration.
- Range of Motion (ROM): Gentle passive motions of the shoulder are carried out weekly under the direct supervision of the surgeon or a specialized physical therapist when the wound is dressed. Active ROM of the elbow, wrist, and hand is encouraged to prevent distal stiffness.
Phase II: Hardware Removal and Active Motion (Week 5 to Week 8)
- Hardware Removal: At exactly 5 weeks postoperative, the Kirschner wire is removed in the clinic under local anesthesia.
- Progression of ROM: Following wire removal, the patient is transitioned out of the immobilizer. Active-assisted and active ROM exercises are initiated.
- Strengthening: Isometric strengthening of the deltoid and rotator cuff begins. Scapular stabilization exercises (e.g., retractions, shrugs) are emphasized to correct any underlying dyskinesia. Normal activities of daily living (ADLs) are gradually resumed.
Phase III: Return to Function (Week 8 and Beyond)
- Advanced Strengthening: Isotonic strengthening is introduced.
- Sports Restrictions: Competitive sports, heavy lifting, and overhead manual labor must be strictly avoided for a minimum of 8 weeks. For contact sports (e.g., rugby, American football, ice hockey), return to play is generally delayed until 4 to 6 months postoperatively, contingent upon the restoration of symmetrical shoulder strength and dynamic stability.
COMPLICATIONS AND MANAGEMENT
Orthopedic surgeons must be vigilant regarding potential complications associated with CA ligament transfers:
- Hardware Migration: As emphasized, K-wires can migrate. Routine radiographic surveillance is required until the wire is removed at 5 weeks.
- Loss of Reduction: Can occur due to premature return to activity, failure of the suture fixation, or poor tissue quality. If asymptomatic, it may be observed; if symptomatic, revision with an allograft or synthetic suspensory device may be required.
- Deltoid Detachment: Results from inadequate repair of the deltotrapezial fascia. Presents as an anterior shoulder defect and weakness in forward elevation. Requires prompt surgical re-attachment.
- Distal Clavicle Osteolysis: May occur if the resection in the Rockwood technique is inadequate, leading to painful impingement. Treated with subsequent arthroscopic or open distal clavicle excision.
By adhering to the meticulous surgical steps outlined by Rockwood and Neviaser, and enforcing a strict, phased rehabilitation protocol, the orthopedic surgeon can reliably restore function and stability to the chronic, unreduced acromioclavicular joint.
📚 Medical References
- coracoacromial ligament transfer, Clin Orthop Relat Res 185:222, 1984.
- Larsen E, Petersen V: Operative treatment for chronic acromioclavicular dislocation, Injury 18:55, 1987.
- Nettles JL, Linscheid RL: Sternoclavicular dislocations, J Trauma 8:158, 1968.
- Rockwood CA Jr: Subluxations and dislocations about the shoulder. In Rockwood CA Jr, Green DP, eds: Fractures in adults, 2nd ed, Philadelphia, 1984, Lippincott. Rockwood CA Jr, Groh GI, Wirth MA, et al: Resection arthroplasty of the sternoclavicular joint, J Bone Joint Surg 79A:387, 1997.
- [Speed K: A textbook of fractures and dislocations, 4th ed, Philadelphia, 1942, Lea & Febiger.
Shoulder Adams JR: Recurrent dislocation of the shoulder, J Bone Joint Surg 30B:26, 1948.](https://pubmed.ncbi.nlm.nih.gov/?term=Speed%20K%3A%20A%20textbook%20of%20fractures%20and%20dislocations%2C%204th%20ed%2C%20Philadelphia%2C%201942%2C%20Lea%20%26%20Febiger.%0A%0AShoulder%20Adams%20JR%3A%20Recurrent%20dislocation%20of%20the%20shoulder%2C%20J%20Bone%20Joint%20Surg%2030B%3A26%2C%201948.)
- Ahmadain AM: The Magnuson-Stack operation for recurrent anterior dislocation of the shoulder: a review of 38 cases, J Bone Joint Surg 69B:111, 1987.
- Ahovuo J, Paavolainen P, Jaaskinen J: Arthrotomography of the unstable shoulder, Acta Orthop Scand 59:681, 1988.
- Allain J, Goutallier D, Gloriaon C: Long-term results of the Laterjet procedure for the treatment of anterior instability of the shoulder, J Bone Joint Surg 80A:841, 1998.
- Altchek DW: Arthroscopic shoulder stabilization using a bioabsorbable fi xation device, Sports Med Arthrosc Rev 1:266, 1993.
You Might Also Like