Chronic AC Joint Dislocation: Coracoacromial Ligament Reconstruction
Key Takeaway
Chronic acromioclavicular (AC) joint dislocations often require surgical reconstruction when conservative management fails. The modified Weaver-Dunn procedure utilizes the coracoacromial (CA) ligament transferred into the distal clavicle to restore stability. By incorporating a bone block from the acromion, surgeons achieve superior bone-to-bone healing. Temporary coracoclavicular fixation with a Bosworth lag screw protects the reconstruction during the critical 12-week healing phase, ensuring optimal biomechanical restoration and functional recovery.
Introduction to Acromioclavicular Joint Reconstruction
The management of chronic, unreduced acromioclavicular (AC) joint dislocations—specifically Rockwood Types III, IV, V, and VI—remains a complex challenge in operative orthopaedics. When conservative management fails, patients frequently present with chronic pain, shoulder fatigue, scapular dyskinesia, and a visually prominent distal clavicle. In these chronic settings (typically defined as injuries older than 3 to 4 weeks), primary repair of the coracoclavicular (CC) ligaments is no longer viable due to tissue retraction and degeneration. Consequently, anatomical or non-anatomical ligamentous reconstruction is mandated.
The classic Weaver-Dunn procedure, first described in 1972, revolutionized the treatment of chronic AC joint instability by transferring the coracoacromial (CA) ligament to the distal clavicle to substitute for the ruptured CC ligaments. However, the original technique relied on ligament-to-bone healing, which biomechanical studies have shown to be the weakest link, often leading to elongation, loss of reduction, and clinical failure.
To address these biomechanical shortcomings, modern operative orthopaedics employs critical modifications. The technique detailed herein incorporates the Copeland and Kessel modification (utilizing an acromial bone block for superior bone-to-bone healing) and the Rockwood and Cadenat modification (for CA ligament lengthening), augmented by rigid, temporary coracoclavicular fixation using a Bosworth lag screw.
Surgical Anatomy and Biomechanics
A profound understanding of the dynamic and static stabilizers of the AC joint is prerequisite for successful reconstruction.
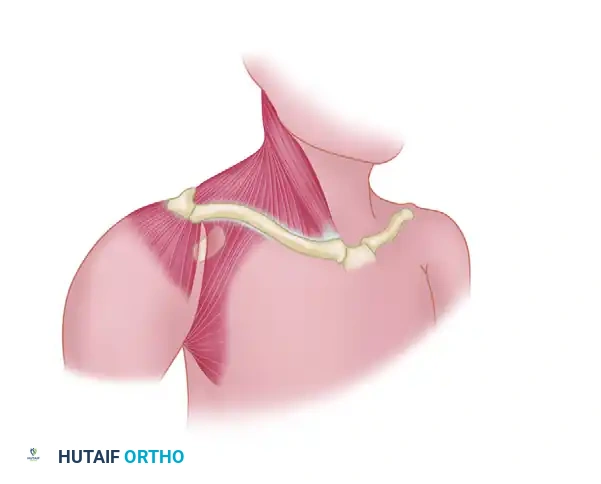
- Acromioclavicular (AC) Ligaments: The superior, inferior, anterior, and posterior AC ligaments primarily control horizontal (anteroposterior) translation. The superior AC ligament is the most robust and blends with the deltotrapezial fascia.
- Coracoclavicular (CC) Ligaments: Comprising the conoid (medial) and trapezoid (lateral) ligaments, these are the primary restraints to superior vertical translation of the clavicle.
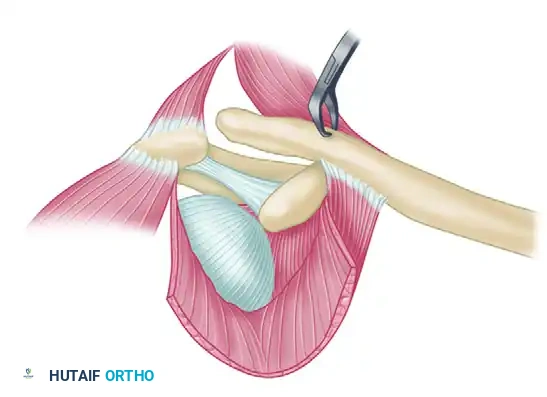
- Coracoacromial (CA) Ligament: A strong, triangular band extending from the coracoid process to the acromion. While its primary native function is to prevent superior migration of the humeral head, its robust tensile strength makes it an ideal autograft for CC ligament reconstruction.
Clinical Pearl: Harvesting the CA ligament removes the primary restraint against superior humeral head escape. Therefore, this procedure is strictly contraindicated in patients with massive, irreparable rotator cuff tears, as it will precipitate rapid superior migration of the humeral head and subsequent cuff tear arthropathy.
Preoperative Planning and Patient Positioning
Imaging Requirements
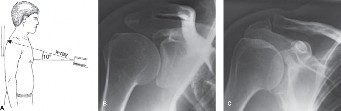
Standard radiographic evaluation must include an anteroposterior (AP) view of the shoulder, a Zanca view (10 to 15 degrees cephalad tilt) to isolate the AC joint, and an axillary lateral view to rule out posterior displacement of the distal clavicle (Type IV dislocation). Bilateral stress radiographs may be utilized to assess the degree of dynamic instability, though their routine use has diminished with the advent of MRI, which can definitively evaluate the integrity of the CC ligaments and the articular disc.
Positioning and Anesthesia
- Anesthesia: A combination of general endotracheal anesthesia and a regional interscalene nerve block is highly recommended for optimal muscle relaxation and postoperative pain control.
- Positioning: The patient is placed in the beach-chair position with the head secured in a neutral position. The operative arm must be draped free to allow full manipulation.
- Preparation: A bump may be placed under the medial border of the scapula to protract the shoulder girdle, facilitating access to the posterior aspect of the AC joint.
Surgical Technique: Step-by-Step Reconstruction
1. Surgical Approach and Exposure
A saber-cut incision or a transverse incision following the Langer lines over the distal clavicle is utilized. The incision begins approximately 2 cm medial to the AC joint and extends laterally toward the tip of the coracoid process.
- Deltotrapezial Fascia: Meticulous dissection is required to elevate the deltotrapezial fascia as a continuous, robust sleeve. The anterior deltoid is subperiosteally elevated off the anterior aspect of the distal clavicle and the anterior acromion.
- Joint Debridement: The AC joint is exposed, and the intra-articular meniscus (articular disc) is excised. The distal clavicle is mobilized by releasing any remaining scarred AC capsule.
2. Distal Clavicle Excision and Coracoacromial Ligament Harvest
To prevent postoperative AC joint arthrosis and to create space for the ligament transfer, approximately 10 to 15 mm of the distal clavicle is resected using an oscillating saw. The cut should be perpendicular to the long axis of the clavicle.
Next, attention is turned to the CA ligament. Instead of sharply detaching the ligament from the acromion (which necessitates ligament-to-bone healing), the Copeland and Kessel modification is employed.
- Bone Block Harvest: Using a sharp, narrow osteotome or a rongeur, remove a sliver of bone from the undersurface of the acromion in continuity with the CA ligament insertion.
- Biomechanical Advantage: This bone block allows for bone-to-bone fixation within the medullary canal of the distal clavicle, significantly accelerating incorporation and increasing the ultimate pull-out strength of the reconstruction.
Surgical Warning: Ensure the bone block is appropriately sized. If it is too large, it will not fit into the medullary canal of the clavicle; if it is too thin, it risks fracturing during suture passage and tensioning.
3. Ligament Mobilization and Suture Preparation
Once the CA ligament is harvested with its acromial bone block, its length must be assessed. If the ligament is too short to reach the distal clavicle without excessive tension, the Rockwood and Cadenat modification is utilized.
- Ligament Lengthening: Detach the anterior fasciculus of the CA ligament off the waist of the coracoid process. This maneuver safely provides several additional millimeters of excursion without compromising the structural integrity of the primary ligamentous band.
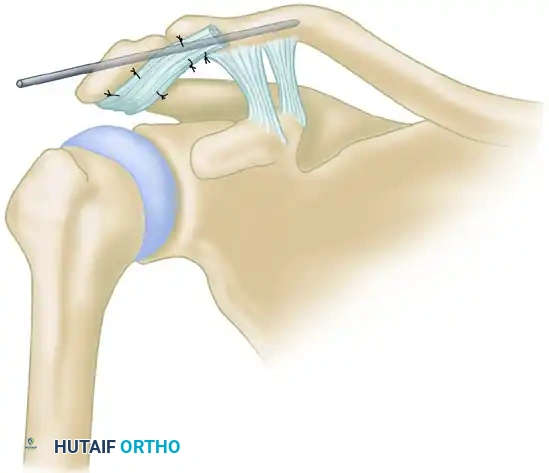
- Suture Passage: Pass a heavy, nonabsorbable braided suture (e.g., #2 or #5 FiberWire or Ethibond) back and forth through the ligament and the bone block using a Krackow or locking whipstitch technique. Ensure that the two free ends of the suture exit through the acromial end of the ligament/bone block construct.
4. Preparation of the Clavicle and Coracoid
The medullary canal of the resected distal clavicle is prepared to receive the bone block.
* Use a curette or a small burr to hollow out the cancellous bone of the distal clavicle, creating a socket approximately 15 to 20 mm deep.
* Drill two small holes (typically 2.0 mm) into the superior cortex of the distal end of the clavicle, communicating directly with the newly created medullary socket.
Next, prepare for the temporary coracoclavicular fixation:
* Drill a hole through the distal clavicle directly above the base of the coracoid process.
* Reduction: The clavicle is manually reduced to its anatomical position relative to the coracoid. Downward pressure is applied to the clavicle while an assistant elevates the arm to lift the scapula and coracoid.
* Coracoid Drilling: With the clavicle held rigidly in the corrected position, insert a drill bit through the clavicular hole and drill directly through both the superior and inferior cortices of the base of the coracoid process.
Pitfall: Drilling the coracoid too anteriorly or medially can lead to cortical blowout or neurovascular injury. The drill must be aimed at the central base of the coracoid, which is the most robust portion of the bone.
5. Coracoclavicular Fixation and Ligament Docking
With the osseous tunnels prepared, the reconstruction is finalized.
- Suture Routing: Pass the two free ends of the heavy suture (attached to the CA ligament) into the medullary canal of the clavicle and out through the two small holes drilled in the superior cortex. Do not tie them yet.
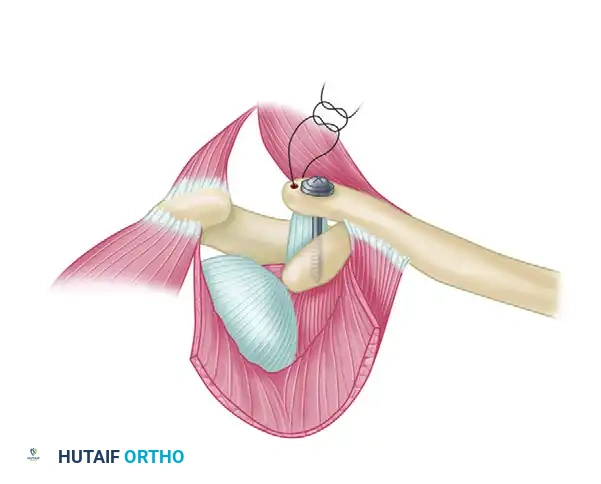
- Lag Screw Insertion: Pass a lag screw (traditionally a Bosworth screw, or a modern 4.5 mm fully threaded cortical screw with a washer) through the clavicle and into the coracoid. Tighten the screw to hold the clavicle in its anatomically reduced position just above the coracoid. This screw acts as an internal splint, completely offloading the CA ligament transfer during the critical healing phase.
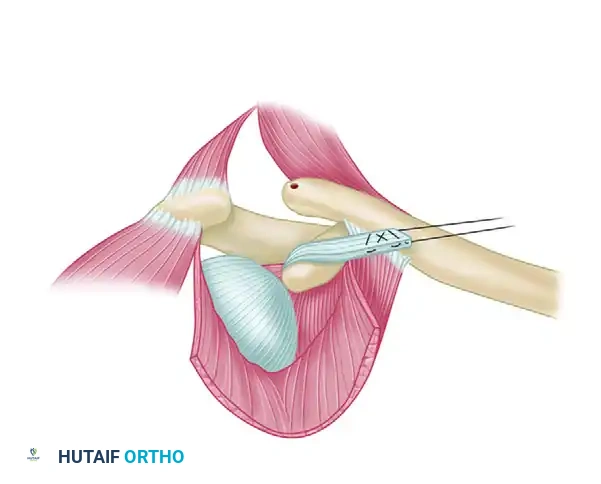
- Ligament Docking: With the clavicle rigidly fixed, pull the suture ends to draw the CA ligament and its attached bone block deep into the medullary canal of the clavicle.
- Final Fixation: Tighten and securely tie the two ends of the suture over the superior bony bridge of the clavicle.
6. Closure
Meticulous closure is critical to prevent hardware prominence and infection. The deltotrapezial fascia must be imbricated and repaired securely over the distal clavicle and the reconstruction site using heavy absorbable sutures. The subcutaneous tissue and skin are closed in a standard layered fashion.
Arthroscopic Considerations
While the open modified Weaver-Dunn procedure remains a gold standard for chronic reconstructions, modern advancements have introduced minimally invasive alternatives. More recently, Boileau et al. reported similar reconstructions performed primarily arthroscopically with excellent short-term results.
Arthroscopic techniques often utilize synthetic cortical buttons and high-tensile suture tapes to recreate the CC ligaments, sometimes augmented with a biologic graft (such as a semitendinosus allograft) woven in a figure-of-eight fashion. While arthroscopy minimizes deltotrapezial disruption and allows for the evaluation of concomitant glenohumeral pathology (e.g., SLAP tears), the open CA ligament transfer with bone-block fixation remains a highly reliable, cost-effective, and biomechanically sound option, particularly in revision scenarios or resource-limited settings.
Postoperative Care and Rehabilitation Protocol
The postoperative rehabilitation phase is as critical as the surgical execution. Because the reconstruction relies on biological healing of the bone block within the clavicle, the construct must be protected from excessive tensile forces.
Phase I: Protection (Weeks 0 to 6)
- Immobilization: The patient is placed in a standard shoulder sling.
- Activity: The patient is allowed to use the arm for basic activities of daily living (ADLs) at waist level (e.g., eating, writing).
- Restrictions: Strict prohibition against any heavy lifting, pushing, pulling, or elevation of the arm above 90 degrees.
- Exercises: Pendulum exercises, elbow/wrist/hand range of motion, and scapular retractions are initiated immediately.
Phase II: Intermediate Motion (Weeks 6 to 12)
- Sling Weaning: The sling is gradually discontinued.
- Range of Motion: Active-assisted and active range of motion exercises are progressed. Elevation above 90 degrees is cautiously introduced.
- Strengthening: Isometric strengthening of the deltoid and rotator cuff begins.
Phase III: Hardware Removal and Advanced Strengthening (Week 12+)
- Screw Removal: At exactly 12 weeks postoperatively, the coracoclavicular lag screw must be removed. This is typically performed as a minor day-case procedure under local anesthesia or light sedation.
- Rationale for Removal: The normal AC joint is a diarthrodial joint that requires rotation and translation during overhead elevation. Leaving a rigid screw across the coracoclavicular interval permanently will inevitably lead to screw breakage, clavicular osteolysis, or restricted shoulder mechanics.
- Return to Sport: Following screw removal, aggressive strengthening and sport-specific rehabilitation commence. Full return to contact sports is generally permitted at 5 to 6 months postoperatively, provided symmetric strength and painless range of motion have been achieved.
Complications and Pitfalls
Despite meticulous technique, complications can arise:
1. Hardware Failure: Breakage of the Bosworth screw can occur if the patient is non-compliant with postoperative restrictions or if the screw is left in place beyond 12 to 14 weeks.
2. Loss of Reduction: Can occur if the bone block fails to integrate, or if the sutures pull through the ligament. The use of the Copeland and Kessel bone block modification significantly mitigates this risk.
3. Clavicular Osteolysis or Fracture: Over-drilling the clavicle or placing the screw eccentrically can create a stress riser, leading to iatrogenic fracture.
4. Infection: Superficial or deep infections require prompt aggressive management, potentially necessitating hardware removal and debridement.
By adhering strictly to the biomechanical principles of bone-to-bone healing, ensuring rigid temporary fixation, and enforcing a disciplined postoperative protocol, the orthopaedic surgeon can achieve excellent, durable outcomes in the reconstruction of chronic acromioclavicular joint dislocations.
You Might Also Like