Clinical Case Study: Diagnosing Right Ring Finger Stenosing Tenosynovitis
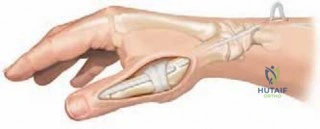
Key Takeaway
Trigger finger is primarily diagnosed through clinical examination, identifying focal tenderness at the A1 pulley, a palpable nodule, and characteristic catching during active finger extension. Imaging like X-rays typically appears normal, serving to rule out other bony pathologies. Patient history of pain and locking also guides diagnosis.
A 58-year-old seamstress presents with a 6-month history of a painful, "clicking" right ring finger. She has type 2 diabetes. On examination, there is tenderness over the A1 pulley and a palpable nodule. The finger locks in flexion and requires passive assistance to extend. How would you classify this presentation and what is your immediate management plan?
Candidate: This patient has a stenosing tenosynovitis of the ring finger. Based on Quinnell’s classification, this is Grade III because it locks and requires passive extension. Since she has already failed a steroid injection, I would discuss surgical options, specifically an open A1 pulley release, given her history of diabetes and the risk of recurrence.
Candidates often jump immediately to "surgery" without mentioning the differential diagnosis or acknowledging the patient's comorbidities. They may also fail to specify the classification system used or ignore the risks associated with her diabetes, such as the potential for poor wound healing or higher recurrence rates.
The candidate should structure the answer: 1. Confirm the diagnosis of stenosing tenosynovitis. 2. Define the severity using Quinnell’s Classification (Grade III). 3. Acknowledge the patient factors (Type 2 Diabetes as a risk for recurrence). 4. Detail the management: Since she has failed a primary corticosteroid injection (the first-line conservative management), surgical intervention via an Open A1 Pulley Release is indicated. Mention that in diabetic patients, open release is preferred over percutaneous to ensure complete release and protect neurovascular structures under direct vision.
You decide to proceed to surgery. You are performing an open A1 pulley release. The patient is prepped and draped. Walk me through the critical steps of your surgical technique to ensure patient safety and avoid complications.
Candidate: I would use a transverse incision at the distal palmar crease. I would perform blunt dissection through the subcutaneous fat, identify and protect the digital neurovascular bundles, then incise the A1 pulley longitudinally, ensuring I do not damage the A2 pulley. Finally, I would verify the release by having the patient, or an assistant, move the finger to ensure it no longer clicks.
Missing the identification of the digital neurovascular bundles is a major safety error. Candidates often fail to mention checking for "bowstringing" or inadvertent injury to the A2 pulley, which is a critical anatomical landmark that must be preserved.
A systematic, safety-first approach: 1. Use a transverse incision in the distal palmar crease. 2. Blunt dissection to identify the sheath. 3. Crucial: Direct visualization and retraction of the radial and ulnar digital neurovascular bundles. 4. Longitudinal release of the A1 pulley only, avoiding the A2 pulley to prevent bowstringing. 5. Confirm complete release by observing full, smooth tendon glide through the pulley area. 6. Meticulous hemostasis and early active range of motion post-operatively.