Expert Guide: Ulna and Wrist External Fixation Pin Placement
Key Takeaway
This article provides essential research regarding Expert Guide: Ulna and Wrist External Fixation Pin Placement. The ulna allows half pin insertion along its palpable length, with the ulnar nerve being a proximal concern. Radius pin placement is complex: proximal avoids due to the posterior interosseous nerve; middle uses mini-open dorsal pins; distal allows safe lateral insertion, avoiding superficial radial nerve branches via incision. The wrist frequently uses percutaneous pinning or external fixation for distal radial fractures.
Introduction and Epidemiology
External fixation of the upper extremity, specifically involving the radius, ulna, and wrist, remains a cornerstone technique in orthopedic traumatology. While internal fixation has seen significant advancements with volar locking plates and intramedullary devices, external fixation provides critical utility in the management of complex, comminuted, or open fractures where soft tissue compromise precludes immediate internal osteosynthesis. The primary objective of external fixation is to provide rigid skeletal stabilization while preserving the biological envelope, adhering to the principles of damage control orthopedics.
Epidemiologically, distal radius fractures account for approximately 17% of all skeletal fractures treated in emergency departments. High-energy mechanisms, such as motor vehicle collisions or falls from a significant height, often result in intra-articular comminution, metaphyseal bone loss, and severe soft tissue injury. In these scenarios, spanning external fixation utilizes the principle of ligamentotaxis to restore radial length, volar tilt, and radial inclination. Forearm diaphyseal fractures, particularly open Monteggia or Galeazzi fracture-dislocations, also frequently necessitate temporary or definitive external fixation.
The successful application of an external fixator in the forearm and wrist requires an intimate understanding of the regional anatomy. The relationships of the radius and ulna to the surrounding neurovascular structures are fundamentally different, dictating distinct pin placement strategies for each bone. Iatrogenic nerve injury, particularly to the superficial branch of the radial nerve (SBRN) and the posterior interosseous nerve (PIN), represents a significant and avoidable complication. This comprehensive guide details the precise anatomical considerations, surgical techniques, and biomechanical principles required for optimal ulna and wrist external fixation.

Surgical Anatomy and Biomechanics
A profound comprehension of cross-sectional forearm anatomy is non-negotiable for safe external fixation pin placement. The forearm is divided into fascial compartments, and the neurovascular structures traverse these compartments in predictable, yet complex, three-dimensional pathways.
Anatomy of the Ulna
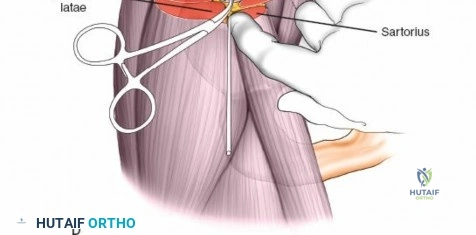
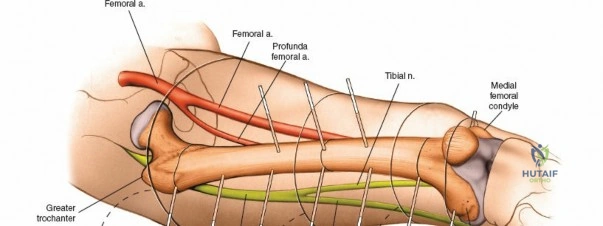
The ulna serves as the stable axis of forearm rotation. It possesses an easily palpable subcutaneous surface throughout its entire length, extending from the olecranon proximally to the ulnar styloid distally. This subcutaneous border is the primary safe zone for pin insertion. The ulnar nerve enters the forearm on the anteromedial aspect of the ulna, passing posterior to the medial epicondyle through the cubital tunnel. It then passes rapidly into the anterior compartment of the forearm, coursing distally on the anterior aspect of the bone alongside the ulnar artery, deep to the flexor carpi ulnaris (FCU). In the proximal end of the ulna, the ulnar nerve is at risk during pin placement. However, because it can be palpated easily as it crosses the back of the medial epicondyle of the humerus, safe pin placement in the subcutaneous surface is achievable through careful anatomical landmarking.

Anatomy of the Radius
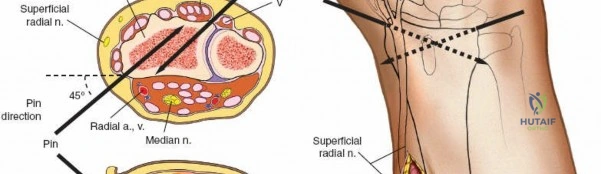
The radius poses a significantly higher risk for iatrogenic injury during pin placement due to its muscular envelope and the proximity of major nerves. The radial artery and the sensory branch of the radial nerve run distally down the forearm roughly on the anterolateral aspect of the radius, deep to the brachioradialis.
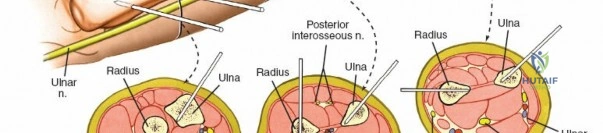
The posterior interosseous nerve (PIN) winds around the proximal third of the radius in an anterolateral to posteromedial direction. It passes through the supinator muscle (entering at the Arcade of Frohse) and lies in direct proximity to the periosteum of the proximal radius. Because radial fractures nearly always involve a rotational deformity of the bone—driven by the opposing forces of the biceps brachii and supinator proximally versus the pronator teres and pronator quadratus distally—the exact position of the posterior interosseous nerve in the proximal third of the radius cannot be predicted safely using percutaneous methods.
Anatomy of the Wrist and Metacarpals
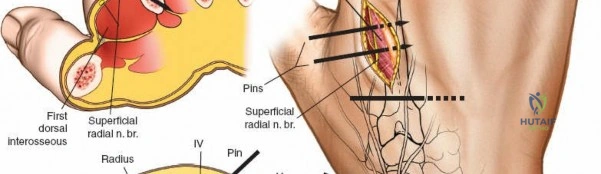
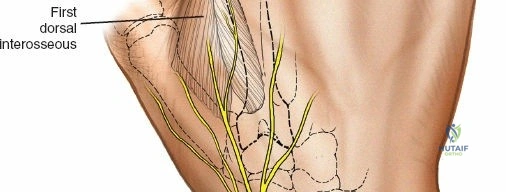
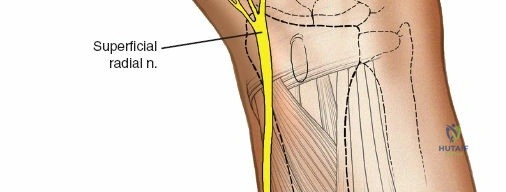
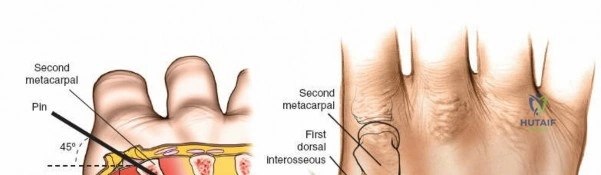
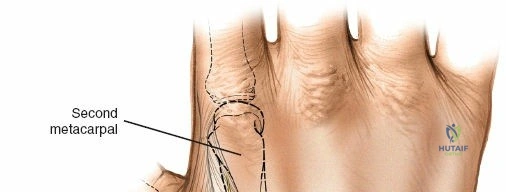
The superficial branch of the radial nerve (SBRN) emerges from beneath the brachioradialis approximately 9 cm proximal to the radial styloid. It then branches out to provide sensation to the dorsoradial aspect of the hand. These branches are highly variable in their anatomical course over the distal third of the radius and the radiocarpal joint. The dorsal aspect of the second metacarpal bone is largely subcutaneous, lying between the first dorsal interosseous muscle and the extensor digitorum communis (EDC) tendons, making it an ideal site for distal fixation in spanning frames.
Biomechanics of External Fixation
The stability of an external fixator frame is governed by several controllable variables. The stiffness of the frame is proportional to the fourth power of the pin radius; therefore, maximizing pin diameter (without exceeding 30% of the bone's diameter to avoid stress risers) is paramount. Increasing the spread of the pins within each bone segment, decreasing the bone-to-rod distance, and utilizing multiplanar configurations further enhance construct rigidity. In the context of distal radius fractures, spanning fixators rely on ligamentotaxis. Tension applied across the radiocarpal ligaments (specifically the radioscaphocapitate and radiolunotriquetral ligaments) reduces the fracture fragments.
Indications and Contraindications
The decision to utilize external fixation in the forearm and wrist must be based on a thorough assessment of the fracture pattern, soft tissue envelope, and the patient's overall physiological status.

External fixation is the treatment of choice for severe open fractures (Gustilo-Anderson Types II, IIIA, IIIB, IIIC) where immediate internal fixation would carry an unacceptably high risk of deep infection. It is also highly indicated in damage control orthopedics for polytraumatized patients, allowing for rapid skeletal stabilization to mitigate systemic inflammatory response syndrome (SIRS).
In the wrist, external fixation is utilized for complex intra-articular fractures that are not amenable to internal fixation due to extreme comminution or osteopenia. If the distal radial fragment is large enough, nonspanning external fixators can be used. However, spanning external fixators (from the distal radius to the second metacarpal) remain the standard for severe articular disruption.
| Indication Profile | Operative (External Fixation) | Non-Operative / Alternative |
|---|---|---|
| Soft Tissue Status | Severe crushing, burns, open wounds (Gustilo II-III) | Intact skin, minimal swelling (ORIF preferred) |
| Fracture Pattern | Highly comminuted intra-articular, bone loss | Simple extra-articular (Casting or ORIF) |
| Patient Physiology | Hemodynamically unstable (Damage Control) | Stable, isolated injury |
| Infection | Active osteomyelitis, infected non-union | Sterile environment |
| Bone Quality | Severe osteopenia (adjunct to K-wires) | Normal bone density (Plating preferred) |

Contraindications are primarily relative. An uncooperative patient who cannot adhere to pin site care protocols is at a high risk for pin tract infections. Pre-existing profound neurological deficits in the extremity may also alter the surgical decision-making process.
Pre Operative Planning and Patient Positioning
Meticulous preoperative planning is essential for successful external fixation. Standard orthogonal radiographs (anteroposterior and lateral) of the forearm and wrist are mandatory. In cases of complex intra-articular distal radius fractures, a non-contrast computed tomography (CT) scan is highly recommended to delineate articular step-offs, gap formations, and the exact number of articular fragments.
Templating should determine the appropriate pin sizes. For the radius and ulna diaphysis, 3.0 mm or 4.0 mm half pins are typically utilized. For the second metacarpal, 2.5 mm or 3.0 mm pins are appropriate to prevent iatrogenic fracture. The external fixator system (e.g., modular rod-to-pin clamps, carbon fiber rods) should be selected based on the required frame geometry.
The patient is positioned supine on the operating table with the affected extremity extended on a radiolucent hand table. A pneumatic tourniquet is placed proximally on the brachium. While percutaneous pinning is often performed without tourniquet inflation, having it available is critical if a mini-open approach requires a bloodless field for nerve identification. The fluoroscopy unit (C-arm) should be positioned to enter from the foot or the head of the hand table, allowing for unobstructed orthogonal imaging without compromising the sterile field.
Detailed Surgical Approach and Technique
The surgical technique for pin placement varies significantly depending on the anatomical zone. Adherence to safe corridors and meticulous soft tissue handling are paramount.
Ulnar Pin Placement
Half pins can be inserted throughout the entire length of the ulna from either side of the subcutaneous surface of that bone. The approach is straightforward due to the lack of overlying muscle mass on the posterior border.
For diaphyseal placement, a longitudinal stab incision is made over the palpable crest. Blunt dissection with a hemostat is carried down to the periosteum. A drill sleeve is firmly seated against the bone to protect the soft tissues during drilling and pin insertion. In the proximal end of the ulna, the ulnar nerve is at risk. It must be palpated easily as it crosses the back of the medial epicondyle of the humerus. Pin placement in the proximal ulna should be directed from lateral to medial or strictly posterior to anterior, ensuring the drill bit and pins do not plunge medially into the cubital tunnel or the flexor pronator mass.

Radial Pin Placement
The radius is divided into three distinct zones for the purpose of external fixation, each carrying specific neurovascular risks.
Proximal Third of the Radius
The proximal third of the radius is the most perilous zone for percutaneous intervention. The posterior interosseous nerve winds around the proximal third of the radius in an anterolateral to posteromedial direction and is intimately applied to the bone. Because radial fractures nearly always involve a rotational deformity of the bone, the exact position of the posterior interosseous nerve in the proximal third of the radius cannot be predicted safely.
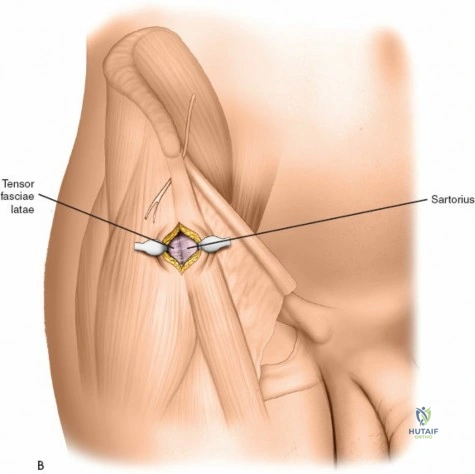
For this reason, percutaneous or blind pin placement in the upper third of this bone is strictly contraindicated. If fixation is mandatory in this segment, it must be performed as an open procedure. A dorsal approach (Thompson) or volar approach (Henry) must be utilized to directly visualize and protect the PIN before any drilling occurs.

Middle Third of the Radius
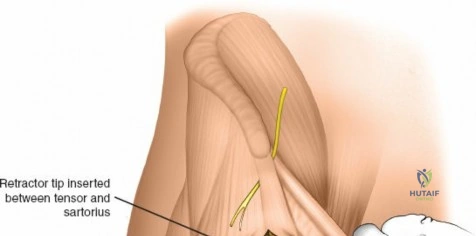
In the middle third of the radius, dorsally inserted half pins can be used with a mini-open technique. The incision is made between the extensor carpi radialis brevis (ECRB) and the extensor digitorum communis (EDC). Blunt dissection is carried down to the bone. The use of a tissue protection sleeve is mandatory. The surgeon must remain vigilant of the PIN, which lies deep to the extensor mass in the proximal aspect of this zone.
Distal Third of the Radius
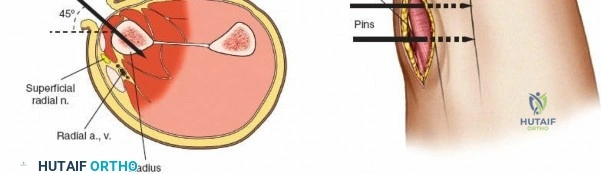
In the distal third of the radius, the lateral insertion of half pins is generally safe. The radial artery passes anterior to these pins and is protected by the brachioradialis tendon. However, the branches of the superficial radial nerve are highly variable in position as they fan out over the anatomic snuffbox and dorsal wrist.
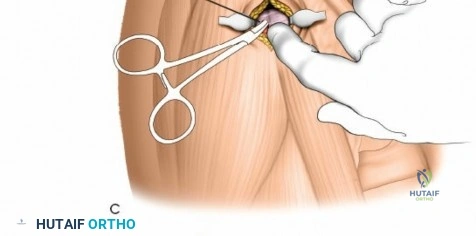
Because of this variability, it is imperative to make a small incision and dissect down to the bone to avoid them, rather than inserting pins blindly. A 1 to 2 cm longitudinal incision is made. Subcutaneous tissues are spread longitudinally using a fine hemostat. Once the bone is reached, a periosteal elevator can be used to clear a small footprint for the drill sleeve.

Wrist Joint and Carpus
Percutaneous pinning is frequently used in the treatment of distal radial fractures. Pins are commonly inserted through the radial styloid or through the dorsal aspect of the distal radius. Insertion of pins through the fracture site (intrafocal pinning, commonly referred to as the Kapandji technique) is also a widely utilized method to buttress the articular fragments and restore volar tilt.
When applying a spanning external fixator, the frame spans the carpus from the distal radius to the second metacarpal, with half pins used in both bones.

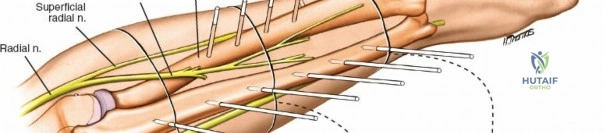
For the radial pins in a spanning construct, the superficial branch of the radial nerve always runs very close to the insertion point. Damage to the superficial branch of the radial nerve creates an area of anesthesia on the dorsum of the wrist and thumb, but the most common and debilitating complication following damage to the nerve is the creation of a painful neuroma, which can be devastating to the patient.
To mitigate this, place distal radial pins using a strict open technique. Make 1-cm skin incisions and carefully deepen the incision down to the bone using blunt dissection, taking care to identify and retract any branches of the nerve. Pins should be inserted in the transverse plane at 45 degrees to the frontal plane and 45 degrees to the sagittal plane; two pins are usually used to provide adequate biomechanical hold.
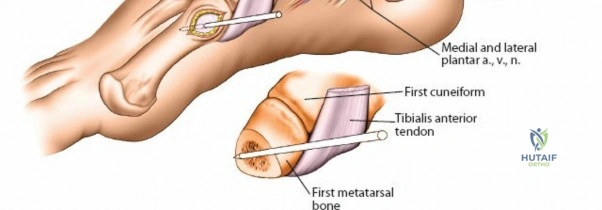
Second Metacarpal Bone
The dorsal aspect of the second metacarpal bone is subcutaneous and provides excellent purchase for the distal pins of a spanning wrist fixator. Pins should be spread widely in the bone to increase the strength of the frame, typically placing one pin in the proximal metaphysis and one in the distal metaphysis.

Because the bone is relatively small, fluoroscopy is highly useful to aid accurate pin placement and prevent cortical blowout. The inclination of the metacarpal pins should be identical to those of the radial pins to facilitate easy rod application without inducing torque on the frame. As with the distal radius, a longitudinal skin incision should be made, and the dissection should be carried down to the bone bluntly, protecting the extensor tendons and dorsal venous network.
Complications and Management
External fixation of the upper extremity is not without inherent risks. Complications can range from minor pin tract issues to severe iatrogenic nerve injuries that permanently compromise hand function.
Pin tract infection is the most ubiquitous complication, occurring in up to 20-30% of cases. These are typically superficial and respond well to local pin care and oral antibiotics. However, deep infections can lead to ring sequestrum, osteomyelitis, and pin loosening, necessitating immediate pin removal and debridement.
Iatrogenic nerve injury, particularly to the SBRN during distal radius pin placement or the PIN during proximal radius manipulation, is a severe complication. As previously discussed, an SBRN neuroma is profoundly painful. If a nerve injury is suspected intraoperatively, the pin must be removed immediately. If recognized postoperatively, frame modification or removal may be required, alongside neuropathic pain management and potential surgical exploration.
Over-distraction of the radiocarpal joint during spanning fixation is a technical error that leads to delayed union, non-union, and severe complex regional pain syndrome (CRPS) or intrinsic minus hand deformity. The joint should be distracted only enough to restore length and alignment, ideally maintaining no more than 1-2 mm of radiocarpal joint space widening under fluoroscopy.
| Complication | Estimated Incidence | Prevention and Salvage Strategies |
|---|---|---|
| Pin Tract Infection | 15% - 30% | Prevention: Pre-drilling, tissue sleeves, daily chlorhexidine care. Salvage: Oral antibiotics, pin exchange, or early removal. |
| SBRN Injury / Neuroma | 2% - 5% | Prevention: Mini-open technique, blunt dissection to bone. Salvage: Pin removal, gabapentinoids, surgical neuroma excision/burial. |
| Loss of Reduction | 5% - 10% | Prevention: Multiplanar pins, maximum pin spread, adequate torque. Salvage: Frame revision, conversion to internal fixation. |
| Over-distraction / CRPS | 3% - 8% | Prevention: Fluoroscopic verification of joint space, avoid excessive traction. Salvage: Frame adjustment, aggressive hand therapy, sympathetic blocks. |
| Iatrogenic Fracture | 1% - 3% | Prevention: Use pins <30% of bone diameter, avoid unicortical placement. Salvage: Bypass fracture with longer frame, ORIF. |
Post Operative Rehabilitation Protocols
The postoperative management of a patient with an external fixator is as critical as the surgical application itself. Immediate postoperative protocols necessitate elevation of the extremity to manage edema, which is a primary driver of postoperative stiffness and CRPS.
Active and passive range of motion of all uninvolved joints must commence immediately. For spanning wrist fixators, this means aggressive digital mobilization (full composite flexion and extension of the metacarpophalangeal and interphalangeal joints), as well as elbow and shoulder range of motion. The intrinsic muscles of the hand are prone to contracture if the metacarpophalangeal joints are maintained in extension; therefore, intrinsic stretching exercises are mandatory.
Pin site care protocols vary by institution, but evidence supports daily or twice-daily cleaning with a 2mg/ml chlorhexidine solution or sterile saline. Crusts that form at the pin-skin interface should be removed to prevent the accumulation of serous fluid, which can act as a nidus for infection.
External fixators for distal radius fractures are typically maintained for 6 to 8 weeks, depending on radiographic evidence of bridging callus and clinical stability. Upon removal, which is often performed
