Masterclass in Distal Humeral Fractures: Surgical Techniques, Biomechanics, and Outcomes
Key Takeaway
Distal humeral fractures present complex reconstructive challenges, often involving severe articular comminution in osteoporotic bone. Successful management requires anatomical articular reduction and rigid bicolumnar fixation to permit early mobilization. This guide details evidence-based surgical approaches—including olecranon osteotomy and triceps-sparing techniques—alongside advanced biomechanical plating principles. Mastery of these techniques minimizes complications such as stiffness and ulnar neuropathy, optimizing functional outcomes in both young and elderly patients.
Introduction to Distal Humeral Fractures
The management of distal humeral fractures represents one of the most formidable challenges in orthopedic trauma surgery. Despite continuous advancements in implant technology, surgical approaches, and standardized rehabilitation protocols, these injuries remain notoriously difficult to treat. They frequently involve severe articular comminution and predominantly occur in a bimodal distribution: high-energy trauma in young patients and low-energy falls in older patients with osteoporotic bone.
Because the elbow joint is highly unforgiving, joint function is frequently compromised by postoperative stiffness, pain, and weakness. A perfectly "normal" elbow is a rare outcome following a complex intra-articular fracture; however, meticulous surgical technique can reliably restore functional range of motion and stability. Unlike fractures of the proximal humerus or humeral shaft, the vast majority of distal humeral fractures in adults mandate operative intervention.
Clinical Pearl: Nonoperative treatment, historically referred to as the "bag of bones" technique, is generally reserved for elderly, low-demand patients with profound medical comorbidities where surgical intervention poses an unacceptable risk to life. In these cases, brief immobilization followed by early gravity-assisted motion is utilized to salvage a functional, albeit deformed, pseudoarthrosis.
Surgical Anatomy and Biomechanics
Understanding the biomechanics of the distal humerus is critical for preoperative planning and successful internal fixation. The distal humerus is best conceptualized as a structural triangle comprising two distinct columns (medial and lateral) that support the articular segment (the trochlea and capitellum).
- The Lateral Column: Diverges from the humeral shaft at approximately 20 degrees. It is broad, flat, and terminates in the capitellum.
- The Medial Column: Diverges at approximately 45 degrees and terminates in the medial epicondyle. It is more tubular and structurally rigid.
- The "Tie-Arch": The articular surface (specifically the trochlea) acts as a tie-arch connecting the two columns, creating a rigid triangular construct that resists torsional and bending forces.
Classification Systems
The complexity of these injuries is reflected in the numerous attempts to classify them. Accurate classification dictates the surgical approach and fixation strategy.
The AO/OTA Classification
The AO/OTA system is the most universally recognized, dividing fractures into three primary categories based on articular involvement:
* Type A: Extra-articular fractures (supracondylar).
* Type B: Partially articular fractures (isolated medial or lateral column).
* Type C: Completely articular fractures (no portion of the articular surface remains attached to the diaphysis).
The Jupiter and Mehne Classification
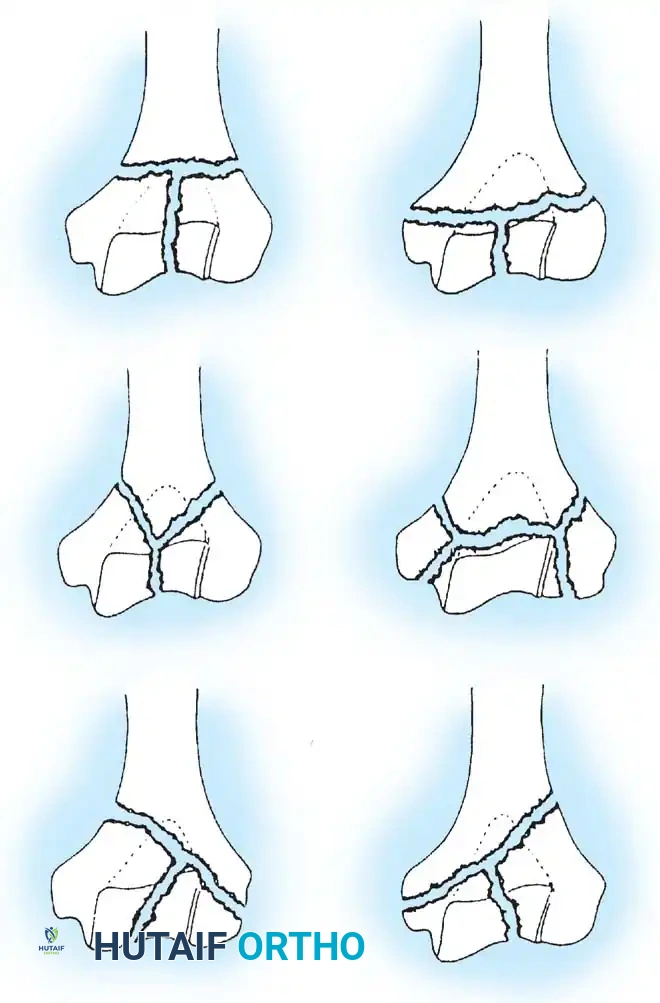
While the AO/OTA system defines up to 61 subgroups, the classification system proposed by Jupiter and Mehne is highly pragmatic for preoperative planning. Based on the "two-column" and "tie-arch" concepts, it categorizes complex bicolumnar fractures according to the geometric configuration of the fracture lines.
Fig. 1: Mehne and Matta classification of distal humeral fractures, demonstrating High T, Low T, Y, H, and Medial/Lateral Lambda configurations.
Principles of Internal Fixation
The ultimate goal of operative treatment is the anatomical restoration of the articular surface combined with bicolumnar fixation rigid enough to permit immediate, active-assisted range of motion.
Isolated Column Fractures (AO/OTA Type B)
Lateral or medial column fractures can typically be reduced through a direct, localized approach. They are most effectively stabilized using a combination of interfragmentary lag screws and a minifragment buttress plate to resist shear forces.
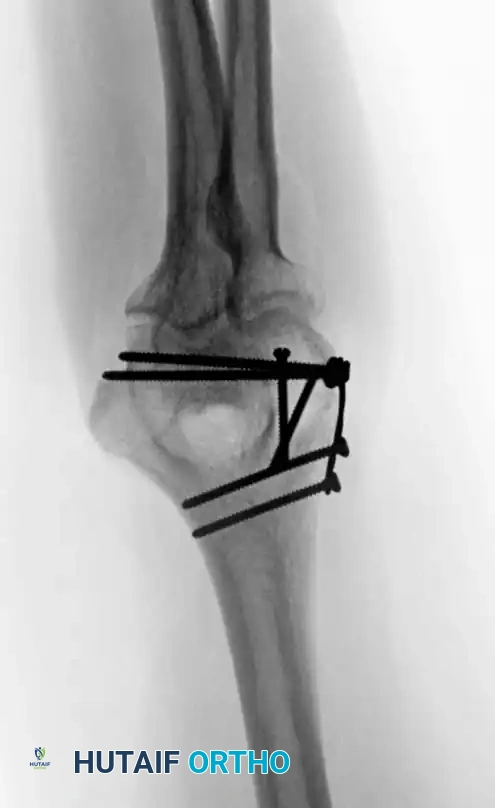
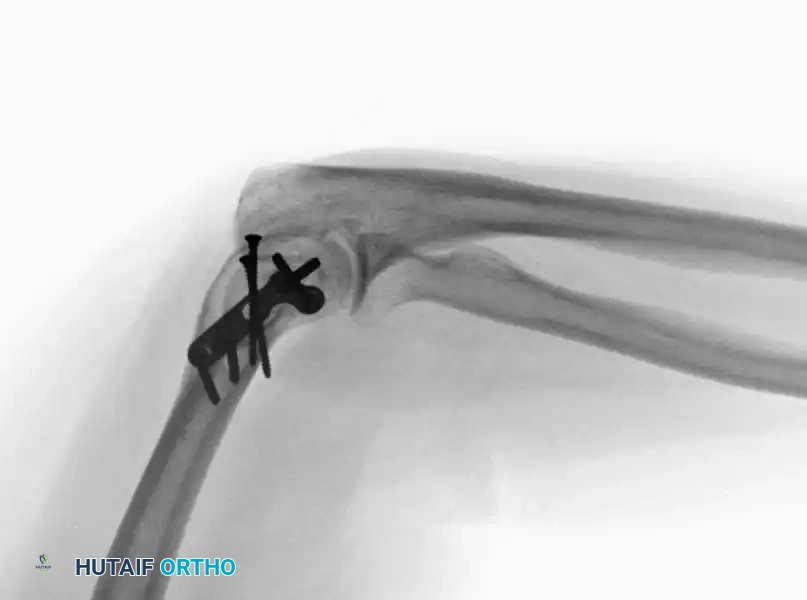
Fig. 2: Isolated lateral condylar fracture fixed with a lag screw and minifragment buttress plate.
Complex Intra-articular Fractures (AO/OTA Type C)
Type C fractures demand comprehensive bicolumnar reconstruction. The difficulty of achieving stable fixation is inversely proportional to the height of the transverse fracture component (lower fractures are harder to fix) and directly proportional to the degree of comminution.
Sanchez-Sotelo et al. established critical biomechanical objectives for distal humeral fracture fixation, which should be strictly adhered to:
Surgical Objectives for Bicolumnar Fixation:
* Every screw should pass through a plate.
* Each screw should engage a fragment on the opposite side that is also fixed to a plate.
* Maximize the number of screws placed into the distal articular fragments.
* Each screw should be as long as possible to maximize bone purchase.
* Screws should engage as many articular fragments as possible.
* Plates must be applied to achieve dynamic compression at the supracondylar level for both columns.
* The chosen plates must possess sufficient stiffness to resist bending or fatigue failure before bony union occurs.
Plating Configurations: Orthogonal vs. Parallel
Historically, the standard technique involved placing plates at orthogonal angles (90-90 plating), typically with a medial plate applied to the medial ridge and a lateral plate applied to the posterior surface of the lateral column.
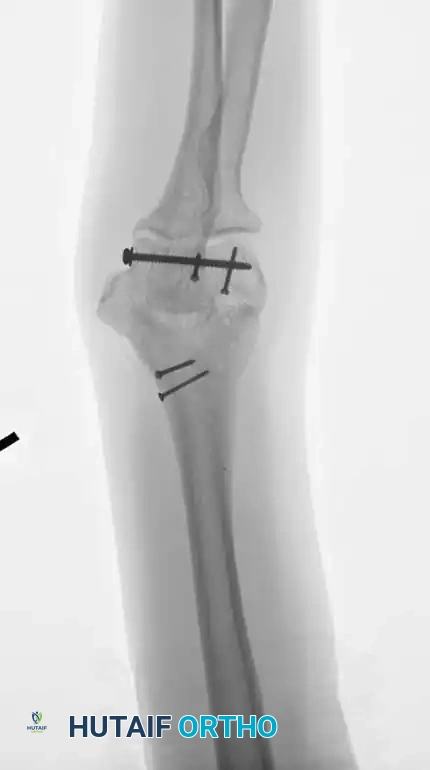
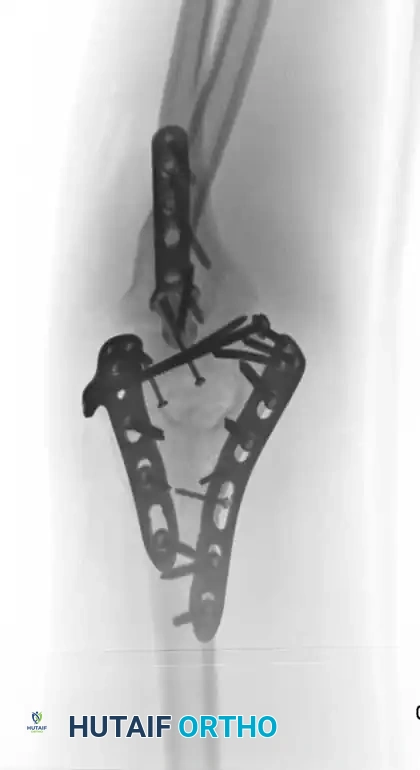
Fig. 3: Supracondylar fracture with intra-articular extension fixed with 90-90 locked plates through an olecranon osteotomy approach, and subsequent hardware removal.
However, modern biomechanical studies (e.g., Self et al., Schemitsch et al.) have demonstrated that parallel plating (direct medial and direct lateral plating) provides superior resistance to torsional forces and axial loading, particularly in the presence of severe metaphyseal comminution. Precontoured anatomical locking plates have largely replaced one-third tubular and 3.5-mm reconstruction plates, which are prone to fatigue failure in complex patterns.
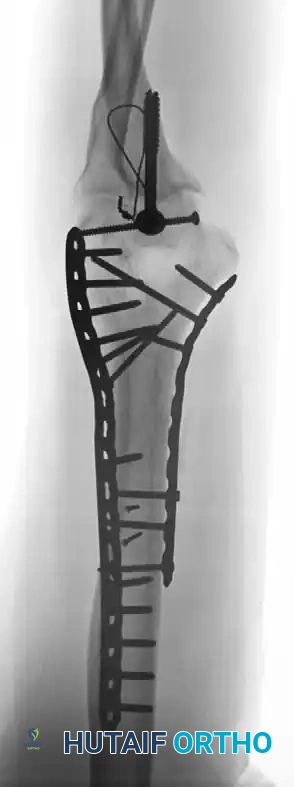
Fig. 4: Distal humeral fracture with intra-articular extension managed with direct medial and lateral parallel plate fixation.
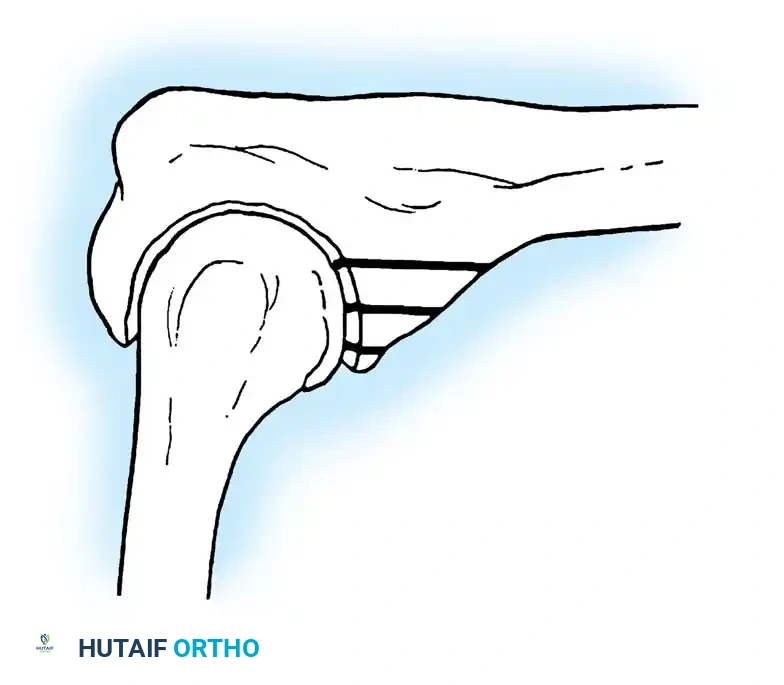
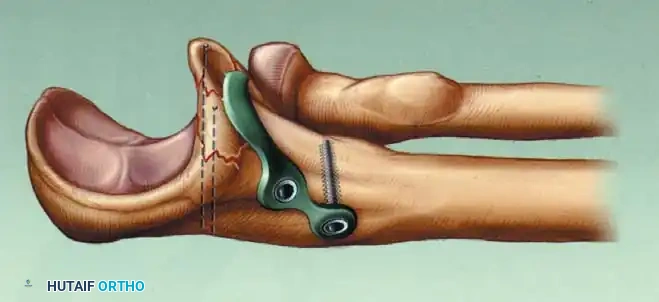
Fig. 5: Intraoperative and radiographic views demonstrating robust bicolumnar parallel plating.
Management of Osteochondral Fragments
Small, free osteochondral fragments that cannot be incorporated into the primary plate construct should be fixed using headless compression screws, countersunk minifragment screws, or bioabsorbable pins. Care must be taken to bury the screw heads beneath the articular cartilage to prevent mechanical abrasion of the radial head or olecranon.
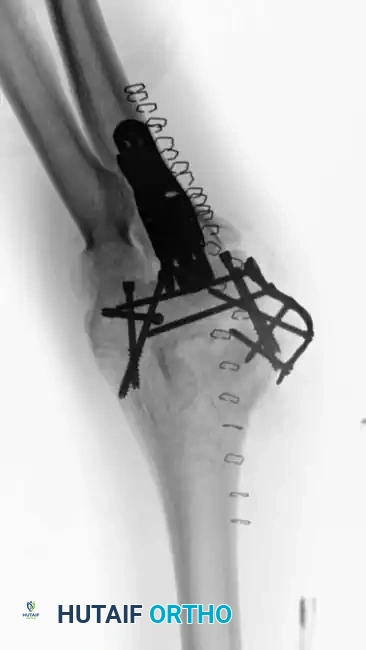
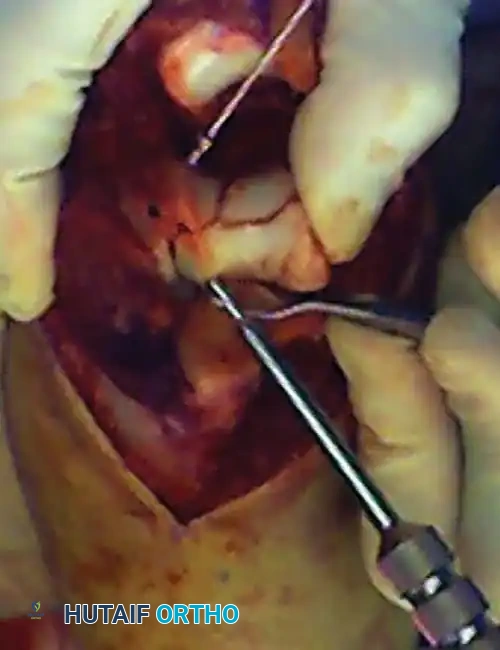
Fig. 6: Fixation of a small osteochondral fragment with an absorbable screw, and a very distal intercondylar fracture fixed with headless screws and minifragment buttress plating.
Surgical Approaches
The choice of surgical approach is dictated by the fracture pattern, the need for articular visualization, and the surgeon's familiarity with the anatomy.
1. Posterior Approach with Olecranon Osteotomy
The trans-olecranon approach remains the gold standard for complex Type C fractures, providing unparalleled, direct visualization of the entire distal humeral articular surface.
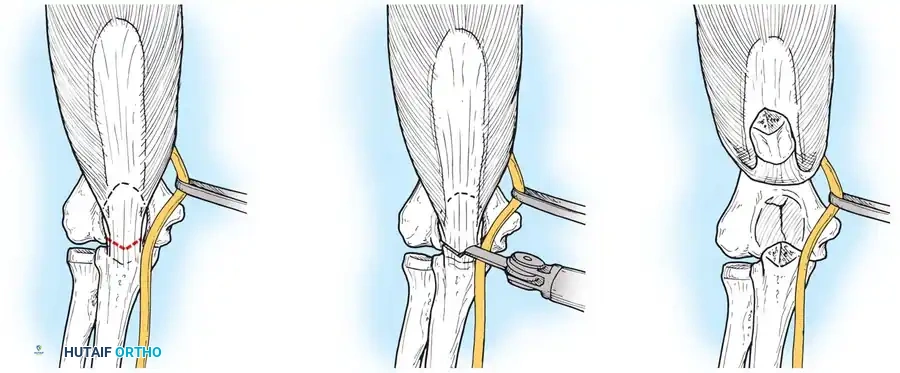
Fig. 7: Olecranon osteotomy approach. A chevron-shaped osteotomy is marked, initiated with an oscillating saw, and completed with an osteotome to preserve subchondral bone interdigitation.
Surgical Steps:
1. Positioning: The patient is placed in the lateral decubitus position with the arm draped over a radiolucent post.
2. Incision: A posterior midline incision is made, curving laterally around the tip of the olecranon to prevent painful scar contracture directly over the bony prominence.
3. Ulnar Nerve Management: The ulnar nerve is identified proximally, neurolysed, and mobilized. It is protected with a vessel loop throughout the procedure. Excessive stripping of its extrinsic blood supply must be avoided.
4. Osteotomy: A chevron (V-shaped) osteotomy is planned at the bare area of the greater sigmoid notch. It is initiated with a thin-bladed oscillating saw and completed by levering with an osteotome. This creates an irregular subchondral fracture that aids in anatomic reduction and rotational stability during closure.
5. Exposure: The proximal olecranon fragment and attached triceps are reflected proximally, exposing the articular surface.

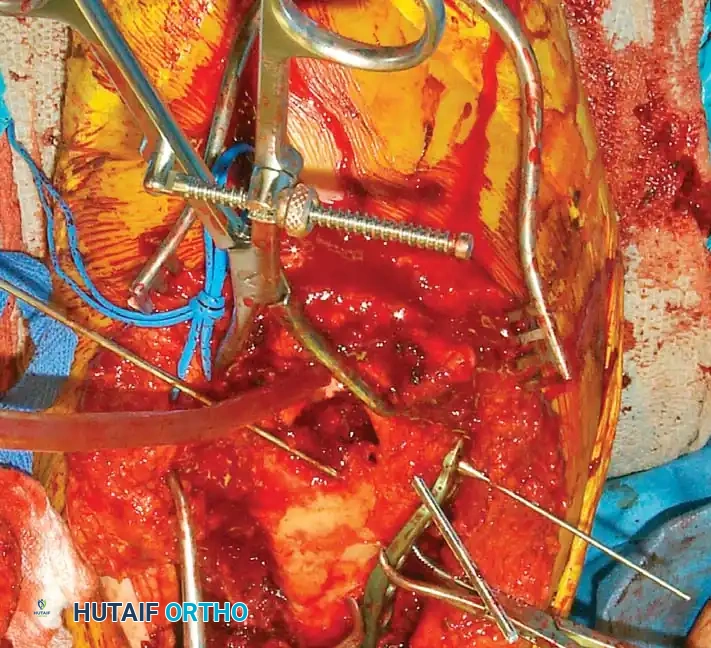
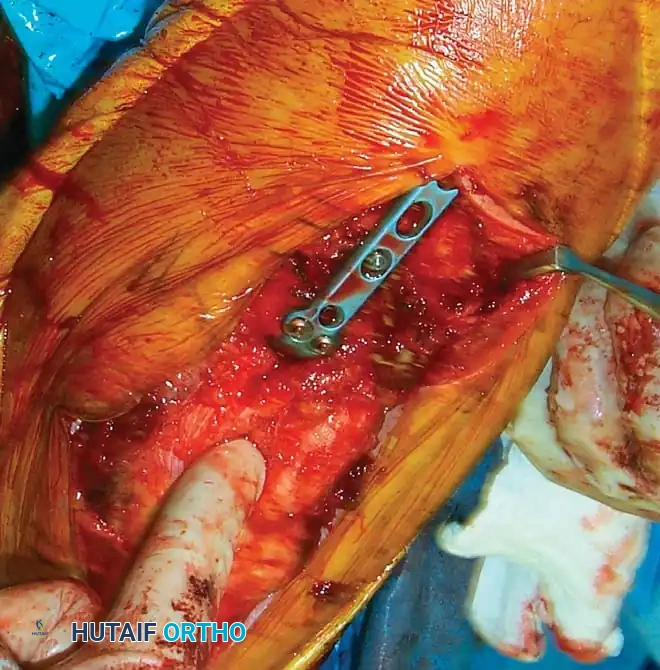
Fig. 8: Intraoperative progression of the olecranon osteotomy, demonstrating the chevron cut and subsequent proximal reflection of the extensor mechanism.
Surgical Warning: The primary disadvantage of the olecranon osteotomy is the risk of osteotomy nonunion (up to 5%) and symptomatic hardware requiring secondary removal. It is contraindicated in patients requiring total elbow arthroplasty (TER).
2. Triceps-Reflecting Approaches
To avoid the complications associated with an olecranon osteotomy, triceps-sparing approaches have gained popularity.
Bryan-Morrey Approach: Involves reflecting the triceps mechanism from medial to lateral off the olecranon.
TRAP (Triceps-Reflecting Anconeus Pedicle) Approach: Advocated by O'Driscoll, this combines a modified Kocher lateral approach with a medial triceps-reflecting approach, preserving the anconeus innervation and blood supply.
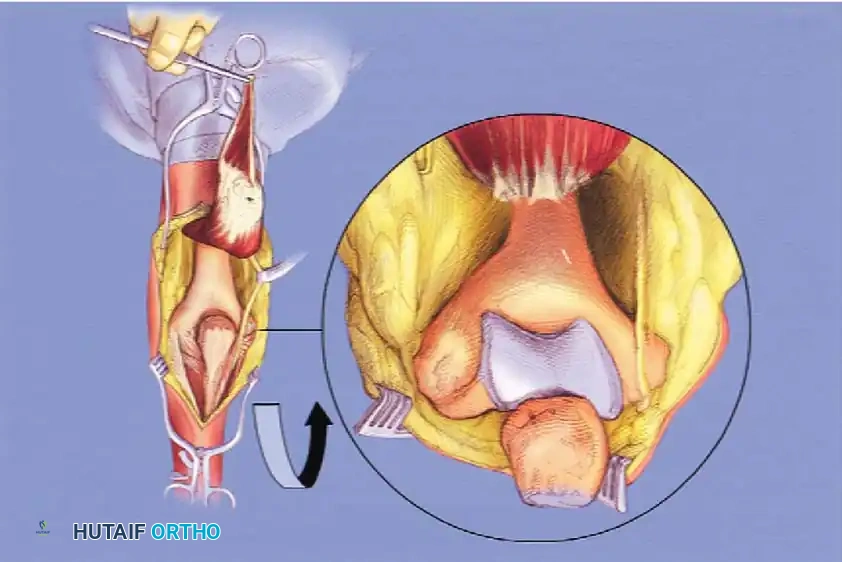
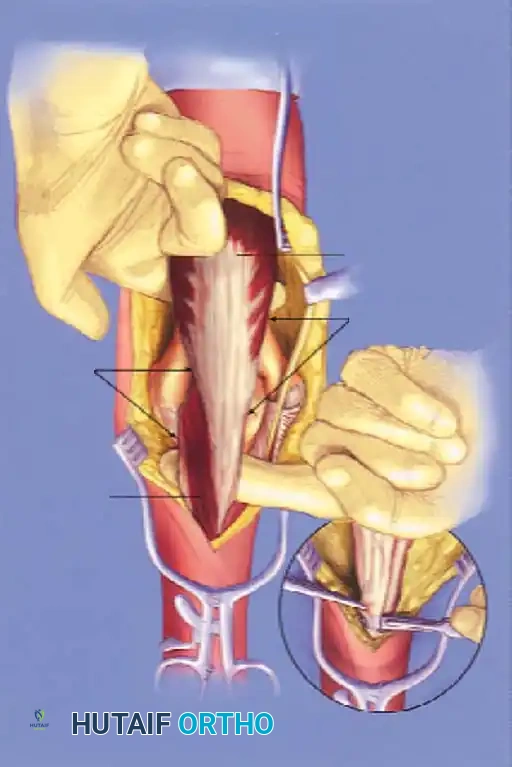
Fig. 9: Triceps-reflecting anconeus pedicle (TRAP) approach. Access to the distal humerus is comparable to an olecranon osteotomy without violating the joint.
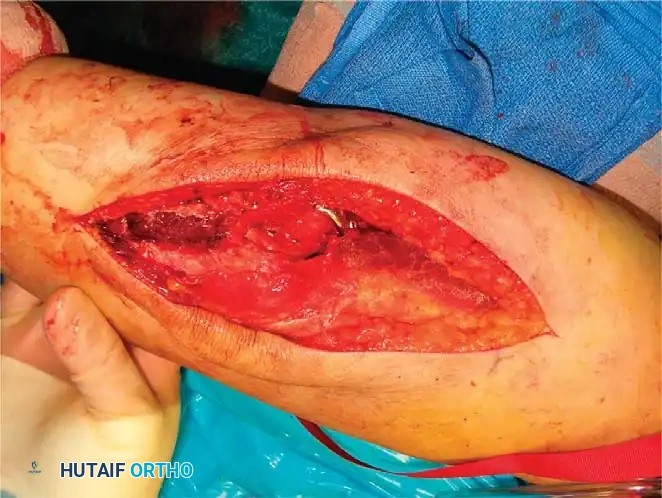
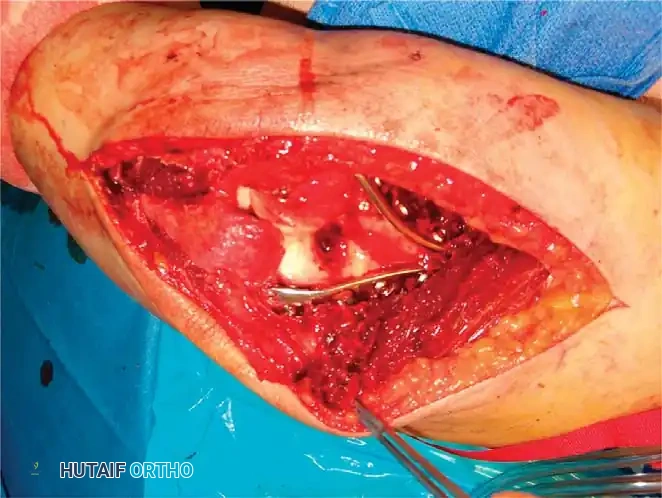
Fig. 10: Plate application executed seamlessly through a triceps-reflecting approach.
3. Triceps-Splitting Approach (Campbell)
Advocated by McKee et al., this approach splits the triceps longitudinally in the midline. While it avoids an osteotomy, it provides limited visualization of the anterior articular surface and is generally reserved for extra-articular bicolumnar fractures or when planning a total elbow arthroplasty.
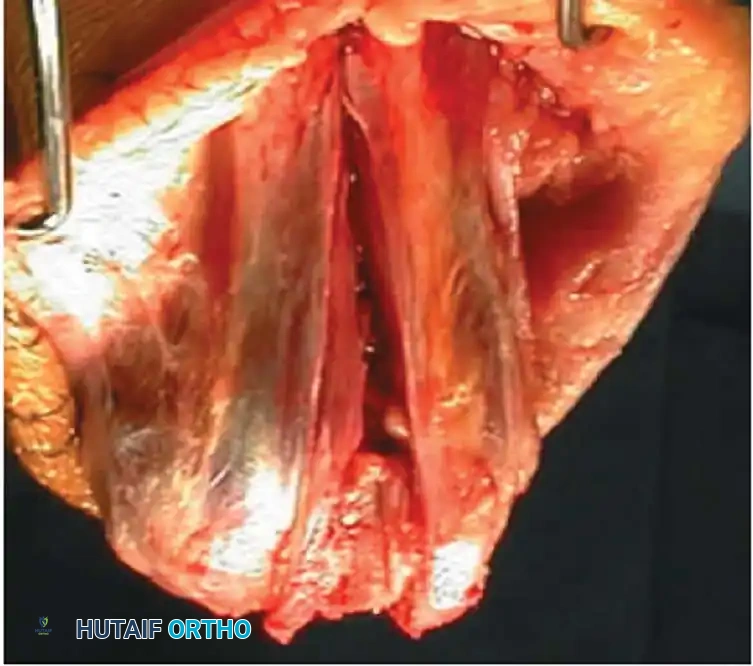
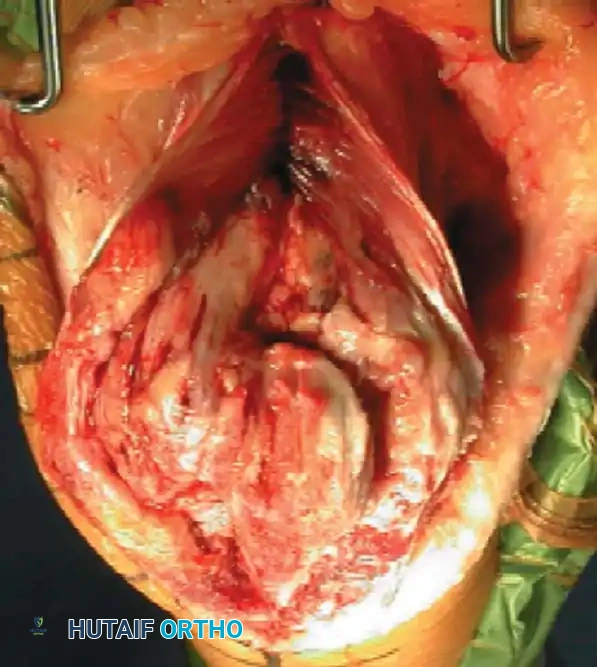
Fig. 11: Triceps-splitting approach to the distal humerus. The split is extended to the transcutaneous border of the ulna.
Step-by-Step Reconstruction Strategy
Reconstruction of the distal humerus generally follows one of two strategic pathways, depending on the fracture morphology:
Strategy 1: Articular-First Reconstruction
1. Reduce and provisionally fix the articular fragments (trochlea and capitellum) to each other using K-wires.
2. Convert provisional fixation to definitive fixation using headless compression screws or countersunk lag screws.
3. Reduce the reconstructed articular block to the humeral metaphysis/diaphysis.
4. Apply bicolumnar plating.
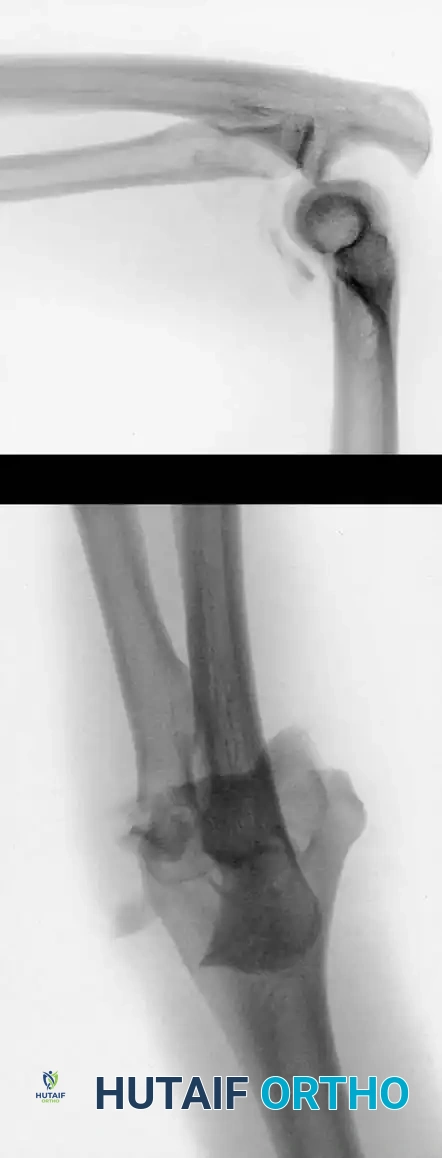
Fig. 12: Intraoperative view demonstrating provisional K-wire fixation of the articular block prior to metaphyseal attachment.
Strategy 2: Column-First Reconstruction
(Advantageous in cases of severe articular comminution where the "tie-arch" cannot be easily reconstructed in isolation).
1. Reduce and fix the least comminuted condyle (usually the lateral condyle) to the humeral shaft.
2. Reconstruct the articular surface by building off the stabilized condyle.
3. Reduce and fix the contralateral condyle to complete the bicolumnar construct.
Pitfall: When utilizing a transverse lag screw across the trochlea in the presence of central bone loss, extreme care must be taken not to over-compress and narrow the trochlear groove. Narrowing the trochlea will alter the kinematics of the ulnohumeral joint, leading to rapid post-traumatic arthritis and severe stiffness.
Postoperative Rehabilitation
The entire premise of rigid internal fixation is to permit early mobilization. If the biomechanical goals of surgery are met, rehabilitation should commence within 3 to 5 days postoperatively.
- Phase 1 (Days 1-3): The arm is immobilized in a bulky posterior splint at 60-90 degrees of flexion to allow soft tissue swelling to subside.
- Phase 2 (Days 3-21): Supervised physical therapy begins. Active and active-assisted range of motion (ROM) exercises are initiated. Gravity-assisted extension and overhead flexion protocols are highly effective.
- Phase 3 (>3 Weeks): Dynamic flexion and extension splinting is prescribed if
Associated Surgical & Radiographic Imaging
📚 Medical References
- distal humeral fractures in elderly patients, J Bone Joint Surg 79A:826, 1997.
- Connor PM, Morrey BF: Total elbow arthroplasty in patients who have juvenile rheumatoid arthritis, J Bone Joint Surg 80A:678, 1998.
- Coonrad RW, Morrey BJ: Coonrad/Morrey total elbow: surgical technique, Warsaw, Ind, 1988, Zimmer USA. Davis RF, Weiland AJ, Hungerford DS, et al: Nonconstrained total elbow arthoplasty, Clin Orthop 171:156, 1982.
- Dee R: Total replacement arthroplasty of the elbow for rheumatoid arthritis, J Bone Joint Surg 54B:88, 1972.
- Dee R: Total replacement of the elbow joint, Orthop Clin North Am 4:415, 1973.
- Dee R: Elbow replacement with the R. Dee prosthesis, Acta Orthop Belg 41:477, 1975.
- Dee R: Reconstructive surgery following total elbow endoprosthesis, Clin Orthop Relat Res 170:196, 1982.
- Dent CM, Hoy G, Stanley JK: Revision of failed total elbow arthroplasty, J Bone Joint Surg 77B:691, 1995.
- Doornberg JN, Linzel DS, Zurakowski D, et al: Reference points for radial head prosthesis size, J Hand Surg 31A:53, 2006.
- Dotzis A, Cochu G, Mabit C, et al: Comminuted fractures of the radial head treated by the Judet fl oating radial head prosthesis, J Bone Joint Surg 88B:760, 2006.
- Ewald FC: Total elbow replacement, Orthop Clin North Am 6:685, 1975.
- Ewald FC, Jacobs MA: Total elbow arthroplasty, Clin Orthop Relat Res 182:137, 1984.
- Ewald FC, Simmons ED, Sullivan JA, et al: Capitellocondylar total elbow replacement in rheumatoid arthritis, J Bone Joint Surg 75A:498, 1993.
- Faber KJ, Cordy ME, Milne AD, et al: Advanced cement technique improves fi xation in elbow arthroplasty, Clin Orthop Relat Res 334:150, 1997.
- Ferlic DC, Clayton ML: Salvage of failed total elbow arthroplasty, J Shoulder Elbow Surg 4:290, 1995.
- Figgie HE III, Inglis AE, Ranawat CS, et al: Results of total elbow arthroplasty as a salvage procedure for failed elbow reconstructive operations, Clin Orthop Relat Res 219:185, 1987.
- Figgie MP, Inglis AE, Mow CS, et al: Total elbow arthroplasty for complete ankylosis of the elbow, J Bone Joint Surg 71A:513, 1989.
- Frankle MA, Herscovici D, DiPasquale TE, et al: A comparison of open reduction and internal fi xation and primary total elbow arthroplasty in the treatment of intraarticular distal humerus fractures in women older than age 65, J Orthop Trauma 17:473, 2003.
- Goldberg VM, Figgie HE III, Inglis AE, Figgie MP: Current concepts review: total elbow arthroplasty, J Bone Joint Surg 70A:778, 1988.
- Foulkes GD, Mitsunaga MM: Allograft salvage of failed total elbow arthroplasty, Clin Orthop Relat Res 296:113, 1993.
- Friedman RJ, Lee DE, Ewald FC: Nonconstrained total elbow arthroplasty: development and results in patients with functional class IV rheumatoid arthritis, J Arthroplasty 4:31, 1989.
- Grewal R, MacDermid JC, Faber KJ, et al: Comminuted
You Might Also Like