Mastering Open Reduction and Internal Fixation of the Distal Humerus with Olecranon Osteotomy
Key Takeaway
Open reduction and internal fixation (ORIF) of the distal humerus via an olecranon osteotomy provides unparalleled visualization of the complex articular surface. This approach is the gold standard for comminuted, intra-articular fractures (AO/OTA Type 13-C). By mobilizing the extensor mechanism, surgeons can anatomically reconstruct the trochlea and capitellum before applying rigid bicolumnar plate fixation, allowing for early postoperative mobilization and optimal functional recovery.
Comprehensive Introduction and Patho-Epidemiology
Fractures of the distal humerus represent a formidable challenge in orthopedic trauma, demanding meticulous preoperative planning, profound anatomical knowledge, and precise surgical execution. Accounting for approximately 2% to 6% of all adult fractures and nearly 30% of all elbow fractures, these injuries present with a bimodal demographic distribution. In younger patients, they typically result from high-energy trauma, such as motor vehicle collisions or falls from significant heights, often presenting as open fractures with severe comminution and concomitant soft tissue compromise. Conversely, in the elderly population, these fractures frequently occur secondary to low-energy falls from a standing height, complicated by underlying osteopenia or osteoporosis, which severely compromises the purchase of internal fixation hardware.
Intra-articular distal humerus fractures, classified under the AO/OTA alphanumeric system as Type 13-C, are particularly deleterious because they disrupt the critical "triangle of stability." This biomechanical construct is formed by the medial column, the lateral column, and the articular spool of the trochlea and capitellum. The primary goal of surgical intervention in these complex scenarios is the absolute anatomic restoration of the articular surface, followed by rigid, bicolumnar fixation to the humeral shaft. This rigid fixation is not merely a radiographic goal; it is a strict clinical prerequisite to permit early, active range of motion (ROM), which is the only reliable method to prevent the devastating complication of post-traumatic elbow stiffness.
While triceps-sparing, triceps-splitting, and triceps-reflecting (e.g., TRAP) approaches have gained popularity for less complex fracture patterns (AO/OTA Type 13-A or 13-B) or total elbow arthroplasty (TEA), the trans-olecranon osteotomy remains the undisputed gold standard for severe, comminuted intra-articular fractures. By reflecting the extensor mechanism proximally, the surgeon gains unparalleled, direct orthogonal visualization of the entire articular surface, particularly the trochlear sulcus and capitellum, which are notoriously difficult to visualize through muscle-splitting windows.
The olecranon osteotomy provides up to 57% visualization of the distal humeral articular surface, compared to only 35% with a triceps-splitting approach. It is the approach of choice when absolute articular congruity must be restored in the setting of severe comminution, coronal shear components, or when the fracture lines extend far distally into the articular spool.
Alternative exposures: The modified Kocher lateral approach combined with a medial triceps-reflecting approach provides access similar to an olecranon osteotomy but preserves the extensor mechanism. However, for maximum visualization, the osteotomy is unparalleled.

The triceps-splitting approach to the distal humerus. While useful for extra-articular fractures or arthroplasty, it limits direct visualization of the anterior articular surface compared to an osteotomy.
Detailed Surgical Anatomy and Biomechanics
A profound understanding of the osseous and soft-tissue anatomy of the distal humerus is non-negotiable for the orthopedic trauma surgeon. The distal humerus is fundamentally structured as a bifurcated column system. The medial and lateral columns diverge at approximately a 45-degree angle from the humeral shaft, forming an inverted Y-shape. Between these columns lies the exceptionally thin bone of the coronoid and olecranon fossae, which can be as thin as 0.5 mm or even fenestrated. This central diaphyseal-metaphyseal junction is a zone of inherent structural weakness and is frequently the site of severe comminution in high-energy axial loading injuries.
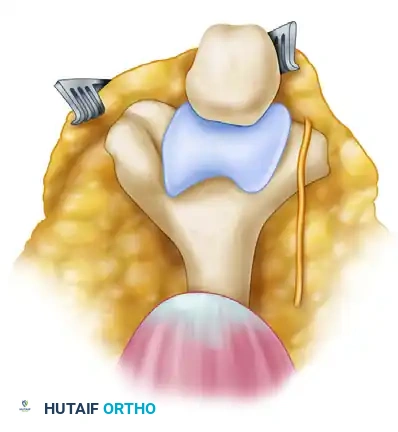
The Articular Spool and the Tie-Arch Concept
The articular surface is composed of the trochlea medially and the capitellum laterally. The trochlea is a complex, spool-shaped structure covered with hyaline cartilage over 300 degrees of its surface, leaving very little "bare area" for hardware placement. It articulates with the greater sigmoid notch of the ulna, providing the intrinsic osseous stability of the ulnohumeral joint. The capitellum is a hemispherical structure articulating with the radial head. Biomechanically, the distal humerus functions as a "tie-arch." The medial and lateral columns act as the supporting pillars, while the articular block acts as the tie beam. Disruption of any of these three components leads to catastrophic structural failure of the elbow joint under physiologic loads.
Neurologic and Vascular Considerations
The ulnar nerve is the structure at greatest risk during posterior approaches to the elbow. It courses distally through the posterior compartment of the arm, piercing the medial intermuscular septum at the arcade of Struthers (approximately 8 cm proximal to the medial epicondyle), and enters the cubital tunnel. The nerve is tethered by Osborne’s fascia and the articular branches to the elbow joint. The radial nerve, while less commonly injured during the posterior approach, must be respected during lateral column plating, particularly when plates extend proximally along the posterior aspect of the humerus. The vascular supply to the distal humerus is derived from a rich anastomotic network fed by the brachial artery, including the superior and inferior ulnar collateral arteries and the radial collateral artery. Preservation of the soft tissue envelope and periosteal attachments during dissection is critical to maintain this tenuous blood supply to the fracture fragments.
Exhaustive Indications and Contraindications
The decision to utilize a trans-olecranon osteotomy for open reduction and internal fixation (ORIF) of the distal humerus must be tailored to the specific fracture morphology, patient physiology, and surgeon experience. The primary indication is a highly comminuted, intra-articular fracture where the complexity of the articular reconstruction demands complete, unobstructed visualization.
Conversely, the approach is contraindicated in patients where the olecranon itself is severely fractured, making subsequent repair of the osteotomy biomechanically untenable. Furthermore, in the extreme elderly with profound osteoporosis and severe articular comminution, primary Total Elbow Arthroplasty (TEA) has been shown to yield superior functional outcomes and lower reoperation rates compared to ORIF. In such cases, an osteotomy should be avoided, as an intact olecranon and extensor mechanism are vital for the success and rehabilitation of a TEA.
| Clinical Parameter | Indications for Trans-Olecranon Osteotomy | Contraindications for Trans-Olecranon Osteotomy |
|---|---|---|
| Fracture Classification | AO/OTA 13-C2 and 13-C3 (Complex articular, multi-fragmentary) | AO/OTA 13-A (Extra-articular), simple 13-B (Partial articular) |
| Fracture Morphology | Severe trochlear comminution, coronal shear fractures extending medially | Concomitant severe proximal ulna/olecranon fractures |
| Patient Demographics | Young, high-demand patients; physiologically active older adults | Extreme elderly with profound osteopenia (TEA preferred) |
| Surgical Goals | Requirement for absolute anatomic articular congruity | Planned primary Total Elbow Arthroplasty (TEA) |
| Anatomic Considerations | Distal fractures with minimal metaphyseal bone for column fixation | Pediatric patients with open proximal ulnar physes |
| Soft Tissue Status | Intact posterior skin envelope capable of healing | Severe posterior soft tissue compromise, active infection |
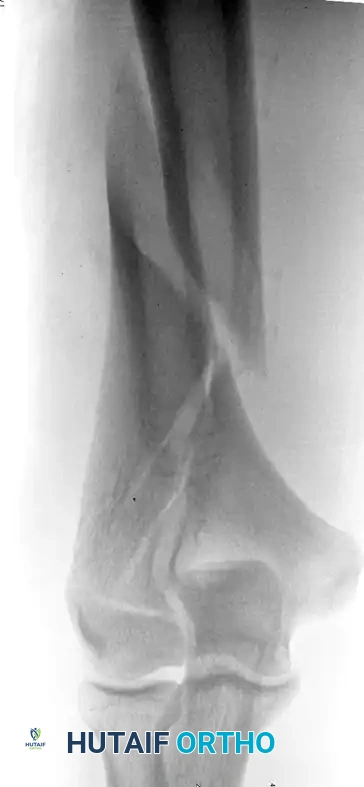
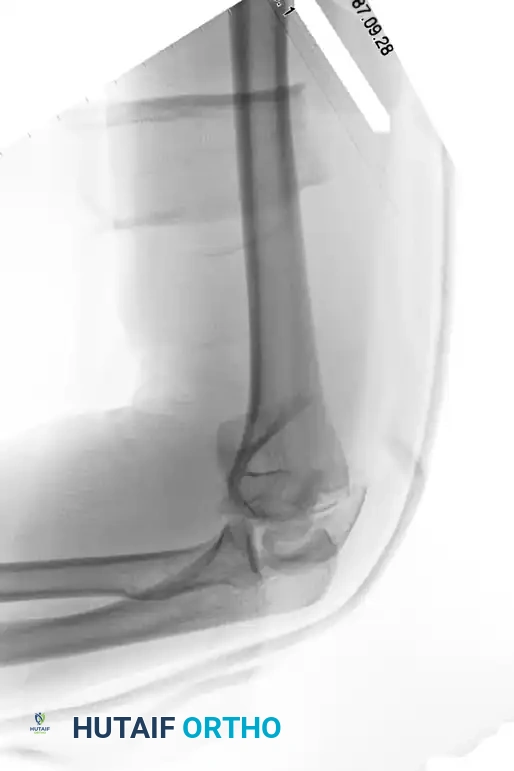
Preoperative imaging of a supracondylar fracture with intraarticular extension. This pattern, while challenging, may be approached via osteotomy if the articular extension is complex.
Preoperative AP radiograph of a distal humeral fracture with severe intraarticular extension, a classic indication for the trans-olecranon approach.
Pre-Operative Planning, Templating, and Patient Positioning
Thorough preoperative imaging is mandatory and serves as the foundation of successful surgical execution. Standard anteroposterior (AP) and lateral radiographs of the elbow provide a baseline understanding of the fracture pattern. However, these must be universally supplemented with a fine-cut computed tomography (CT) scan featuring 3D reconstructions with subtraction of the radius and ulna. The CT scan allows the surgeon to meticulously map the fracture lines, identify the "key" articular fragments that will dictate the reduction sequence, and anticipate the exact inventory of implants required, including headless compression screws, mini-fragment plates, and anatomic bicolumnar locking plates.
Advanced Preoperative Templating
Templating should be performed on the 3D CT reconstructions to determine the optimal plate configurations (orthogonal vs. parallel). The surgeon must identify the column with the least comminution, as this will serve as the foundation for rebuilding the articular block back to the humeral shaft. Anticipating the trajectory of interfragmentary lag screws is crucial to ensure they do not conflict with the planned positions of the bicolumnar plate screws.
Patient Positioning Options
The patient may be positioned in the lateral decubitus, prone, or supine position, depending heavily on surgeon preference, the presence of concomitant polytrauma, and anesthesia considerations.
- Lateral Decubitus: This is the most common and historically favored position. The patient is rolled onto their uninjured side, and the injured arm is draped over a radiolucent post (e.g., a heavily padded Mayo stand). This configuration allows gravity to assist with elbow flexion, opening the posterior joint space, and provides excellent, ergonomic access to the posterior elbow for the primary surgeon and assistant.
- Prone: Excellent for isolated distal humerus fractures, allowing the arm to rest comfortably on a radiolucent arm board. It provides a stable platform for the arm and excellent posterior exposure. However, it poses significant airway, ventilation, and hemodynamic monitoring challenges, making it highly undesirable in polytrauma patients with potential cervical spine, thoracic, or abdominal injuries.
- Supine: An increasingly favored position, particularly for complex polytrauma patients requiring simultaneous interventions by multiple surgical teams. The arm is brought across the chest or suspended. An advantage of the supine position is the ease of airway access and the ability to easily convert to an anterior approach if necessary.
Fixation of a fracture with extension into the humeral shaft can be exceptionally difficult to reduce with the patient supine due to the lack of gravity assistance pulling the forearm down. When the supine position is chosen, the use of a specialized sterile arm holder is strongly recommended to maintain reduction and free the assistant's hands.

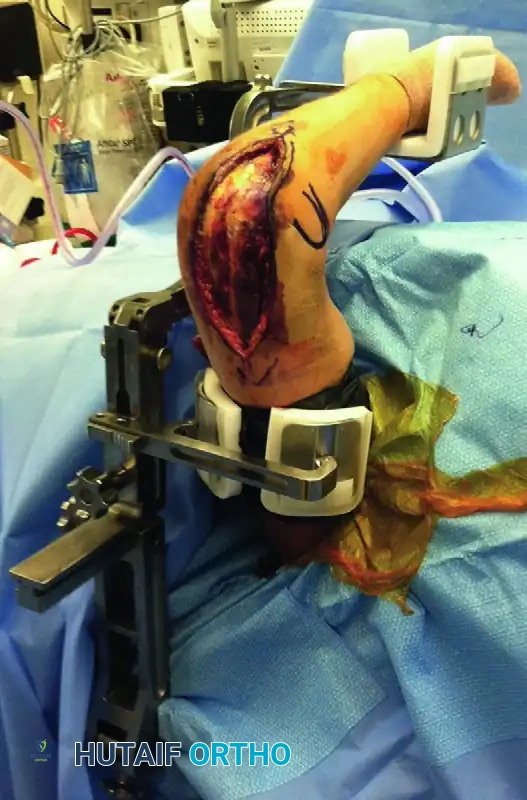
An arm holder (e.g., Elbow LOC, Symmetry Medical) assists significantly with arm positioning and maintaining reduction during surgery in the supine position.
Prepare and drape the entire forequarter to allow the placement of a sterile pneumatic tourniquet as proximal on the arm as possible. Ensure the C-arm fluoroscopy unit can easily swing in for true AP and lateral views without compromising the sterile field or requiring awkward manipulation of the unstable limb.
Step-by-Step Surgical Approach and Fixation Technique
Incision and Superficial Dissection
The procedure commences with a generous posterior midline incision, typically extending 8 to 10 cm proximal to the olecranon tip and 6 to 8 cm distal to it. To prevent painful postoperative scarring directly over the subcutaneous bony prominence of the olecranon, the incision must incorporate a slight lateral curve over the tip of the olecranon. Develop full-thickness fasciocutaneous flaps medially and laterally. It is imperative to avoid undermining the subcutaneous tissues; dissecting directly on the triceps fascia preserves the delicate vascular supply to the skin flaps, dramatically reducing the risk of postoperative wound dehiscence and full-thickness necrosis.
Ulnar Nerve Management
The ulnar nerve must be identified, mobilized, and meticulously protected early in the procedure before any deep dissection or osteotomy is performed.
Locate the nerve proximally at the medial border of the triceps. Dissect the ulnar nerve free from the medial edge of the triceps and release it from the cubital tunnel posterior to the medial epicondyle. Release the arcade of Struthers proximally and Osborne's fascia distally to ensure the nerve is completely free of tethering points.
Preserve the extrinsic vascular structures (vasa nervorum) that supply the ulnar nerve. Excessive skeletonization of the nerve disrupts its intrinsic blood supply and can lead to devastating ischemic neuropathy. Use a soft vessel loop to gently retract the nerve, absolutely avoiding excessive or prolonged traction.
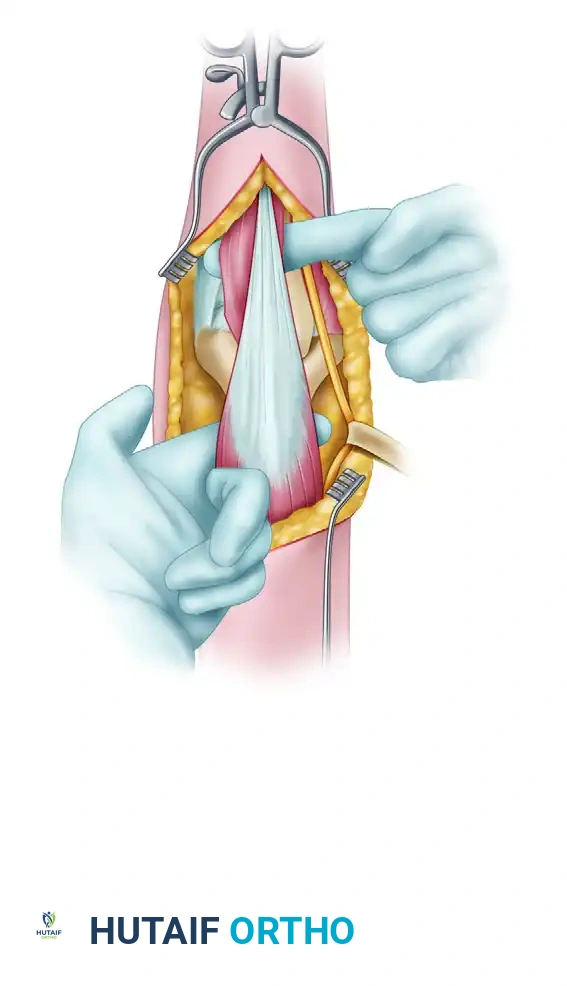
Triceps and Anconeus Dissection
Laterally, dissect the triceps off the lateral intermuscular septum. Incise the interval between the triceps and anconeus muscles to expose the posterior joint capsule. Alternatively, to preserve the anconeus innervation (which is derived from the radial nerve), utilize the interval between the anconeus and the extensor carpi radialis brevis (ECRB), elevating the anconeus in continuity with the triceps flap. Ensure that both the medial and lateral olecranon articular surfaces can be clearly visualized prior to initiating the osteotomy.
The Olecranon Osteotomy
The osteotomy must be planned meticulously to ensure a highly stable repair and prevent any articular step-off, which would inevitably lead to post-traumatic radioulnar arthrosis.
Predrill the holes for olecranon fixation before making the osteotomy. This critical step ensures perfect rotational and angular alignment during closure. While tension band wiring is a historical option, modern academic practice heavily favors plate fixation for the olecranon, as it provides superior biomechanical stability and allows for earlier, more aggressive mobilization.
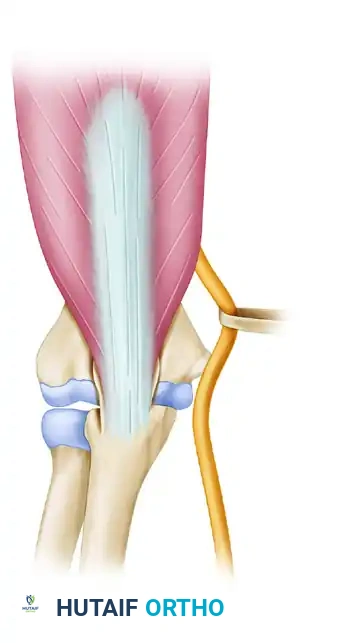
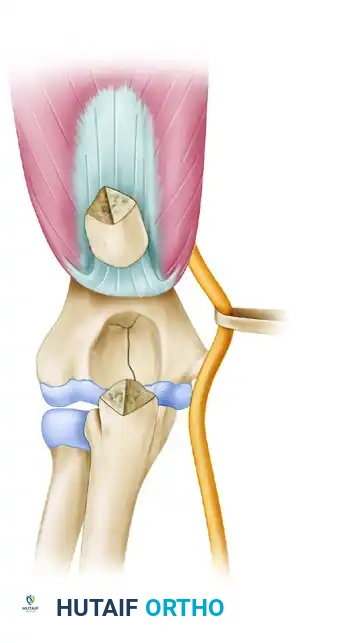
Make a distally oriented (apex distal) chevron osteotomy. The apex-distal shape increases the surface area for osteosynthesis healing and provides intrinsic rotational stability when the fragment is reduced. Use a thin-bladed oscillating saw directed toward the bare area (sulcus) of the articular surface of the olecranon. Do not cut completely through the articular cartilage with the saw, as the heat generated can cause thermal necrosis of the chondrocytes.
The olecranon osteotomy is marked in the shape of a shallow V or apex-distal chevron.
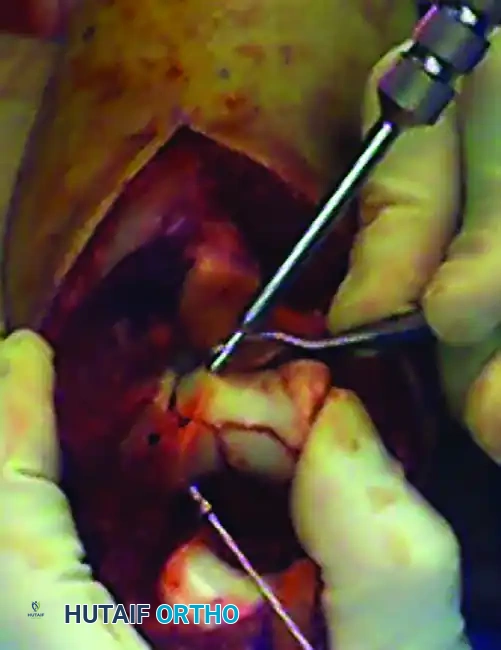
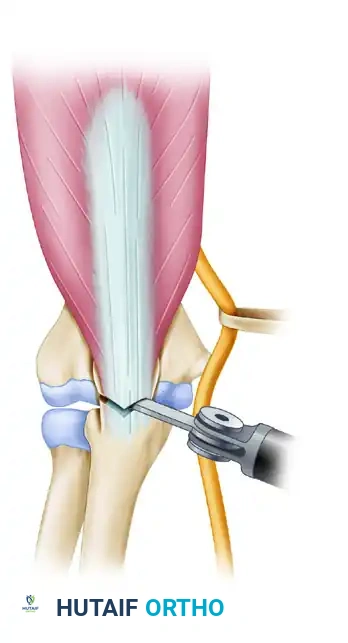
A thin-blade oscillating saw is used to start the osteotomy, stopping just short of the subchondral bone.
Use a sharp, broad osteotome to carefully complete the osteotomy by cracking the subchondral bone and articular cartilage. If the osteotomy is forcefully wedged open with the osteotome before the bone is adequately weakened by the saw, a large, uncontrolled cartilaginous flap can be created inadvertently on the ulnar side, severely complicating the subsequent repair.
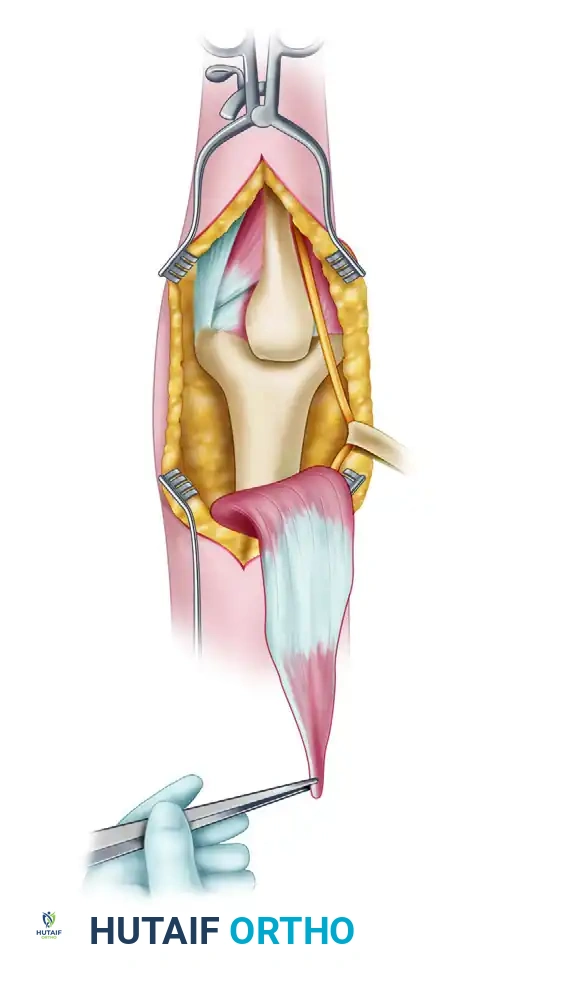
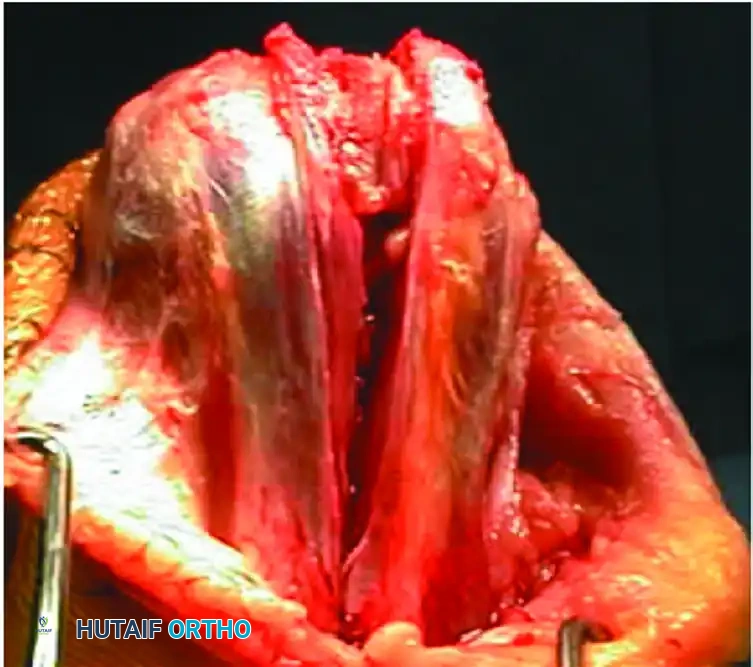
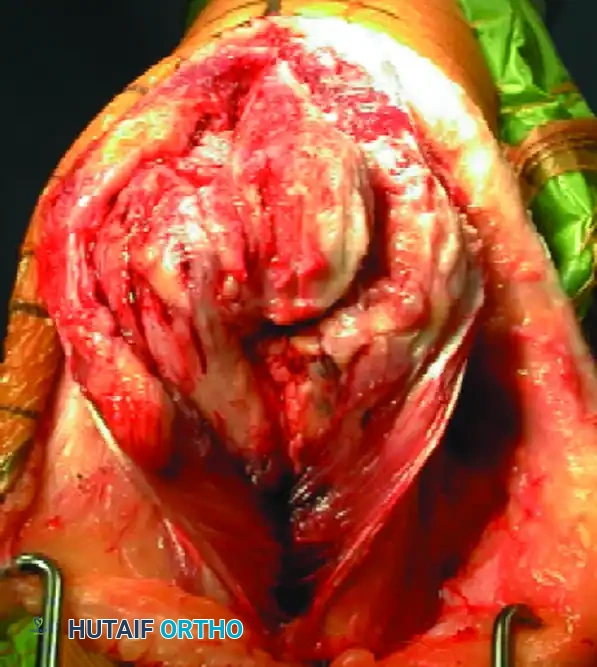
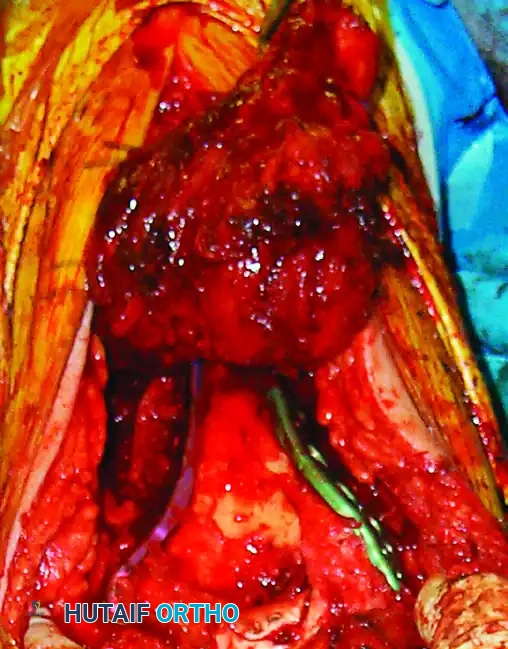
The osteotomized proximal olecranon fragment is elevated proximally. The ulnar nerve is isolated, mobilized, and protected throughout this maneuver.
Raise the triceps with the proximal olecranon fragment, and dissect the triceps musculature off the posterior humerus, preserving the periosteum where possible to maintain the blood supply to the posterior humeral cortex.
Fracture Reduction and Articular Reconstruction
With the distal humerus fully exposed, thoroughly débride the fracture edges using a dental pick and curette to clean the surfaces of organized hematoma, periosteum, and interposed soft tissue.
The fundamental principle of complex distal humerus ORIF is to conceptually and physically convert a Type C (intra-articular bicolumnar) fracture into a Type A (extra-articular) fracture by first reconstructing the articular block.
Use threaded Kirschner wires (K-wires) as joysticks to manipulate the medial and lateral condyles. If the articular fracture is simple (e.g., a single sagittal split), reduce the fracture with the joysticks and a Weber clamp, and insert K-wires for provisional fixation.
Provisional fixation of the articular block using K-wires and reduction forceps.
For complex articular comminution, reconstruct the articular surface "around the clock." Provisionally fix the reconstructed fragments. If either the medial or lateral condyle has a good "key" to reduction with the humeral shaft, reduce that condyle to the shaft first to establish a reference point for length and rotation.
A countersunk mini-fragment (2.0-mm or 2.4-mm) lag screw can be used for provisional or definitive fixation of the articular block because its low profile will not interfere with subsequent bicolumnar plate positioning. Use headless compression screws, mini-fragment screws, or bioabsorbable pins for the fixation of small osteochondral fragments and deep articular comminution where screw heads would otherwise impinge on the joint space.

Fixation of a small osteochondral fragment with an absorbable or headless screw.
A very distal intercondylar fracture fixed with headless screws and mini-fragment buttress plating through the olecranon osteotomy approach.
Bicolumnar Plate Fixation
Once the articular block is anatomically reconstructed and provisionally attached to the humeral shaft with K-wires, rigid bicolumnar plating is absolutely required. Plate the column with the better key to reduction first, followed by the opposite column.
There are two primary biomechanical constructs for bicolumnar plating:
1. Orthogonal (90-90) Plating: One plate is placed on the medial ridge (medial column), and the other is placed on the posterior aspect of the lateral column. This construct is highly effective for resisting sagittal plane bending moments and is frequently utilized when posterior comminution of the lateral column dictates posterior plate placement.
2. Parallel Plating: Plates are placed directly medially and laterally (180 degrees apart). Biomechanical studies, heavily championed by O'Driscoll's architectural principles, suggest parallel plating may offer superior stability in axial compression and coronal shear forces. The plates must be interlocked with long screws passing through the articular block from medial to lateral, and lateral to medial, creating a highly rigid "tie-arch" construct.
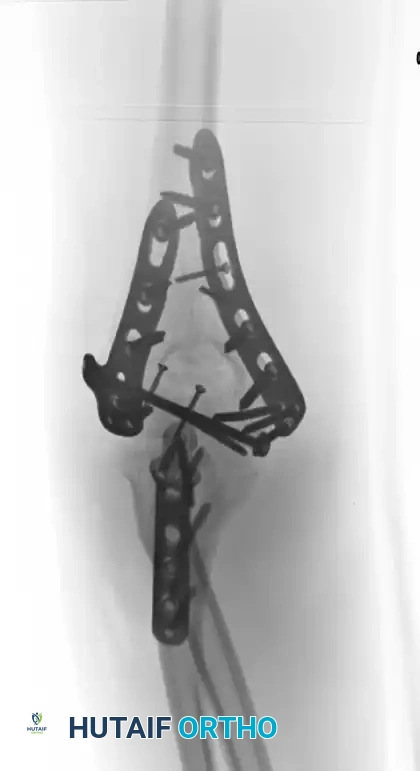
Fixation achieved with 90-90 locked plates through an olecranon osteotomy approach. Notice the posterior lateral plate and medial ridge plate.
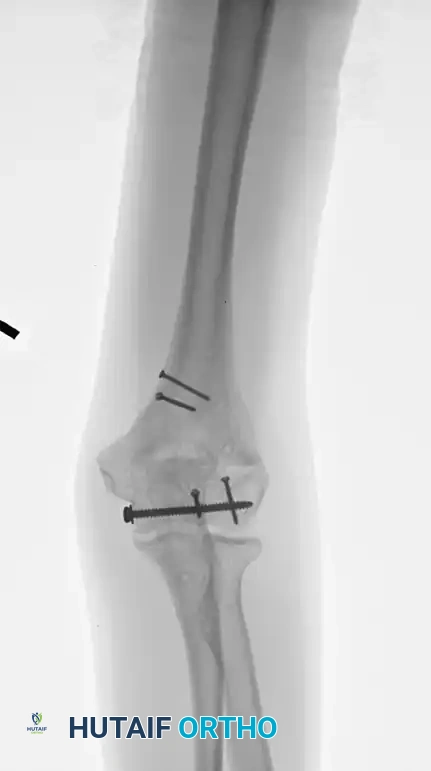
Postoperative radiograph demonstrating anatomic reduction after direct medial and lateral parallel plate fixation.
Evaluate every single screw under live fluoroscopy (AP, lateral, and oblique views) to ensure that it does not cross the articular surface. Furthermore, the olecranon fossa must remain completely clear of hardware, bone cement, or protruding screw tips to allow for full elbow extension.
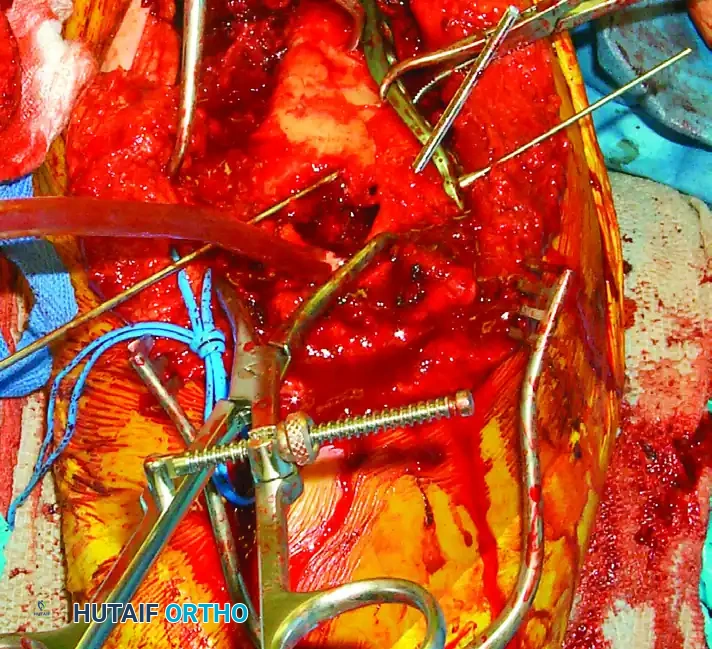
Intraoperative view of definitive bicolumnar plate fixation. Notice the meticulous preservation of the soft tissue envelope and the robust construct achieved.
Osteotomy Repair and Layered Closure
After confirming the absolute stability of the distal humerus fixation and verifying full, unimpeded ROM without hardware impingement or subluxation, the olecranon osteotomy must be repaired.
Reduce the proximal olecranon fragment anatomically. The apex-distal chevron shape should interlock perfectly, restoring immediate rotational stability. Fix the osteotomy using the pre-drilled holes. Modern practice heavily favors anatomic proximal ulna locking plates. Plating provides superior interfragmentary compression, significantly reduces the risk of hardware prominence (a notorious complication of tension band wiring), and allows for aggressive early rehabilitation without fear of construct failure.
Repair of the olecranon osteotomy. Anatomic reduction of the chevron cut is critical to restore the articular congruity of the greater sigmoid notch.
Final intraoperative view of the repaired olecranon osteotomy prior to layered closure. The plate provides rigid, low-profile fixation.
Consider transposing the ulnar nerve anteriorly (subcutaneous or submuscular) if the medial plate hardware is prominent, if the nerve rests with tension
Clinical & Radiographic Imaging Archive
