Percutaneous Scaphoid Nonunion Repair: A Masterclass in Minimally Invasive Carpal Reconstruction
Key Takeaway
This masterclass guides fellows through percutaneous scaphoid nonunion repair for Grades I-III. We cover comprehensive anatomy, meticulous preoperative planning, and granular intraoperative execution. Learn precise guidewire placement, fracture reduction, arthroscopic evaluation, bone grafting, and stable headless screw fixation. Emphasis is placed on neurovascular protection, avoiding pitfalls, and ensuring robust fixation to prevent long-term arthritic progression.
Comprehensive Introduction and Patho-Epidemiology
Welcome, fellows, to the operating theater and to this definitive masterclass on carpal reconstruction. Today, we are tackling a challenging yet immensely rewarding pathology: the scaphoid nonunion. While seemingly straightforward to the untrained eye, the scaphoid’s unique spatial anatomy, precarious retrograde blood supply, and absolutely critical role in carpal kinematics demand meticulous attention to detail. Our focus today will be on the percutaneous treatment of Grade I to III scaphoid nonunions, a technique that, when executed precisely, offers excellent outcomes with minimal soft tissue disruption, preserving the delicate vascular envelope that is often decimated by traditional open approaches.
Before we scrub in and address the technical execution, we must thoroughly understand the pathogenesis of the condition we are treating. A scaphoid nonunion is not a static, singular entity; it is a progressive spectrum of pathoanatomy. The classification system we utilize helps us stratify these injuries based on their morphological characteristics and, crucially, dictates our treatment algorithm. Grade I nonunions are essentially delayed presentations, typically 4 to 12 weeks post-injury, often lacking significant resorption or sclerosis. These frequently respond well to rigid percutaneous screw fixation alone, relying on the stabilization to promote primary bone healing. Grade II nonunions are fibrous in nature, characterized by an intact cartilaginous envelope but lacking significant sclerosis or massive resorption. These typically require percutaneous débridement to stimulate bleeding bone, followed by percutaneous bone grafting and rigid fixation.
As we progress down the spectrum, the pathology becomes more hostile. Grade III nonunions present with minimal sclerosis and resorption (less than 1 mm). Similar to Grade II, these benefit immensely from percutaneous débridement, structural or cancellous bone grafting, and fixation. Grade IV nonunions exhibit moderate resorption (up to 5 mm) and sclerosis, but crucially, overall carpal alignment is maintained, often contained within an intact fibrous envelope. While some Grade IV lesions can be managed with advanced percutaneous techniques, open structural grafting may become necessary. Finally, Grades V and VI involve substantial bone loss, frank synovial pseudarthrosis, and significant carpal collapse (flexion deformity), rendering them entirely unsuitable for the percutaneous approach we will demonstrate today. These advanced stages mandate open volar wedge grafting, vascularized bone flaps, or salvage procedures.
The natural history of an untreated scaphoid nonunion is a predictable and devastating march toward radiocarpal and midcarpal arthrosis. The fundamental culprits are mechanical instability and decreased perfusion, which form a vicious, self-perpetuating cycle. Micromotion at the fracture site disrupts delicate neovascularization attempts, leading to osteoclastic bone resorption, which in turn further compromises mechanical stability. Without intervention, patients typically develop a dorsal intercalated segment instability (DISI) deformity. The distal scaphoid fragment flexes with the distal carpal row, while the proximal fragment extends with the lunate. This uncoupling alters contact mechanics, leading to Scaphoid Nonunion Advanced Collapse (SNAC). We classify SNAC wrist into four progressive stages: Stage I involves styloscaphoid arthritis; Stage II progresses to the entire radioscaphoid fossa; Stage III encompasses the scaphocapitate and capitolunate joints; and Stage IV represents pancarpal arthritis. Our surgical objective today is to halt this degenerative cascade by achieving rigid union.
Detailed Surgical Anatomy and Biomechanics
To master percutaneous scaphoid surgery, one must possess a three-dimensional, almost intuitive understanding of carpal anatomy. The scaphoid is a fascinating and unforgiving bone. It is almost entirely covered with articular cartilage—approximately 80% of its surface area—leaving very limited real estate for vascular ingress or ligamentous attachment. It acts as the critical mechanical tie-rod between the proximal and distal carpal rows, bridging the radiocarpal and midcarpal joints. This unique bridging position subjects the scaphoid to immense sheer and bending forces during normal wrist motion, particularly during loaded extension and ulnar deviation, explaining why rigid internal fixation is paramount for nonunion repair.
The vascular anatomy of the scaphoid is the primary dictator of its healing potential and the Achilles heel of the proximal pole. The scaphoid receives its arterial supply primarily from branches of the radial artery. The dorsal carpal branch of the radial artery provides the dominant blood supply, entering the scaphoid through the dorsal ridge in the distal third of the bone. Crucially, these vessels then travel in a retrograde fashion intraosseously to supply the proximal pole. A volar branch supplies the distal tubercle and a small portion of the distal waist. Because the proximal pole is entirely dependent on this intraosseous, retrograde flow, any fracture at the waist or proximal pole severs this lifeline. This precarious arrangement, akin to the vascularity of the femoral head or the talar body, makes the proximal pole highly susceptible to avascular necrosis (AVN) following a fracture.
Biomechanically, the scaphoid is subjected to a complex interplay of forces. During wrist flexion, the scaphoid naturally flexes. During radial deviation, it also palmar flexes to avoid impingement against the radial styloid. The scapholunate interosseous ligament (SLIL) rigidly binds the proximal pole of the scaphoid to the lunate, ensuring they move synchronously. When a scaphoid nonunion occurs, this synchronous movement is destroyed. The distal fragment, driven by the trapezium and trapezoid, falls into flexion. The proximal fragment, still tethered to the lunate via the intact SLIL, follows the lunate into extension. This creates the classic "humpback" deformity at the nonunion site and the associated DISI posture of the carpus.
Understanding these biomechanics is critical for percutaneous intervention. Our surgical approach must not only achieve osseous union but must also correct this three-dimensional deformity. If we simply fix the scaphoid in its deformed, humpback position, we fail to restore normal carpal kinematics, and the patient will inevitably develop restricted range of motion and eventual arthrosis despite a healed bone. Furthermore, the percutaneous approach is specifically designed to respect the fragile vascular anatomy. By avoiding large arthrotomies and capsular stripping—particularly over the dorsal ridge where the primary blood supply enters—we maximize the biological potential for the nonunion to heal.
Exhaustive Indications and Contraindications
The decision to proceed with percutaneous scaphoid nonunion repair requires a nuanced understanding of patient factors, fracture morphology, and biological viability. The paradigm has shifted significantly over the last two decades, moving away from mandatory open exposures toward minimally invasive techniques, provided strict criteria are met. The primary rationale for the percutaneous approach is the preservation of the extrinsic vascular supply and the radiocarpal ligaments, which minimizes postoperative stiffness and accelerates rehabilitation. However, pushing the indications of percutaneous surgery beyond its limits will predictably result in catastrophic failure.
Indications for percutaneous repair are generally limited to Slade and Dodds Grades I, II, and III nonunions. Specifically, this includes delayed unions, fibrous nonunions, and nonunions with minimal to moderate cystic resorption (typically less than 2-3 mm of bone loss). The scaphoid must maintain acceptable overall alignment; a mild humpback deformity can be reduced percutaneously using joystick techniques, but severe structural collapse cannot. Furthermore, the proximal pole must demonstrate viability on preoperative magnetic resonance imaging (MRI). If the proximal pole is entirely avascular and necrotic, percutaneous revascularization techniques alone are rarely sufficient, and vascularized bone grafting is indicated.
Contraindications must be strictly observed. Absolute contraindications include advanced SNAC wrist arthrosis (Stage II or greater), where achieving union will not resolve the patient's degenerative pain. In such cases, salvage procedures like proximal row carpectomy (PRC) or four-corner fusion are appropriate. Significant structural bone loss (Grade V/VI) requiring a cortiocancellous interposition wedge graft is an absolute contraindication for percutaneous techniques, as the graft cannot be adequately delivered or stabilized without an open approach. Uncontrolled local infection and severe patient non-compliance are also absolute deterrents.
Relative contraindications require surgeon judgment. A highly fragmented proximal pole, even if viable, may be impossible to capture adequately with a percutaneous central axis screw. Patients who actively smoke tobacco present a significantly higher risk of persistent nonunion; while not an absolute contraindication, smoking cessation is heavily advised, and the patient must be counseled on the elevated risk of failure. Below is a comprehensive table outlining the decision-making matrix for this procedure.
| Parameter | Indications for Percutaneous Repair | Contraindications for Percutaneous Repair |
|---|---|---|
| Nonunion Grade | Slade/Dodds Grade I, II, III | Slade/Dodds Grade V, VI (Pseudarthrosis) |
| Bone Loss/Gap | Minimal cystic changes (< 3 mm) | Large cavitary defects (> 5 mm) |
| Carpal Alignment | Maintained or reducible percutaneously | Fixed, severe humpback/DISI deformity |
| Proximal Pole Viability | Viable (punctate bleeding, MRI contrast uptake) | Frank Avascular Necrosis (AVN) |
| Joint Status | No radiocarpal/midcarpal arthrosis | SNAC Stage II, III, or IV |
| Patient Factors | Compliant, non-smoker (ideal) | Active infection, severe non-compliance |
Pre-Operative Planning, Templating, and Patient Positioning
Fellows, I cannot overstate this: a flawless surgery begins weeks before the first incision. For scaphoid nonunions, meticulous preoperative planning is absolutely non-negotiable. The clinical evaluation sets the stage. Patients typically present with chronic radial-sided wrist pain, worsened by loading or gripping. On physical examination, you will consistently find point tenderness in the anatomical snuffbox and over the volar scaphoid tubercle. Range of motion is often restricted, particularly in extension and radial deviation, secondary to the mechanical block of the humpback deformity and early capsular contracture.
Advanced imaging is the cornerstone of our preoperative templating. Standard radiographs are insufficient for complex nonunions. A high-resolution Computed Tomography (CT) scan is mandatory. The CT must be reformatted with 1-mm slices oriented in the true sagittal and coronal planes of the scaphoid itself, not the wrist. This allows us to accurately measure the fracture gap, assess the degree of volar collapse (humpback), evaluate the volume of cystic resorption, and plan our screw trajectory. To assess the biological environment, an MRI with intravenous gadolinium contrast is the gold standard. We look for contrast enhancement in the proximal pole; a lack of enhancement signifies ischemia or frank AVN, which may force us to pivot to a vascularized open graft.
Hardware selection and approach planning are dictated by the fracture location. We utilize headless cannulated compression screws to achieve rigid interfragmentary compression while allowing the screw head to be buried beneath the articular cartilage. For proximal pole nonunions and proximal waist fractures, a dorsal percutaneous approach is biomechanically superior. It allows us to place the screw down the central axis of the scaphoid, perpendicular to the fracture plane, effectively "securing the small proximal island to the large distal mainland." Distal pole fractures are best approached volarly. Today, we are demonstrating a dorsal approach for a proximal waist nonunion.
Let us transition to the operating room setup. The patient is positioned supine on the operating table. The affected arm is extended onto a dedicated, radiolucent hand table, ensuring ample space for unrestricted C-arm fluoroscopy. We employ a traction tower to apply controlled longitudinal distraction. Typically, 10 to 12 pounds of traction is distributed among four finger traps (index, middle, ring, and little fingers). This traction distracts the radiocarpal and midcarpal joints, unlocking the carpus and significantly facilitating percutaneous reduction maneuvers. The C-arm is positioned perpendicular to the table, draped sterilely, and configured to easily rotate between true AP, true lateral, and 45-degree pronated oblique views. A preliminary fluoroscopic survey is conducted prior to prepping to confirm our ability to visualize the scaphoid comprehensively.
Step-by-Step Surgical Approach and Fixation Technique
Now, let us scrub in and execute. The percutaneous approach is a symphony of fluoroscopic guidance, tactile feedback, and precise spatial awareness. We will proceed systematically through the critical stages of targeting, reduction, preparation, and fixation.
Step 1: Placement of Targeting Guidewires
Our initial objective is to establish a three-dimensional fluoroscopic "crosshair" to guide our central axis wire placement. Accurate screw trajectory is the single most important technical factor in achieving union; an eccentric screw will fail to provide adequate compression and may cut out of the bone.
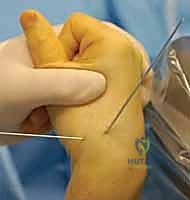
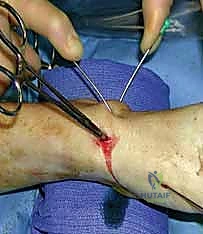
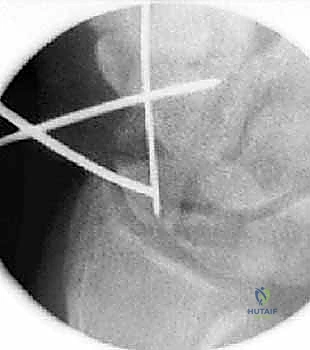
First, we address the distal fragment. We place a smooth 0.062-inch lateral targeting wire into the exact center of the distal scaphoid fragment, driving it from radial to ulnar. Palpate the radial styloid and the distal scaphoid tubercle. Make a 2-mm stab incision to protect the superficial radial nerve branches. Advance the K-wire carefully under live fluoroscopy, ensuring it is perfectly centered in the distal fragment on both the AP and lateral planes.
Next, we establish the proximal-distal axis. We ulnarly deviate the wrist within the traction tower to extend the scaphoid and present its dorsal proximal pole. A smooth 0.062-inch dorsal-to-volar targeting Kirschner wire is placed into the center of the distal fragment. Identify the dorsal aspect of the scaphoid via fluoroscopy, advance this wire from dorsal to volar, aiming to intersect the previously placed lateral wire. These two intersecting Kirschner wires now form our visual "crosshair" target for all subsequent instrumentation.
TECH FIG 1 • Crosshair targeting guide. A. External view demonstrating the intersecting wires.
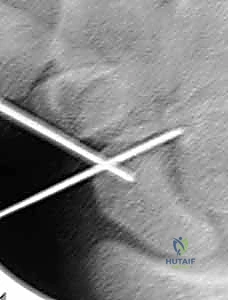
TECH FIG 1 • Crosshair targeting guide. B. AP fluoroscopic view confirming central placement in the distal fragment.
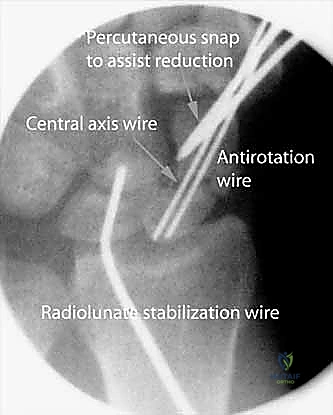
Step 2: Placement of the Distal Central Axis Derotation Wire
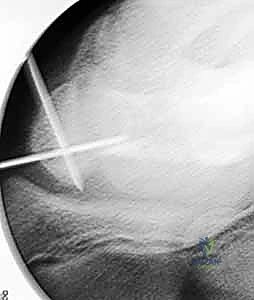
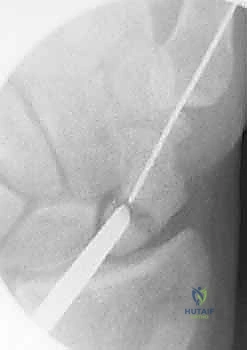
With our target established, we must place a temporary wire to control the distal fragment and prevent rotational displacement during subsequent reaming. Under fluoroscopic guidance, we insert a 19-gauge needle percutaneously directly into the dorsal aspect of the nonunion site. We confirm its precise location within the fracture gap on both AP and lateral views. This needle serves as a tactile and visual landmark.
Using the needle's trajectory as a guide, we introduce a double-cut 0.045-inch Kirschner wire into the fracture site from a dorsal approach. We drive this wire distally down the medullary canal of the distal fragment, utilizing our previously established "crosshair" wires as external visual guides to ensure a central trajectory. The wire is driven until it exits the skin at the volar base of the thumb. We then carefully withdraw the wire retrograde until its proximal tip is positioned exactly at the fracture line. This wire now acts as a dedicated control mechanism for the distal fragment.
TECH FIG 2 • Introduction of the 19-gauge needle into the nonunion site for precise localization.
TECH FIG 3 • Advancement of the double-cut 0.045-inch derotation wire down the central axis of the distal fragment.
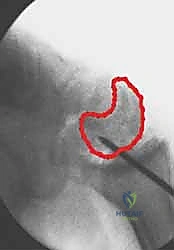
Step 3: Fracture Reduction and Deformity Correction
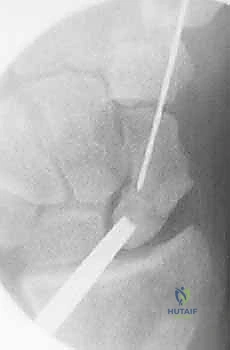
This is the crux of the procedure: restoring anatomical alignment and correcting the humpback deformity without opening the joint. We utilize a percutaneous joystick technique. From the dorsal aspect, we drive a stout 0.062-inch Kirschner wire into the proximal fragment. This serves as our "proximal joystick." Perfect central placement is not required here, as this wire is purely for mechanical leverage.
To correct the DISI and humpback deformity, we must manipulate both fragments simultaneously. We grasp the distal dorsal-to-volar targeting wire (placed in Step 1) and flex it toward the newly placed proximal joystick wire. This maneuver extends the palmar-flexed distal fragment, bringing it into anatomical alignment with the proximal pole. Once the reduction appears anatomical on fluoroscopy, we drive the distal central axis wire (which is currently resting at the fracture line) retrograde across the nonunion site and into the proximal pole, temporarily locking the reduction in place.
TECH FIG 4 • A. Fracture during reduction showing the Kirschner wire positioned distally, ready to capture the reduction.
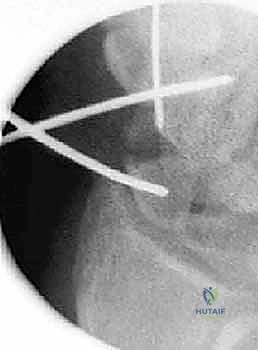
TECH FIG 4 • B. Fluoroscopic view of fracture reduction achieved via joystick manipulation prior to advancing the central wire.
Step 4: Central Guidewire Advancement and Preparation
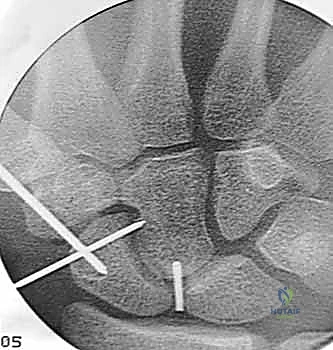
With the scaphoid anatomically reduced and temporarily pinned, we must now place the definitive central guidewire for our cannulated screw system. We introduce the manufacturer-specific guidewire (typically 0.045-inch) from the dorsal proximal pole, aiming precisely down the central longitudinal axis of the scaphoid, targeting the distal volar tubercle. The trajectory must be verified in multiple planes. The wire should be advanced until it engages the dense subchondral bone of the distal pole, but it must not penetrate the scaphotrapezial joint.
Once the definitive guidewire is perfectly positioned, we measure for screw length using a depth gauge over the wire. We typically subtract 2 to 4 mm from the measured length to ensure the headless screw can be deeply countersunk beneath the proximal articular cartilage without protruding distally.
TECH FIG 5 • Advancement of the definitive central guidewire down the true anatomical axis of the reduced scaphoid.
TECH FIG 6 • Depth measurement taken over the central guidewire to determine the appropriate length for the headless compression screw.
Step 5: Percutaneous Reaming and Biological Augmentation
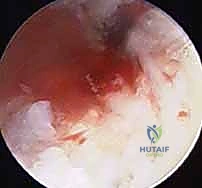
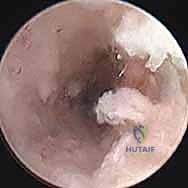
To address the fibrous nonunion tissue and stimulate a biological healing response, we perform percutaneous reaming. A cannulated hand reamer is passed over the central guidewire. We carefully ream across the nonunion site. This action achieves two critical goals: it clears the fibrous interposition tissue, and it generates autologous bone morphogenetic proteins and osteoprogenitor cells (bone mud) from the adjacent healthy bone, depositing them directly into the nonunion gap.
For Grade II and III nonunions, we often augment this space with percutaneous bone grafting. A small cannula is introduced over the guidewire. We harvest cancellous autograft (typically from the distal radius via a small cortical window) or utilize a high-quality allograft/demineralized bone matrix composite. This osteoconductive and osteoinductive material is packed tightly through the cannula directly into the reamed nonunion defect, ensuring robust biological support for the mechanical fixation.
TECH FIG 7 • Hand reaming over the central guidewire to clear fibrous tissue and prepare the medullary canal.
TECH FIG 8 • Fluoroscopic confirmation of the reamer crossing the nonunion site, generating local autograft.
TECH FIG 9 • Introduction of the delivery cannula over the guidewire for percutaneous bone grafting.
TECH FIG 10 • Packing of osteoinductive bone graft material directly into the nonunion defect via the cannula.
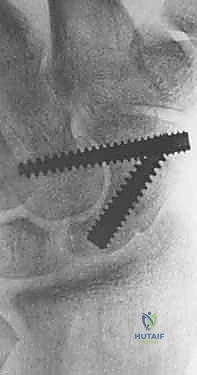
Step 6: Definitive Screw Fixation
The final step is the insertion of the headless cannulated compression screw. The selected screw is passed over the central guidewire. As the trailing threads engage the proximal pole, the variable pitch of the screw generates robust interfragmentary compression across the nonunion site. It is imperative to bury the trailing edge of the screw at least 1-2 mm beneath the articular cartilage of the proximal pole to prevent catastrophic impingement against the radioscaphoid fossa during wrist extension.
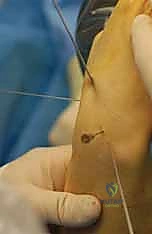
We confirm the final position under live fluoroscopy, taking the wrist through a full range of motion to ensure there is no hardware prominence dorsally or volarly. The guidewires are then removed, the small stab incisions are closed with simple sutures, and a sterile dressing is applied.
TECH FIG 11 • Insertion of the headless cannulated compression screw over the central guidewire.
TECH FIG 12 • Final tightening of the screw, ensuring the trailing head is countersunk beneath the articular surface.
TECH FIG 13 • Final intraoperative fluoroscopic lateral view demonstrating anatomical reduction and central screw placement.
Complications, Incidence Rates, and Salvage Management
Despite meticulous technique, percutaneous scaphoid repair carries inherent risks. The most devastating complication is persistent nonunion or hardware failure, which occurs in approximately 5-10% of cases, heavily skewed toward patients who smoke or possess unrecognized proximal pole AVN. If the screw fails to achieve adequate compression, or
