Open Reduction and Internal Fixation of Acute Displaced Scaphoid Fractures: The Volar Approach
Key Takeaway
The volar approach for open reduction and internal fixation (ORIF) of acute displaced scaphoid fractures is the gold standard for waist and distal pole lesions. This technique provides direct visualization of the fracture, facilitates anatomic reduction, and allows for optimal trajectory of headless compression screws. Careful preservation of the volar radiocarpal ligaments and precise fluoroscopic guidance are critical to achieving stable fixation and preventing postoperative carpal instability or nonunion.
Comprehensive Introduction and Patho-Epidemiology
The scaphoid represents the critical biomechanical linchpin between the proximal and distal carpal rows, playing an absolutely indispensable role in global wrist kinematics and load transmission. Situated obliquely across the midcarpal joint, it functions essentially as a dynamic tie rod, stabilizing the carpus during functional arcs of motion. Acute displaced fractures of the scaphoid disrupt this delicate mechanical harmony and demand meticulous surgical intervention. The primary objectives of operative management are to restore precise anatomic alignment, preserve intrinsic carpal stability, and prevent the devastating, irreversible long-term sequelae of scaphoid nonunion advanced collapse (SNAC).
Epidemiologically, scaphoid fractures account for approximately 60% to 70% of all carpal bone fractures, predominantly affecting young, active males in their second and third decades of life. The classic mechanism of injury involves a high-energy fall onto an outstretched hand (FOOSH) with the wrist positioned in forced hyperextension and ulnar deviation. This specific vector of force drives the proximal pole of the scaphoid against the dorsal rim of the radius while the distal pole is forcefully tethered by the robust volar carpal ligaments, resulting in a bending moment that typically fractures the scaphoid waist. High-velocity trauma, such as motor vehicle collisions or contact sports injuries, further exacerbates the degree of initial displacement and comminution.
The natural history of an untreated or inadequately reduced displaced scaphoid fracture is almost universally poor. Displacement greater than 1 millimeter, angular deformity, or the presence of carpal instability significantly diminishes the probability of spontaneous osseous union. The resulting nonunion predictably alters the contact mechanics of the radiocarpal and midcarpal joints. Over time, this aberrant load distribution initiates a progressive, predictable cascade of degenerative osteoarthritis, beginning at the radioscaphoid articulation (SNAC Stage I), progressing to the scaphocapitate joint (SNAC Stage II), and ultimately involving the lunocapitate joint (SNAC Stage III).
While dorsal surgical approaches are generally reserved for proximal pole fractures due to the proximity of the retrograde blood supply and the specific geometry of the proximal fragment, the volar approach remains the absolute gold standard for displaced fractures located at the scaphoid waist and distal pole. This approach provides unparalleled exposure of the volar cortex, facilitates the direct visual correction of the classic "humpback" flexion deformity, and allows for the optimal distal-to-proximal trajectory required for the insertion of headless compression screws. This chapter provides an exhaustive, highly technical guide detailing the patho-anatomy, biomechanical considerations, and step-by-step surgical execution of the volar approach for open reduction and internal fixation (ORIF) of acute displaced scaphoid fractures.
Detailed Surgical Anatomy and Biomechanics
A profound, three-dimensional understanding of scaphoid osseous, vascular, and ligamentous anatomy is mandatory before undertaking any operative intervention on the carpus. The scaphoid is a uniquely complex, twisted, peanut-shaped bone that bridges the proximal and distal carpal rows. Approximately 80% of its surface area is covered by hyaline articular cartilage to accommodate its extensive articulations with the radius, lunate, capitate, trapezium, and trapezoid. This extensive articular coverage severely limits the available non-articular surface area for vascular penetration, ligamentous attachment, and surgical hardware insertion.
The Tenuous Retrograde Blood Supply
The vascular anatomy of the scaphoid is notoriously precarious and is the primary anatomical factor dictating the high rates of delayed union, nonunion, and avascular necrosis (AVN) following fracture. The scaphoid relies almost entirely on a retrograde intraosseous blood supply. Landmark anatomical studies by Gelberman and Menon definitively demonstrated that the major vascular contribution arises from the dorsal carpal branch of the radial artery. This vessel enters the scaphoid at the non-articular dorsal ridge and supplies the proximal 70% to 80% of the bone in a retrograde fashion.
Conversely, a minor volar vascular branch, arising from the superficial palmar arch or the radial artery directly, enters the region of the scaphoid tubercle and supplies only the distal 20% to 30% of the bone. The clinical implications of this vascular arborization cannot be overstated. A fracture through the scaphoid waist physically severs the intraosseous blood supply to the proximal pole, rendering it entirely dependent on tenuous collateral circulation or making it completely avascular. The primary advantage of the volar surgical approach for waist and distal pole fractures is the complete preservation of the critical dorsal blood supply. Dissecting dorsally for a waist fracture unnecessarily strips the dorsal ridge, risking iatrogenic AVN of the proximal pole.
Ligamentous Anatomy and Carpal Stability
The scaphoid is deeply embedded within a complex web of intrinsic and extrinsic carpal ligaments. On the volar aspect, the radioscaphocapitate (RSC) ligament acts as a vital sling supporting the scaphoid waist, while the long radiolunate (LRL) ligament provides secondary support. The scapholunate interosseous ligament (SLIL), an intrinsic structure, tightly binds the proximal pole of the scaphoid to the lunate, ensuring synchronous motion of the proximal carpal row.
During the volar approach, the surgeon must incise the robust volar extrinsic ligaments (specifically the RSC and LRL) to access the radiocarpal joint. Meticulous preservation and subsequent watertight repair of these capsuloligamentous structures are absolutely critical. Failure to perform a robust repair at the conclusion of the procedure will compromise the volar tether of the carpus, potentially leading to postoperative volar intercalated segment instability (VISI), ulnar translocation of the carpus, or chronic midcarpal instability.
Biomechanics of the "Humpback" Deformity
The biomechanics of the scaphoid are dictated by its intercalated position. The distal pole of the scaphoid naturally tends to flex volarly and pronate due to the strong pull of the scaphotrapezial ligaments and the functional demands of the distal carpal row. Conversely, the proximal pole is tethered to the lunate via the SLIL and tends to extend with the proximal carpal row.
When the scaphoid fractures at its waist, this mechanical linkage is uncoupled. The distal pole collapses into flexion and pronation, while the proximal pole extends with the lunate. This opposing motion creates a distinct volar cortical defect and a severe flexion deformity known as the "humpback" deformity. The intrascaphoid angle, normally less than 35 degrees, increases significantly. Failure to correct this humpback deformity during ORIF will result in a permanent loss of wrist extension, abnormal load transfer across the radiocarpal joint, and accelerated, progressive carpal collapse.
Exhaustive Indications and Contraindications
The decision to proceed with operative management of a scaphoid fracture hinges on a meticulous evaluation of fracture morphology, degree of displacement, chronicity, and patient-specific functional demands. While non-displaced fractures may occasionally be managed with prolonged cast immobilization or percutaneous fixation, acute displaced fractures mandate open reduction to restore normal carpal kinematics. The volar approach is specifically tailored to address the unique pathoanatomy of waist and distal pole fractures.
Surgical decision-making must be guided by strict adherence to established biomechanical and radiographic criteria. Displacement of even 1 millimeter significantly alters contact pressures within the radiocarpal joint and exponentially increases the risk of nonunion. Furthermore, the presence of angular instability, specifically the humpback deformity, cannot be adequately corrected through closed means or percutaneous techniques, necessitating an open volar approach for direct visualization and structural grafting if required.
The following table provides an exhaustive breakdown of the indications and contraindications for utilizing the volar approach in the management of scaphoid fractures.
| Category | Specific Criteria / Condition | Clinical Rationale and Biomechanical Justification |
|---|---|---|
| Absolute Indications | Displaced Waist Fractures (>1mm step-off or gap) | Displacement >1mm disrupts the cartilaginous envelope and prevents primary bone healing. Open reduction is required to appose fracture margins. |
| Absolute Indications | "Humpback" Flexion Deformity (Intrascaphoid Angle >35°) | Closed reduction cannot overcome the deforming forces of the RSC ligament. The volar approach allows direct elevation of the distal pole and structural grafting of the volar defect. |
| Absolute Indications | Distal Pole Fractures requiring internal fixation | The volar approach provides direct, unhindered access to the distal pole and scaphoid tubercle without risking the dorsal blood supply. |
| Absolute Indications | Associated Perilunate Fracture-Dislocations | Volar capsular repair and direct visualization of the radiocarpal joint are mandatory in complex carpal fracture-dislocations. |
| Relative Indications | Delayed Presentation (4-8 weeks post-injury) | Early resorption at the fracture site often mimics comminution. The volar approach allows for thorough debridement and application of cancellous bone graft. |
| Relative Indications | High-Demand Athletes / Manual Laborers | Even in minimally displaced fractures, ORIF via a volar approach accelerates the timeline to clinical stability and allows for earlier rehabilitation. |
| Absolute Contraindications | Proximal Pole Fractures | Proximal pole fragments are too small to adequately capture via a volar trajectory. A dorsal approach is mandatory to allow for a proximal-to-distal screw trajectory. |
| Absolute Contraindications | Established SNAC Wrist (Stage II or III) | Once midcarpal arthritis is established, ORIF is futile. Salvage procedures (e.g., proximal row carpectomy, four-corner fusion) are indicated. |
| Absolute Contraindications | Active Local or Systemic Infection | Introduction of hardware in the presence of active osteomyelitis or overlying cellulitis will lead to catastrophic septic arthritis of the carpus. |
| Relative Contraindications | Severe Osteopenia / Osteoporosis | Poor bone stock severely compromises the purchase of headless compression screws, increasing the risk of hardware pull-out and loss of reduction. |
Pre-Operative Planning, Templating, and Patient Positioning
Flawless execution of scaphoid ORIF begins long before the skin incision is made. Rigorous preoperative planning, advanced imaging analysis, and meticulous patient positioning are fundamental prerequisites for achieving anatomic reduction and stable fixation. The complex, three-dimensional geometry of the scaphoid demands a highly systematic approach to preoperative evaluation.
Advanced Imaging Modalities and Templating
Standard orthogonal radiographs—including posteroanterior (PA), lateral, and pronated oblique views—are necessary for initial screening but are grossly inadequate for definitive surgical planning of a displaced scaphoid fracture. Specialized scaphoid views (e.g., the Ziter view, obtained with the wrist in ulnar deviation and the X-ray beam angled 30 degrees proximally) help elongate the scaphoid profile but still lack true three-dimensional fidelity.
Fine-cut computed tomography (CT) scanning is now universally considered the absolute standard of care for preoperative planning. Crucially, the CT reformats must be aligned along the true longitudinal axis of the scaphoid, not the anatomical planes of the wrist. Sagittal and coronal reformats along this specific axis allow the surgeon to accurately quantify the degree of displacement, assess the exact location of the fracture line, evaluate the extent of volar comminution, and measure the magnitude of the humpback deformity (intrascaphoid angle). Furthermore, digital templating software should be utilized on these CT images to estimate the required length of the headless compression screw, ensuring that the hardware will be fully contained within the subchondral bone without penetrating the articular surfaces.
Operating Room Setup and Anesthesia
The operating room must be configured to facilitate seamless integration of the surgical team and the fluoroscopy unit. The patient is placed supine on the operating table with the affected arm extended onto a radiolucent hand table. The hand table must be completely free of any radiopaque underlying structures to allow for unobstructed C-arm imaging in multiple planes. The C-arm is typically brought in perpendicular to the hand table, allowing the surgeon to easily rotate the wrist for PA, lateral, and oblique views without constantly repositioning the fluoroscopy unit.
Anesthesia for this procedure is highly dependent on patient comorbidities, surgeon preference, and the anticipated need for structural bone grafting. Regional anesthesia, such as an ultrasound-guided supraclavicular or axillary brachial plexus block, is generally preferred as it provides excellent intraoperative muscle relaxation and superior postoperative analgesia. However, if preoperative CT imaging indicates significant volar comminution requiring a structural iliac crest bone graft (ICBG), general anesthesia is often necessary, and the ipsilateral iliac crest must be prepped and draped simultaneously.
Patient Positioning and Tourniquet Application
Proper positioning and exsanguination are critical for maintaining a bloodless surgical field, which is essential for identifying the delicate capsular structures and terminal nerve branches. A well-padded pneumatic tourniquet is applied to the proximal arm. The entire hand, wrist, and forearm are subjected to a meticulous surgical prep and drape.
Prior to incision, the limb is elevated and exsanguinated using a tight Esmarch bandage wrapped from the fingertips to the distal edge of the tourniquet. The tourniquet is then inflated to an appropriate pressure, typically 250 mm Hg or 100 mm Hg above the patient's systolic blood pressure. The surgeon must note the tourniquet time, as prolonged inflation (greater than 120 minutes) can lead to ischemic neurapraxia and delayed functional recovery.
Step-by-Step Surgical Approach and Fixation Technique
The volar approach to the scaphoid is a masterclass in meticulous soft tissue handling, precise capsular preservation, and exacting osseous spatial awareness. The following step-by-step technical guide details the execution of this approach, emphasizing the critical nuances required to achieve an anatomic reduction and biomechanically rigid fixation.
Superficial Incision and Nerve Protection
The volar approach exploits the internervous plane and the anatomical bed of the flexor carpi radialis (FCR) tendon to access the radiocarpal joint safely. The surgeon must utilize a #15 scalpel blade to make a longitudinal skin incision over the palmar surface of the wrist. The incision begins approximately 3 to 4 cm proximal to the wrist flexion crease, directly overlying the palpable FCR tendon. As the incision approaches the wrist flexion crease, it is gently curved radially, extending toward the base of the thumb metacarpal and crossing the scaphotrapezial (STT) joint.
Superficial dissection must proceed with extreme caution. The subcutaneous tissues are spread longitudinally using blunt tenotomy scissors. The surgeon must actively identify and protect two highly sensitive neural structures: the palmar cutaneous branch of the median nerve (PCBMN) and the superficial branch of the radial nerve (SBRN). The PCBMN typically lies just ulnar to the FCR tendon, while the SBRN lies radially in the subcutaneous tissues. Iatrogenic injury or aggressive retraction of these nerves will result in debilitating postoperative neuromas or chronic regional pain syndrome (CRPS). Blunt Ragnell or Senn retractors should be used to gently retract the skin flaps and superficial nerves away from the surgical field.
Deep Dissection and the FCR Sheath
Once the superficial fascia is cleared, the FCR tendon is identified within its distinct fascial sheath. The surgeon sharply incises the superficial layer of the FCR sheath longitudinally. The FCR tendon is then mobilized and retracted. While classical descriptions sometimes advocate retracting the FCR ulnarly to protect the median nerve, modern techniques strongly favor retracting the FCR radially. Radial retraction of the FCR tendon provides a more direct, linear trajectory to the longitudinal axis of the scaphoid and safely sweeps the radial artery laterally, protecting it from iatrogenic injury during drilling.
Following retraction of the FCR tendon, the deep layer of the FCR sheath is exposed. This layer is sharply incised to reveal the underlying palmar capsule of the radiocarpal joint. Hemostasis at this stage is critical; small traversing venous branches should be meticulously cauterized using bipolar electrocautery to maintain a pristine view of the capsular ligaments.
Capsulotomy and Ligament Preservation
Exposing the radioscaphoid joint requires a deliberate and precise incision through the robust volar extrinsic carpal ligaments. The wrist is placed in extension and slight ulnar deviation over a rolled towel; this maneuver translates the scaphoid volarly, bringing it out from under the protective overhang of the radial styloid. The surgeon must visually identify the distinct fibers of the radioscaphocapitate (RSC) and long radiolunate (LRL) ligaments.
The capsulotomy is performed in line with the longitudinal axis of the scaphoid bone. Using a #15 blade, the surgeon incises the capsule, extending the cut obliquely from the radial styloid distally toward the STT joint. The RSC and LRL ligaments are sharply incised. It is an absolute surgical imperative to meticulously preserve thick, robust leaves of these capsuloligamentous structures on both the radial and ulnar sides of the incision. Failure to leave adequate tissue for a secure, watertight repair at the conclusion of the procedure will lead to catastrophic postoperative carpal instability.
Fracture Exposure, Debridement, and Reduction
Upon opening the capsule, the scaphoid waist and distal pole are directly visualized. The fracture site is typically obscured by organized hematoma, fibrous tissue, and devitalized bone debris. Using a fine dental pick, a small curette, and copious saline irrigation, the surgeon must completely clear the fracture site. This allows for a direct assessment of the fracture edges, the degree of volar comminution, and the exact morphology of the humpback deformity.
Anatomic reduction is the single most critical determinant of a successful long-term outcome. To manipulate the fragments, the surgeon places 0.045-inch Kirschner wires (K-wires) into the distal and proximal poles to act as "joysticks." By applying extending force to the distal pole joystick and flexing force to the proximal pole joystick, the surgeon hinges the fracture open dorsally, thereby correcting the volar flexion deformity. If a significant volar cortical defect is present after reduction, a structural corticocancellous block from the iliac crest must be impacted into the defect to provide mechanical support and restore scaphoid length. Once perfectly reduced, the fracture is provisionally stabilized with a separate 0.045-inch K-wire driven obliquely across the fracture site. This provisional wire must be placed peripherally to avoid obstructing the central trajectory required for the definitive headless compression screw.
Internal Fixation: Headless Compression Screw Technique
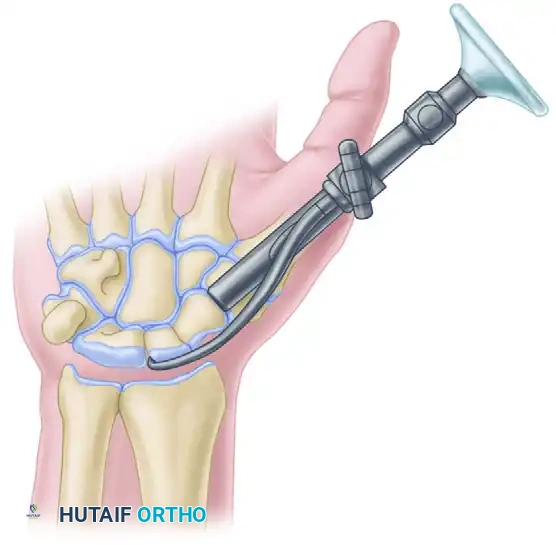
The invention of the Herbert screw revolutionized the surgical management of scaphoid fractures by providing rigid dynamic compression without a protruding head that could impinge on the delicate articular cartilage. Modern cannulated headless compression screws operate on identical biomechanical principles, utilizing a variable pitch thread design to generate compression as the screw is advanced. For waist and distal pole fractures, a distal-to-proximal trajectory down the central axis of the scaphoid is biomechanically superior and is the hallmark of the volar approach.
To achieve this trajectory, a distal portal must be created. The STT joint capsule is opened longitudinally. Because the proximal lip of the trapezium often physically blocks the direct linear trajectory to the central axis of the scaphoid, the surgeon must use a small rongeur to carefully excise a minimal portion of the trapezial ridge. This critical maneuver allows unhindered placement of the central guidewire.
The wrist is gently radially deviated to align the scaphoid vertically relative to the radius. The central guidewire is then introduced at the distal pole and directed almost dorsally and proximally, aiming for the proximal ulnar corner of the proximal pole. Central placement within the middle third of the scaphoid on all fluoroscopic views (PA, lateral, and pronated oblique) is absolutely mandatory to maximize biomechanical stability and prevent cortical breach.
The following sequence illustrates the classic Herbert screw technique, which remains the foundational method for headless scaphoid fixation.
A. Jig Placement:
A specialized compression jig is applied to maintain rigid stability across the fracture site and guide the subsequent drilling process. The jig hooks securely around the proximal pole and seats firmly against the distal pole, ensuring the reduction is maintained during instrumentation.
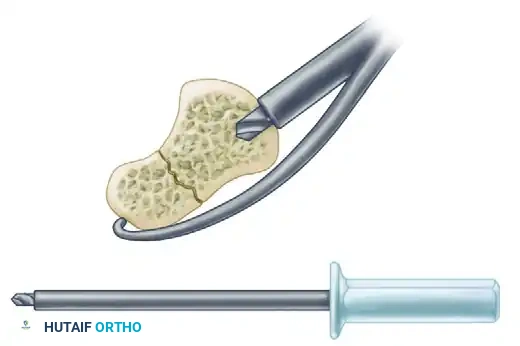
B. Short Drill:
A short drill is utilized to open the near cortex and prepare the distal pole. This step creates the necessary channel for the trailing threads of the headless screw, preventing the screw from binding prematurely in the dense cortical bone of the distal pole.
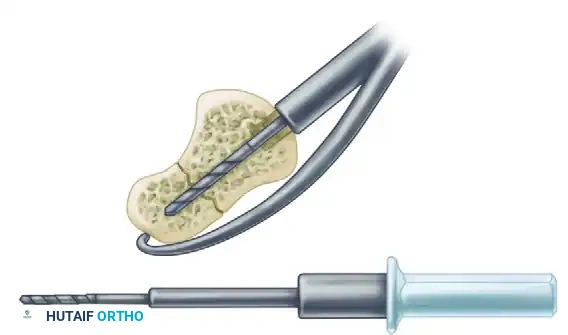
C. Long Drill:
A long drill is then inserted through the guide to its maximal depth. This drill crosses the fracture site and penetrates deep into the proximal pole, preparing the channel for the leading threads of the screw and ensuring precise trajectory alignment.
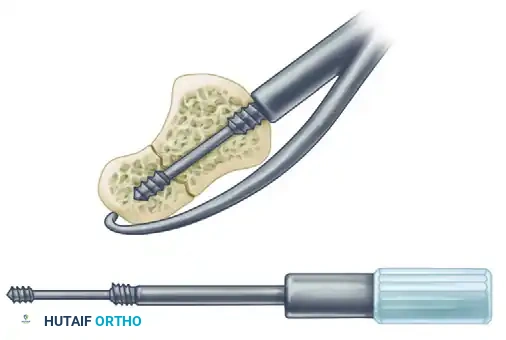
D. Screw Insertion:
The headless compression screw is carefully inserted. The differential pitch between the leading threads (which engage the proximal pole) and the trailing threads (which engage the distal pole) generates dynamic compression across the fracture site as the screw is fully seated.
A crucial technical requirement during insertion is to ensure that the trailing end of the screw is advanced until it is completely flush with the subchondral bone and countersunk beneath the articular cartilage of the distal pole. Even a fraction of a millimeter of hardware prominence will cause rapid, irreversible destruction of the STT joint articular surface. Final fluoroscopic verification is performed by sweeping the C-arm through a full range of motion, confirming that the screw is fully contained within the osseous margins and that the anatomic reduction has been perfectly maintained.
Complications, Incidence Rates, and Salvage Management
Despite meticulous surgical technique, the operative management of scaphoid fractures carries a distinct profile of potential complications. The tenuous vascularity of the bone, the unforgiving nature of carpal kinematics, and the technical demands of central screw placement all contribute to this risk. Surgeons must be acutely aware of these potential pitfalls, their respective incidence rates, and the appropriate salvage pathways.
Nonunion and malunion represent the most significant mechanical failures following scaphoid ORIF. Nonunion, particularly in the presence of proximal pole ischemia, may require revision surgery with vascularized bone grafting (e.g., 1,2-Intercompartmental Supraretinacular Artery [1,2-ICSRA] graft or free medial femoral condyle graft). Malunion, specifically failure to correct the humpback deformity, results in an abnormal dorsal intercalated segment instability (DISI) posture of the lunate and rapid radiocarpal degeneration.
Iatrogenic complications, such as hardware prominence or nerve injury, are entirely preventable with rigorous technique. Prominent hardware at the STT joint will rapidly abrade the trapezium, necessitating early hardware removal and potential STT arthrodesis. Injury to the PCBMN during the superficial approach results in a highly morbid, painful neuroma that is notoriously difficult to treat, often requiring surgical excision and burial of the nerve stump into the pronator quadratus muscle belly.
The following table outlines the primary complications, their approximate incidence rates following volar ORIF, and standard salvage management strategies.
| Complication | Approximate Incidence | Pathophysiology and Clinical Presentation | Salvage Management Strategy |
|---|---|---|---|
| Nonunion | 5% - 10% | Failure of osseous bridging due to inadequate stability, poor blood supply, or severe comminution. Presents with persistent pain and lack of trabecular crossing on CT. | Revision ORIF with structural ICBG; Vascularized bone grafting (1,2-ICSRA or Medial Femoral Condyle) if proximal pole is avascular. |
| Malunion (Humpback) | 3% - 8% | Failure to adequately elevate the distal pole during index surgery. Presents with loss of wrist extension and DISI deformity on lateral radiograph. | Corrective opening wedge osteotomy with structural volar bone grafting and revision hardware fixation. |
| Avascular Necrosis (AVN) | 10% - 15% (Higher in proximal fractures) | Disruption of the retrograde intraosseous blood supply. Presents with increased radiodensity of the proximal pole and eventual collapse. | Vascularized bone grafting for pre-collapse AVN. Proximal row carpectomy (PRC) or scaphoid excision with 4-corner fusion for post-collapse. |
| Hardware Prominence | 2% - 5% | Inadequate countersinking of the trailing screw threads at the distal pole. Presents with mechanical catching, crepitus, and rapid STT joint arthritis. | Immediate hardware removal. If severe STT arthritis is already established, STT arthrodesis or trapeziectomy may be required. |
| Neuroma (PCBMN / SBRN) | 1% - 3% | Iatrogenic traction injury, laceration, or entrapment of superficial nerves in scar tissue. Presents with severe neuropathic pain and positive Tinel's sign. | Conservative management with gabapentinoids/desensitization. Surgical excision of neuroma and intra-muscular burial of the proximal nerve stump. |
| Carpal Instability (VISI) | < 2% | Failure to adequately repair the RSC and LRL ligaments during capsular closure. Presents with volar sagging of the carpus and midcarpal pain. | Revision capsuloligamentous repair or reconstruction. Midcarpal arthrodesis in chronic, recalcitrant cases. |
Phased Post-Operative Rehabilitation Protocols
The postoperative rehabilitation following volar ORIF of a scaphoid fracture is a delicate balancing act. The surgeon and hand therapist must protect the tenuous osseous fixation and capsular repair while simultaneously preventing debilitating stiffness of the wrist and digits. A highly structured, phased rehabilitation protocol is essential for optimizing functional recovery and ensuring long-term success.
Phase 1: Maximum Protection and Edema Control (0 to 2 Weeks)
Immediately following surgery, the wrist is immobilized in a bulky, well-molded sugar-tong splint with a thumb spica extension. The wrist is positioned in neutral to
