Masterclass in Tendon Repair: The Kessler and Tajima Techniques

Key Takeaway
The Kessler grasping suture is a foundational core suture technique utilized in orthopedic and hand surgery for primary tendon repair. By engaging approximately one-quarter of the tendon's width, it provides robust tensile strength and gap resistance. When combined with the Tajima modification utilizing double-armed needles, surgeons can achieve precise anatomical approximation, facilitating early active motion protocols and minimizing postoperative adhesions in critical zones of the hand.
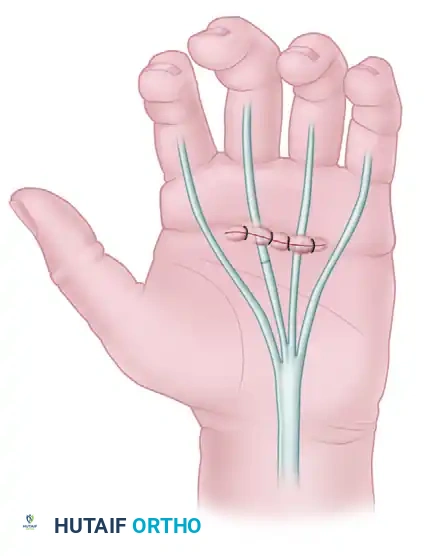
Introduction to Flexor Tendon Repair
The primary goal of flexor tendon repair is to restore the anatomical continuity and biomechanical integrity of the tendon while minimizing the formation of restrictive peritendinous adhesions. Achieving this delicate balance requires a meticulous surgical technique, a profound understanding of tendon biomechanics, and the selection of an appropriate core suture configuration. Among the myriad of techniques developed over the past century, the Kessler Grasping Suture and its subsequent modification by Tajima remain foundational pillars in the armamentarium of the hand and orthopedic surgeon.
Originally described by Isidor Kessler, the classic Kessler technique revolutionized tendon surgery by introducing a "grasping" mechanism. Unlike simple sutures that rely merely on the friction of the thread against the longitudinally oriented collagen bundles—which are prone to pull-out under tension—the grasping suture loops around a portion of the tendon fibers. This transverse engagement significantly increases the pull-out strength and gap resistance of the repair, allowing for more aggressive postoperative rehabilitation protocols.
This comprehensive guide expands upon the classic operative instructions, providing a postgraduate-level analysis of the indications, biomechanics, step-by-step surgical execution, and postoperative management of the Kessler and Tajima tendon repair techniques.
Surgical Anatomy and Biomechanics
Tendon Nutrition and Healing
To execute a flawless tendon repair, the surgeon must respect the dual mechanisms of tendon nutrition: vascular perfusion and synovial imbibition.
* Vascular Perfusion: Blood supply is delivered via the vincula (longa and brevia), which enter the tendon on its dorsal aspect.
* Synovial Imbibition: The diffusion of nutrients from the synovial fluid within the flexor sheath is critical, particularly in the relatively avascular zones (e.g., Zone II, historically termed "no man's land").
Clinical Pearl: When placing core sutures, the needle passes should ideally be situated in the volar (palmar) half of the tendon. This preserves the critical dorsal intrinsic microvasculature supplied by the vincula, thereby optimizing the biological environment for intrinsic tendon healing.
Biomechanics of the Grasping Suture
The biomechanical efficacy of a tendon repair is evaluated based on two primary metrics: tensile strength (the load required to cause catastrophic failure) and gap resistance (the load required to produce a 2 mm gap at the repair site). Gap formation is highly detrimental, as it disrupts the smooth gliding surface, invites fibrovascular ingrowth (adhesions), and elongates the tendon, leading to a loss of active flexion.
The Kessler grasping suture addresses these biomechanical challenges by:
1. Transverse Fiber Engagement: By capturing approximately one-quarter of the tendon's width transversely, the suture creates a mechanical lock against the longitudinal collagen fibers.
2. Load Distribution: The tension is distributed across the grasping loops rather than relying solely on the knot, reducing the risk of suture cut-through.
Preoperative Preparation and Setup
Indications
- Primary repair of acute flexor tendon lacerations (Zones I-V).
- Primary repair of extensor tendon lacerations (Zones IV-VIII).
- Tendon transfers and grafting procedures requiring robust end-to-end anastomosis.
Anesthesia and Positioning
- Anesthesia: General anesthesia, regional block (axillary or supraclavicular), or Wide Awake Local Anesthesia No Tourniquet (WALANT). WALANT is increasingly preferred as it allows intraoperative active movement testing to assess repair integrity and gliding through the pulleys.
- Positioning: The patient is positioned supine with the operative arm extended on a radiolucent hand table.
- Tourniquet: If WALANT is not used, a pneumatic upper arm tourniquet is applied and inflated to 250 mm Hg (or 100 mm Hg above systolic pressure) after exsanguination.
- Magnification: Surgical loupes (minimum 2.5x to 3.5x magnification) or an operating microscope are mandatory for precise epitenon handling and suture placement.
Instrumentation and Suture Selection
- Core Suture: A 3-0 or 4-0 non-absorbable, braided synthetic suture (e.g., braided polyester) or monofilament (e.g., polypropylene) is typically selected. Braided sutures offer superior knot security and handling, while monofilaments glide more easily through the tendon substance.
- Needles: Tapered or cutting needles depending on surgeon preference; double-armed needles are specifically required for the Tajima modification.
- Epitendinous Suture: A 5-0 or 6-0 monofilament (e.g., nylon or polypropylene) on a fine taper needle.
Surgical Technique 66-1: The Classic Kessler Grasping Suture
The classic Kessler technique is characterized by its distinct grasping loops and the placement of the knots on the external surface of the tendon. While modern variations often bury the knot to reduce gliding resistance, understanding the classic technique is essential for mastering tendon biomechanics.
Step 1: Initial Transverse Pass and Grasp
Begin with the first segment of the lacerated tendon. Handle the tendon edges delicately using skin hooks or by placing a temporary core suture to avoid crushing the epitenon with forceps.
* Tie a knot near the end of the first suture.
* Pass the needle transversely through the tendon, ensuring that you include exactly one-quarter of the tendon width in this first pass. This creates the initial "grasp" on the collagen fibers.
Step 2: Longitudinal Exit
- Redirect the needle and pass it longitudinally through the substance of this first tendon segment.
- The needle must exit directly out through the cut surface of the tendon.
Step 3: Entering the Second Segment
- Align the second segment of the lacerated tendon.
- Pass the needle directly into the cut surface of the second segment, advancing it longitudinally into the tendon substance.
Step 4: The Second Transverse Grasp
- With a separate needle (or continuing if using a specific single-needle modification), pass another suture transversely through the second segment.
- Lock the suture with a knot. This mirrors the grasping action performed on the first segment, securing the collagen bundles of the distal stump.
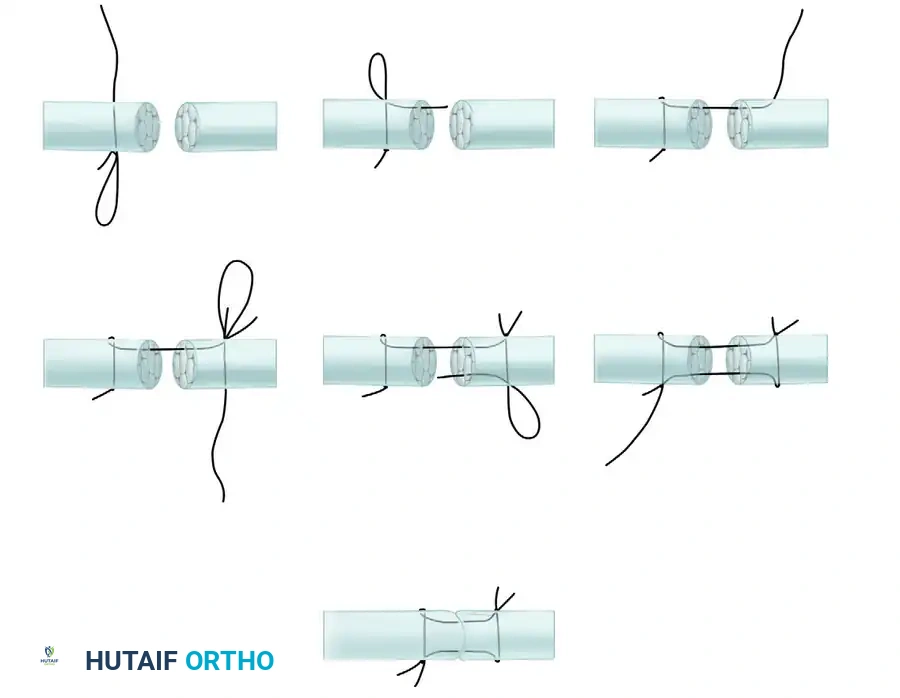
Step 5: Return Longitudinal Pass
- Pass the needle from the second segment of the tendon back into the first segment.
- The needle must traverse the cut surfaces and exit precisely at the initial entry point of the first suture on the lateral aspect of the tendon.

Step 6: Approximation and Knot Tying
- Carefully apply tension to the suture ends to draw the two tendon stumps together.
- Crucial Step: Approximate the cut surfaces completely before tying the final knots on the surface.
- The final construct results in two diagonally placed knots tied on the external surface of the tendon.
Surgical Warning: In the classic Kessler technique, the knots are left on the surface of the tendon. In Zone II repairs, bulky surface knots can significantly increase gliding resistance against the A2 or A4 pulleys, potentially leading to triggering or repair rupture. For Zone II, a modified technique that buries the knot within the repair site is highly recommended.
Surgical Technique 66-3: The Tajima Tendon Repair
Recognizing the limitations of surface knots in the classic Kessler repair, T. Tajima introduced a highly effective modification in 1984. The Tajima technique utilizes double-armed needles and strategically places the knots inside the cut surfaces of the tendon (buried knots), resulting in a smoother exterior profile that is ideal for Zone II flexor tendon repairs.
Step 1: Preparation with Double-Armed Needles
The Tajima method is vastly simplified by using a suture equipped with needles at both ends (double-armed). This allows for symmetrical, simultaneous placement of the core strands.
Step 2: Core Placement in the First Stump
- Introduce the first needle into the cut surface of the proximal tendon stump, advancing it longitudinally for approximately 1 cm.
- Exit the tendon laterally.
- Pass the needle transversely across the dorsal aspect of the tendon (capturing the necessary collagen fibers) and re-enter the tendon.
- Pass the needle longitudinally back down the tendon, exiting through the cut surface.
- Repeat this exact process with the second needle on the opposite side of the same tendon stump.
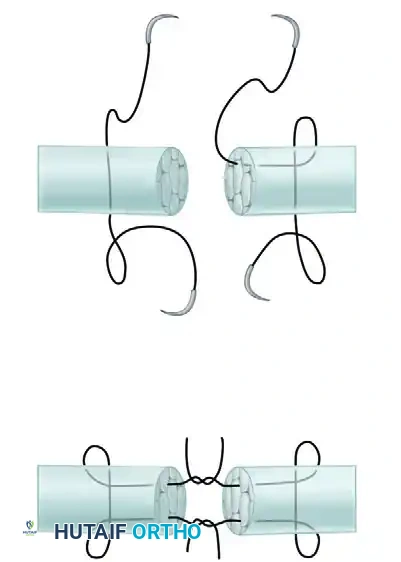
Step 3: Core Placement in the Second Stump
- Perform the identical grasping loop configuration on the distal tendon stump using a second double-armed suture.
- Ensure that the longitudinal passes exit precisely at the cut surface, aligning with the exit points of the proximal stump.
Step 4: Suture Tying and Knot Burial
- You now have four suture strands exiting the cut surfaces (two from the proximal stump, two from the distal stump).
- Pair the corresponding strands from the proximal and distal stumps.
- Apply even tension to approximate the tendon ends.
- Tie the strands together. Because the knots are tied between the cut surfaces, they become completely buried within the tendon substance once the stumps are fully approximated.

Clinical Pearl: The Tajima modification not only buries the knot but also allows the surgeon to place the core sutures independently in the proximal and distal stumps before bringing them together. This is exceptionally useful when working in tight spaces, such as retrieving a retracted proximal stump through a small window in the flexor sheath.
Epitendinous Augmentation
Regardless of whether the classic Kessler or the Tajima modification is utilized, a core suture alone is insufficient for modern early active motion protocols. The repair must be augmented with a peripheral epitendinous suture.
Biomechanical Advantages of Epitendinous Sutures
- Increased Tensile Strength: A well-placed peripheral suture increases the overall strength of the repair by 10% to 50%.
- Gap Prevention: It tightly seals the repair site, preventing the micro-gapping that leads to adhesion formation.
- Improved Gliding: It tucks in any frayed collagen edges, creating a smooth, streamlined surface that glides effortlessly beneath the annular pulleys.
Technique
- Utilize a 5-0 or 6-0 monofilament suture.
- A running simple, running locking, or Silfverskiöld cross-stitch technique can be employed.
- The needle should purchase approximately 1 to 2 mm of the epitenon on each side of the repair.
- Ensure the suture is pulled taut enough to coapt the edges but not so tight as to strangulate the tissue or cause bunching of the tendon.
Postoperative Rehabilitation Protocols
The success of a Kessler or Tajima tendon repair is inextricably linked to the postoperative rehabilitation protocol. The goal is to apply enough controlled stress to stimulate intrinsic tendon healing and prevent adhesions, without exceeding the tensile strength of the repair.
1. Immobilization (Historical/Pediatric)
Strict immobilization is rarely used in compliant adults today due to the high risk of severe adhesions. It is reserved for pediatric patients (under 7 years old) or patients lacking the cognitive ability to comply with complex rehab protocols.
2. Early Passive Motion (Kleinert and Duran Protocols)
- Kleinert Protocol: Utilizes a dynamic splint. The wrist is placed in slight flexion, and rubber band traction is attached to the injured finger, pulling it into passive flexion. The patient actively extends the finger against the resistance of the rubber band.
- Duran Protocol: Involves a static dorsal blocking splint. The patient uses their uninjured hand to passively flex and extend the joints of the injured finger within the constraints of the splint.
3. Early Active Motion (EAM)
Modern 4-strand to 6-strand repairs (often built upon the Kessler/Tajima foundation) are strong enough to withstand Early Active Motion.
* Place and Hold: The therapist passively flexes the digits, and the patient gently contracts their muscles to "hold" the fist position.
* True Active Motion: The patient actively flexes the digits to half a fist or a full fist, depending on the protocol and the surgeon's assessment of repair strength.
* Synergistic Motion: Utilizing the tenodesis effect (wrist extension combined with finger flexion) to minimize the work of flexion and reduce gliding resistance.
Complications and Pitfalls
Even with flawless execution of the Kessler or Tajima techniques, complications can arise. Anticipating and mitigating these risks is the hallmark of a master surgeon.
1. Tendon Rupture
Rupture typically occurs between postoperative days 7 and 21, during the inflammatory and early fibroblastic phases of healing when the tendon softens before regaining strength.
* Prevention: Ensure adequate core suture purchase (1/4 width), use an epitendinous suture, and strictly adhere to the rehabilitation protocol.
2. Adhesion Formation
Adhesions restrict tendon gliding, leading to a discrepancy between passive and active range of motion.
* Prevention: Minimize handling of the epitenon, bury knots using the Tajima technique, ensure a smooth epitendinous repair, and initiate early motion.
3. Bowstringing
Occurs if critical pulleys (A2 and A4) are excessively vented or damaged during the approach and not adequately reconstructed.
* Prevention: Preserve the A2 and A4 pulleys whenever possible. If venting is necessary to accommodate a swollen repair site, vent the A3, A5, or the cruciate pulleys instead.
4. Joint Contracture
Flexion contractures of the Proximal Interphalangeal (PIP) joint are common following flexor tendon injuries.
* Prevention: Incorporate night extension splinting into the rehabilitation protocol once the repair is deemed strong enough to tolerate passive stretch (usually around 4-6 weeks postoperatively).
Conclusion
The Kessler grasping suture and the Tajima modification represent critical milestones in the evolution of operative orthopaedics and hand surgery. By understanding the biomechanical necessity of transverse fiber engagement and the gliding advantages of buried knots, surgeons can construct robust repairs capable of withstanding the demands of early active motion. Mastery of these techniques, combined with meticulous tissue handling and rigorous postoperative rehabilitation, ensures optimal functional outcomes for patients sustaining debilitating tendon injuries.
You Might Also Like