Hybrid External Fixation of Tibial Pilon Fractures: The Watson Technique
Key Takeaway
Hybrid external fixation is a highly effective, tissue-sparing technique for managing complex tibial pilon fractures. By combining tensioned fine wires for precise articular reduction with rigid half-pins in the tibial diaphysis, this construct minimizes soft tissue compromise while providing robust biomechanical stability. This guide details the Watson technique, emphasizing preoperative CT planning, fibular stabilization, meticulous frame assembly, and both closed and open articular reduction strategies.
INTRODUCTION TO HYBRID EXTERNAL FIXATION
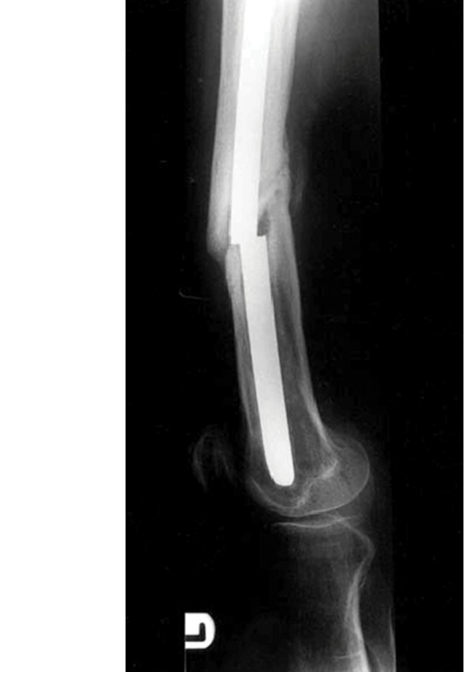
The management of high-energy tibial pilon fractures remains one of the most formidable challenges in orthopedic trauma surgery. The defining characteristic of these injuries is severe axial loading, which results in profound articular comminution, metaphyseal impaction, and, critically, devastating injury to the surrounding soft tissue envelope. Traditional open reduction and internal fixation (ORIF) in the acute setting is historically fraught with unacceptably high rates of wound dehiscence, deep infection, and osteomyelitis.
To mitigate these catastrophic soft tissue complications while still achieving rigid skeletal stabilization, hybrid external fixation has emerged as a cornerstone of modern pilon fracture management. The Watson technique of hybrid external fixation marries the principles of Ilizarov tensioned fine-wire fixation for the periarticular fragments with the simplicity and rigidity of unilateral half-pins (Schanz pins) in the tibial diaphysis. This hybrid construct provides a biomechanically sound, tissue-sparing alternative that allows for precise articular reconstruction, maintenance of length and alignment, and unimpeded access for soft tissue management.
INDICATIONS AND PREOPERATIVE PLANNING
Hybrid external fixation is primarily indicated for Tscherne Grade II or III closed soft tissue injuries, open fractures, and highly comminuted C-type pilon fractures where extensive surgical approaches would compromise the tenuous vascularity of the distal tibia.
Advanced Imaging and Corridor Selection
Standard orthogonal radiographs are insufficient for preoperative planning. A fine-cut computed tomography (CT) scan with 2D sagittal and coronal reconstructions, as well as 3D surface rendering, is mandatory.
Surgical Pearl: The CT scan is not merely diagnostic; it is the roadmap for wire placement. You must map the major fracture lines (sagittal, coronal, and oblique) to determine the exact trajectories for your tensioned olive wires. The goal is to place wires orthogonal to the primary fracture planes to maximize interfragmentary compression.
PATIENT POSITIONING AND PREPARATION
Meticulous patient positioning is critical to facilitate unimpeded fluoroscopic imaging and to allow 360-degree access for circular frame application.
- Table and Positioning Device: Place the patient supine on a fully radiolucent operating table. Utilize a beanbag patient-positioning device beneath the ipsilateral hip and leg.
- Elevation: Bolster the beanbag to elevate the entire lower extremity. This elevation is crucial to allow the placement of the posterior half of the circular fixator rings without impinging on the table surface.
- Traction Setup: Maintain longitudinal calcaneal traction throughout the procedure. This can be achieved via a table extension utilizing a sterile traction bow. Alternatively, if a temporary damage-control two-pin external fixator (spanning the ankle) is already in place, utilize it to maintain traction and ligamentotaxis during the initial stages of the definitive reconstruction.
SURGICAL TECHNIQUE: STEP-BY-STEP
Step 1: Fibular Stabilization
Restoring the lateral column is generally the first step in pilon reconstruction. The fibula acts as a template for tibial length and rotational alignment.
- Favorable Soft Tissues: If the lateral soft tissue envelope permits, perform a limited open reduction technique. Utilize a standard posterolateral approach to apply a four-hole or six-hole one-third tubular or locking plate.
- Compromised Soft Tissues: If the soft tissues along the lateral aspect of the fibula are severely contused or blistered, avoid a formal incision. Instead, use percutaneous tenaculum forceps to pull the fibula out to length. Pin it temporarily to the lateral tibia using a percutaneous Kirschner wire (K-wire). Later in the procedure, this K-wire will be replaced with a tensioned olive wire to maintain the reduction.
Surgical Warning: Do not force an open fibular reduction if the lateral soft tissues are compromised. Wound necrosis over the lateral malleolus is a devastating complication that can expose hardware and necessitate complex flap coverage.
Step 2: Proximal Frame Assembly and Diaphyseal Fixation
The external fixation frame typically consists of three or four rings, depending on the proximal extent of the fracture lines.
- Frame Blueprint: Begin conceptualizing the frame with a distally based ring located at the level of the ankle joint. Locate the second ring just proximal to any diaphyseal shaft extension. If there is a wide zone of diaphyseal-metaphyseal comminution, an additional middle ring is necessary to bridge the defect.
- Connecting the Rings: Connect the proximal two or three rings (those situated above the fracture zone) using long, threaded rods. Leave the distal-most ring free at this stage.
- The Clamshell Technique: Open the pre-assembled proximal ring construct in a "clamshell" fashion and place it over the tibial shaft.
- Establishing the Reference Wire: Place a transverse reference fine wire parallel to the knee joint line and level with the fibular head. Attach the most proximal ring to this wire.
- Alignment: Obtain appropriate soft tissue clearance (minimum two fingerbreadths circumferentially). Position the proximal ring construct on the limb to ensure it is perfectly parallel to the knee joint and colinear with the intact proximal shaft of the tibia.
- Diaphyseal Fixation: Place a 5.0mm or 6.0mm hydroxyapatite-coated Schanz pin into the proximal tibial shaft and attach it to the most proximal ring using a pin-to-ring clamp. The proximal ring construct is now firmly attached to the intact tibia above the fracture.
- Reinforcing the Construct: Place additional transfixation wires or Schanz pins on the additional proximal rings to obtain at least two levels of multi-planar fixation on each ring of the intact proximal shaft.
- Comminution Zone: Crucial step: Do not yet place any olive wires or pins through the area of metaphyseal comminution.
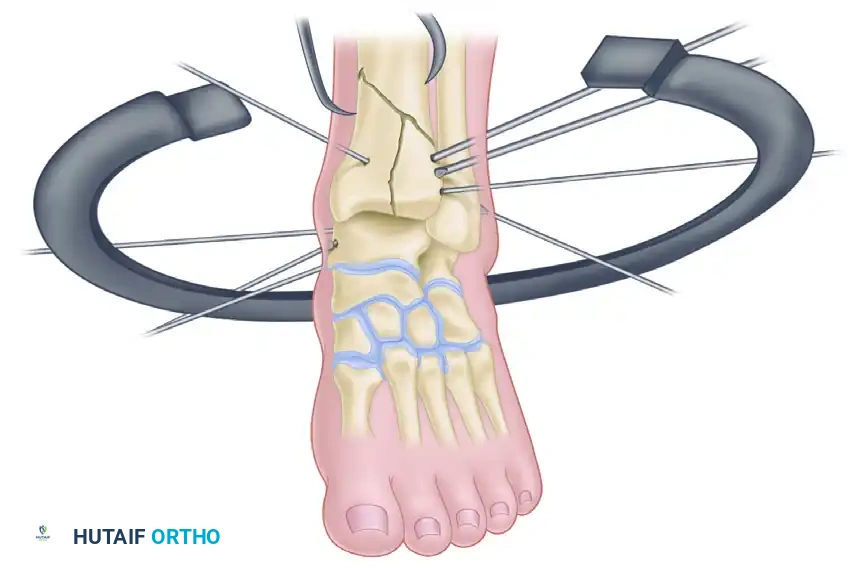
Step 3: Articular Reduction and Fixation (Closed Technique)
Articular fixation is performed next. The goal is to reconstruct the joint block from the "inside out" or "outside in" based on the fracture morphology.
If longitudinal traction (ligamentotaxis) successfully reduces the articular fragments, proceed with percutaneous fixation.
- Wire Trajectory Planning: Based strictly on the preoperative CT data, stabilize the fracture by placing percutaneous olive wires across the major articular fragments.
- Wire Placement: Drive the olive wires from the smaller fragment toward the larger fragment to achieve compression.
- Coronal Fractures: For distinct coronal plane fractures (e.g., a large posterior malleolar Volkmann fragment), the use of anterior-to-posterior (or posterior-to-anterior) cannulated screws (3.5mm or 4.0mm) is highly recommended to facilitate rigid interfragmentary compression, supplementing the wire fixation.
- Customized Patterns: Unlike traditional Ilizarov techniques that utilize standardized, rigid patterns of transfixation wire placement, the Watson hybrid technique dictates that transfixation wires are placed exactly where the specific fracture patterns dictate.
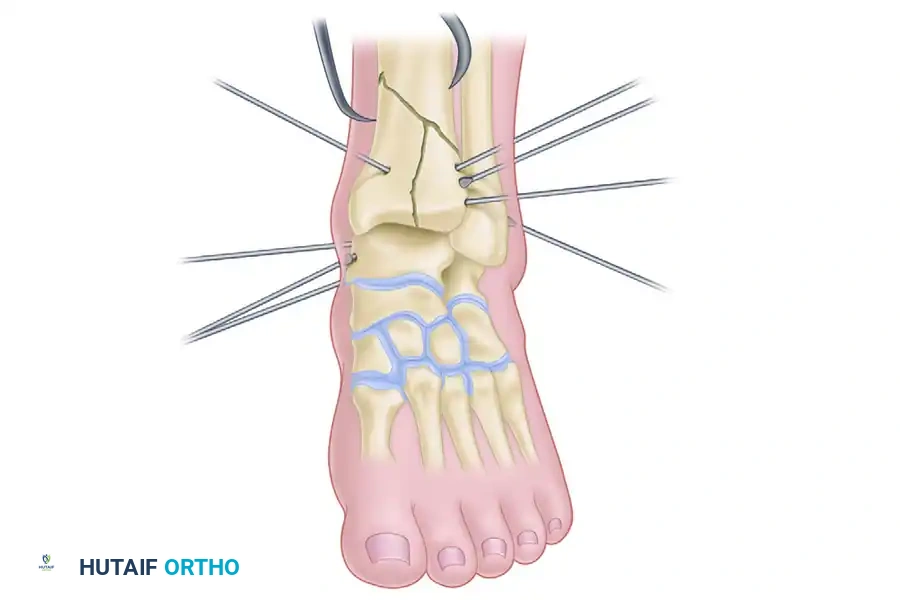
Step 4: Distal Ring Application
Once the articular block is reconstructed and provisionally held with olive wires, the distal ring is applied.
- Clamshell the Distal Ring: Open the distal ring in a clamshell fashion and position it around the ankle.
- Alignment: Ensure the distal ring is placed perfectly parallel to the ankle joint line. This is critical for restoring the mechanical axis of the lower extremity.
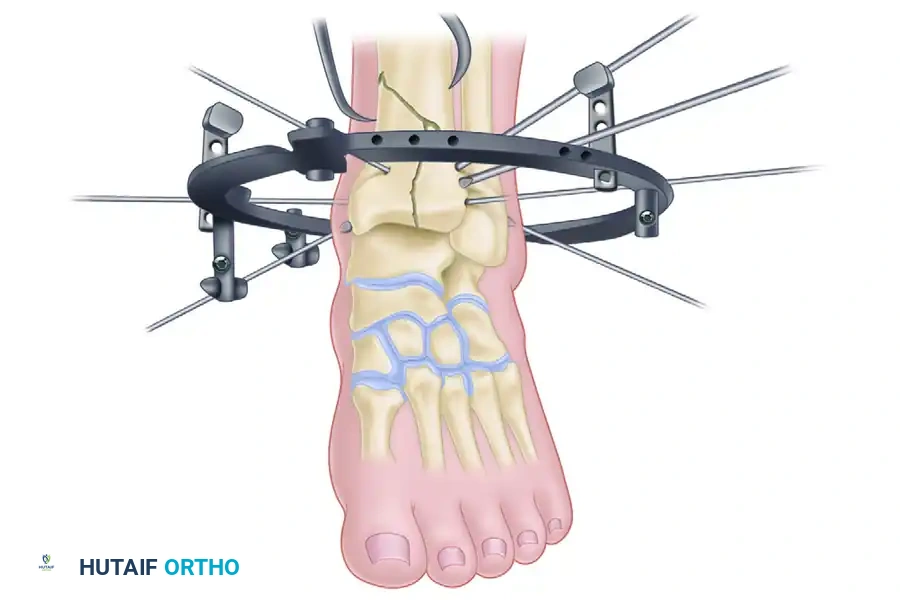
Step 5: Wire Attachment and Tensioning
The previously placed articular olive wires must now be secured to the distal ring. Because the wires were placed based on fracture anatomy rather than ring geometry, they will likely not sit flush against the ring.
- Using Posts: Utilize posts (male/female hinges, slotted washers, or stand-offs) of various heights to attach the wires to the ring without bending the wires. Bending the wires to meet the ring will displace the meticulously achieved articular reduction.
- Tensioning: Once attached via posts, tension the fine wires (typically to 110-130 kg) using a dynamometer. Tensioning transforms the flexible wires into rigid structural members, providing immense stability to the articular block.
- Connecting the Construct: Finally, connect the distal ring to the proximal diaphyseal construct using threaded rods, locking in the overall length, alignment, and rotation.
Step 6: Open Articular Reduction (If Ligamentotaxis Fails)
If closed ligamentotaxis is unsuccessful in restoring articular congruity (step-off > 2mm), a limited open approach is strictly indicated.
- Incision Planning: Based on the CT data, select an appropriate safe corridor. Make a limited 4- to 6-cm incision.
- Soft Tissue Handling: Absolutely avoid undermining any large cutaneous flaps. The incision should lead directly down to the major fracture line.
- Exposure: Perform minimal periosteal stripping. Open the primary fracture line "like a book" to reveal the impacted joint surface. Because the joint is distracted by the external fixator, the impacted central articular fragments (die-punch fragments) will be clearly visible.
- Disimpaction and Grafting: Use a small periosteal elevator or dental pick to disimpact the articular surface. Reduce the fragments under direct vision. Apply cancellous bone graft (autograft or allograft) into the resulting metaphyseal void to maintain the elevated segment in position and prevent late subsidence.
- Provisional Fixation: Reduce the metaphyseal fragments and hold the entire construct with temporary K-wires.
- Definitive Fixation: Use cannulated screws for definitive articular fixation of coronal fracture lines. For most other fracture lines, place olive wires percutaneously or directly through the incision to compress the fragments. At least three or four olive wires are necessary to obtain adequate, multi-planar fixation of the articular surfaces.
- Syndesmotic Disruption: If the distal tibiofibular joint has been disrupted, utilize a dedicated olive wire traversing the fibula into the tibia to stabilize the syndesmosis.
PRIMARY ARTHRODESIS IN SEVERE TRAUMA
While anatomical reduction is the primary goal, primary arthrodesis is a recognized salvage pathway for the most devastating injuries.
Primary arthrodesis has been suggested as a method of treating severely comminuted tibial pilon fractures where the articular cartilage is unsalvageable. However, several investigators have noted that severe skeletal injury and nonanatomical reduction do not necessarily preclude a satisfactory clinical result if stability and alignment are restored.
We generally recommend stabilization of these fractures with an external fixator to maintain alignment and allow bony consolidation first. Arthrodesis can be performed as a staged, secondary procedure later if the patient develops symptomatic post-traumatic arthritis.
Indications for Immediate Primary Arthrodesis:
Primary arthrodesis may be considered in the acute setting for severe open injuries (e.g., Gustilo-Anderson IIIB/IIIC) with extensive, irreversible loss of cartilage from both the tibial plafond and the talar dome.
Technique:
1. The wound is aggressively débrided.
2. All remaining devitalized cartilage is denuded from the talus and distal tibia down to bleeding subchondral bone.
3. A hybrid or circular external fixator is applied to compress the tibia directly onto the talus.
4. Bone grafting is usually delayed until the soft tissue envelope has healed and is free of infection.
Clinical Pitfall: In these severe, open injuries with massive bone and soft tissue loss, functional results of salvage are often poor. Primary or delayed amputation must be discussed with the patient as a viable, and sometimes functionally superior, alternative to endless reconstructive surgeries.
POSTOPERATIVE PROTOCOL AND REHABILITATION
The success of hybrid external fixation relies heavily on meticulous postoperative care.
- Wound Care: Incisions and pin sites are dressed with sterile, non-adherent dressings. Pin tract care protocols vary by institution but generally involve daily cleansing with chlorhexidine or saline to prevent crust buildup and superficial infection.
- Mobilization: Early range of motion of the knee and toes is encouraged immediately. Ankle range of motion is restricted by the frame.
- Weight-Bearing: Patients are typically kept non-weight-bearing or touch-down weight-bearing for the first 6 to 8 weeks. Progressive weight-bearing is initiated once radiographic evidence of bridging callus is observed in the metaphyseal/diaphyseal junction.
- Frame Removal: The hybrid frame is generally maintained for 12 to 16 weeks. Removal is performed in the clinic or under light sedation once clinical stability and radiographic union are confirmed. Following removal, the limb is often protected in a controlled ankle motion (CAM) boot for an additional 4 weeks.
By adhering to these rigorous biomechanical principles and respecting the delicate soft tissue envelope, the Watson technique of hybrid external fixation provides a powerful tool for the orthopedic surgeon to conquer the complexities of the tibial pilon fracture.
📚 Medical References
- tibial pilon fractures: a study of three techniques, J Orthop Trauma 15:153, 2001.
- Blotter RH, Connolly E, Wasan A, et al: Acute complications in the operative treatment of isolated ankle fractures in patients with diabetes mellitus, Foot Ankle Int 20:687, 1999.
- Boden BP, Osbahr DC: High-risk stress fractures: evaluation and treatment, J Am Acad Orthop Surg 8:344, 2000.
- Boden SD, Labropoulos PA, McCowin P, et al: Mechanical considerations for the syndesmosis screw, J Bone Joint Surg 71A:1548, 1989.
- Bonar SK, Marsh JL: Unilateral external fi xation for severe pilon fractures, Foot Ankle 14:57, 1993.
- Bone LB: Fractures of the tibial plafond: the pilon fracture, Orthop Clin North Am 18:95, 1987.
- Borens O, Kloen P, Richmond J, et al: Minimally invasive treatment of pilon fractures with a low profi le plate: preliminary results in 17 cases, Arch Orthop Trauma Surg 2006 [epub ahead of print]. Borrelli J Jr, Ellis E: Pilon fractures: assessment and treatment, Orthop Clin North Am 33:231, 2002.
- Borrelli J, Prickett W, Song E, et al: Extraosseous blood supply of the tibia and effects of different plating techniques: a human cadaver study, J Orthop Trauma 16:691, 2002.
- Böstman OM: Displaced
You Might Also Like