Ulnar Collateral Ligament Reconstruction: The Jobe Technique Masterclass
Key Takeaway
The Jobe Technique for Ulnar Collateral Ligament (UCL) reconstruction is the gold standard for restoring medial elbow stability in overhead athletes. This procedure utilizes a tendon autograft, typically the palmaris longus, routed in a figure-of-eight configuration through ulnar and humeral bone tunnels. Meticulous handling of the ulnar nerve, precise anatomic tunnel placement, and rigorous postoperative rehabilitation are critical to achieving a successful return to competitive play.
Introduction to Ulnar Collateral Ligament Reconstruction
The Ulnar Collateral Ligament (UCL) is the primary restraint to valgus stress at the elbow, particularly during the late cocking and early acceleration phases of the overhead throwing motion. Repetitive near-failure tensile stresses can lead to microtears, attenuation, and eventual macroscopic rupture of the UCL, predominantly affecting the anterior bundle. When conservative management fails, UCL reconstruction—famously pioneered by Dr. Frank Jobe in 1974 (colloquially known as "Tommy John Surgery")—remains the gold standard for returning elite athletes to competitive play.
This masterclass details the classic Jobe Technique and its critical modifications, emphasizing precise anatomic tunnel placement, meticulous soft-tissue handling, and rigorous biomechanical restoration of the medial elbow.
Biomechanics and Surgical Anatomy
A profound understanding of medial elbow anatomy is non-negotiable for successful UCL reconstruction. The UCL complex consists of three distinct bundles: the anterior, posterior, and transverse bundles.
- The Anterior Bundle: The primary stabilizer against valgus stress from 30 to 120 degrees of elbow flexion. It originates from the anteroinferior surface of the medial epicondyle and inserts onto the sublime tubercle of the anteromedial coronoid process.
- The Posterior Bundle: Forms the floor of the cubital tunnel and acts as a secondary restraint, primarily taut in higher degrees of flexion.
- The Transverse Bundle (Cooper's Ligament): Originates and inserts on the ulna, contributing minimally to valgus stability.
💡 Clinical Pearl: The Isometric Point
The origin of the anterior bundle on the medial epicondyle is not a single point but a broad footprint. However, the functional isometric point lies on the inferior surface of the medial epicondyle, slightly posterior to the axis of rotation. Precise placement of the humeral tunnel at this anatomic origin is the most critical step in preventing graft stretching or joint stiffness postoperatively.
Preoperative Planning and Indications
UCL reconstruction is indicated in overhead athletes (pitchers, javelin throwers, tennis players) who present with symptomatic medial elbow instability that has failed a comprehensive non-operative rehabilitation program (typically 3 to 6 months).
Key Diagnostic Indicators:
* Positive Moving Valgus Stress Test.
* Positive Milking Maneuver.
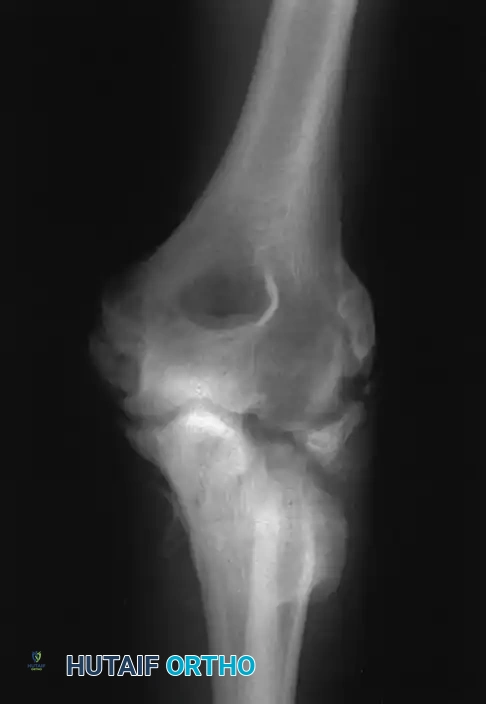
* MRI or MR Arthrogram demonstrating a high-grade partial tear, complete rupture, or chronic attenuation of the anterior bundle of the UCL.
* Concomitant valgus extension overload (VEO) syndrome, characterized by posteromedial olecranon osteophytes.
The Jobe Technique: Core Principles
Before initiating the surgical approach, the surgeon must internalize the five cardinal technical points of the Jobe procedure:
1. Debridement: All calcifications and degenerative tissue must be meticulously removed from the native ligament.
2. Anatomic Fidelity: Drill holes must correspond exactly to the native UCL attachment sites (medial epicondyle and sublime tubercle).
3. Graft Protection: The graft must not rub against the epicondyle or ulna; the ends of the graft must be securely buried within the osseous tunnels.
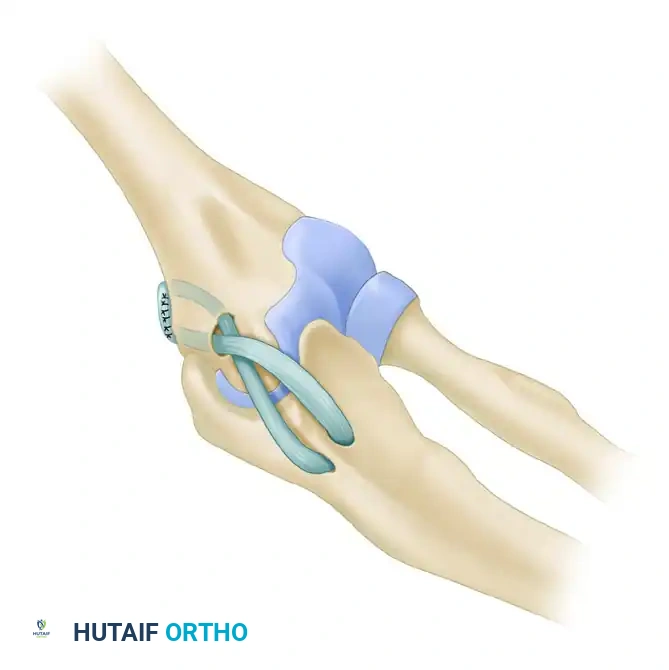
4. Biomechanical Configuration: A figure-of-eight configuration ensures optimal tensile strength and closely approximates native UCL biomechanics.
5. Neurological Preservation: Meticulous handling of the medial antebrachial cutaneous nerve (MABCN), the ulnar nerve, their branches, and their vascular supply is paramount to prevent devastating postoperative neuropathies.
Step-by-Step Surgical Technique
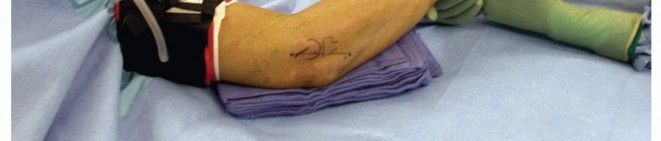
1. Patient Positioning and Preparation
- Place the patient supine on the operating table.
- Apply a well-padded pneumatic tourniquet high on the brachium.
- Position the operative arm on a radiolucent hand table with the elbow fully extended. Place a rolled towel beneath the elbow to allow for controlled flexion and extension during the procedure.
- Simultaneously prepare and drape the ipsilateral forearm (or contralateral arm/ipsilateral leg) for graft harvest (palmaris longus, plantaris, or gracilis).
2. Incision and Superficial Exposure
- Make a 10-cm longitudinal incision centered over the medial epicondyle, extending distally over the flexor-pronator mass.
- Carefully dissect through the subcutaneous tissue.
- CRITICAL STEP: Identify and protect the branches of the medial antebrachial cutaneous nerve (MABCN). Iatrogenic injury to the MABCN is a common cause of painful postoperative neuromas.
3. Deep Dissection and Muscle Splitting
- Identify the common flexor-pronator mass.
- Incise the fascia over the posterior third of the flexor-pronator mass.
- Utilize a muscle-splitting approach (rather than a full detachment) to expose the underlying UCL. This preserves the dynamic medial stabilizers of the elbow.
- Incise the native UCL longitudinally to evaluate the quality of the ligamentous tissue and inspect the medial joint compartment.
4. Ulnar Nerve Management
- Identify the ulnar nerve within the cubital tunnel.
- Lightly retract the ulnar nerve posteriorly just enough to clear it from the bone, allowing safe access for ulnar tunnel drilling.
- Note: In the classic Jobe technique without pre-existing neuropathy, the nerve is not routinely transposed. It is simply protected.
⚠️ Surgical Warning: Ulnar Nerve Handling
Avoid excessive traction or circumferential dissection of the ulnar nerve unless a formal transposition is planned. Devascularization of the nerve can lead to severe postoperative ulnar neuritis.
5. Preparation of the Ulnar Tunnels
- Identify the sublime tubercle on the proximal ulna.
- Using a 3.2-mm drill bit on a slow speed setting (to prevent thermal necrosis), drill two holes: one anterior and one posterior to the sublime tubercle.
- Bone Bridge: Ensure a minimum 1-cm bone bridge is left intact between the two holes at the level of the coronoid tubercle. A compromised bone bridge can lead to catastrophic intraoperative fracture during graft tensioning.
- Connect the holes using small angled curettes to create a smooth, U-shaped tunnel.
6. Preparation of the Humeral Tunnels
- Identify the anatomic origin of the UCL on the anteroinferior aspect of the medial epicondyle.
- Using a 4-mm drill bit, create a common anterior hole at the exact origin of the UCL, drilling to a depth of approximately 1 cm.
- Switch to a 3.2-mm drill bit to create divergent tunnels (a "lazy Y" configuration). These tunnels should exit anterior to the medial intermuscular septum, spaced approximately 0.5 cm apart.
- Chamfer all tunnel edges with a rasp or curette to prevent graft abrasion.
7. Graft Harvest (Palmaris Longus)
- Identify the palmaris longus tendon by having the patient (preoperatively) oppose the thumb and small finger while flexing the wrist.
- Make a small transverse incision at the distal wrist crease. Identify the median nerve and isolate the palmaris longus tendon with a hemostat.
- Make serial transverse incisions proximally at 7 to 9-cm intervals up to the musculotendinous junction (usually requiring three incisions).
- Release the tendon distally, deliver it through each proximal incision, and divide it just proximal to the musculotendinous junction. The goal is to obtain a graft 15 to 20 cm in length.
- Strip all adherent muscle belly from the tendon on the back table.
- Place a 1-0 nonabsorbable locking suture (e.g., Krackow or whipstitch) into both ends of the graft to facilitate passage.
8. Management of Concomitant Pathology (Andrews Modification)
If the patient suffers from Valgus Extension Overload (VEO) with posterior olecranon osteophytes:
* Make a vertical arthrotomy posteriorly to expose the olecranon tip.
* Use a small osteotome and rongeur to resect the posteromedial tip of the olecranon (removing approximately 5 mm to 1 cm of bone and cartilage).
* Thoroughly irrigate the joint and close the posterior arthrotomy before proceeding with graft passage.
9. Graft Passage and Fixation
- Using a Hewson suture passer or a looped passing wire, thread the graft through the ulnar tunnel first.
- Pass the limbs of the graft across the joint in a figure-of-eight pattern.
- Bring each end of the graft into the common 4-mm humeral hole and out through the divergent 3.2-mm tunnels.
- If the graft length permits, pass one limb through the tunnels a second time to augment the reconstruction.
10. Tensioning and Final Suture
- Remove the rolled towel from beneath the elbow.
- Position the elbow in neutral varus-valgus alignment and exactly 45 degrees of flexion.
- Apply manual tension to the graft limbs.
- Tie the nonabsorbable sutures over the intervening bone bridge on the medial epicondyle.
- Take the elbow through a full range of motion to evaluate graft isometry and joint stability. The graft should be taut in extension and maintain tension through flexion without restricting motion.
- Suture the graft limbs to each other and to the native remnants of the UCL to promote biological healing and augment the construct.
Management of the Ulnar Nerve (Transposition)
If the patient presented with preoperative ulnar nerve symptoms (cubital tunnel syndrome), or if heavy scar tissue/subluxation is noted intraoperatively, a formal ulnar nerve transposition is mandatory.
Transposition Technique:
1. Elevate the flexor-pronator musculature, ensuring a ring of soft tissue is left on the medial epicondyle for later repair.
2. Decompress the ulnar nerve proximally up to the arcade of Struthers and distally to the end of the intermuscular septum between the two heads of the flexor carpi ulnaris (FCU).
3. Crucial: Preserve the extrinsic vascular supply to the nerve as much as possible to avoid devascularization.
4. Transfer the nerve anterior to the medial epicondyle.
5. Reattach the flexor-pronator mass to the epicondyle superficial to the transferred nerve (Submuscular Transposition), ensuring the nerve glides freely without compression.
Closure and Immediate Postoperative Care
- Release the pneumatic tourniquet and obtain meticulous hemostasis. Hematoma formation can lead to severe stiffness and increased risk of infection.
- Bathe the ulnar nerve with a dexamethasone (Decadron) solution to minimize postoperative perineural inflammation.
- Perform a routine layered closure of the subcutaneous tissue and skin.
- Apply a sterile dressing and a well-padded posterior splint with the elbow immobilized at 90 degrees of flexion and the forearm in neutral rotation. Ensure the wrist and hand are left free to encourage early distal mobilization.
Postoperative Rehabilitation Protocol
The success of a UCL reconstruction relies as much on the postoperative rehabilitation as it does on surgical execution. The protocol must balance the protection of the healing graft with the prevention of elbow stiffness.
Phase I: Immediate Postoperative Phase (Days 0 to 10)
- The elbow remains strictly immobilized in the posterior splint at 90 degrees of flexion.
- Gentle hand grip exercises (putty or stress ball) are initiated immediately to promote venous return and prevent distal edema.
- Active range of motion (ROM) of the shoulder and wrist is encouraged, provided no valgus stress is transmitted to the elbow.
Phase II: Early Mobilization (Day 10 to Week 6)
- The splint is removed, and the patient is transitioned to a hinged elbow brace.
- Active and active-assisted ROM exercises for the elbow are initiated. The brace is typically locked to prevent terminal extension (e.g., 30 to 100 degrees), gradually increasing the arc of motion by 5 to 10 degrees per week.
- Isometrics for the biceps, triceps, and shoulder musculature begin.
- At 4 to 6 weeks, light isotonic strengthening exercises for the wrist and forearm flexors/pronators are introduced. These muscles act as dynamic medial stabilizers and are critical for protecting the graft.
Phase III: Strengthening Phase (Week 6 to Month 4)
- The hinged brace is discontinued once full, painless ROM is achieved (usually by week 6).
- Progressive elbow strengthening exercises are initiated.
- Strict Precaution: Valgus stress on the elbow is strictly avoided until a minimum of 4 months postoperatively to allow for complete ligamentization of the tendon graft.
- Core and lower extremity kinetic chain strengthening are emphasized, as throwing power is generated from the ground up.
Phase IV: Return to Sport (Month 4 to Year 1)
- At 4 months, athletes may begin a highly structured, progressive, and supervised interval throwing program.
- Throwing begins on flat ground at short distances (45 feet), focusing purely on mechanics rather than velocity.
- Distance and intensity are incrementally increased over the next several months.
- Mound throwing typically commences around month 9 or 10.
- Return to competitive pitching is generally permitted at 12 to 14 months postoperatively, contingent upon the athlete demonstrating pain-free, full-velocity throwing with proper mechanics and no medial elbow apprehension.
Conclusion
The Jobe Technique for UCL reconstruction is a highly successful, biomechanically sound procedure that has salvaged the careers of countless overhead athletes. Mastery of this technique requires a deep respect for the medial elbow anatomy, precision in tunnel placement to achieve isometry, delicate handling of the ulnar nerve, and a steadfast commitment to a phased, biologically appropriate rehabilitation program. When executed flawlessly, the figure-of-eight tendon autograft provides robust stability, allowing athletes to return to their pre-injury level of elite performance.
You Might Also Like