Arthroscopic Management of Partial-Thickness Rotator Cuff Tears: Débridement and Transtendinous Repair
Key Takeaway
Partial-thickness rotator cuff tears present a unique biomechanical challenge. Management depends on tear depth, location, and tissue quality. Tears involving less than 50% of the tendon thickness are typically treated with arthroscopic debridement. Conversely, tears exceeding 50% depth or exhibiting significant delamination require structural restoration, often via a transtendinous repair technique. This guide details the surgical indications, precise arthroscopic steps, and phased postoperative rehabilitation protocols for optimal clinical outcomes.
Introduction to Partial-Thickness Rotator Cuff Tears
Partial-thickness rotator cuff tears (PTRCTs) represent a complex spectrum of tendon pathology, characterized by incomplete disruption of the rotator cuff footprint. Unlike full-thickness tears, PTRCTs maintain a degree of biomechanical continuity but often generate significant pain and functional impairment due to altered tendon kinematics and localized inflammation.
These lesions are broadly classified by their anatomic location: articular-sided, bursal-sided, or interstitial. Articular-sided tears are the most common, frequently resulting from intrinsic tendon degeneration, internal impingement, or tensile overload in overhead athletes. Bursal-sided tears are typically associated with extrinsic subacromial impingement. Delaminated tears—where the articular and bursal layers of the tendon shear and separate due to differing histological properties and strain rates—present a unique surgical challenge requiring specialized repair techniques.
The critical threshold for surgical decision-making is the 50% thickness rule. Tears involving less than 50% of the tendon footprint are generally managed with arthroscopic débridement, whereas tears exceeding 50% depth, or those with significant delamination, necessitate structural repair to restore the tendon's biomechanical integrity.
Patient Positioning and Operating Room Setup
Meticulous patient positioning is paramount for optimal arthroscopic visualization and safe execution of both débridement and transtendinous repair techniques.
The Lateral Decubitus Position
While the beach-chair position is an acceptable alternative, the lateral decubitus position is highly advantageous for articular-sided tears and transtendinous repairs, as it provides excellent distraction of the glenohumeral joint and expands the subacromial space.
- Patient Alignment: Place the patient in a true lateral decubitus position. Ensure the cervical spine is maintained in neutral alignment to prevent brachial plexus traction injuries.
- Padding and Support: Carefully pad all bony prominences, particularly the common peroneal nerve at the fibular head and the axilla of the dependent arm. Maintain the patient's position using a beanbag, kidney rests, and secure strapping across the greater trochanter.
- Eye Protection: Ensure the patient's eyes are taped closed and protected from external pressure or fluid extravasation.
- Arm Suspension: After wide sterile draping, place the operative arm in a sterile traction device. The suspension device should hold the arm in exactly 45 degrees of abduction and 0 degrees of forward flexion. This specific vector optimizes capsular tension, allowing for superior visualization of the articular surface of the supraspinatus and infraspinatus tendons.
Surgical Warning: Excessive traction weight (typically >10-15 lbs depending on patient size) or prolonged operative times in the lateral decubitus position can lead to transient neurapraxia. Always use the minimum traction necessary to achieve joint distraction.
Arthroscopic Débridement of Partial-Thickness Tears (<50% Depth)
For partial-thickness tears involving less than 50% of the tendon thickness, arthroscopic débridement is the gold standard. The goal is to remove degenerative, pain-generating tissue, stimulate a healing response, and prevent tear propagation without compromising the remaining intact tendon fibers.
Portal Placement and Diagnostic Arthroscopy
- Standard Portals: Establish a standard posterior viewing portal. Create an anterior working portal through the rotator interval. A lateral or anterosuperior portal may be added depending on the specific location and geometry of the tear. Usually, three portals are sufficient for a simple débridement.
- Intra-articular Evaluation: Perform a comprehensive diagnostic arthroscopy. Carefully evaluate the articular surface of the rotator cuff, the biceps anchor, and the labrum.
Débridement Technique
- Tear Identification: Identify the partial-thickness tear. Use a calibrated arthroscopic probe to assess the depth and extent of the lesion.
- Tissue Resection: Introduce a full-radius resector (shaver) through the anterior or anterosuperior portal. Carefully débride the frayed, degenerative tendon margins.
- Stimulating the Healing Response: The débridement must be thorough enough to reach healthy, viable tendon tissue and incite petechial bleeding at the footprint. This localized bleeding introduces mesenchymal stem cells and growth factors to the defect, promoting a fibrocartilaginous healing response.
- Preservation of Intact Tissue:
Clinical Pearl: Do not remove excessive tissue. Overzealous débridement can inadvertently convert a low-grade partial tear into a high-grade or full-thickness tear, destabilizing the biomechanical integrity of the cuff.
- Probing for Delamination: Meticulously probe the débrided area to ensure a hidden delaminating tear is not present. If a delamination cleavage plane is identified extending laterally into the tendon substance, simple débridement is insufficient, and a transtendinous repair is indicated.
- Subacromial Decompression: Redirect the arthroscope into the subacromial space. Perform a bursectomy and assess the coracoacromial arch. Perform an acromioplasty if extrinsic impingement is identified as a contributing pathoanatomic factor.
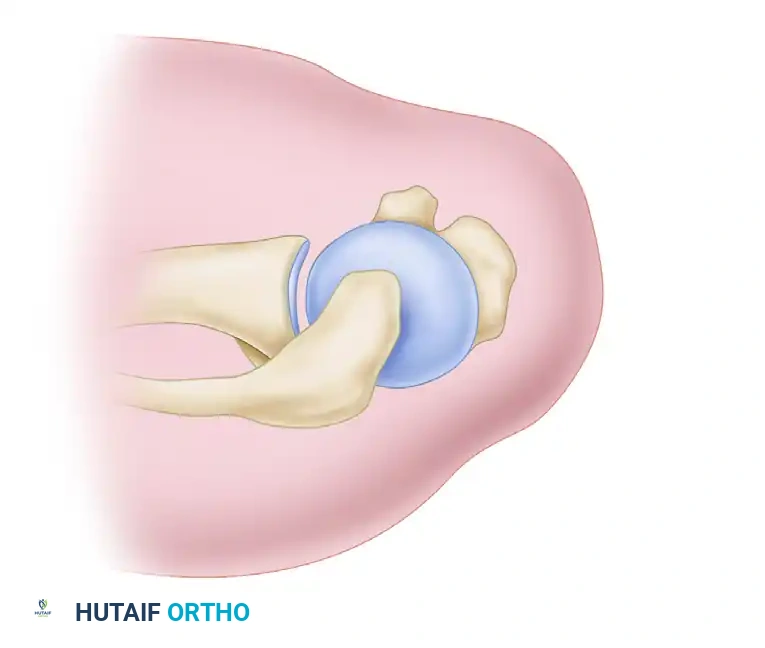
Transtendinous Repair of Delaminated and High-Grade Articular-Side Tears (>50% Depth)
When an articular-sided partial tear exceeds 50% of the tendon thickness, or when significant delamination is present, the remaining intact bursal fibers are often mechanically insufficient to withstand physiologic loads. In these cases, a transtendinous repair is highly effective. This technique secures the torn articular layer back to the footprint while preserving the intact bursal fibers, thereby maintaining the native lateral anatomy of the tendon.
Depth Assessment and Preparation
- Measuring Tear Depth: Lightly débride the tear site to clearly define its margins. The depth of the tear is determined by measuring the exposed footprint—the distance from the articular margin of the humeral head to the healthy, attached tendon on the greater tuberosity.
- The 6-mm Rule: The normal medial-to-lateral width of the supraspinatus footprint is approximately 12 to 14 mm. Therefore, an exposed footprint depth of more than 6 mm indicates a tear exceeding 50% thickness.
- Reference Tool: Use the tip of a 4.5-mm shaver as a known intra-articular reference guide to accurately estimate this 6-mm threshold.
Subacromial Preparation
- Bursectomy: Before addressing the intra-articular lesion, withdraw the arthroscope and enter the subacromial space. Using a combination of posterior and lateral portals (established 2 to 3 cm lateral and posterior to the anterior acromial edge), perform a thorough subacromial bursectomy. Clear visualization of the bursal surface of the rotator cuff is mandatory.
- Acromioplasty: Perform an acromioplasty if indicated by the acromial morphology.
- Return to the Joint: Place the arthroscope back into the glenohumeral joint through the posterior portal to visualize the articular-sided tear.
Transtendinous Suture Passing Technique
- Approximation: Use an arthroscopic suture grasper to pull the delaminated or retracted articular edge of the tear laterally toward its anatomic attachment site on the tuberosity. This confirms mobility and helps plan suture placement.
- Spinal Needle Localization: Insert an 18-gauge spinal needle percutaneously from the lateral aspect of the shoulder, just off the lateral edge of the acromion. Advance the needle directly through the intact bursal layer of the tendon, and then through the torn articular layer at the desired medial bite location.
- Suture Shuttling (First Pass): Pass a No. 1 PDS (polydioxanone) suture through the spinal needle into the joint. Retrieve the intra-articular end of the PDS out through the anterior portal using a grasper.
- Suture Shuttling (Second Pass): Withdraw the spinal needle and re-insert it approximately 1 cm adjacent to the first pass, again traversing both the intact bursal and torn articular layers. Pass a second No. 1 PDS suture through the needle and retrieve it out the anterior portal. You now have two PDS suture tails exiting the anterior cannula, separated by 1 cm of tendon tissue.
- Passing the Permanent Suture: Tie a No. 2 nonabsorbable, high-strength suture to each tail of the PDS exiting the anterior cannula. Pull the percutaneous (lateral) tails of the PDS sutures. This action shuttles the No. 2 nonabsorbable suture into the anterior portal, into the joint, up through the articular layer, through the bursal layer, and out the lateral percutaneous puncture sites.
- Securing the Suture: Carefully manage the suture limbs to prevent tangling. Clip the percutaneous suture ends with a hemostat.
- Repeating the Process: Repeat this entire shuttling procedure as necessary (usually 2 to 3 mattress configurations) until secure side-to-side or medial-to-lateral approximation can be achieved.
Surgical Pitfall: Ensure that the permanent sutures do not cross or tangle within the subacromial space during the shuttling process. Tangled sutures will prevent smooth knot tying and can compromise the security of the repair.
Subacromial Knot Tying
- Subacromial Visualization: Pass the arthroscope back into the subacromial space. Identify the percutaneous suture limbs exiting the bursal surface of the tendon.
- Cannula Placement: Place a 7-mm clear plastic working cannula through the midlateral portal.
- Retrieval and Tying: Retrieve the paired suture limbs individually through the lateral cannula. Tie them securely in the subacromial space using a sliding-locking knot followed by alternating half-hitches. Tying the knots in the subacromial space (rather than intra-articularly) prevents the knot stacks from abrading the articular cartilage of the humeral head or glenoid.
- Final Evaluation: Upon completion of the knot tying, pass the arthroscope back into the glenohumeral joint to re-evaluate the repair. The articular surface should be firmly approximated to the footprint, obliterating the delamination or partial tear defect.
Postoperative Rehabilitation Protocols
Postoperative rehabilitation is dictated by the size of the tear, the quality of the tissue, and the security of the repair. Allowing the tendon to heal adequately before subjecting it to tensile stress is paramount. The following protocols are divided based on tear size: Minor (<2 cm) and Moderate (2-5 cm).
Rehabilitation Protocol: Minor Tears (<2 cm)
Preoperative Goals:
* Achieve Passive Range of Motion (PROM) within functional limits (WFL) to prevent postoperative adhesive capsulitis.
* Ensure patient independence in the home exercise program (HEP).
Phase I: Protection and Progressive PROM (Weeks 0–6)
- Weeks 0–3: The patient is immobilized in a sling at all times, removed only for hygiene and specific exercises. Stitches are removed at 7–10 days. Begin pendulum exercises, active range of motion (AROM) of the wrist and hand, and scapular proprioceptive neuromuscular facilitation (PNF). Ice and electrical stimulation are used for edema and pain control.
- Goals by Week 3: PROM >150° flexion, >50° external rotation (ER) in neutral, >140° abduction (ABD) scaption.
- Precautions: No active or active-assisted ROM (A/AAROM) of the shoulder, as this jeopardizes the repair.
- Weeks 4–6: Wean from the sling. Initiate true abduction stretching and gentle internal rotation (IR) stretching. Begin cane exercises in supine, shoulder pulleys, and Grade II-III capsular mobilizations. Submaximal (25%) isometrics with the arm at the side can be introduced.
- Goals by Week 6: PROM ≥160° flexion, ≥65° ER, ≥160° scaption. Able to perform light activities of daily living (ADLs) such as combing hair or opening a car door.
- Precautions: Lift nothing heavier than a coffee cup. Avoid aggressive IR stretching.
Phase II: Progressive AROM and Strengthening (Weeks 7–10)
- Weeks 7–8: Progress to full AROM. Introduce light-weight, high-repetition isotonics (biceps curls, triceps extension, shoulder shrugs, reverse Codman exercises). Begin upper body ergometer (UBE) with minimal resistance.
- Goals by Week 8: A/PROM within normal limits (WNL) for flexion, abduction, and ER. PROM ≥60° IR.
- Precautions: Unilateral lifting limited to ≤3 lbs. Prevent posterior capsular tightness.
- Weeks 9–10: Advance isotonics (standing flexion/abduction to 90°, prone rows, side-lying IR/ER). Begin wall push-ups with a "plus" to engage the serratus anterior.
- Goals by Week 10: Manual Muscle Testing (MMT) ≥4/5 for flexion, abduction, and ER. Able to place a 2-lb object into an overhead cabinet.
Phase III: Advanced Strengthening and Return to Sport (Weeks 11–16)
- Weeks 11–16: Introduce advanced isotonics (bench press, lateral pull-downs, incline chest press). At 3 months, initiate plyometrics (chest pass, overhead throw).
- Goals by Week 16: MMT 5/5 in all planes. Return to throwing or racquet sports is permitted at 3 months provided there is normal strength, normal glenohumeral mechanics, and zero pain.
Rehabilitation Protocol: Moderate Tears (2–5 cm)
For moderate tears, the progression is intentionally decelerated to protect the larger repair site.
Phase I: Protection and Progressive PROM (Weeks 0–6)
- Weeks 0–3: Sling immobilization at all times. Pendulums and distal AROM only.
- Goals by Week 3: PROM >130° flexion, >40° ER, >130° scaption.
- Weeks 4–6: Wean from the sling. Progress PROM slowly. Initiate IR stretching without overpressure. Submaximal isometrics are permitted.
- Goals by Week 6: PROM ≥150° flexion, ≥65° ER.
- Precautions: Lifting is strictly limited to ≤1 lb until 6 weeks postoperatively.
Phase II: Progressive AROM and Strengthening (Weeks 7–12)
- Weeks 7–8: Begin A/AAROM and progress to AROM. Initiate light isotonics and UBE with minimal resistance.
- Goals by Week 8: AROM ≥140° flexion, ≥130° abduction. PROM WNL in all planes.
- Precautions: Unilateral lifting limited to ≤2 lbs.
- Weeks 9–12: Advance isotonics (standing, prone, and side-lying). Increase UBE resistance and begin wall push-ups.
- Goals by Week 12: AROM WFL in all planes. MMT ≥4/5. Able to lift a gallon of milk into the refrigerator. Lifting limited to ≤10 lbs.
Phase III: Advanced Strengthening and Return to Sport (Weeks 11–16+)
- Weeks 11–16: Progress to heavy isotonics. Plyometrics are delayed until 4 months postoperatively.
- Goals by Week 16: MMT 5/5 in all planes. Return to throwing or racquet sports is delayed until 4 months, contingent upon normal strength and mechanics.
Conclusion
The management of partial-thickness rotator cuff tears requires precise intra-operative decision-making based on tear depth, location, and the presence of delamination. While tears involving less than 50% of the tendon thickness respond well to meticulous arthroscopic débridement, high-grade and delaminated lesions demand structural restoration. The transtendinous repair technique offers a biomechanically sound solution, securing the articular layer while preserving the intact bursal footprint. Adherence to a phased, size-specific postoperative rehabilitation protocol is essential to protect the repair, restore kinematics, and ensure a successful return to function.
📚 Medical References
- Partial-thickness rotator cuff tears, Am J Sports Med 33:1405, 2005.
- [Matsen FA III, Arntz CT: Rotator cuff tendon failure. In Rockwood CA Jr, Matsen FA III, eds: The shoulder, Philadelphia, 1990, Saunders.
Matsen FA III, Arntz CT: Subacromial impingement. In Rockwood CA Jr, Matsen FA III, eds: The shoulder, Philadelphia, 1990, Saunders. Matthews LS, Parks BG, Pavlovich LJ Jr, et al: Arthroscopic versus open distal clavicle resection: a biomechanical analysis on a cadaver model, Arthroscopy 15:237, 1999.](https://pubmed.ncbi.nlm.nih.gov/?term=Matsen%20FA%20III%2C%20Arntz%20CT%3A%20Rotator%20cuff%20tendon%20failure.%20In%20Rockwood%20CA%20Jr%2C%20Matsen%20FA%20III%2C%20eds%3A%20The%20shoulder%2C%20Philadelphia%2C%201990%2C%20Saunders.%0A%0AMatsen%20FA%20III%2C%20Arntz%20CT%3A%20Subacromial%20impingement.%20In%20Rockwood%20CA%20Jr%2C%20Matsen%20FA%20III%2C%20eds%3A%20The%20shoulder%2C%20Philadelphia%2C%201990%2C%20Saunders.%20Matthews%20LS%2C%20Parks%20BG%2C%20Pavlovich%20LJ%20Jr%2C%20et%20al%3A%20Arthroscopic%20versus%20open%20distal%20clavicle%20resection%3A%20a%20biomechanical%20analysis%20on%20a%20cadaver%20model%2C%20Arthroscopy%2015%3A237%2C%201999.)
- McCallister WV, Parsons IM, Titelman RM, et al: Open rotator cuff repair without acromioplasty, J Bone Joint Surg 87A:1278, 2005.
- McConville OR, Iannotti JP: Partial-thickness tears of the rotator cuff: evaluation and management, J Am Acad Orthop Surg 7:32, 1999.
- McFarland EG, Selhi HS, Keyurapan E: Clinical evaluation of impingement: what to do and what works, J Bone Joint Surg 88A:432, 2006.
- McLaughlin HL: Lesions of the musculotendinous cuff of the shoulder, I: the exposure and treatment of tears with retraction, J Bone Joint Surg 26:31, 1944.
- McLaughlin HL: The frozen shoulder, Clin Orthop 20:126, 1961.
- McLaughlin HL: Rupture of the rotator cuff, J Bone Joint Surg 44A:979, 1962.
- McLaughlin HL: Repair of major cuff ruptures, Surg Clin North Am 43:1535, 1963.
- McLaughlin HL: The selection of calcium deposits for operation: the technique and results of operation, Surg Clin North Am 43:1501, 1963.
- Meister K, Andrews JR, Batts J, et al: Symptomatic throwers exostosis: arthroscopic evaluation and treatment, Am J Sports Med 27:133, 1999.
- Meister K, Buckley B, Batts J: The posterior impingement sign: diagnosis of rotator cuff and posterior labral tears secondary to internal impingement in overhand athletes, Am J Orthop 33:412, 2004.
- Melillo AS, Savoie FH III, Field LD: Massive rotator cuff tears: debridement versus repair, Orthop Clin North Am 28:117, 1997.
- Mellado JM, Calmet J, Olona M, et al: Surgically repaired massive rotator cuff tears: MRI of tendon integrity, muscle fatty degeneration, and muscle atrophy correlated with intraoperative and clinical fi ndings, AJR Am J Roentgenol 184:1456, 2005.
- Mikasa M: Trapezius transfer for global tear of the rotator cuff. In Bateman JE, Welsh RP, eds: Surgery of the shoulder, Philadelphia, 1984, Decker. Mileski RA, Snyder SJ: Superior labral lesions in the shoulder: pathoanatomy and surgical management, J Am Acad Orthop Surg 6:121, 1998.
- Millett PJ, Clavert P, Warner JJP: Current concepts review: open operative treatment for
You Might Also Like