Spanning & Hybrid External Fixation for Tibial Pilon Fractures
Key Takeaway
Tibial pilon fractures present profound challenges due to severe articular comminution and tenuous soft tissue envelopes. Spanning external fixation and hybrid ring constructs offer powerful solutions by utilizing ligamentotaxis to restore length and alignment while minimizing periosteal stripping. This comprehensive guide details the precise surgical steps, biomechanical principles, and safe corridors required to optimize outcomes and mitigate complications in complex pilon fracture management.
INTRODUCTION TO TIBIAL PILON FRACTURE MANAGEMENT
The management of tibial pilon fractures remains one of the most formidable challenges in orthopedic trauma surgery. Characterized by high-energy axial loading forces, these injuries result in severe articular comminution, metaphyseal impaction, and profound disruption of the surrounding soft tissue envelope. Historically, early aggressive open reduction and internal fixation (ORIF) led to unacceptably high rates of wound dehiscence, deep infection, and osteomyelitis.
Modern treatment paradigms have shifted toward a biologically respectful approach, heavily utilizing external fixation. Whether employed as a temporary spanning device in a staged protocol or as a definitive hybrid fixation construct, external fixators leverage the principle of ligamentotaxis to restore limb length, correct angular deformity, and decompress the articular surface while preserving the tenuous extraosseous blood supply.
This masterclass details the advanced surgical techniques, biomechanical principles, and postoperative protocols for both Spanning External Fixation (as described by Bonar and Marsh) and Hybrid External Fixation.
SPANNING EXTERNAL FIXATION OF TIBIAL PILON FRACTURES
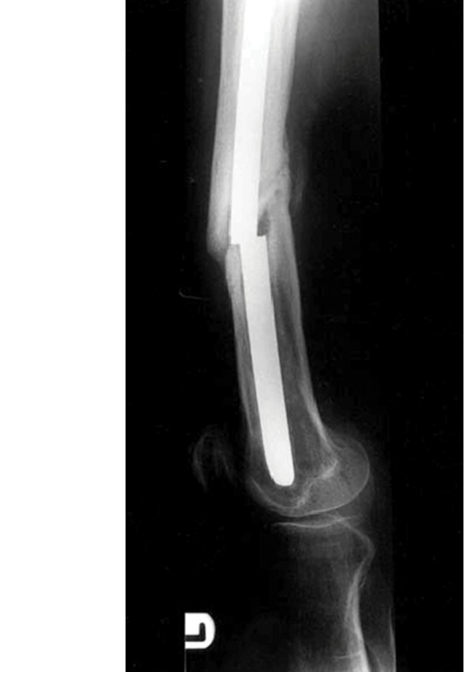
The spanning external fixation technique utilizes a hinged, articulated fixator to bridge the zone of injury. By anchoring pins in the intact diaphysis proximally and the talus/calcaneus distally, the surgeon can distract the ankle joint, achieve indirect reduction of the metaphyseal fragments, and perform limited, targeted internal fixation of the articular surface.
Indications and Preoperative Planning
Spanning external fixation is primarily indicated for high-energy pilon fractures (AO/OTA Type C) with severe soft tissue compromise (Tscherne Grade II or III closed injuries, or open fractures). It is often the first step in a "span, scan, and plan" protocol.
Clinical Pearl: Always assess the soft tissue envelope meticulously. The presence of fracture blisters, severe edema (loss of skin wrinkles), or open wounds mandates the use of spanning external fixation rather than acute ORIF.
Biomechanics of the Articulated Fixator
The articulated fixator is designed to allow controlled distraction across the tibiotalar joint. The hinge must be carefully aligned with the anatomical axis of rotation of the ankle (approximately at the tips of the malleoli, passing through the body of the talus). Proper hinge placement permits postoperative dynamization and early range of motion (ROM) without eccentrically loading the articular reconstruction.
Surgical Technique: Step-by-Step (Bonar and Marsh)
1. Patient Positioning and Setup
Place the patient supine on a radiolucent operating table. Ensure the ipsilateral hip is bumped to correct natural external rotation, allowing true anteroposterior (AP) and lateral fluoroscopic views of the ankle and hindfoot. A sterile tourniquet may be applied but is often unnecessary if percutaneous techniques are strictly followed.
2. Distal Pin Placement Principles
The distal fixation relies on two critical screws: one in the talus and one in the calcaneus.
* Soft Tissue Protection: All drilling and screw insertion must be performed through protective drill sleeves.
* Predrilling: Always predrill the near cortex to prevent thermal necrosis and microfracture.
* Neurovascular Avoidance: The placement of the calcaneal and talar screws must straddle the medial neurovascular bundle (posterior tibial artery and tibial nerve).
Figure A: Placement of calcaneal and talar screws to avoid the neurovascular bundle and subtalar joint.
3. Talar Screw Insertion
The talar screw is the keystone of the construct. Its placement dictates the alignment of the fixator template.
1. Starting Point: Locate the starting point on the distal medial neck of the talus using fluoroscopy.
2. Trajectory (AP View): Advance the screw parallel to the dome of the talus. This ensures the fixator hinge will align with the ankle's axis of rotation.
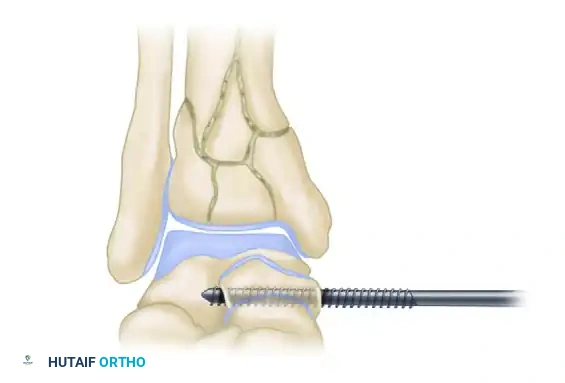
Figure B: The talar screw must be strictly parallel to the talar dome on the anteroposterior fluoroscopic view. Dashed lines indicate inaccurate, non-parallel screw placement.
3. Trajectory (Axial View): The screw must be driven roughly perpendicular to the long axis of the foot.
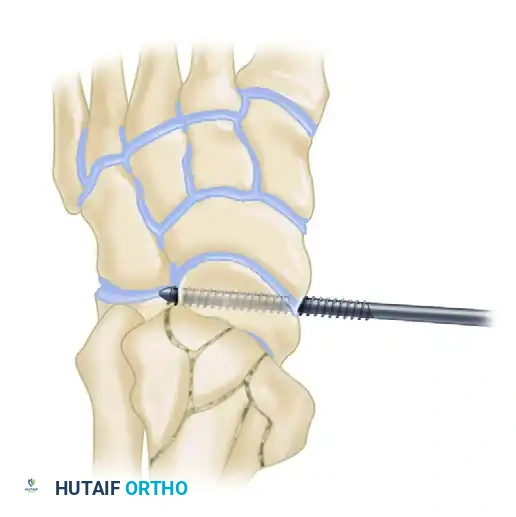
Figure C: The screw is placed perpendicular to the long axis of the foot. Ensure bicortical purchase; two threads should protrude through the far (lateral) cortex of the talus.
4. Calcaneal and Tibial Screw Insertion
- Template Application: Slide the fixator template over the perfectly positioned talar screw.
- Calcaneal Screw: Place the calcaneal screw through the template. By rotating the articulated hinge, this screw can be placed high or low in the calcaneal tuberosity.
> Surgical Warning: A high position in the calcaneal tuberosity is strongly recommended. This position prevents impingement during postoperative dorsiflexion and mitigates the risk of equinus contracture. - Verification: Confirm bicortical purchase of the calcaneal screw on an axial fluoroscopic view of the hindfoot. The center of the fixator hinge should now rest near the middle of the talus.
- Proximal Tibial Screws: Insert two half-pins into the anterior or anteromedial tibial diaphysis, well proximal to the fracture zone, using the template for guidance.
5. Distraction and Articular Reconstruction
- Frame Assembly: Remove the template, apply the definitive articulated fixator body, and lock the proximal ball joint.
- Ligamentotaxis: Apply a compression-distraction apparatus to the frame. Distract the ankle joint longitudinally. Evaluate the reduction of the metaphyseal and articular fragments fluoroscopically.
- Limited ORIF: Based on preoperative CT planning and the intraoperative response to distraction, make limited, targeted incisions directly over major fracture lines.
- Use the fracture lines as a "window" to visualize the articular surface.
- Employ large tenaculum reduction forceps to manipulate major articular blocks.
- Fix the articular fragments using small fragment (2.7mm or 3.5mm) or cannulated screws.
- CRITICAL RULE: Do not attempt to bridge the metaphyseal fracture with screw fixation, and do not use tibial plates in this specific spanning technique. Keep periosteal stripping to an absolute minimum.
- Bone Grafting: If a significant metaphyseal void exists after articular elevation, apply cancellous bone graft or orthobiologics through the limited incisions.
HYBRID EXTERNAL FIXATION
Hybrid external fixation combines the principles of Ilizarov tensioned fine wires in the periarticular (epiphyseal) segment with standard half-pins in the diaphyseal segment. This construct provides robust stability while preserving the soft tissue envelope, making it ideal for spanning complex diaphyseal-metaphyseal fracture extensions.
Biomechanical Considerations
The surgeon must possess a deep understanding of hybrid biomechanics to prevent construct failure.
* Flexibility vs. Stability: In a landmark biomechanical study, Yang et al. demonstrated that a standard bar-ring hybrid fixator (a unilateral fixator body connected to a single distal ring) is excessively flexible, particularly in cantilever bending.
* Construct Optimization: To achieve adequate stability, diagonally placed struts must be added to the unilateral frame. Alternatively, a two-ring hybrid fixator (two distal rings block-connected) provides superior mechanical performance and is the preferred construct for highly comminuted pilon fractures.
* Wire Function: Tensioned fine wires (1.5mm or 1.8mm) act similarly to lag screws. Olive wires can be utilized to compress articular fragments together dynamically.
Indications and Limitations
Hybrid fixators are most appropriate for AO Type A, Type C1, and Type C2 fractures.
* Limitations: In fractures with extreme articular comminution (Type C3), fine wires may fail to achieve adequate purchase. Furthermore, fractures associated with profound tibiotalar instability may not be adequately stabilized by a frame that stops proximal to the ankle joint.
* Intracapsular Risks: Wires placed very distally may enter the ankle capsule. While septic arthritis secondary to pin tract infection is a known risk, clinical experience shows it is significantly less common in the ankle compared to the knee.
Watson’s Technique: Early Ligamentotaxis and Safe Corridors
J.T. Watson emphasized the critical importance of immediate ligamentotaxis. Delaying traction allows the metaphyseal fragments to impact further, making indirect reduction nearly impossible and necessitating highly morbid extensile exposures.
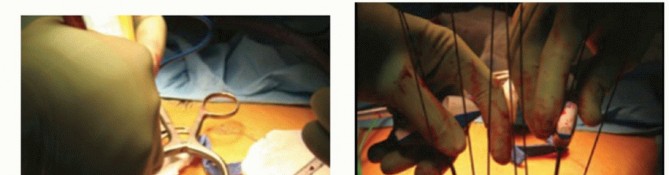
1. Traveling Traction
Watson advocates for immediate calcaneal traction in the emergency department or during initial surgical debridement.
* Insert a 6-mm centrally threaded Steinmann pin through the calcaneal tuberosity.
* Insert a second pin through the proximal tibia (at the level of the fibular head).
* Construct a simple quadrilateral frame using radiolucent carbon fiber bars.
* Apply manual distraction to achieve ligamentotaxis.
* Post-Traction CT: Obtain a CT scan after the traction frame is applied. This reveals the true nature of the articular impaction once the soft tissue tension has pulled the peripheral fragments out to length.
2. The Four-Quadrant Approach and Safe Zones
Based on extensive CT analysis, Watson developed a four-quadrant approach for wire insertion to avoid neurological, vascular, and tendinous impalement. The pilon typically fractures into anterolateral, posterolateral, anteromedial, and posteromedial fragments, often with central die-punch impaction.
Surgical Warning: Due to anatomical constraints (the anterior neurovascular bundle and extensor tendons), tensioned olive wires cannot be placed directly from anterior to posterior. Coronal plane fracture lines must be stabilized with small cannulated screws instead.
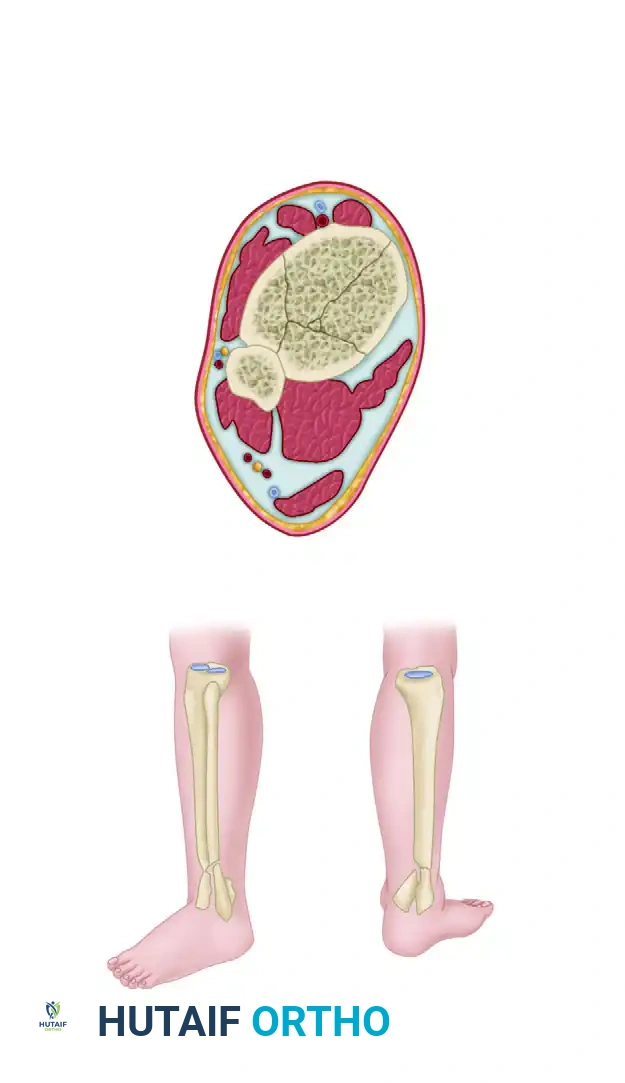
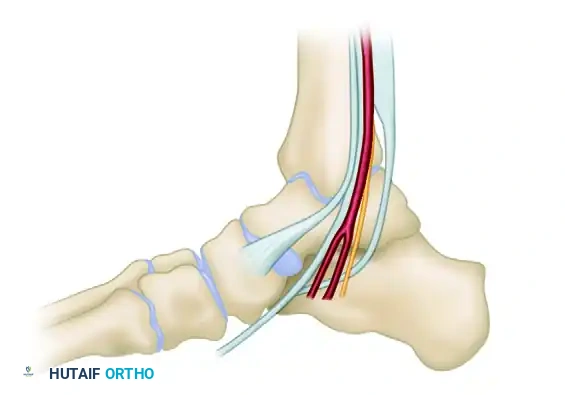
Figure D: Cross-sectional anatomy demonstrating Watson's safe zones. Based on anatomically safe corridors, wires can be passed obliquely through safe zones A and D, or B and C. Direct anterior-to-posterior wire passage is unsafe.
- Zone A (Anteromedial): Safe for wire entry, avoiding the saphenous vein and nerve.
- Zone B (Anterolateral): Requires careful blunt dissection to avoid the superficial peroneal nerve.
- Zone C (Posterolateral): Safe zone posterior to the fibula, avoiding the sural nerve.
- Zone D (Posteromedial): Must stay strictly posterior to the medial malleolus to avoid the posterior tibial artery and tibial nerve.
Wires are passed obliquely (e.g., from Zone A to Zone D, or Zone B to Zone C) to capture the major articular blocks and compress them toward the center.
POSTOPERATIVE CARE AND REHABILITATION
The success of external fixation in pilon fractures relies heavily on meticulous postoperative management.
1. Immediate Postoperative Phase (Weeks 0-2)
- Elevation: The limb must be strictly elevated above the level of the heart to combat profound swelling and prevent fracture blister formation.
- Immobilization: For spanning fixators, an Orthoplast (Johnson & Johnson) splint is often applied to maintain the foot in a neutral position, preventing equinus contracture.
- Range of Motion: Ankle joint motion is initiated as soon as the soft tissue envelope permits, typically between 1 to 2 weeks postoperatively. The splint is removed only for active and active-assisted ROM exercises.
2. Intermediate Phase (Weeks 2-6)
- Weight-Bearing: Most patients are maintained strictly non-weight-bearing (NWB) or touch-down weight-bearing (maximum 20 kg) for the first 6 weeks to protect the articular reconstruction.
- Pin Site Care: Daily pin site care using chlorhexidine or saline solutions is mandatory to prevent superficial pin tract infections, which can rapidly loosen the construct or seed the joint.
3. Late Phase and Dynamization (Weeks 4-12)
- Dynamization: Between 4 to 12 weeks, depending on radiographic evidence of callus formation, the spanning external fixator is dynamized. The locking nut on the telescoping body is released to allow axial sliding. This micromotion stimulates secondary bone healing in the metaphyseal defect.
- Progressive Weight-Bearing: Weight-bearing is gradually advanced as tolerated once the frame is dynamized and radiographic healing progresses.
4. Frame Removal
The external fixator is removed in the outpatient clinic or under light sedation when:
1. Radiographs demonstrate bridging callus across at least three cortices of the metaphyseal fracture.
2. The patient can ambulate with full weight-bearing without pain while the fixator body is temporarily detached or loosened.
COMPLICATIONS AND PITFALLS
- Pin Tract Infection: The most common complication. Treat aggressively with oral antibiotics (e.g., cephalexin) and local pin care. If a pin loosens or deep infection is suspected, the pin must be removed and relocated.
- Equinus Contracture: Failure to place the calcaneal pin high enough, or failure to utilize a neutral splint, will result in a rigid equinus deformity that severely impairs gait.
- Malunion/Nonunion: Over-distraction of the metaphyseal fracture gap can lead to nonunion. Ensure the frame is dynamized at the appropriate time to allow axial loading.
- Neurovascular Injury: Deviating from Watson's safe zones during hybrid wire placement can result in pseudoaneurysms of the anterior tibial artery or permanent deep peroneal nerve palsy. Always use drill sleeves and spread tissues bluntly down to the bone before wire insertion.
You Might Also Like