Principles of External Fixation: Pin Insertion Techniques and Spatial Frame Applications
Key Takeaway
External fixation relies on meticulous pin insertion to ensure construct stability and minimize complications. This guide details the step-by-step surgical technique for half-pin placement, emphasizing soft tissue protection and bicortical purchase. Furthermore, it explores advanced applications of tensioned wire fixators and computer-assisted spatial frames in managing complex deformities, nonunions, and salvage arthrodeses, providing orthopedic surgeons with an evidence-based framework for optimal patient outcomes.
Introduction to External Fixation
External fixation remains a cornerstone in the armamentarium of the orthopedic surgeon, offering unparalleled versatility in the management of complex fractures, nonunions, malunions, and limb deformities. The efficacy of any external fixator construct—whether a simple uniplanar frame for acute trauma or a complex multiplanar hexapod system for gradual deformity correction—is fundamentally dictated by the integrity of the pin-bone interface.
Meticulous surgical technique during pin insertion is paramount. Poor technique invariably leads to thermal necrosis, premature pin loosening, pin tract infections, and ultimate failure of the construct. This comprehensive guide expands upon the foundational principles of pin insertion and explores the advanced applications of tensioned wire fixators and computer-assisted spatial frames.
Biomechanics of the Pin-Bone Interface
Understanding the biomechanical principles governing the pin-bone interface is essential for optimizing construct stability and minimizing complications. The stability of an external fixator is influenced by pin diameter, pin geometry, thread design, and the method of insertion.
Pin Diameter and Stiffness
The bending stiffness of a pin is proportional to the fourth power of its radius ($r^4$). Therefore, a minimal increase in pin diameter yields a profound increase in stiffness. However, the pin diameter must not exceed 30% of the bone's diameter; exceeding this threshold significantly increases the risk of iatrogenic stress risers and subsequent fracture through the pin tract.
* Upper Extremity: Typically, 4-mm pins are utilized for the radius, ulna, and humerus.
* Lower Extremity: 5-mm or 6-mm pins are standard for the robust cortices of the femur and tibia.
Thermal Necrosis and Pre-Drilling
Thermal necrosis is the primary enemy of pin stability. Bone is highly sensitive to thermal injury; temperatures exceeding 47°C for longer than one minute result in irreversible osteocyte death, leading to a fibrous tissue envelope around the pin rather than direct osseous integration.
Surgical Warning: Self-drilling pins, while convenient, generate significantly more heat than pre-drilled pins. In dense cortical bone (e.g., the tibial diaphysis), pre-drilling with a sharp drill bit under continuous saline irrigation is mandatory to prevent thermal necrosis and subsequent aseptic loosening.
Anatomic Considerations: Safe Corridors
The concept of "safe corridors" is critical to avoid iatrogenic injury to neurovascular structures and to minimize tethering of muscle-tendon units. Pins must be inserted through anatomic windows where nerves and vessels are predictably absent or easily mobilized.
- Femur: The lateral and anterolateral approaches are generally safe, avoiding the femoral artery and sciatic nerve. However, tethering of the iliotibial band and vastus lateralis must be minimized.
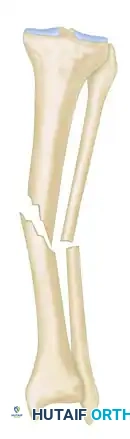
- Tibia: The anteromedial face of the tibia is subcutaneous and provides an excellent, safe corridor. Care must be taken proximally to avoid the pes anserinus and distally to avoid the saphenous nerve and vein.
- Humerus: The radial nerve dictates safe corridors in the humerus. Distal pins are often placed laterally (with direct visualization of the nerve), while proximal pins can be placed laterally or anteriorly.
- Forearm: The dorsal approach to the radius and the subcutaneous border of the ulna are standard, requiring meticulous blunt dissection to protect the superficial branch of the radial nerve and the dorsal sensory branch of the ulnar nerve.
Surgical Technique: Half-Pin Insertion
The following step-by-step protocol outlines the gold-standard technique for the insertion of half-pins (Schanz screws) to ensure maximal purchase and minimal soft tissue morbidity.
Step 1: Incision and Soft Tissue Dissection
Make a short longitudinal incision (approximately 1 to 2 cm) directly over the planned insertion site. The incision must be parallel to the longitudinal axis of the limb and the underlying muscle fibers to minimize tension during subsequent limb positioning or deformity correction.
Following the skin incision, use a hemostat to perform blunt dissection down to the periosteum. Spreading the soft tissues longitudinally prevents transection of cutaneous nerves and small vessels.
Step 2: Application of the Drill Sleeve and Trocar
Insert the drill sleeve and trocar assembly into the pin clamp of the fixator (if pre-constructing the frame) or directly into the wound. Advance the assembly through the bluntly dissected soft tissue window until the trocar rests firmly against the near cortex.
Clinical Pearl: The drill sleeve is non-negotiable. It serves a dual purpose: it protects the surrounding soft tissues from the rotating drill bit and provides a rigid trajectory to prevent the drill bit from "walking" or skiving along the cortical surface.
Step 3: Cortical Preparation
Remove the trocar from the drill sleeve, maintaining firm pressure on the sleeve against the bone to prevent soft tissue interposition.
Step 4: Drilling the Cortices
Drill both cortices using the appropriate drill bit matched to the core diameter of the selected pin. As noted, 4-mm pins are generally used for the upper extremity, while 5-mm or 6-mm pins are reserved for the femur and tibia.
* Use a sharp drill bit to minimize friction.
* Apply continuous, copious cold saline irrigation directly onto the drill bit and sleeve to dissipate heat.
* Employ a "pecking" technique (frequent withdrawal of the drill bit) to clear bone flutes and further reduce thermal buildup.
Step 5: Depth Measurement
Once the far cortex is breached, remove the drill bit. Use a depth gauge inserted through the drill sleeve to measure the exact distance from the near cortex to the far cortex. Accurate measurement ensures that the threaded portion of the pin fully engages the far cortex without excessive protrusion, which could endanger contralateral neurovascular structures.
Step 6: Pin Insertion and Verification
Insert the appropriate pin through the sleeve. Pins should ideally be inserted by hand using a T-handle to provide tactile feedback of cortical engagement, though low-speed power insertion is acceptable if carefully monitored.
Confirm bicortical purchase of the threads. The threads must fully engage the far cortex, with the tip protruding no more than 1 to 2 mm beyond the bone. This is vastly easier and more accurate when confirmed with intraoperative image intensification (fluoroscopy).
Advanced Applications: Circular and Tensioned Wire Fixators
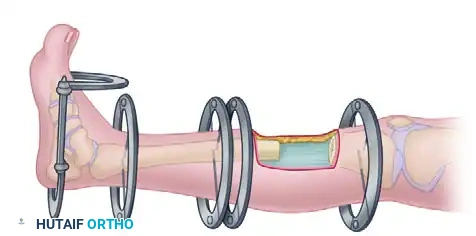
While uniplanar half-pin fixators are excellent for acute stabilization, complex orthopedic pathologies often require the versatility of circular frames utilizing tensioned wires, pioneered by Gavriil Ilizarov.
Indications for Ilizarov Techniques
Tensioned wire fixators are exceptionally useful in treating a myriad of difficult clinical scenarios, including:
* Chronic Malunion and Nonunion: The frame allows for simultaneous correction of deformity and compression/distraction at the nonunion site.
* Infected Nonunion (Osteomyelitis): Wires can be placed outside the zone of infection. The frame permits radical debridement of infected bone followed by bone transport (distraction osteogenesis) to fill the resulting defect.
* Complex Deformities: Angulatory, translational, rotational, and length deformities can be corrected simultaneously or sequentially.
* Salvage Arthrodesis: The Ilizarov device is highly effective in salvage arthrodesis of the knee, ankle, and hindfoot, particularly in the setting of poor bone stock, active infection, or severe soft tissue compromise where internal fixation is contraindicated.
Biomechanics of Tensioned Wires
Unlike half-pins, which act as cantilever beams, tensioned smooth or olive wires (typically 1.5 to 1.8 mm in diameter) act like a trampoline. When tensioned to 110–130 kg across a rigid circular ring, these wires provide immense axial stability while allowing micromotion at the fracture or osteotomy site. This controlled micromotion is the primary mechanical stimulus for distraction osteogenesis and secondary bone healing.
Surgical Warning: When inserting transfixing wires, the surgeon must possess an intimate knowledge of cross-sectional anatomy. Wires must be pushed through the soft tissues to the bone, drilled through the bone, and then tapped through the exiting soft tissues to avoid wrapping neurovascular structures around the spinning wire.
Hexapod and Spatial Frame Technologies
The latest and most revolutionary adaptation of the Ilizarov pin-to-ring concept is the spatial frame, most notably the Taylor Spatial Frame (TSF) and similar hexapod systems.
The Stewart-Gough Platform
Spatial frames are based on the Stewart-Gough platform, a parallel manipulator utilizing six telescopic struts connecting two rings. This configuration provides six degrees of freedom, allowing for the simultaneous correction of multidirectional deformities (angulation, translation, and rotation in the coronal, sagittal, and axial planes) along with length adjustments.
Computer-Assisted Deformity Correction
The true power of the spatial frame lies in its integration with proprietary computer software. The process involves:
1. Mounting Parameters: Identifying exactly where the frame is positioned relative to the bone in space.
2. Deformity Parameters: Inputting the exact nature of the fracture or deformity based on orthogonal radiographs.
3. Mathematical Calculation: The software utilizes complex algorithms to generate a "prescription"—a daily schedule of strut adjustments.
With this mathematical calculation, deformities can be corrected and fractures can be reduced gradually by the patient at home, without the need to return to the operating room for frame modifications.
Acute vs. Gradual Reduction
While spatial frames are famous for gradual deformity correction, they are equally adept at acute fracture reduction. Surgeons can apply the frame to a displaced fracture, obtain intraoperative fluoroscopic images, input the parameters into the software, and adjust the struts acutely in the operating room to achieve an anatomic reduction under image intensification. This "virtual reduction" technique is particularly useful in complex periarticular fractures (e.g., tibial plateau, tibial pilon) where extensive soft tissue dissection for internal fixation would be disastrous.
Postoperative Management and Pin Site Care
The success of any external fixation strategy relies heavily on meticulous postoperative care. Pin tract infection is the most common complication, occurring in up to 30% of patients, though the vast majority are superficial and easily managed.
Pin Site Care Protocol
- Immediate Postoperative Period: Pin sites should be dressed with sterile, compressive dressings to minimize hematoma formation and restrict skin motion around the pin.
- Daily Maintenance: Once the initial dressings are removed (typically at 48 to 72 hours), daily pin site care should commence. Protocols vary, but cleansing with chlorhexidine solution or half-strength hydrogen peroxide, followed by normal saline, is standard.
- Crust Management: Scabs or crusts that form around the pin should generally be left intact unless there is underlying fluctuance or purulent drainage, as the crust acts as a biologic seal against bacterial ingress.
Weight-Bearing and Rehabilitation
Early weight-bearing is encouraged in both half-pin and circular frame constructs, provided the fracture pattern and frame stability allow. Axial loading stimulates osteogenesis and prevents disuse osteopenia. Aggressive physical therapy is mandatory to maintain joint range of motion, particularly in joints spanned by or adjacent to the fixator, to prevent debilitating contractures.
Monitoring for Complications
Patients must be educated on the signs of pin tract infection (erythema, increased pain, purulent discharge).
* Grade 1-2 Infections: Typically resolve with local wound care and oral antibiotics (e.g., cephalexin).
* Grade 3-4 Infections: Involving deep soft tissue or bone (osteomyelitis/ring sequestrum), require intravenous antibiotics, pin removal, and surgical debridement.
By adhering to strict biomechanical principles, respecting anatomic safe corridors, and utilizing advanced spatial frame technologies when indicated, the orthopedic surgeon can harness the full potential of external fixation to solve the most complex musculoskeletal challenges.
You Might Also Like