Masterclass in External Fixation: Principles, Biomechanics, and Surgical Techniques
Key Takeaway
External fixation is a versatile and indispensable technique in orthopedic trauma, offering rigid skeletal stabilization when internal fixation is contraindicated. It is primarily indicated for severe open fractures, damage control orthopedics, and complex reconstructive procedures. Mastery of cross-sectional anatomy, safe corridors for pin insertion, and biomechanical frame constructs is essential to optimize bone healing while minimizing complications such as pin tract infections and neurovascular injury.
Introduction to External Fixation
External fixation is a foundational pillar in the management of orthopedic trauma and complex reconstructive surgery. Ranging from emergent damage control orthopedics (DCO) to definitive fracture management and limb lengthening, the external fixator provides versatile, rigid skeletal stabilization. Although external fixation requires more meticulous clinical and radiographic monitoring than internal fixation, its general principles of application are straightforward, and its modularity allows for adaptation to a vast array of fracture patterns.
However, external fixation is not a panacea. It is not appropriate for all fractures and should generally be reserved for scenarios where conventional internal fixation (such as plates, screws, or intramedullary nails) is contraindicated, technically unfeasible, or poses an unacceptable risk to the soft tissue envelope.
Clinical Pearl: The decision to use an external fixator must always balance the mechanical needs of the healing bone with the biological needs of the surrounding soft tissues. The fixator is a tool to respect the soft tissue envelope, not merely a device to align bone.
Biomechanics of External Fixation
Understanding the biomechanics of external fixation is critical for the orthopedic surgeon. The stability of the frame dictates the mechanical environment at the fracture site, which in turn influences the type of bone healing (primary vs. secondary).
Factors Influencing Frame Stiffness
The rigidity of an external fixator construct is determined by several modifiable variables:
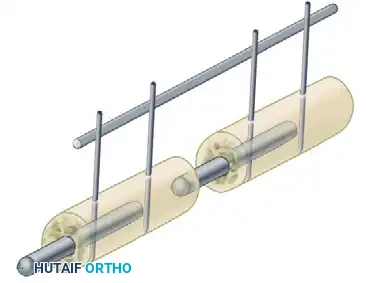
* Pin Diameter: The stiffness of a half-pin is proportional to the fourth power of its radius ($r^4$). Increasing the pin diameter is the single most effective way to increase frame rigidity. However, pin diameter should not exceed one-third of the bone's diameter to prevent stress risers and subsequent iatrogenic fractures.
* Distance from Bone to Rod: The closer the longitudinal rod is to the bone, the stiffer the construct. The rod should be placed approximately 2 to 3 cm from the skin to allow for postoperative swelling while maximizing stability.
* Pin Spread: Increasing the distance between the two outermost pins in a single bone segment increases the stability of the construct.
* Number of Pins: Increasing the number of pins per segment increases stiffness, though the biomechanical advantage diminishes after three or four pins per segment.
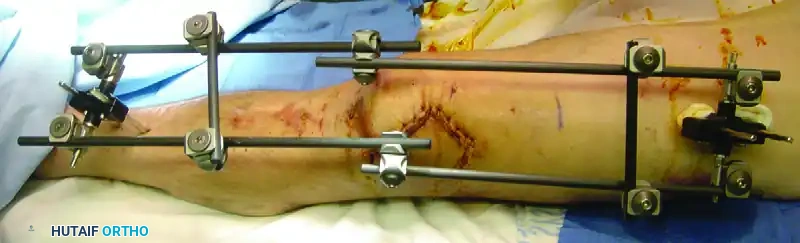
* Number of Bars: Adding a second longitudinal bar (creating a stacked or double-bar construct) significantly increases stiffness, particularly in bending and torsion.
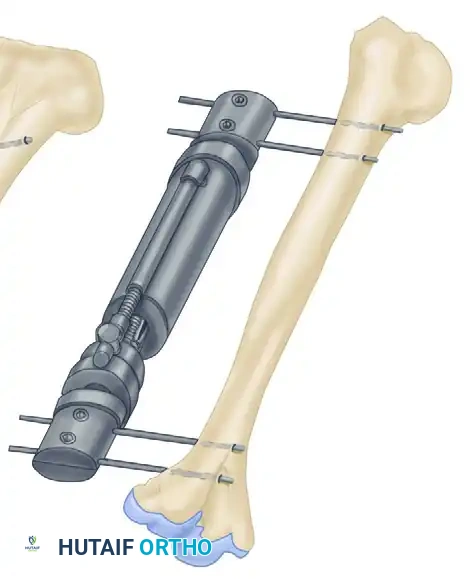
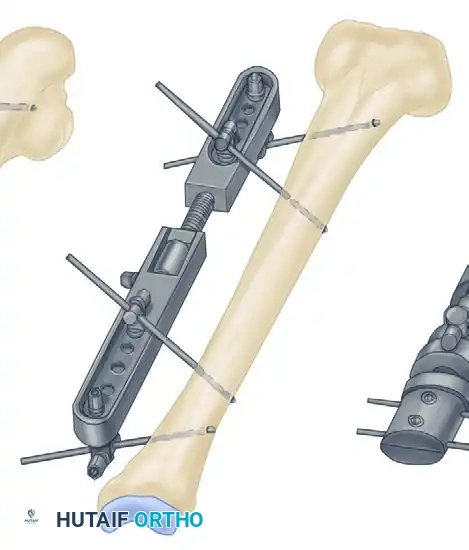
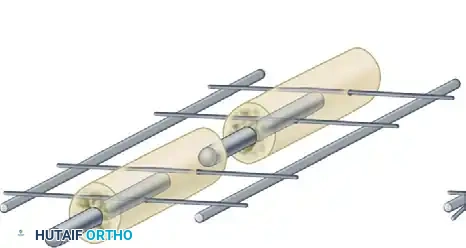
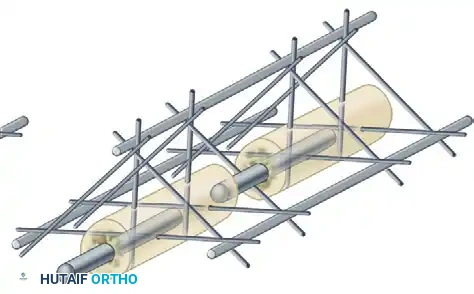
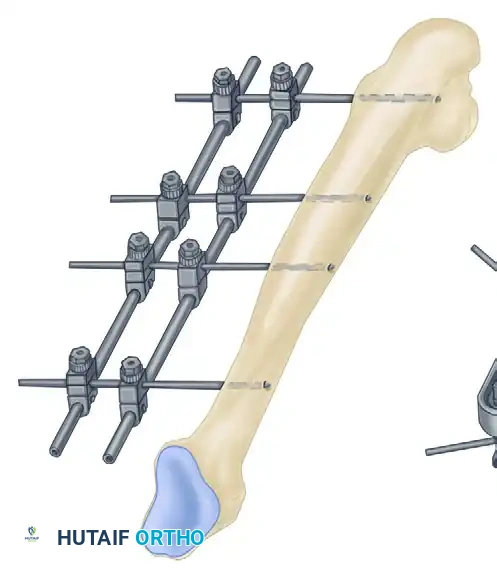
* Multiplanar Constructs: Placing pins in different planes (e.g., a delta frame or biplanar construct) dramatically increases torsional and bending rigidity compared to a uniplanar frame.

Indications for External Fixation
The indications for external fixation are specific. Routine use is not justified when time-tested methods like casting or open reduction and internal fixation (ORIF) are safe and applicable. Indications are broadly categorized into accepted, possible, and occasional.
Accepted Indications
- Severe Open Fractures: Particularly Gustilo-Anderson Type II, IIIA, IIIB, and IIIC fractures where extensive soft tissue stripping makes internal fixation an infection risk.
- Damage Control Orthopedics (DCO): Rapid stabilization of long bone and pelvic fractures in the polytraumatized patient to mitigate the systemic inflammatory response syndrome (SIRS) and prevent "second hit" phenomena.
- Fractures with Severe Burns: Where the skin cannot tolerate incisions or internal hardware.
- Reconstructive Soft Tissue Procedures: Fractures requiring subsequent cross-leg flaps, free vascularized tissue transfers, or serial debridements.
- Bone Loss and Distraction Osteogenesis: Management of segmental bone defects via bone transport (Ilizarov technique).
- Infected Fractures and Nonunions: Rigid fixation is critical for eradicating infection; external fixators provide stability without introducing foreign bodies directly into the infected nidus.
- Arthrodesis: Particularly in cases of failed, infected total joint arthroplasties where joint reconstruction is impossible.
Possible and Occasional Indications
- Pelvic Ring Disruptions: For acute volume reduction and stabilization of hemodynamically unstable pelvic fractures (e.g., open-book injuries).
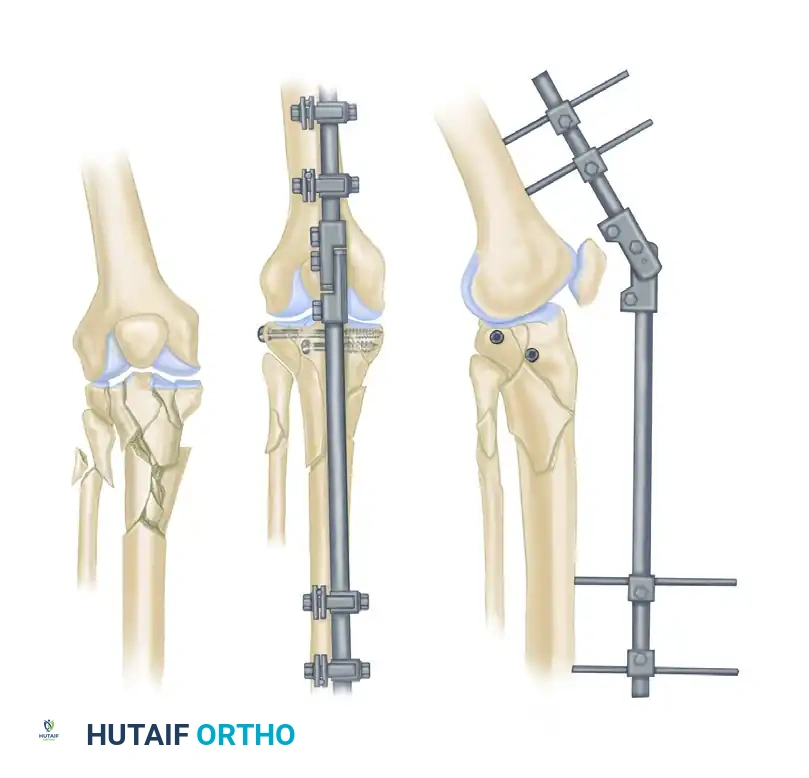
- Ligamentotaxis: Utilizing the fixator to apply traction across a joint, utilizing the intact capsuloligamentous structures to reduce intra-articular fracture fragments (commonly used in distal radius and tibial pilon fractures).
- Floating Knee Injuries: Ipsilateral femoral and tibial fractures where rapid stabilization is required to permit early joint mobilization.
- Pediatric Femoral Osteotomies: Eliminates the need for a second operation to remove internal hardware.
Advantages and Disadvantages
Advantages
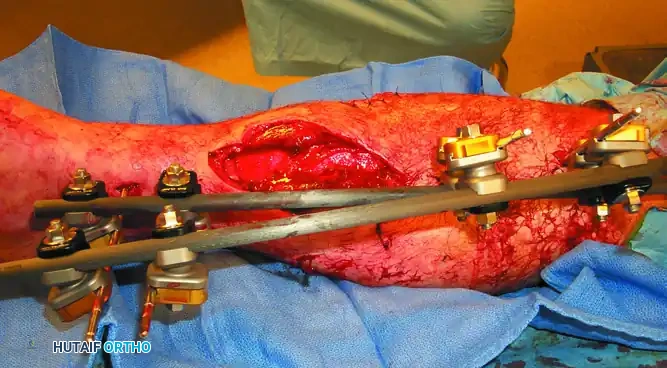
- Soft Tissue Preservation: Provides rigid fixation without the need for extensive surgical exposure, preserving the periosteal blood supply and avoiding devitalization of bone fragments.
- Direct Wound Surveillance: Allows unimpeded access for wound care, vacuum-assisted closure (VAC) dressings, and plastic surgery interventions.
- Adjustability: Postoperative adjustments to alignment can be made in the clinic without returning to the operating room.
- Early Mobilization: Permits early patient mobilization and, depending on the construct, early weight-bearing, which aids in edema reduction and prevents joint stiffness.
- Versatility in Anesthesia: Can be applied under regional or even local anesthesia in critically ill patients who cannot tolerate general anesthesia.
Disadvantages
- Pin Tract Infections: The most common complication, requiring meticulous patient compliance and pin site care.
- Patient Tolerance: Frames can be bulky, cumbersome, and aesthetically displeasing, leading to psychological distress or noncompliance.
- Joint Stiffness: If the frame spans a joint (e.g., ankle or knee), prolonged immobilization can lead to severe capsular fibrosis.
- Stress Shielding and Refracture: Highly rigid frames can "unload" the fracture site, leading to cortical cancellization. If the frame is removed before adequate corticalization of the callus, refracture may occur.
- MRI Incompatibility: Many external fixator components induce artifacts, and there are theoretical risks of heating or displacement in the MRI scanner, though modern titanium and carbon fiber components mitigate some of these risks.
Cross-Sectional Anatomy and Safe Zones
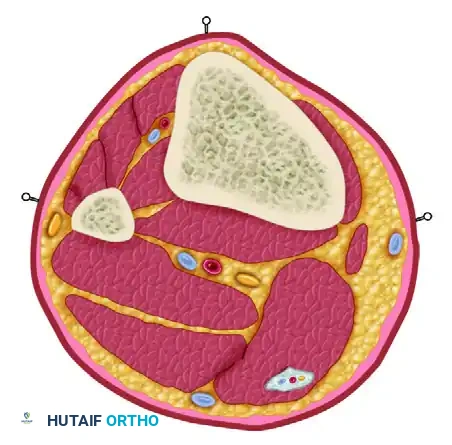
The most critical technical aspect of external fixation is the safe insertion of pins. The surgeon must possess an intimate knowledge of cross-sectional anatomy to avoid neurovascular impalement and muscle tethering.
Surgical Warning: Pins inserted through muscle bellies or tendons will tether the muscle, restricting its excursion. This leads to severe pain, joint contractures, and potential tendon rupture. Always insert pins through intermuscular planes or directly into subcutaneous bone borders where possible.
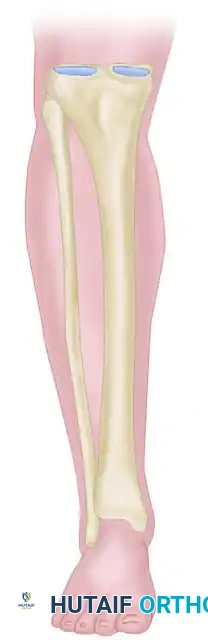
The Tibia
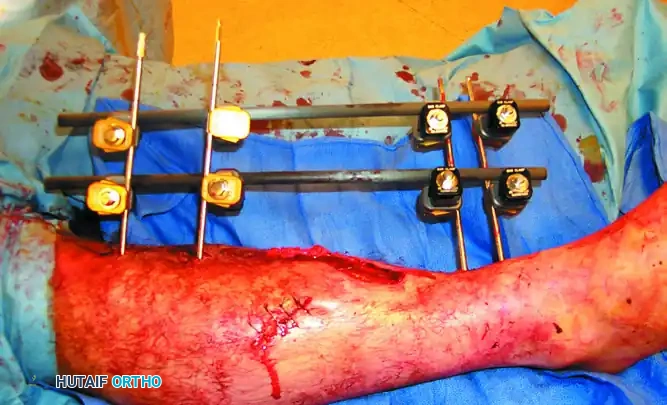
The tibia is the most common site for external fixation. The anteromedial face of the tibia is subcutaneous and represents the optimal "safe corridor" for pin insertion along its entire length.
* Proximal Tibia: Pins can be placed from medial to lateral or anterior to posterior. Avoid the common peroneal nerve laterally at the fibular neck.
* Middle and Distal Tibia: The anterior tibial artery and deep peroneal nerve lie closely applied to the interosseous membrane and the lateral cortex of the tibia. Pins must be placed strictly on the anteromedial surface.
The Femur
- Distal Femur: The safe zone is strictly lateral or anterior. Medial pins risk injury to the superficial femoral artery and vein in the adductor canal.
- Proximal Femur: Pins are typically placed laterally, aiming toward the lesser trochanter, avoiding the femoral neurovascular bundle anteriorly and the sciatic nerve posteriorly.
The Upper Extremity
- Humerus: The radial nerve is at extreme risk in the distal half of the arm as it spirals from posterior to anterior. The safe zone is strictly lateral in the proximal third and strictly posterior in the distal third.
- Forearm: The dorsal sensory branch of the radial nerve is at risk distally. Pins in the radius are typically placed dorsoradially, utilizing a mini-open technique to protect the nerve and tendons.
Step-by-Step Surgical Technique
Adherence to meticulous surgical technique is paramount to minimize complications, particularly thermal necrosis of bone and subsequent pin loosening.
1. Preoperative Planning and Positioning
- Evaluate orthogonal radiographs to determine fracture geometry and plan pin placement. Ensure pins are placed at least 1.5 to 2 cm away from the fracture lines to avoid propagating cracks.
- Position the patient on a radiolucent table. Ensure the C-arm fluoroscope can freely image the entire bone in both AP and lateral planes.
2. Pin Insertion Technique
- Incision: Make a longitudinal stab incision (1-2 cm) through the skin. Do not use a puncture technique, as skin tension around the pin leads to necrosis and infection.
- Blunt Dissection: Use a hemostat to bluntly dissect down to the periosteum. Insert a tissue protection sleeve (drill guide) firmly against the bone.
- Pre-drilling: Always pre-drill the near and far cortices using a sharp drill bit. Use continuous saline irrigation to cool the drill bit. Thermal necrosis from drilling is the primary cause of premature pin loosening and ring sequestrum formation.
- Pin Placement: Insert the half-pin manually or on low speed. Ensure the pin engages the far cortex but does not protrude more than 1-2 threads to avoid tethering far-side soft tissues.
3. Frame Assembly and Reduction
- Apply the pin-to-bar clamps to the pins.
- Attach the longitudinal carbon fiber or titanium rods.
- Perform the fracture reduction under fluoroscopic guidance using manual traction.
- Once length, alignment, and rotation are restored, sequentially tighten all clamps.
- Verify the final reduction and ensure the frame is 2-3 cm away from the skin to accommodate swelling.
Postoperative Protocols and Pin Site Care
The management of the external fixator does not end in the operating room; postoperative care is critical to success.
Pin Tract Care
Pin tract infection is the Achilles heel of external fixation. While protocols vary, the consensus emphasizes minimizing skin tension and keeping the sites clean.
* Immediate Post-op: Apply sterile, compressive dressings around the pin sites to prevent hematoma formation and limit skin motion.
* Maintenance: Cleansing with chlorhexidine solution or normal saline is standard. A comprehensive review of studies suggests that minimizing skin motion at the pin site (via proper surgical release and compressive dressings) is more important than the specific cleansing agent used.
* Showering: Patients are generally allowed to shower with the frame after the incisions have sealed (typically 7-10 days), provided they dry the frame thoroughly afterward.
Complications and Their Management
Widespread use of external fixation has brought about a series of unique complications. Adherence to basic principles keeps these to a minimum.
1. Pin Tract Infection
Occurring in up to 30% of patients, infections range from minor superficial erythema to deep osteomyelitis.
* Management: Minor inflammation is treated with local wound care and oral antibiotics (covering Staphylococcus aureus). Deep infections with radiographic evidence of pin loosening or ring sequestrum require immediate pin removal, curettage of the tract, and potentially frame revision.
2. Neurovascular Impalement
Direct injury to vessels or nerves can occur during pin insertion. Late complications include vessel erosion, arteriovenous fistulas, and pseudoaneurysms.
* Prevention: Strict adherence to anatomical safe zones and the mandatory use of blunt dissection and tissue protection sleeves.
3. Delayed Union and Nonunion
Rigid frames can "unload" the fracture site, preventing the micromotion necessary for secondary bone healing (callus formation).
* Management: If callus formation is delayed, the frame should be "dynamized." This involves loosening the frame slightly or removing a longitudinal bar to allow axial loading and stimulate osteogenesis, provided the fracture pattern is axially stable.
4. Compartment Syndrome
Increases in intracompartmental pressures can occur if pins traverse a tense muscle compartment, leading to bleeding or edema within the fascial envelope.
* Management: High index of suspicion in high-energy trauma. If compartment syndrome is diagnosed, immediate four-compartment fasciotomy is required.
5. Refracture
Because healing under rigid external fixation is largely endosteal with minimal peripheral callus, the bone may be mechanically weak upon frame removal.
* Prevention: The limb must be adequately protected with functional bracing, casts, or crutches for several weeks following frame removal until the bone remodels and adapts to normal physiological stresses.
Conclusion
External fixation remains an indispensable tool in the armamentarium of the orthopedic surgeon. Whether utilized for emergent damage control in the polytraumatized patient or for the definitive management of complex, infected nonunions, its success relies heavily on the surgeon's mastery of biomechanics, cross-sectional anatomy, and meticulous surgical technique. By respecting the soft tissue envelope and adhering to strict postoperative protocols, the surgeon can harness the power of external fixation to salvage limbs and restore function in the most challenging clinical scenarios.
You Might Also Like

