Operative Management of Meniscal Root and Radial Tears: Suture Anchor and All-Inside Techniques
Key Takeaway
Meniscal root and radial tears disrupt the circumferential hoop stresses of the knee, leading to rapid joint degeneration. This comprehensive surgical guide details the operative management of these complex lesions, including high posteromedial suture anchor techniques and all-inside fixation methods. Emphasizing precise portal placement, footprint preparation, and neurovascular safety, this text provides orthopedic surgeons with evidence-based protocols to restore meniscal biomechanics and optimize patient outcomes.
Introduction to Meniscal Root and Radial Tears
The integrity of the meniscus is paramount to the biomechanical homeostasis of the knee joint. Meniscal root tears and complete radial tears represent a unique and devastating subset of meniscal pathology. Unlike simple longitudinal or degenerative cleavage tears, root and complete radial tears disrupt the circumferential collagen fibers of the meniscus. This disruption leads to a complete loss of hoop stresses, rendering the meniscus functionally incompetent. Biomechanical studies have unequivocally demonstrated that a meniscal root avulsion or a complete radial tear is kinematically equivalent to a total meniscectomy, leading to meniscal extrusion, significantly decreased contact area, and exponentially increased peak contact pressures within the tibiofemoral compartment.
Historically, these tears were either ignored or treated with partial meniscectomy, which inevitably led to rapid, progressive osteoarthritis and subchondral insufficiency fractures. Modern orthopedic surgery mandates a joint-preserving approach. The surgical repair of these lesions is technically demanding, requiring meticulous preoperative planning, precise portal placement, and advanced arthroscopic suturing techniques. This masterclass details the operative techniques for repairing radial and meniscal root tears using suture anchors, as well as the principles and application of all-inside meniscal repair devices.
Biomechanics and Pathoanatomy
To fully appreciate the surgical techniques required for repair, the operating surgeon must understand the underlying pathoanatomy. The menisci are semilunar fibrocartilaginous structures anchored to the tibial plateau via their anterior and posterior roots.
- Circumferential Hoop Stresses: Axial loads applied to the knee are converted into tensile forces along the circumferential collagen fibers of the meniscus. The strong root attachments prevent the meniscus from extruding peripherally under this load.
- Root Avulsions: When a root tears (most commonly the posterior horn of the medial meniscus), the anchor is lost. The meniscus extrudes medially or laterally, and the articular cartilage is subjected to unmitigated axial loading.
- Radial Tears: A complete radial tear transects the circumferential fibers. Even if the roots remain attached, the hoop stress mechanism is broken, leading to the same biomechanical failure as a root avulsion.
💡 Clinical Pearl: Meniscal Extrusion
On preoperative magnetic resonance imaging (MRI), meniscal extrusion greater than 3 mm on a mid-coronal image is highly pathognomonic for a meniscal root tear or a complete radial tear. Recognizing this "ghost sign" or extrusion is critical for preoperative surgical planning.
Indications and Contraindications for Repair
Patient selection is the most critical determinant of postoperative success. Not all root or radial tears are amenable to repair, and attempting repair in a poorly selected patient will result in early clinical failure.
Indications
- Acute or subacute meniscal root avulsions or complete radial tears.
- Chronic tears in symptomatic patients with minimal to no osteoarthritic changes (Outerbridge Grade I or II).
- Patients with normal mechanical alignment or those undergoing concurrent realignment osteotomy (e.g., High Tibial Osteotomy).
- Young, active patients who are compliant with strict postoperative rehabilitation protocols.
Contraindications
- Advanced unicompartmental osteoarthritis (Kellgren-Lawrence Grade III or IV).
- Significant, uncorrected axial malalignment.
- Severe obesity (BMI > 35 is considered a strong relative contraindication due to the massive forces placed on the repair).
- Inability or unwillingness to comply with prolonged postoperative weight-bearing restrictions.
Surgical Technique: Suture Anchor Repair of Meniscal Root Tears
While transtibial pull-out techniques are widely used, the direct suture anchor repair technique offers excellent biomechanical fixation and avoids the need for a tibial tunnel. This technique is particularly useful for posterior root tears and relies heavily on the use of a high posteromedial portal.
Patient Positioning and Diagnostic Arthroscopy
The patient is placed supine on the operating table. A lateral post or a leg holder is utilized to allow for valgus stress, which is essential for opening the medial compartment. A well-padded tourniquet is applied to the proximal thigh.
Standard anterolateral (AL) and anteromedial (AM) portals are established. A thorough diagnostic arthroscopy is performed to evaluate the articular cartilage, the cruciate ligaments, and the extent of the meniscal pathology. The root tear is probed to assess mobility and the feasibility of reduction to its anatomic footprint.
Portal Placement and Cannulation
For a medial meniscal root repair using a suture anchor, three primary portals are utilized:
1. Anterolateral (AL) Portal: Primarily used as the viewing portal.
2. Anteromedial (AM) Portal: Used as a working portal. It should be established under direct visualization, ensuring it is slightly larger to accommodate suture management and shuttle devices.
3. High Posteromedial (HPM) Portal: This is the critical working portal for anchor insertion.
⚠️ Surgical Warning: Posteromedial Portal Placement
The high posteromedial portal must be established with extreme care to avoid injury to the saphenous nerve and vein. Transillumination of the posteromedial compartment is mandatory. An 18-gauge spinal needle is used to localize the exact trajectory, ensuring it provides a direct, orthogonal approach to the posterior root footprint.
Once established, the medial portals (AM and HPM) are fitted with clear arthroscopic cannulas to prevent soft tissue bridging and facilitate smooth suture management.
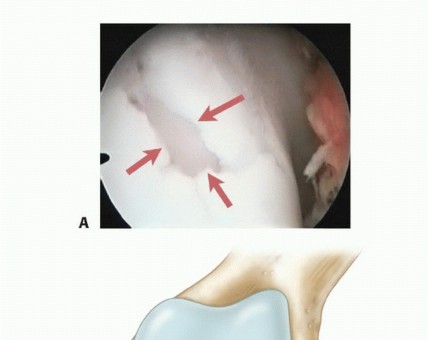
Footprint Preparation
Healing of the meniscal root requires a robust biological response. The anatomic footprint of the posterior root must be meticulously prepared.
* Use an arthroscopic elevator or raspatory to clear the fibrous tissue from the tibial plateau at the anatomic insertion site.
* A motorized shaver and an arthroscopic curette are then used to decorticate the bone.
* The goal is to expose a bleeding, cancellous bone bed to optimize the healing environment. Failure to adequately prepare the footprint is a primary cause of non-healing and repair failure.
Anchor Insertion
With the footprint prepared, the suture anchor is introduced.
* The anchor is inserted through the high posteromedial (HPM) portal.
* Due to the posterior location and the angle of approach, an angled inserter and a flexible drill bit are highly recommended. These specialized instruments allow for easier, orthogonal placement of the anchor into the prepared footprint without skiving across the tibial plateau.
* Once the anchor is seated securely in the bone, the sutures are retrieved and pulled out through the anteromedial (AM) portal to clear the posterior working space.
Suture Passing and Meniscal Fixation
The goal of suture passing is to achieve a secure, tissue-gripping construct that will withstand the forces of early rehabilitation.
- Meniscal Penetration: A specialized arthroscopic suture shuttle device (e.g., a knee scorpion or a curved suture lasso) is introduced through the AM portal. The meniscus is grasped and penetrated approximately 3 to 4 mm from the torn edge. Taking an adequate bite is crucial; bites less than 3 mm are prone to tissue pull-through (the "cheese-wiring" effect).
- Suture Shuttling: The shuttle is retrieved through the AM portal. One limb of the anchor suture is loaded into the shuttle and passed back through the meniscus, exiting at the superior surface of the meniscal tissue.
- Creating the Mattress Construct: The process is repeated for the second suture limb. The shuttle is passed adjacent to the first bite, and the second suture is retrieved, producing a robust mattress suture configuration.
- Knot Tying: The two limbs of the mattress suture are then retrieved through the posteromedial portal. Arthroscopic knot tying (e.g., a sliding locking knot followed by alternating half-hitches) is performed through the HPM cannula, securing the meniscus down to the prepared bony footprint.
💡 Clinical Pearl: Double-Loaded Anchors
For greater biomechanical security and a broader footprint compression, a double-loaded suture anchor is highly recommended. This allows the surgeon to pass two separate mattress sutures, significantly increasing the load-to-failure strength of the repair construct.
Surgical Technique: All-Inside Meniscal Repair
While root tears require anchoring to bone, radial tears and peripheral longitudinal tears are frequently managed with all-inside suture-based fixators. The modern market offers numerous all-inside devices that utilize PEEK or bioabsorbable anchors connected by a pre-tied, sliding suture knot.
Indications for All-Inside Devices
Biomechanical studies and short-term follow-up clinical data demonstrate that the holding strength and healing rates of modern all-inside devices approach those of the traditional "gold standard" inside-out suture fixation.
We utilize all-inside devices primarily for:
* Small to Moderate Tears: Situations where two or fewer fixators are sufficient to achieve stable reduction and compression.
* Posterior Horn Repairs: The posterior horn is notoriously difficult to access with inside-out needles without extensive posterior incisions. All-inside devices excel in this anatomical zone.
* Hybrid Repairs: Using all-inside devices for the posterior aspect of a large tear, followed by inside-out or outside-in sutures to repair the anterior extension of the tear.
Advantages and Disadvantages
Advantages:
* Ease of Use: The learning curve is less steep compared to inside-out techniques.
* Decreased Morbidity: Elimination of accessory posterior surgical incisions reduces operative time and postoperative pain.
Disadvantages:
* Meniscal Trauma: The deployment needles of all-inside devices are of a larger caliber than standard suture needles, which can cause iatrogenic damage to the meniscal tissue during insertion.
* Vector Limitations: It is technically difficult to obtain a true vertical mattress repair (the strongest biomechanical configuration) with all-inside devices, as they tend to deploy in a horizontal or oblique vector.
* Cost: These proprietary devices are significantly more expensive than standard suture materials.
Technical Execution and Safety Principles
The same fundamental principles that govern inside-out techniques apply to the use of all-inside devices. Proper selection, meticulous preparation of the meniscal tear (rasping the edges to stimulate bleeding), and anatomic reduction are non-negotiable.
🚨 Surgical Warning: Neurovascular Safety
The most devastating complication of all-inside meniscal repair is iatrogenic injury to the popliteal neurovascular bundle. The popliteal artery lies mere millimeters posterior to the posterior horn of the lateral meniscus.
To ensure safety during all-inside deployment:
1. Aim Away from Danger: Always direct the deployment needle away from the central neurovascular structures. For the posterior horn, angle the needle slightly inferiorly and away from the midline.
2. Strict Depth Control: The use of a depth limiter is mandatory. The needle stop must be set at 14 mm or 16 mm. Penetrating deeper than 16 mm exponentially increases the risk of puncturing the popliteal artery or vein.
3. Controlled Deployment: Insert the needle through the meniscus until the depth stop contacts the tissue. Deploy the first implant outside the capsule. Retract the needle slightly, reposition across the tear, and deploy the second implant.
4. Tensioning: Sequentially tension the sliding knot using the provided knot pusher, ensuring the tear is anatomically reduced and the edges are compressed without over-tensioning, which could cause the implant to cut through the meniscus.
Postoperative Rehabilitation Protocol
The surgical repair is only half of the equation; strict adherence to a phased postoperative rehabilitation protocol is critical to prevent repair failure. The postoperative care for both suture anchor root repairs and all-inside radial repairs follows a similar, highly protective trajectory.
Phase I: Maximum Protection (Weeks 0 to 6)
- Weight-Bearing: Strictly Non-Weight-Bearing (NWB) or Toe-Touch Weight-Bearing (TTWB) with crutches. Axial loading during the early healing phase will cause the sutures to cheese-wire through the meniscal tissue.
- Bracing: The knee is locked in full extension in a hinged knee brace for ambulation and sleeping.
- Range of Motion (ROM): Passive and active-assisted ROM is initiated early but strictly limited to 0° to 90° of flexion. Flexion past 90° places excessive tension on the posterior root and posterior horn repairs.
- Therapy: Focus on quadriceps activation (isometric sets), straight leg raises (in the brace), and patellar mobilization.
Phase II: Progressive Loading (Weeks 6 to 12)
- Weight-Bearing: Gradual progression to full weight-bearing. Patients typically transition from two crutches to one, and then to unassisted ambulation over a 2-to-3-week period.
- Bracing: The brace is unlocked for ambulation and eventually discontinued once the patient demonstrates adequate quadriceps control and a normal gait pattern.
- Range of Motion: ROM is progressed beyond 90° as tolerated, aiming for full, symmetric flexion by week 10-12.
- Therapy: Initiation of closed-kinetic-chain exercises (e.g., mini-squats, leg press) limited to 0°-60° of flexion to protect the repair from high shear forces.
Phase III: Strengthening and Proprioception (Months 3 to 6)
- Weight-Bearing: Full, unrestricted weight-bearing.
- Therapy: Advanced strengthening of the quadriceps, hamstrings, and gluteal musculature. Proprioceptive and balance training are emphasized. Deep squats and heavy axial loading in deep flexion are still avoided.
Phase IV: Return to Sport (Months 6+)
- Return to pivoting, cutting, and high-impact sports is generally delayed until at least 6 months postoperatively.
- Clearance is contingent upon the patient achieving full, painless ROM, no effusion, and isokinetic strength testing demonstrating >90% symmetry compared to the contralateral uninjured limb.
Conclusion
The repair of meniscal root and radial tears represents a critical intervention in the preservation of the knee joint. Whether utilizing a high posteromedial suture anchor technique for root avulsions or deploying all-inside devices for posterior horn tears, the surgeon must adhere to strict biomechanical and anatomical principles. Meticulous footprint preparation, secure tissue bites of at least 3 to 4 mm, strict depth control to 14-16 mm to protect neurovascular structures, and a highly controlled postoperative rehabilitation protocol are the cornerstones of a successful outcome. By mastering these techniques, the orthopedic surgeon can effectively restore the circumferential hoop stresses of the meniscus, thereby altering the natural history of the joint and preventing the rapid onset of degenerative osteoarthritis.
You Might Also Like