Intramedullary Nailing of Tibial Shaft Fractures: A Comprehensive Surgical Guide
Key Takeaway
Intramedullary nailing is the gold standard for treating displaced diaphyseal tibial fractures. This technique provides relative stability through a load-sharing biomechanical construct, promoting secondary bone healing. Success relies on precise entry portal placement, meticulous reduction, and accurate rotational alignment. This guide details the step-by-step surgical approach, including patient positioning, reaming protocols, interlocking screw placement, and advanced techniques for managing complex proximal third tibial fractures to prevent malalignment.
INTRODUCTION AND BIOMECHANICAL PRINCIPLES
Intramedullary (IM) nailing remains the gold standard for the operative management of displaced, unstable, or open diaphyseal fractures of the tibia. By acting as an internal splint, the intramedullary nail provides a load-sharing construct that preserves the extraosseous blood supply while delivering relative stability. This biomechanical environment optimally stimulates secondary bone healing via callus formation.
The success of tibial nailing is highly dependent on meticulous surgical technique. Errors in patient positioning, entry portal creation, or rotational alignment can lead to catastrophic complications, including malunion, iatrogenic comminution, and chronic anterior knee pain. This masterclass delineates the evidence-based, step-by-step approach to intramedullary nailing of tibial shaft fractures, tailored for the postgraduate orthopedic surgeon.
PREOPERATIVE PLANNING AND PATIENT POSITIONING
Proper patient positioning is the foundation of a successful tibial nailing procedure. The surgeon must choose between a fracture table and a standard radiolucent operating table based on the fracture pattern, soft tissue status, and institutional availability.
The Fracture Table Setup
The fracture table utilizes skeletal traction to maintain length and alignment, which is particularly useful in highly unstable or length-unstable comminuted fractures.
- Positioning: Place the patient supine. Flex the hip to 45 degrees and the knee to 90 degrees.
- Traction Pin: Insert a stout calcaneal traction pin (typically a centrally threaded Steinmann pin) from medial to lateral to avoid the neurovascular bundle.
- Support: Place a well-padded crossbar proximal to the popliteal fossa to support the thigh.
- Reduction: Attach the calcaneal pin to the traction apparatus. Apply longitudinal traction and reduce the fracture under multiplanar fluoroscopic guidance.
🚨 SURGICAL WARNING: Adequate padding over the popliteal crossbar is mandatory. Prolonged pressure in this region can induce severe compression neuropathy of the common peroneal or tibial nerves. To further decrease the risk of traction injury, release the traction immediately after provisional reduction is confirmed, reapplying it only when necessary (e.g., during nail insertion).
The Standard Operating Table Setup
Many contemporary trauma surgeons prefer the standard radiolucent operating table, as it allows for easier assessment of rotational alignment, facilitates the treatment of concomitant injuries, and avoids the complications associated with fracture tables.
- Positioning: Place the patient supine with the injured thigh supported over a padded radiolucent bolster or triangle, maintaining the knee in a flexed position (typically 90 degrees for standard infrapatellar approaches).
- Reduction Aids: A skilled assistant is paramount for maintaining reduction. Alternatively, a femoral distractor or a two-pin external fixator can be utilized as a reduction tool.
- Pin Placement for Distractor: Place a Schanz pin 1 cm distal to the knee joint (posteriorly in the tibial condyle to avoid the nail path) and a second pin 1 cm proximal to the ankle joint.
ASSESSMENT OF ROTATIONAL ALIGNMENT
Malrotation is a frequent and highly morbid complication of tibial nailing. Because the intramedullary nail dictates alignment in the coronal and sagittal planes but offers little control over rotation, the surgeon must actively establish and verify rotational alignment before interlocking.
The Clementz Method (Fluoroscopic)
Before initiating the nailing sequence, rotation can be precisely measured using the fluoroscopic method described by Clementz:
- Baseline Measurement: Measure the tibial torsion in the uninjured contralateral extremity. Fully extend the knee and place the C-arm in a lateral position with the beam parallel to the floor.
- Femoral Alignment: Rotate the leg until a perfect lateral view of the distal femur is obtained (condyles superimposed exactly). Hold the limb rigidly in this position.
- Ankle Imaging: Bring the C-arm into the anteroposterior (AP) position (beam perpendicular to the floor) to image the ankle. Rotate the C-arm until a tangential image of the inner surface of the medial malleolus is visualized. This establishes the reference line.
- Calculation: The amount of tibial torsion equals the difference between the reference line at the ankle and a line perpendicular to the floor. (e.g., If the tangential view requires 10 degrees of lateral C-arm rotation, the torsion is 10 degrees).
- Application: Replicate this exact degree of torsion in the injured limb prior to locking the nail.
Clinical Alignment Landmarks
Alternatively, or as an adjunct to fluoroscopy, clinical landmarks must be assessed. The classic triad for rotational alignment involves aligning the:
* Anterior Superior Iliac Spine (ASIS) / Iliac Crest
* Center of the Patella
* Second Ray of the Foot
SURGICAL TECHNIQUE: STEP-BY-STEP
1. Incision and Entry Portal Creation
The entry portal is the most critical step in tibial nailing. An eccentric starting point will inevitably dictate a malaligned trajectory for the nail, leading to coronal or sagittal plane deformities.
- Incision: Make a 3-cm to 5-cm longitudinal incision along the medial border of the patellar tendon, extending proximally from the tibial tubercle. Retract the patellar tendon laterally.
- Guidewire Placement: Insert a threaded-tip guidewire through the anterior metaphysis.
- The Safe Zone:
- AP View: The starting point must be located along the medial slope of the lateral tibial eminence. If placed too medially, the nail will violate the medial plateau and risk injury to the intermeniscal ligament.
- Lateral View: The starting point must be immediately adjacent and anterior to the articular margin. A portal placed too distally damages the patellar tendon insertion and creates a steep entry angle, risking posterior cortical penetration or anterior cortical blowout.
💎 CLINICAL PEARL: Direct the guidewire nearly perpendicular to the tibial plateau when it first penetrates the cortex to prevent skiving. Once the cortex is breached, gradually drop the hand to bring the wire parallel to the anterior tibial cortex.
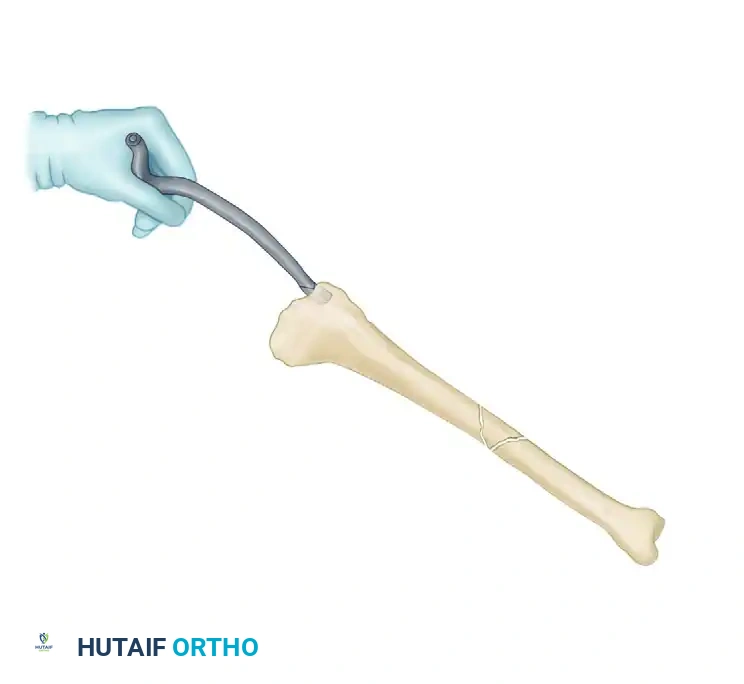
Opening of the medullary canal with a cannulated curved awl over the initial guidewire.
Once the trajectory is confirmed on both AP and lateral fluoroscopy, open the proximal cortex using a cannulated entry reamer with a soft-tissue protection sleeve, or a cannulated curved awl.
2. Guidewire Passage and Fracture Reduction
Insert a ball-tipped guidewire (typically 3.0 mm) through the entry portal. Using a combination of manual traction, manipulation, and reduction tools (e.g., percutaneous clamps, blocking screws, or a femoral distractor), reduce the fracture.
Pass the ball-tipped guidewire across the fracture site and advance it into the distal metaphysis. The wire should be centered within the distal fragment on both AP and lateral views, terminating 0.5 cm to 1.0 cm proximal to the ankle joint line.
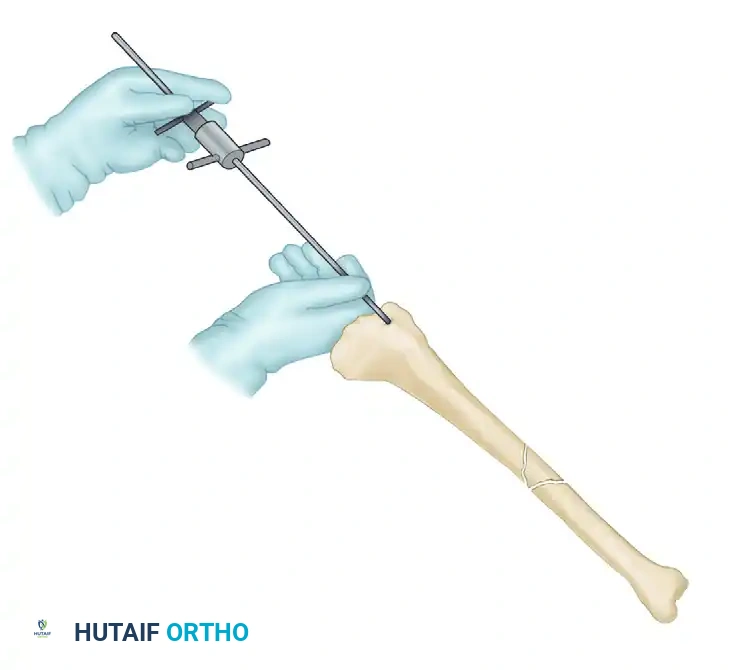
Provisional reduction of the tibial shaft fracture maintained by the passage of the ball-tipped guide rod.
3. Canal Preparation and Reaming
The decision to ream the medullary canal depends on the fracture characteristics and soft tissue envelope. Reaming increases the endosteal contact area, allows for the insertion of a larger, biomechanically superior nail, and deposits osteogenic reamings at the fracture site.
- Reaming Protocol: Begin with an end-cutting reamer smaller than the narrowest diameter of the isthmus. Ream in 0.5-mm increments.
- Knee Position: Maintain the knee in flexion during reaming to prevent the reamer from abutting and excessively thinning the anterior cortex.
- Minimal Reaming Technique: Modern evidence favors "minimal" reaming. Stop reaming after 1.5 mm to 2.0 mm of cortical "chatter" (contact with the diaphyseal cortex) is achieved.
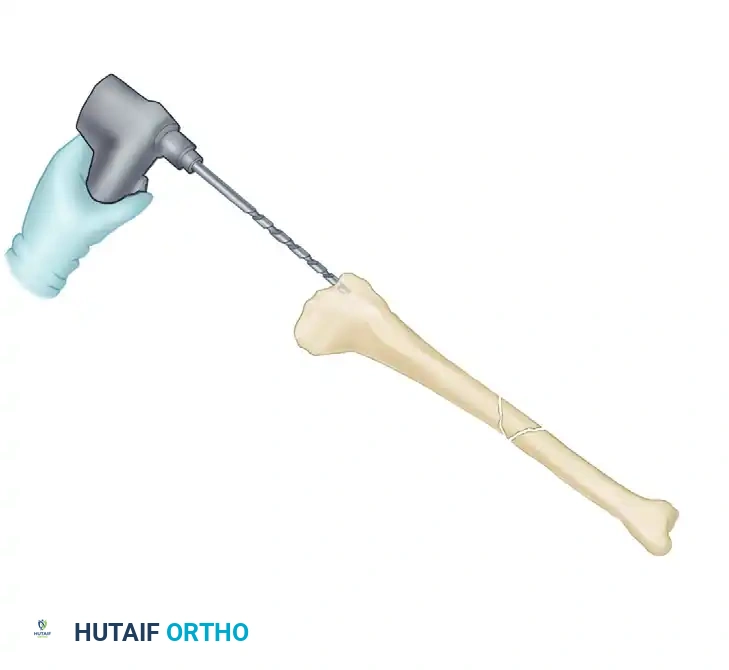
Sequential reaming of the tibial canal in 0.5-mm increments using flexible cannulated reamers over the ball-tipped guide rod.
🚨 SURGICAL WARNING: Never ream with a pneumatic tourniquet inflated. The lack of blood flow eliminates the limb's ability to dissipate heat, leading to severe thermal necrosis of the bone and surrounding soft tissues, particularly in patients with narrow medullary canals.
If an unreamed technique is selected (often reserved for severe open fractures with compromised endosteal and periosteal blood supply), manually pass flexible sounds to determine the canal diameter. Never insert a nail larger than the unreamed canal.
4. Nail Selection and Insertion
- Sizing: Choose a nail diameter that is 1.0 mm to 1.5 mm smaller than the diameter of the last reamer used. Determine the length using a system-specific radiographic depth gauge over the guidewire, ensuring the fracture is held out to length during measurement.
- Insertion: Attach the insertion jig. Direct the apex of the proximal bend (Herzog curve) posteriorly. Insert the nail with moderate manual pressure and a gentle twisting motion.
- Troubleshooting: If the nail fails to advance, do not use excessive force with a mallet, as this risks iatrogenic comminution. Withdraw the nail and either over-ream the canal by an additional 0.5 mm or select a smaller diameter nail.
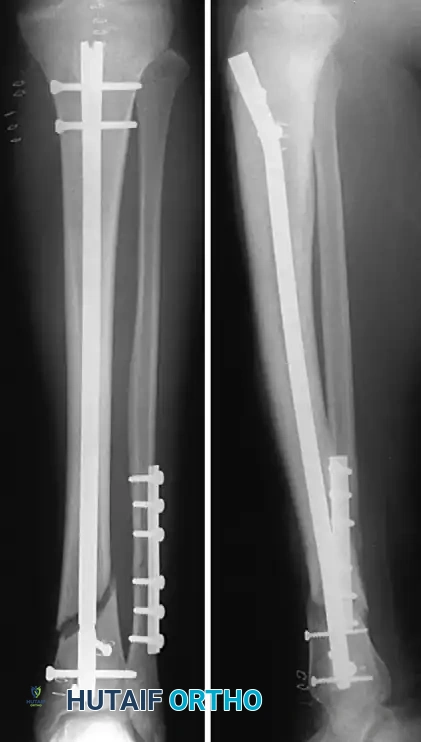
- Final Seating: Remove the guidewire before final seating to prevent incarceration. Release traction to allow the fracture to impact (avoiding distraction). The proximal end of the nail should be countersunk 0.5 cm to 1.0 cm below the cortical opening to prevent anterior knee pain. The distal tip should rest 0.5 cm to 2.0 cm from the subchondral bone of the plafond.

Postoperative AP and Lateral radiographs demonstrating excellent alignment and appropriate nail depth following statically locked intramedullary nailing.
5. Interlocking
Proximal Locking:
Utilize the targeting jig attached to the insertion handle. Place the drill sleeve through a small stab incision directly down to the bone to protect the neurovascular structures and soft tissues. Drill bicortically and insert the appropriate length screws.
Distal Locking (Freehand Technique):
Distal locking relies on the fluoroscopic "perfect circles" technique.
1. Adjust the C-arm until the fluoroscopic beam is perfectly collinear with the distal locking holes. The holes must appear as perfectly round circles, not ovals.
2. Make a stab incision over the hole. Rest the tip of the drill bit on the near cortex, centered in the hole.
3. Align the drill bit with the fluoroscopic beam. Drill through the near (medial) cortex.
4. Detach the drill, leave the bit in place, and verify the trajectory with a fluoroscopic shot.
5. Once confirmed, drill through the far (lateral) cortex. Measure and insert the screw.
💎 CLINICAL PEARL: Before placing the final locking screws, meticulously inspect the fracture site for distraction. If distraction is present, place the distal screws first, then use the nail's internal compression mechanism (if available) or gently back-slap the nail to compress the fracture before placing the proximal screws.
SPECIAL CONSIDERATIONS: PROXIMAL THIRD TIBIAL FRACTURES
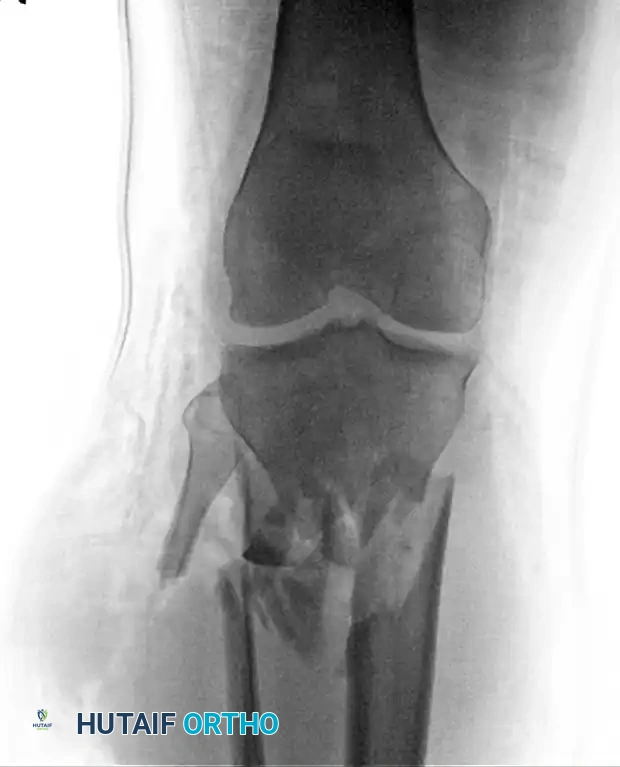
Fractures of the proximal third of the tibial shaft are notoriously difficult to manage with intramedullary nailing. The wide metaphyseal flare provides poor endosteal fit, and the pull of the extensor mechanism combined with the posterior angle of the nail insertion often leads to a characteristic valgus and procurvatum (anterior angulation) deformity.
Preoperative radiograph of a highly unstable proximal third tibial shaft fracture, prone to valgus and procurvatum deformities during standard nailing.
Techniques to Prevent Malalignment:
- Modified Entry Portal: Move the starting point slightly more proximal, posterior, and lateral (in line with the lateral intercondylar eminence) to compensate for the tendency of the nail to track anteromedially.
- Blocking Screws (Poller Screws): Place blocking screws in the concave side of the anticipated deformity to artificially narrow the medullary canal and force the nail into the center of the distal fragment. For proximal fractures, place a blocking screw posteriorly (to prevent procurvatum) and laterally (to prevent valgus) in the proximal fragment.
- Semi-Extended Nailing (Tornetta Technique): Flexing the knee to 90 degrees increases the deforming pull of the patellar tendon. Tornetta et al. popularized nailing in a semi-extended position (15 to 20 degrees of flexion). This is achieved via a medial parapatellar arthrotomy, subluxating the patella laterally to gain straight-line access to the starting point without the deforming forces of deep flexion.
- Suprapatellar Nailing: Modern specialized instrumentation allows for nail insertion through a suprapatellar pouch approach, keeping the knee in near-full extension throughout the procedure, drastically reducing malalignment rates.
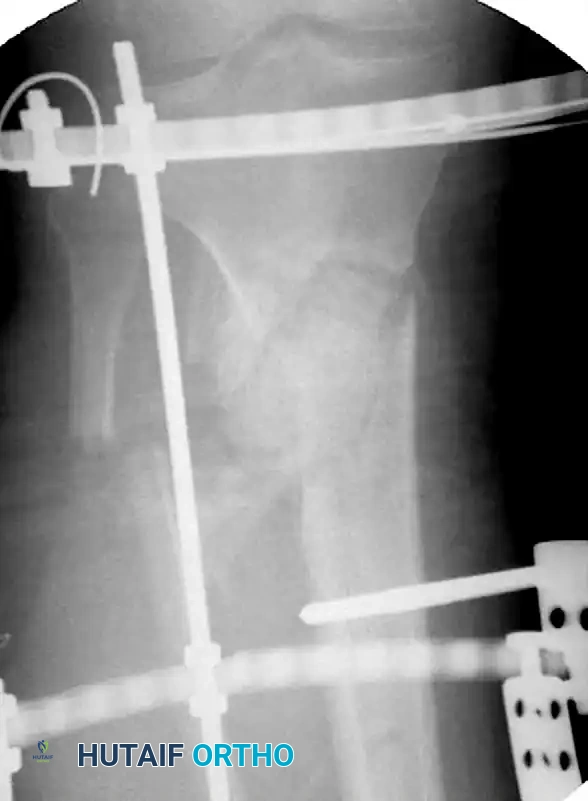
EXTERNAL FIXATION: DAMAGE CONTROL AND SEVERE SOFT TISSUE INJURY
While intramedullary nailing is the definitive treatment for most closed and low-grade open fractures, external fixation remains a vital, versatile tool in the orthopedic armamentarium.
Severe Gustilo-Anderson Type IIIB open tibial fracture with massive soft tissue stripping and contamination. Such injuries often preclude immediate intramedullary nailing.
Indications for External Fixation:
- Damage Control Orthopedics (DCO): In polytraumatized patients with hemodynamic instability, a spanning external fixator provides rapid skeletal stabilization (usually in under 30 minutes) with minimal physiological hit.
- Severe Open Fractures: Gustilo-Anderson Type IIIB and IIIC fractures with massive soft tissue loss, gross contamination, or requiring vascular repair are often best managed with temporizing external fixation until the soft tissue envelope is optimized.
- Compartment Syndrome: When four-compartment fasciotomies are required, external fixation avoids the additional soft tissue trauma and potential deep infection risks associated with immediate IM nailing.
Application of a temporizing spanning external fixator. Note the placement of pins well outside the zone of injury.
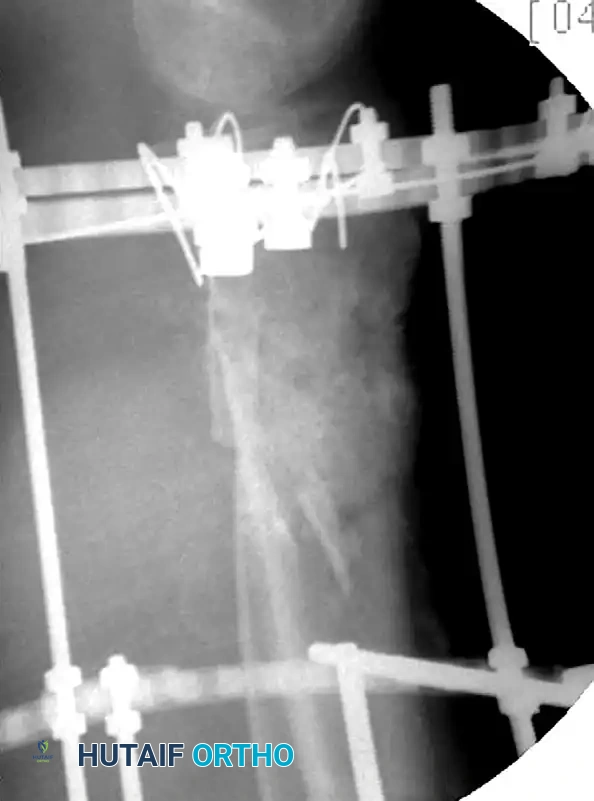
Lateral radiograph demonstrating the external fixator construct maintaining length and provisional alignment.
Once the patient is physiologically stable and the soft tissue bed is clean and granulating (typically within 7 to 14 days), the external fixator can be safely converted to an intramedullary nail.
POSTOPERATIVE PROTOCOL AND REHABILITATION
The postoperative regimen is dictated by the fracture pattern, the stability of the fixation, and the status of the soft tissues.
- Weight-Bearing: For stable, transversely oriented, or short oblique fractures treated with a statically locked, reamed nail, immediate weight-bearing as tolerated (WBAT) is generally encouraged. The axial loading promotes micromotion at the fracture site, stimulating secondary bone healing. For highly comminuted or length-unstable fractures, partial weight-bearing may be instituted for the first 4 to 6 weeks.
- Range of Motion: Early, aggressive active and active-assisted range of motion (ROM) exercises for the knee and ankle are initiated on postoperative day one to prevent arthrofibrosis and joint contractures.
- Dynamization: If delayed union is noted at 12 to 16 weeks postoperatively (lack of bridging callus), dynamization may be considered. This involves removing the locking screws from the longer fragment (usually the proximal screws for a distal fracture) to allow the nail to slide and axially compress the fracture site during weight-bearing.
By adhering to these rigorous biomechanical principles and precise surgical techniques, the orthopedic surgeon can consistently achieve excellent clinical outcomes, minimizing complications and maximizing functional recovery in patients with tibial shaft fractures.
You Might Also Like