Operative Management of Tibial Fractures: Intramedullary Nailing and Locking Plate Fixation
Key Takeaway
The surgical management of tibial shaft fractures requires meticulous preoperative planning and precise execution. This comprehensive guide details the operative techniques for both intramedullary interlocking nailing and large fragment locking compression plating. Key aspects include accurate nail length determination using the tibial tubercle-medial malleolar distance, optimal patient positioning, safe entry portal establishment, and evidence-based reaming protocols to ensure biomechanical stability and promote fracture union.
Principles of Tibial Fracture Fixation
The operative management of tibial shaft and metaphyseal fractures demands a profound understanding of lower extremity biomechanics, soft-tissue envelopes, and implant metallurgy. The primary goals of surgical intervention are the restoration of axial alignment, rotation, and length, coupled with the provision of absolute or relative stability to facilitate early mobilization and predictable osseous union.
This masterclass delineates the advanced surgical techniques for two foundational pillars of tibial fracture management: Large Fragment Locking Compression Plating (LCP) and Intramedullary (IM) Interlocking Nailing.
Large Fragment Locking Compression Plate (LCP) Fixation
Locking compression plates have revolutionized the management of periarticular tibial fractures, particularly in the presence of severe comminution or osteoporotic bone where conventional plating systems fail to achieve adequate purchase. The LCP functions as an internal fixator; the threaded screw heads lock directly into the plate, creating a fixed-angle construct that does not rely on plate-to-bone friction for stability. This preserves the delicate periosteal blood supply, which is critical for secondary bone healing.
Biomechanics and Implant Design
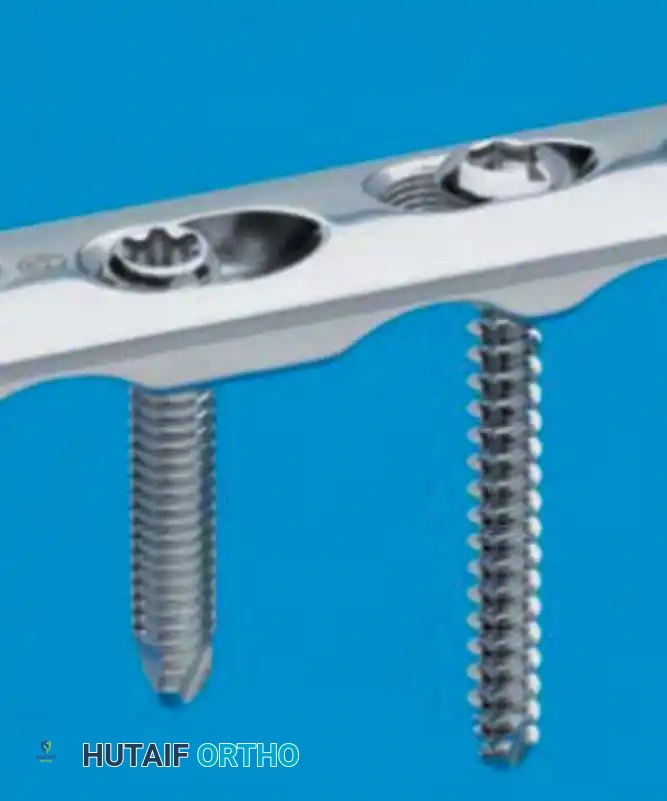
The 4.5-mm proximal tibial plate is engineered to contour to the complex three-dimensional anatomy of the proximal tibia. The hallmark of the LCP system is the "Combi-hole" design, which integrates a dynamic compression unit (DCU) with a threaded locking section.
Fig. 1: Large fragment locking compression plate (LCP) design features. Note the threaded hole section for locking screws and the DCU hole section for conventional cortical screws.
Clinical Pearl: When utilizing a combination of conventional and locking screws in the same plate, conventional screws must be inserted and fully tightened before any locking screws are placed. Inserting a locking screw first will fix the plate at a specific distance from the bone, preventing subsequent conventional screws from compressing the plate to the bone.
Surgical Technique: Bicortical Screw Fixation
- Exposure and Reduction: Achieve anatomical reduction of the articular surface (if involved) and restore metaphyseal-diaphyseal alignment. Provisional fixation with Kirschner wires or independent lag screws is often necessary.
- Plate Application: Slide the LCP submuscularly if utilizing a minimally invasive percutaneous osteosynthesis (MIPO) technique, or apply it directly via an open approach.
- Measurement and Drilling: Slide the tapered end of the measuring device over the guidewire down to the wire sleeve. Remove the measuring device, guidewire, and wire sleeve, leaving the threaded drill guide intact. Use the appropriate size drill bit to drill the near cortex. Remove the threaded drill guide.
- Screw Insertion: Insert the appropriate length locking screw under power. The screw is securely locked to the plate when an audible click is heard, indicating engagement of the torque-limiting mechanism.
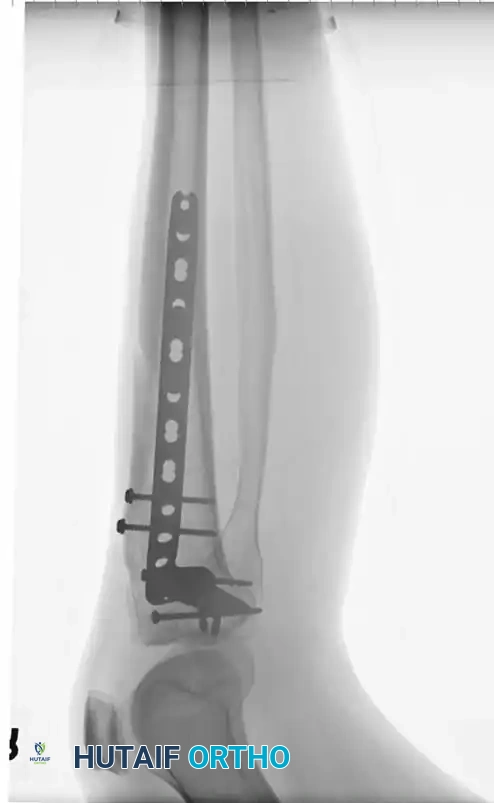
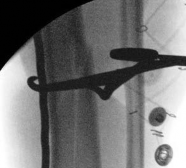
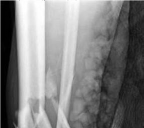
Fig. 2: Clinical application of a large fragment locking compression plate in a patient with a complex fracture of the tibial shaft extending into the tibial plateau.
Intramedullary Interlocking Nailing
Intramedullary nailing remains the gold standard for the treatment of displaced diaphyseal tibial fractures. It offers a load-sharing construct, preserves the extraosseous blood supply, and provides excellent control of length, alignment, and rotation.
Indications and Implant Selection
Currently, a vast array of interlocking tibial nails is available, varying in composition (stainless steel vs. titanium alloy), radius of curvature, and the location of the proximal bend (Herzog curve).

Fig. 3: Shaded areas indicate the diaphyseal and metaphyseal zones highly amenable to fixation with an interlocking medullary nail.
Modern nail designs feature multi-planar proximal locking options and extreme distal locking holes, expanding the indications to include very proximal and very distal extra-articular fractures.
* Stable Isthmic Fractures: Transverse and short oblique uncomminuted fractures can theoretically be treated without locking screws, though this is rarely practiced today.
* Unstable Fractures: All unstable, comminuted, or segmental fractures must be statically locked with at least two screws distally and two proximally to maintain length and prevent rotational malalignment.
Preoperative Planning: Length and Diameter
Accurate preoperative determination of nail length and diameter is paramount. Incorrect nail length can lead to catastrophic complications: a nail that is too short may migrate distally into the ankle joint, while a nail that is too long will protrude proximally, causing severe anterior knee pain and patellar tendon impingement.
Surgical Warning: Further impaction occasionally occurs when severely comminuted fractures are later dynamized. This risk must be factored into nail length selection to prevent delayed intra-articular migration.
Colen and Prieskorn evaluated four methods for determining correct nail length: full-length scanograms, "spotograms," acrylic template overlays, and the tibial tubercle–medial malleolar distance (TMD). They concluded that the TMD is the most accurate method.
* TMD Measurement: Measured clinically from the highest (most prominent) point of the medial malleolus to the tibial tubercle on the uninjured contralateral leg.
* Diameter Assessment: The diameter of the nail is assessed by measuring the medullary canal at its narrowest point (the isthmus), which is best appreciated on lateral radiographs.
The Reamed vs. Unreamed Debate
The decision to insert the nail with or without reaming must be made preoperatively.
* Unreamed Nails: Typically require smaller diameters (8 to 10 mm) and cannot be used in patients with medullary canals narrower than 8 mm. They are historically favored in severe open fractures to minimize further disruption of the endosteal blood supply.
* Reamed Nails: Reaming allows for the insertion of larger diameter, biomechanically superior implants. The reaming process also deposits osteogenic reamings at the fracture site, acting as an autogenous bone graft. Current evidence strongly supports reamed nailing for closed fractures and most open fractures with manageable soft-tissue envelopes.
Operative Setup and Patient Positioning
Tibial nailing can be performed utilizing either a fracture table or a standard radiolucent operating table. The choice depends on surgeon preference, the presence of concomitant injuries, and the availability of skilled surgical assistants.
Fracture Table Setup
A fracture table is highly advantageous when a skilled assistant is unavailable, as it maintains sustained traction and reduction throughout the procedure.
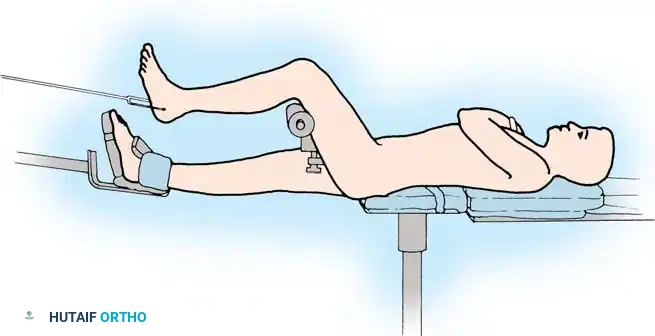
Fig. 4: Patient positioned supine on a fracture table. Traction is applied through a calcaneal traction pin or a specialized foot holder.
- Place a calcaneal traction pin (typically a centrally threaded 5.0 mm Steinmann pin) from medial to lateral to avoid the neurovascular bundle.
- Position the patient supine with the hip flexed 45 degrees and the knee flexed 90 degrees.
- Place a well-padded crossbar proximal to the popliteal fossa. Crucial: Adequate padding is mandatory to prevent compression neuropathy of the common peroneal or tibial nerves.
- Apply traction and reduce the fracture under fluoroscopic guidance. Once reduction is confirmed, slightly release the traction to decrease the risk of neurological stretch injuries.
Standard Radiolucent Table Setup
Treating polytrauma patients is often easier on a standard operating table. It offers greater flexibility for positioning and reduces the risk of traction-related complications.
* Place the patient supine with the thigh supported over a padded radiolucent bolster, allowing the knee to flex freely to 90 degrees or more.
* A femoral distractor or a temporary two-pin external fixator can be utilized to maintain reduction. Place the proximal Schanz pin in the posterior aspect of the tibial condyle to ensure it remains out of the trajectory of the intramedullary nail.
Measurement of Rotation (Clementz Method)
Rotational malalignment is a frequent complication of intramedullary nailing. Rotation must be assessed meticulously before and during the procedure.
- Measure tibial torsion in the uninjured extremity with the knee fully extended.
- Place the C-arm in a lateral position, beam parallel to the floor. Rotate the leg until a perfect lateral view of the distal femur is obtained (condyles superimposed exactly).
- Hold the limb in this position. Bring the C-arm to the anteroposterior position (beam perpendicular to the floor) to image the ankle.
- Rotate the C-arm until a tangential image of the inner surface of the medial malleolus is seen. This establishes the reference line.
- The amount of tibial torsion equals the difference between the reference line at the ankle and a line perpendicular to the floor.
Surgical Technique: Intramedullary Nailing
1. Establishing the Entry Portal
The entry portal is the most critical step in tibial nailing. An eccentric starting point will inevitably lead to angular malalignment of the fracture.
- Make a 5-cm longitudinal incision along the medial border of the patellar tendon, extending proximally from the tibial tubercle. Retract the patellar tendon laterally.
- Insert a curved awl through the anterior metaphysis. The starting point should be immediately proximal to the tibial tubercle, at the level of the tip of the fibular head (approximately 1.5 cm distal to the knee joint line).
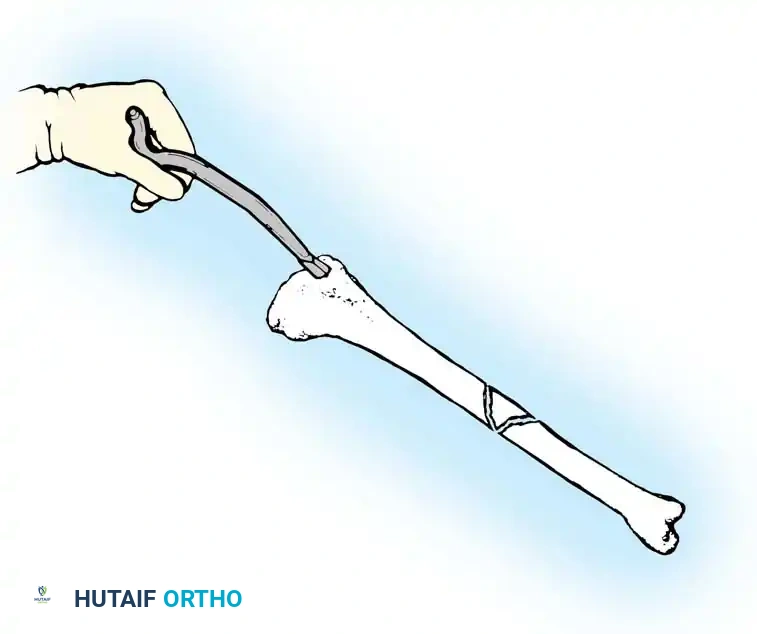
Fig. 5: Opening of the proximal tibial medullary canal utilizing a curved awl. Note the trajectory aligning with the anatomical axis of the diaphysis.
Surgical Warning: The safe zone for tibial nail placement is just medial to the lateral tibial spine on the AP view, and immediately adjacent and anterior to the articular surface on the lateral view. A portal placed too medially risks violating the tibial plateau and injuring the transverse intermeniscal ligament. A portal placed too distally causes the nail to enter at a steep angle, risking posterior cortical penetration or anterior cortical blowout.
Direct the awl nearly perpendicular to the anterior cortex initially to prevent skiving, then gradually drop the handle to align the awl parallel to the medullary canal.
2. Guidewire Insertion and Fracture Reduction
Insert a ball-tipped guidewire (typically 3.0 mm) through the entry portal. Advance it down the proximal fragment to the fracture site.

Fig. 6: Reduction of the tibial shaft fracture and passage of the ball-tipped guide rod across the fracture site into the distal fragment.
Manipulate the fracture to achieve anatomical reduction. Pass the guidewire across the fracture site and advance it into the distal metaphysis. The tip of the guidewire must be centered within the distal fragment on both AP and lateral fluoroscopic views, resting approximately 0.5 cm to 1.0 cm proximal to the ankle joint subchondral line.
3. Canal Preparation and Reaming
If a reamed technique is selected, utilize flexible cannulated reamers over the ball-tipped guidewire.
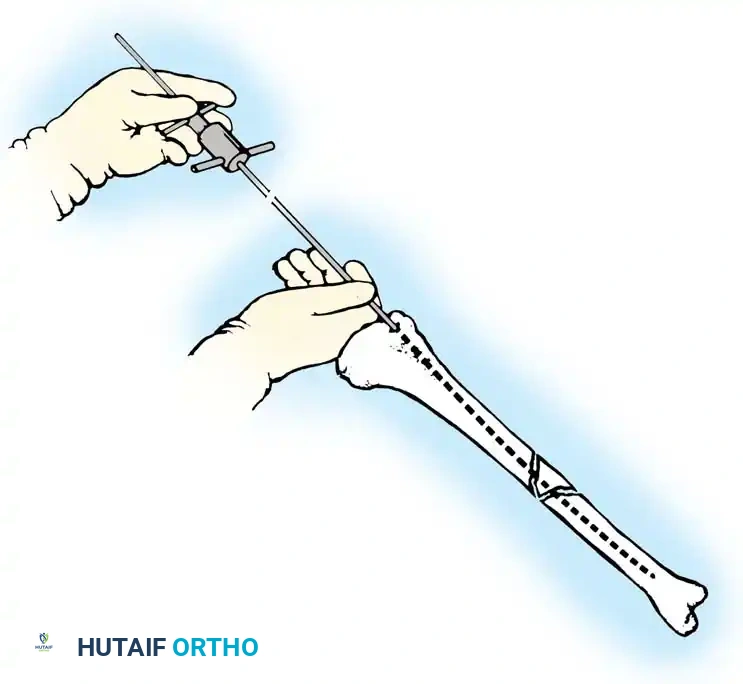
Fig. 7: Sequential reaming of the tibial medullary canal in 0.5-mm increments using flexible cannulated reamers over the guide rod.
- Begin with an end-cutting reamer that is smaller than the measured isthmic diameter (e.g., 8.5 mm).
- Ream in 0.5-mm increments. Maintain the knee in hyperflexion during proximal reaming to prevent the reamer shaft from impinging on the patella or anterior cortex.
- Minimal Reaming Protocol: We advocate for minimal reaming. Stop reaming after achieving 1.5 to 2.0 mm of cortical "chatter" (the tactile and auditory feedback indicating contact with the dense diaphyseal cortical bone).
- Thermal Necrosis Prevention: Never ream with a pneumatic tourniquet inflated. The lack of blood flow combined with the friction of the reamer can cause severe thermal necrosis of the bone and surrounding soft tissues.
4. Nail Insertion and Locking
Choose a nail diameter that is 1.0 to 1.5 mm smaller than the diameter of the final reamer used.
* Exchange the ball-tipped guidewire for a smooth-tipped insertion wire using a plastic exchange tube. (Solid nails are inserted without a guidewire).
* Mount the nail on the insertion jig and advance it into the canal. Use gentle, twisting manual pressure or light mallet taps. Excessive force indicates an undersized canal or an eccentric entry angle; stop and reassess.
* Ensure the proximal end of the nail is countersunk at least 2 to 5 mm below the cortical surface of the entry portal to prevent postoperative patellar tendon impingement.
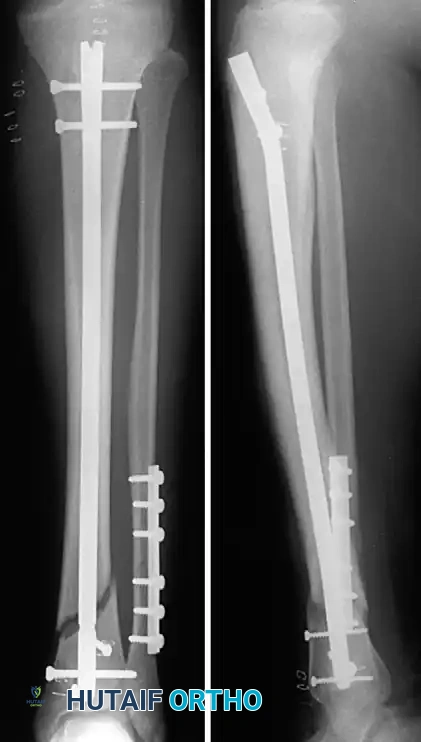
Fig. 8: Final fluoroscopic assessment demonstrating excellent axial alignment following intramedullary nail insertion and static interlocking screw placement.
- Distal Locking: Perform distal locking first using a freehand perfect-circle fluoroscopic technique. Ensure the drill bit passes cleanly through both cortices and the nail hole.
- Proximal Locking: Utilize the outrigger targeting jig to place the proximal locking screws.
- Before placing the final proximal screws, release traction and gently impact the heel to compress the fracture site, eliminating any iatrogenic distraction.
Postoperative Protocols and Aftertreatment
Postoperative management is dictated by the fracture pattern, the stability of the fixation construct, and the status of the soft-tissue envelope.
- Weight-Bearing: For stable, transversely oriented fractures treated with a statically locked, reamed intramedullary nail, immediate weight-bearing as tolerated (WBAT) is generally encouraged. For highly comminuted or segmental fractures, or those treated with LCP fixation, partial weight-bearing (toe-touch) may be indicated for the first 4 to 6 weeks.
- Mobilization: Early active and active-assisted range of motion (ROM) of the knee and ankle joints is initiated on postoperative day one to prevent arthrofibrosis and promote venous return.
- Monitoring: Vigilant monitoring for compartment syndrome is mandatory in the first 48 hours, regardless of whether the fracture was treated open or closed.
- Dynamization: Routine dynamization (removal of static locking screws to allow axial compression) is not recommended. It is reserved for cases of delayed union presenting at 12 to 16 weeks postoperatively, provided rotational stability can be maintained.
You Might Also Like