Compression Hip Screw Fixation for Intertrochanteric Fractures
Key Takeaway
Compression hip screw (CHS) fixation remains a foundational technique for managing stable intertrochanteric femoral fractures. This comprehensive surgical guide details patient positioning, precise reduction maneuvers, lateral approach exposure, and step-by-step stabilization. Emphasizing biomechanical principles such as the tip-apex distance and lateral wall integrity, this resource equips orthopedic surgeons with evidence-based strategies to minimize implant failure and optimize postoperative patient outcomes.
INTRODUCTION TO INTERTROCHANTERIC FEMORAL FRACTURES
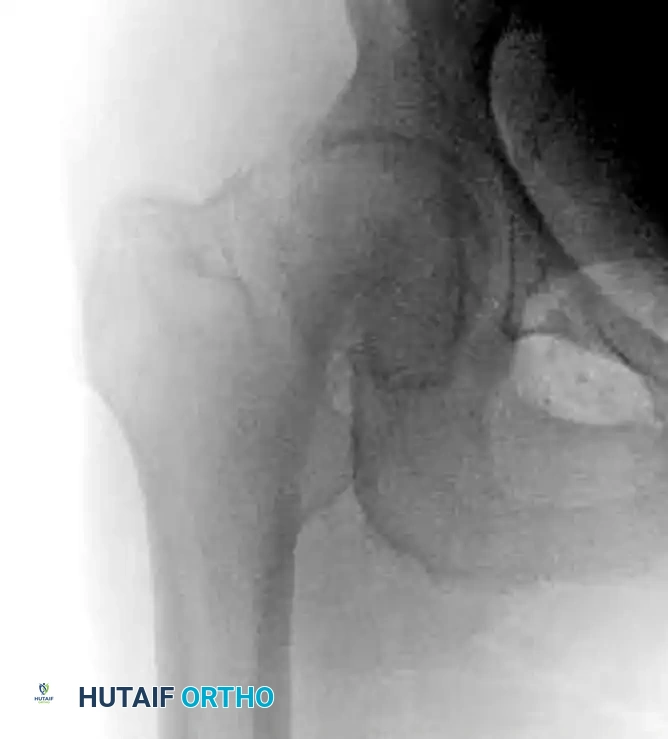
Intertrochanteric femoral fractures represent a significant proportion of fragility fractures encountered in orthopedic trauma. The primary goal of surgical intervention is to achieve stable fixation that permits early mobilization, thereby mitigating the profound morbidity and mortality associated with prolonged recumbency in the geriatric population.
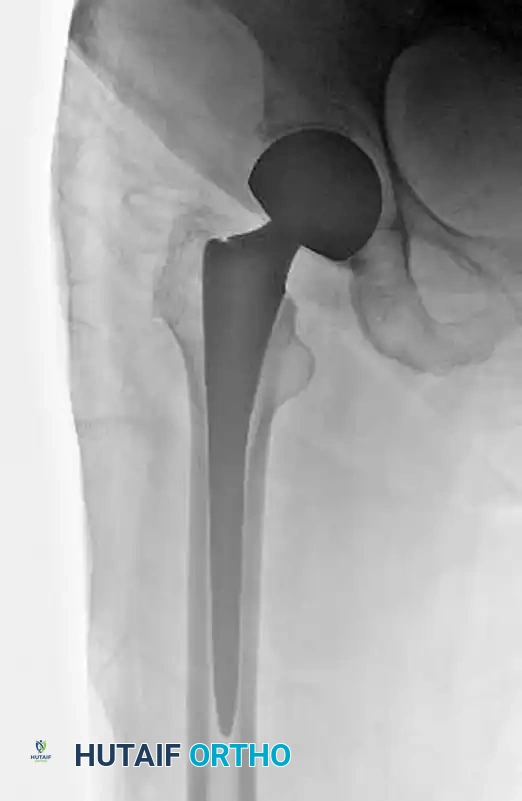
The compression hip screw (CHS), also known as the dynamic hip screw (DHS), has historically been the gold standard for the fixation of stable intertrochanteric fractures. The biomechanical genius of the CHS lies in its ability to allow controlled, dynamic sliding of the proximal fragment along the axis of the femoral neck. This sliding mechanism promotes secondary bone healing through controlled impaction at the fracture site while preventing the lag screw from penetrating the articular surface of the femoral head.
Clinical Pearl: The success of a compression hip screw relies heavily on three pillars: an anatomic or slightly valgus reduction, optimal lag screw placement (center-center), and the structural integrity of the lateral femoral wall.
FRACTURE CLASSIFICATION AND BIOMECHANICS
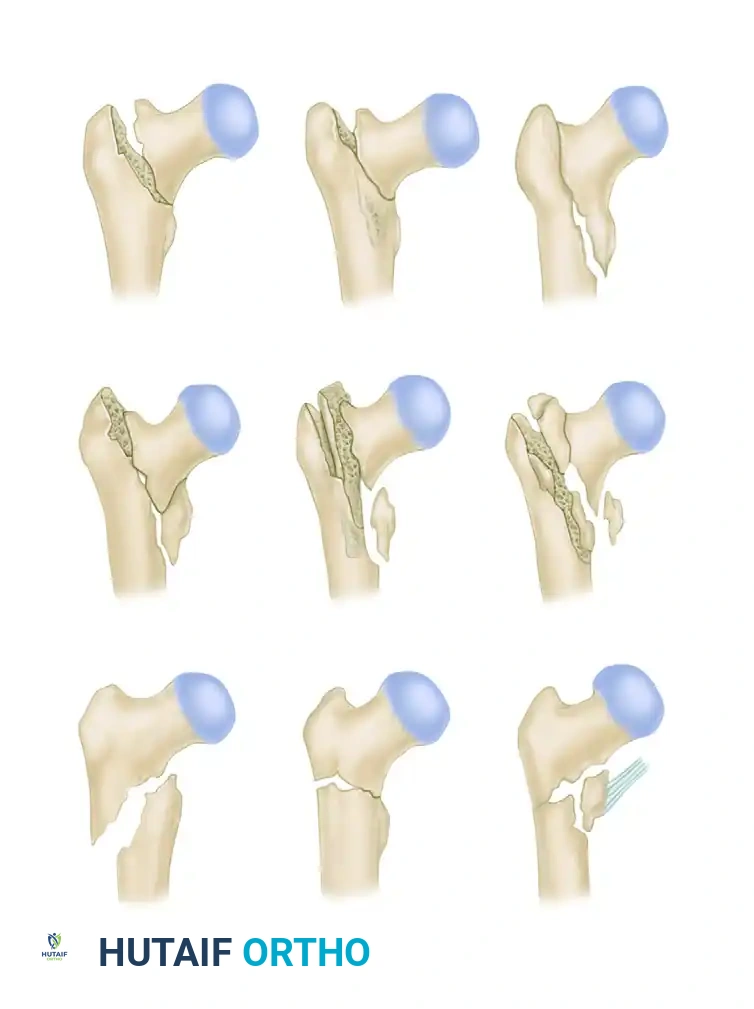
Understanding fracture morphology is paramount when selecting the appropriate implant. Intertrochanteric fractures are broadly categorized into stable and unstable patterns based on the integrity of the posteromedial cortex (calcar femorale) and the lateral trochanteric wall.
The AO/OTA Classification
The Comprehensive Classification of Fractures (AO/OTA) divides trochanteric fractures (31-A) into three primary groups:
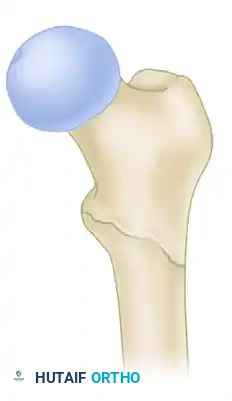
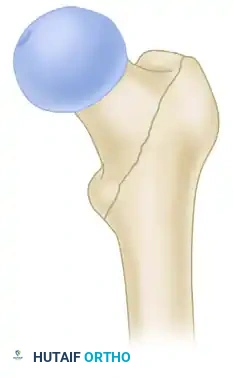
* 31-A1: Simple, two-part fractures with a stable medial cortex.
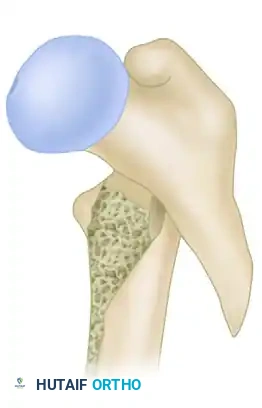
* 31-A2: Multifragmentary fractures with posteromedial comminution (incompetent medial buttress) but an intact lateral wall.
* 31-A3: Reverse obliquity or transverse fractures extending through the lateral cortex.
Boyd and Griffin Classification
An alternative historical framework is the Boyd and Griffin classification, which highlights the complexity and potential for instability in trochanteric fractures.
While A1 and stable A2.1 fractures are highly amenable to CHS fixation, fractures with significant lateral wall comminution (A2.2, A2.3, and A3) exhibit a high failure rate with side-plate devices due to excessive medialization of the femoral shaft.
PREOPERATIVE PLANNING AND PATIENT POSITIONING
Meticulous preoperative planning and precise patient positioning are critical prerequisites for a successful operation.
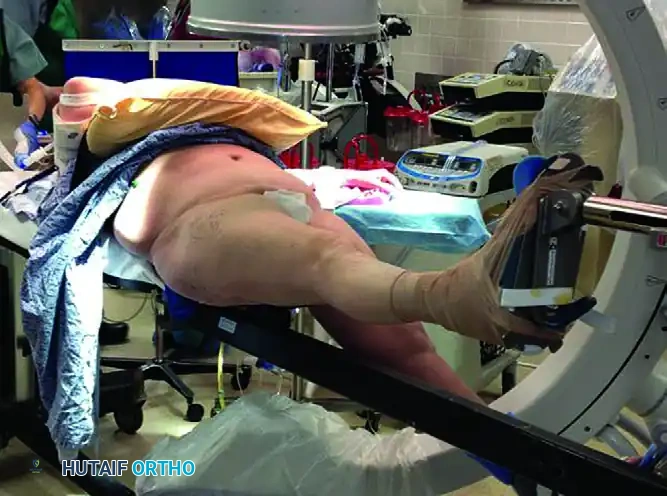
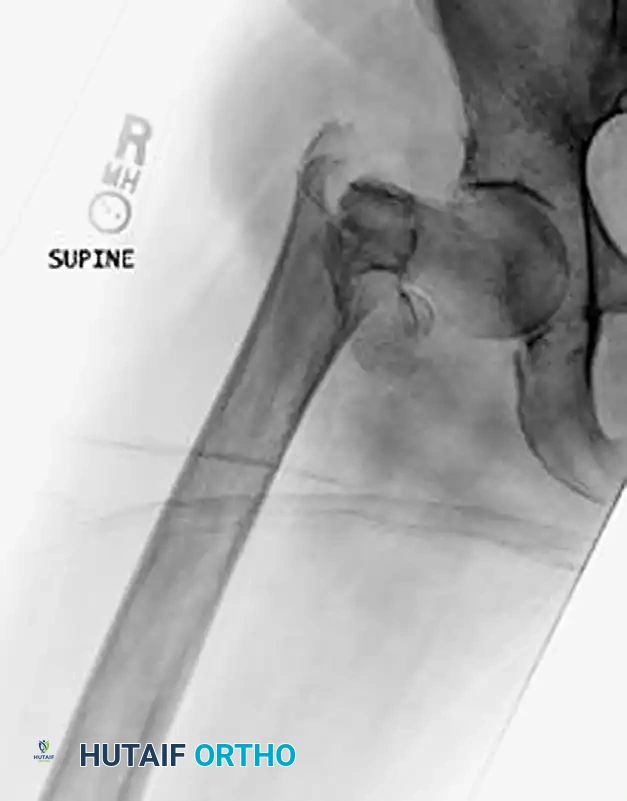
Patient Positioning on the Fracture Table
- Anesthesia and Transfer: Following the induction of regional or general anesthesia, transfer the patient to a radiolucent fracture table equipped with a perineal post. Ensure the perineal post is well-padded to prevent pudendal nerve neurapraxia.
- Contralateral Limb Setup: The uninjured contralateral lower extremity must be positioned out of the way of the fluoroscopy unit. This can be achieved by placing the foot in a boot and scissoring the leg (extending the unaffected hip relative to the injured side) or by utilizing a well-leg holder in a lithotomy position.
- Affected Limb Setup: Place the affected extremity into the traction boot. We typically position the affected extremity in 20 to 30 degrees of hip flexion to relax the iliopsoas muscle, which often acts as a deforming force on the proximal fragment.
- Fluoroscopy Integration: Position the C-arm fluoroscopy unit either on the contralateral side or between the patient’s legs. It is absolutely mandatory to confirm that unhindered, high-quality anteroposterior (AP) and lateral orthogonal views of the proximal femur and femoral head can be obtained before prepping and draping.
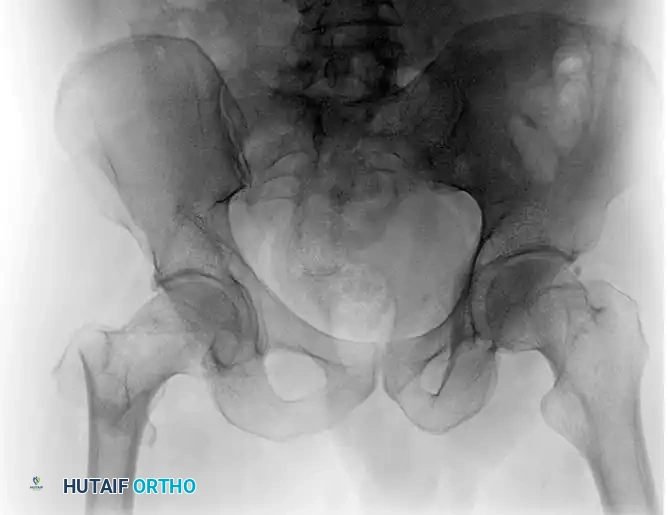
CLOSED REDUCTION MANEUVERS
Surgical Warning: Never proceed with the surgical incision until an acceptable closed reduction is confirmed on both AP and lateral fluoroscopic views. A poorly reduced fracture cannot be salvaged by a perfectly placed implant.
- Standard Reduction: Reduction of the affected extremity is typically achieved through longitudinal traction followed by internal rotation. The internal rotation corrects the external rotation deformity caused by the short external rotators and gravity, bringing the femoral neck parallel to the floor.
- Correcting Sagittal Deformity: The most common sagittal plane deformity is a posterior sag of the fracture site. This may require correction via an anteriorly applied force (e.g., a crutch or a specialized reduction tool placed under the posterior thigh) to lift the distal fragment before finalizing the reduction with traction and internal rotation.
- Fluoroscopic Scrutiny: Carefully scrutinize the images to rule out varus deformity, posterior sag, and excessive internal rotation. A slight valgus reduction is biomechanically superior to any degree of varus.
High-Energy and Irreducible Fractures
The fracture mechanism (low-energy fragility vs. high-energy trauma) dictates the ease of reduction. Standard closed reduction maneuvers are frequently unsuccessful in high-energy intertrochanteric fractures or delayed presentations.

In such instances, percutaneous reduction aids (e.g., ball-spike pushers, collinear reduction clamps) or an open reduction through a Watson-Jones approach may be required to anatomically align the fragments prior to fixation.
SURGICAL EXPOSURE: THE LATERAL APPROACH
The lateral approach to the proximal femur provides direct, extensile access to the vastus ridge and the femoral shaft.
- Incision: Begin the longitudinal incision at the level of the vastus ridge (the flare of the greater trochanter) and extend it distally for approximately 6 to 10 centimeters, depending on the planned length of the side plate.
- Superficial Dissection: Carry the dissection sharply through the subcutaneous tissues to the iliotibial band. Incise the iliotibial band longitudinally in line with its fibers.
- Deep Dissection: Identify the vastus lateralis muscle. Split the fascia of the vastus lateralis longitudinally. Elevate the muscle belly anteriorly off the lateral intermuscular septum.
- Hemostasis: As the vastus lateralis is elevated, perforating branches of the profunda femoris artery will be encountered. These must be meticulously isolated and coagulated or ligated to prevent postoperative hematoma.
- Bone Exposure: Complete the exposure by sharply incising the origin of the vastus lateralis at the vastus ridge, leaving a small cuff of tissue for later repair. Use a periosteal elevator to clear the lateral femoral cortex, allowing flush seating of the side plate.
STEP-BY-STEP STABILIZATION TECHNIQUE
The stabilization phase requires precise spatial awareness and strict adherence to the surgical technique to ensure optimal biomechanical stability.
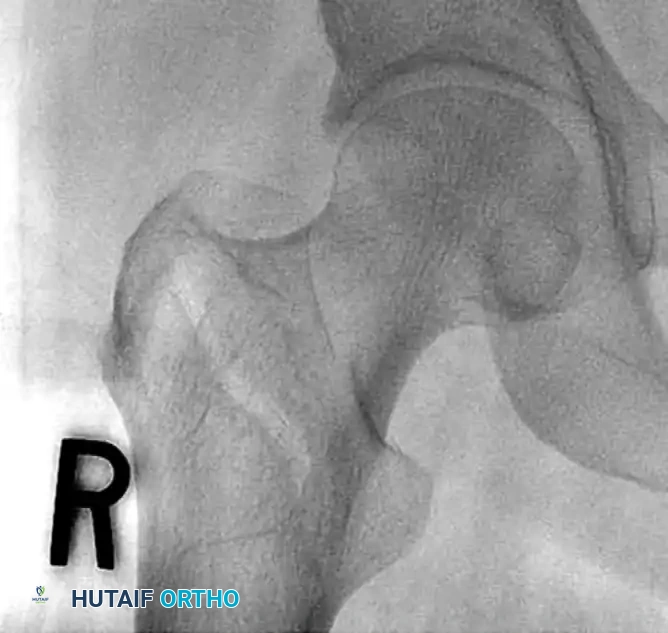
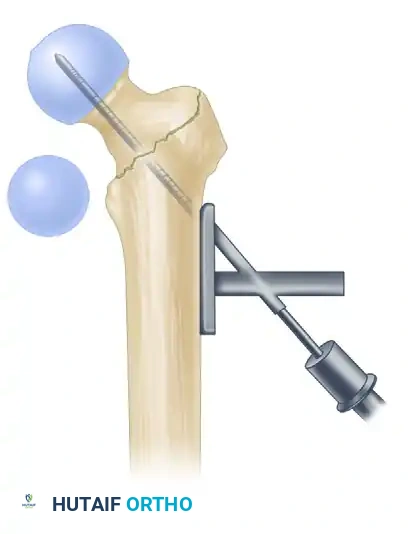
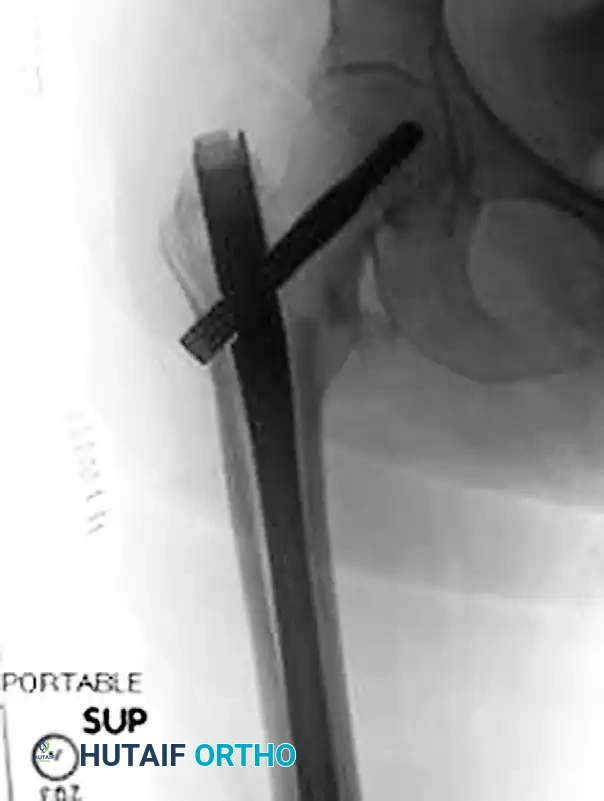
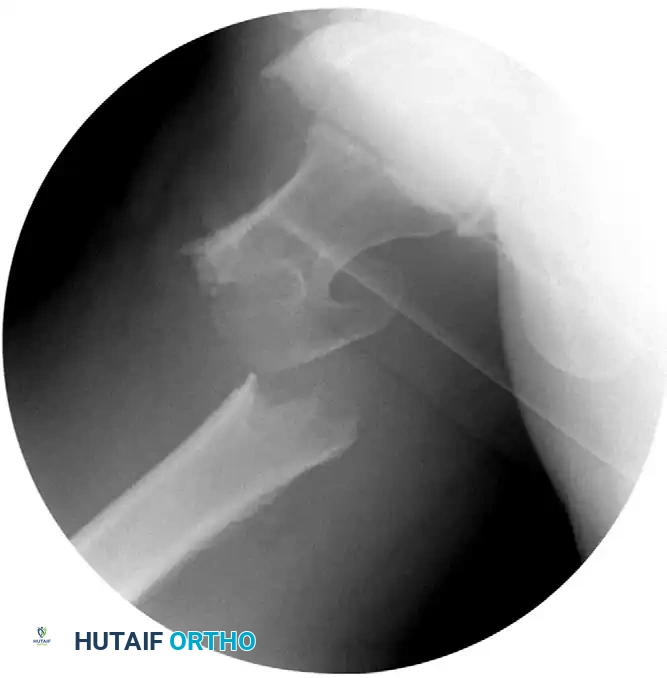
1. Guide Pin Insertion
- Place a 135-degree angled guide against the lateral femoral cortex.
- Insert a 2.8-mm threaded guide pin through the guide, aiming for the exact center of the femoral head on both the AP and lateral fluoroscopic views (the "center-center" position).
- To assist with anteversion alignment, a secondary guide pin can be placed anteriorly along the femoral neck.
- Advance the primary guide pin until its tip is approximately 5 mm from the subchondral bone of the articular surface.
2. Measurement and Reaming
- Measure the depth of the inserted guide pin using the specialized measuring gauge.
- Set the triple reamer to exactly 5 mm less than the measured depth.
- Ream over the guide pin. Crucial Step: Monitor the reaming process continuously under fluoroscopy to ensure the guide pin is not inadvertently advanced through the femoral head into the acetabulum or pelvis.
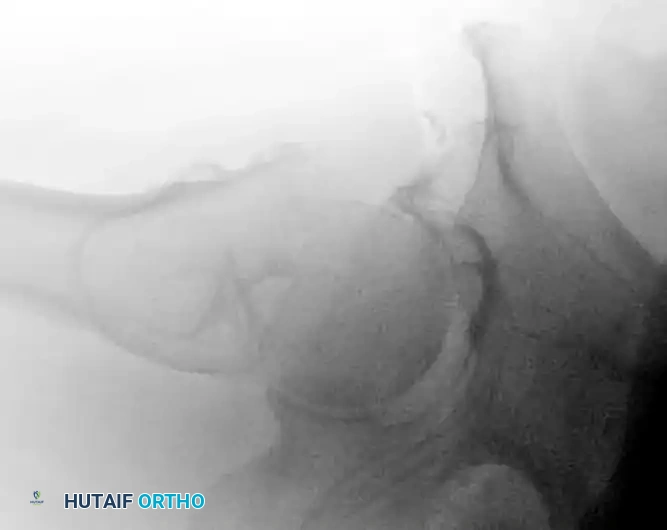
- In young patients or those with dense, sclerotic bone, a tap may need to be used to prepare the channel for the lag screw threads.
3. Lag Screw Insertion
- Select a lag screw that matches the measurement obtained from the triple reamer. If significant fracture impaction (shortening) is anticipated, select a lag screw that is 5 mm shorter to prevent the screw threads from bottoming out in the plate barrel.
- Using the insertion wrench, advance the lag screw into the femoral head. Remember that 90 degrees of rotation results in approximately 0.75 mm of advancement.
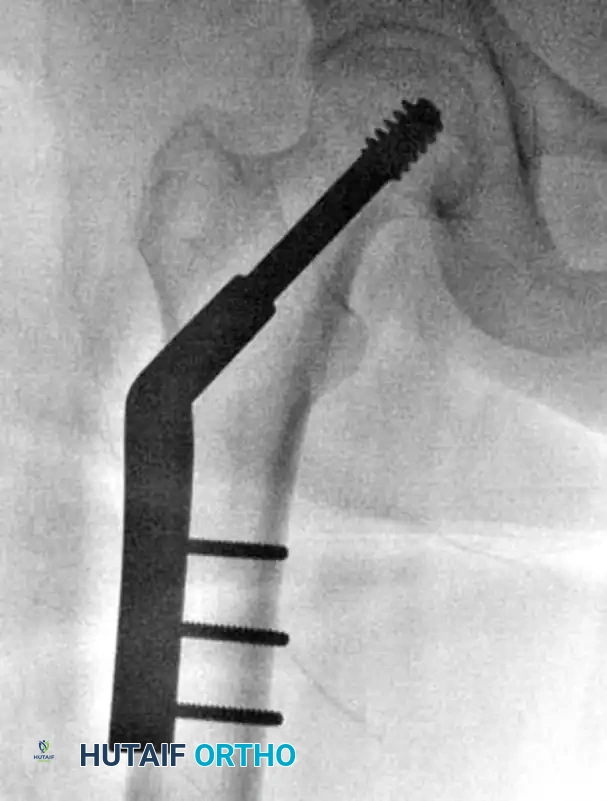
- Alignment: When the final depth is reached, the handle of the insertion wrench must be perfectly parallel to the axis of the femoral shaft (perpendicular to the floor in a lateral position). This aligns the flats of the lag screw shaft with the barrel of the side plate, allowing the plate to slide over the screw.
4. Plate Application
- Slide the side plate over the lag screw shaft and advance it onto the lateral aspect of the femur.
- Use a tamp to fully seat the plate barrel over the screw and flush against the lateral cortex.
- Remove the lag screw retaining rod, the insertion wrench, and finally, the guide pin.
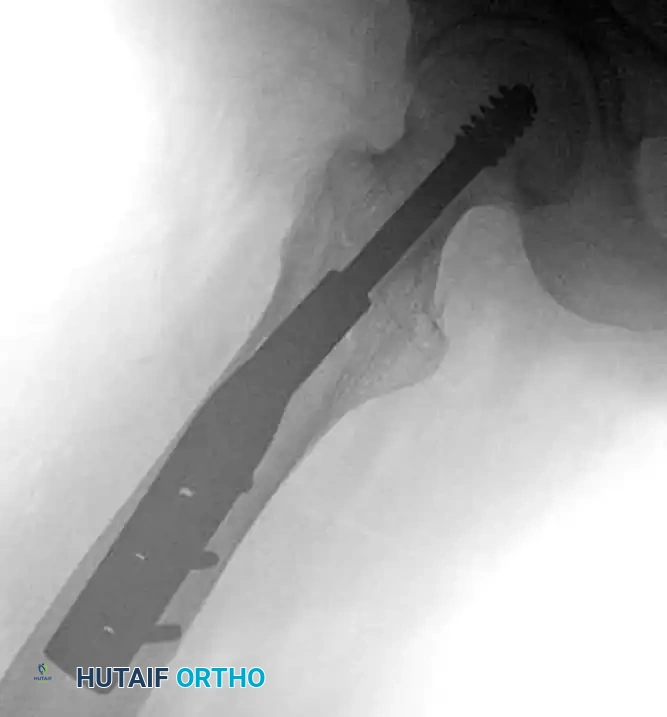
5. Cortical Fixation and Compression
- Secure the side plate to the femoral shaft using a bone clamp.
- Drill, measure, tap (if necessary), and place two to four bicortical 4.5-mm cortical screws through the plate into the femoral shaft. If a screw was initially used to pull the plate to the bone, it may need to be exchanged for a shorter one once the plate is fully seated.
- Release the traction on the fracture table.
- If additional impaction is desired, insert a compression screw into the back of the lag screw. Alternatively, manual compression can be applied by gently pushing the leg proximally.
BIOMECHANICAL CONSIDERATIONS FOR SUCCESS
The Tip-Apex Distance (TAD)
Proper placement of the lag screw is the single most important surgeon-controlled variable in reducing the incidence of implant failure, specifically lag screw "cut-out" through the superior femoral head.
The Tip-Apex Distance (TAD), described by Baumgaertner, is calculated by summing the distance from the tip of the lag screw to the apex of the femoral head on both the AP and lateral radiographs, corrected for magnification.
* Rule of Thumb: As the TAD increases above 25 mm, the risk of biomechanical failure and cut-out increases exponentially. A center-center position inherently minimizes the TAD.
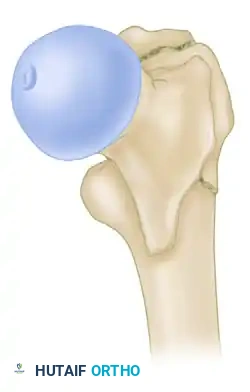
Integrity of the Lateral Wall
The lateral trochanteric wall acts as a critical buttress for the proximal fragment. When treating intertrochanteric fractures with a CHS, the integrity of this wall must be rigorously evaluated.
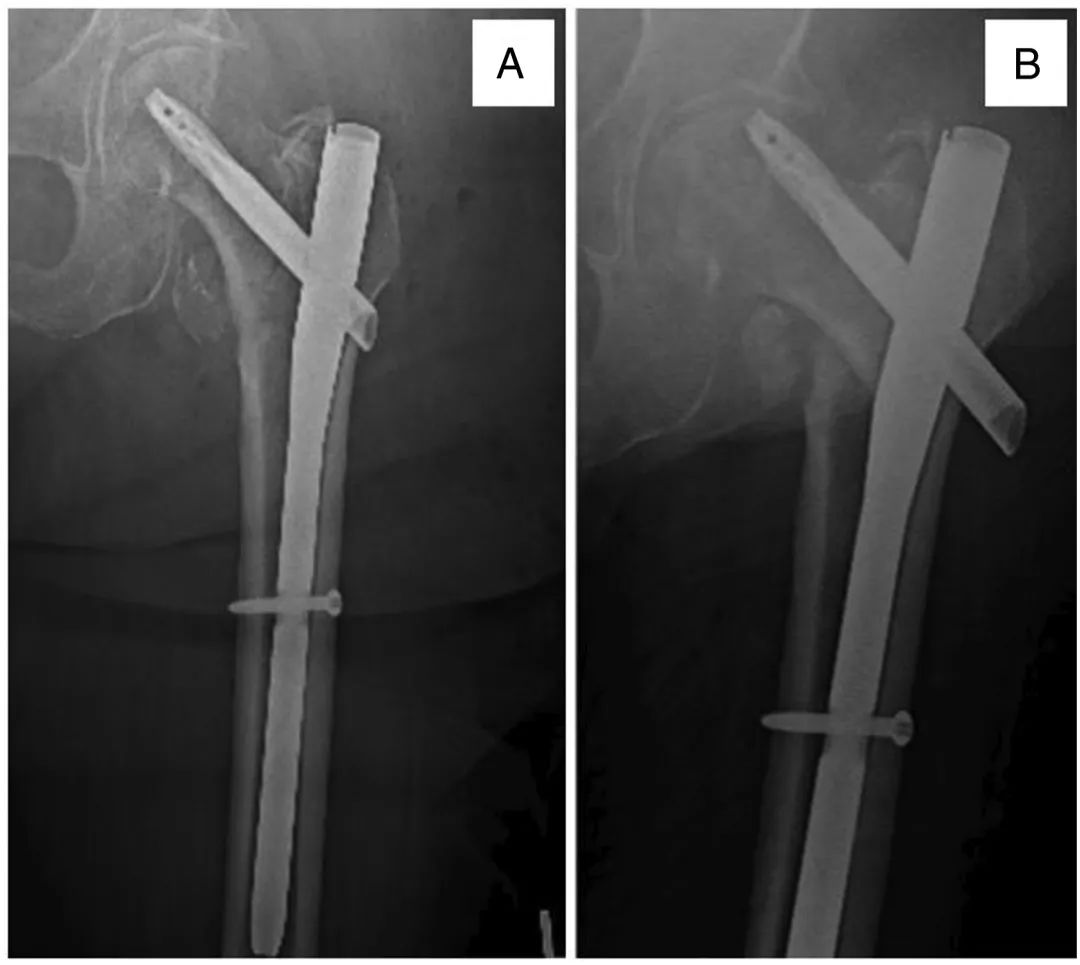
Clinical Pearl: In a landmark series, 22% of patients with a fractured lateral wall (A3 fractures or iatrogenic fractures in A1/A2) treated with a CHS required a reoperation within 6 months. Strikingly, 74% of these lateral wall fractures occurred intraoperatively during reaming or plate impaction.
Studies by Im and Chung identified iatrogenic lateral wall comminution as the most significant predictor of excessive fracture displacement. If iatrogenic comminution occurs, the surgeon must strongly consider augmenting the construct with a trochanteric stabilizing plate (TSP) or abandoning the CHS in favor of an intramedullary nail. Therefore, the CHS should be used with extreme caution in fractures more complex than A2.1.
ALTERNATIVE FIXATION STRATEGIES
Intramedullary Nails (Cephalomedullary Devices)
Unstable intertrochanteric femoral fractures (A3, reverse obliquity, and highly comminuted A2 fractures) are biomechanically best treated with an intramedullary implant, such as a Gamma nail or an intramedullary hip screw (IMHS).
The theoretical benefits of intramedullary nails over side-plate devices include:
* Improved Biomechanics: A shortened lever arm reduces bending moments on the implant.
* Minimally Invasive: Smaller incisions lead to decreased blood loss and soft tissue stripping.
* Lateral Wall Bypass: The nail acts as an internal buttress, preventing excessive medialization even if the lateral wall is incompetent.
While early meta-analyses suggested side plates were superior due to complications like distal femoral fractures at the nail tip, modern, anatomically bowed second- and third-generation cephalomedullary nails have largely mitigated these risks.
Hemiarthroplasty
In rare instances, such as intertrochanteric fractures with pre-existing severe osteoarthritis of the hip, or highly comminuted fractures in profoundly osteoporotic elderly patients where fixation failure is deemed inevitable, a hemiarthroplasty or total hip arthroplasty may be indicated.
Arthroplasty allows for immediate, unrestricted weight-bearing, though it carries higher risks of dislocation, blood loss, and surgical site infection compared to internal fixation.
POSTOPERATIVE CARE AND REHABILITATION
Because the compression hip screw is primarily utilized for stable fracture patterns (A1 and A2.1), the postoperative protocol is generally aggressive.
- Weight-Bearing: Patients are typically allowed to bear weight as tolerated (WBAT) immediately postoperatively. The dynamic sliding nature of the implant relies on physiological loading to impact the fracture site and promote primary stability.
- Physical Therapy: Early mobilization is critical to prevent deep vein thrombosis (DVT), pulmonary embolism, pneumonia, and decubitus ulcers.
- Radiographic Follow-up: Serial radiographs should be obtained at 2 weeks, 6 weeks, and 3 months to monitor for progressive sliding, fracture union, and to ensure there is no evidence of varus collapse or lag screw cut-out.
By strictly adhering to biomechanical principles, achieving an anatomic reduction, and respecting the lateral wall, orthopedic surgeons can utilize the compression hip screw to achieve excellent, reproducible outcomes in the management of stable intertrochanteric femoral fractures.
You Might Also Like