Intramedullary Nailing of Intertrochanteric Femoral Fractures: A Master Surgical Technique Guide
Key Takeaway
Intramedullary nailing is a biomechanically superior fixation method for unstable intertrochanteric femoral fractures. By utilizing a modified medial trochanteric entry portal, surgeons can minimize abductor damage while achieving stable, center-center lag screw placement. This comprehensive guide details patient positioning, precise entry portal localization, sequential reaming, and implant insertion techniques to optimize fracture reduction, minimize postoperative shortening, and ensure excellent functional outcomes in orthopedic trauma patients.
Comprehensive Introduction and Patho-Epidemiology
The surgical management of intertrochanteric femoral fractures (AO/OTA 31-A) has evolved significantly over the past two decades, driven by both a rapidly aging global demographic and profound advancements in orthopedic biomechanics. Intertrochanteric fractures represent approximately half of all proximal femur fractures, carrying a devastating epidemiological burden characterized by immense healthcare costs, severe functional morbidity, and a staggering one-year mortality rate approaching 20% to 30% in the frail elderly population. As the "silver tsunami" of osteoporotic patients continues to surge, the orthopedic surgeon's mastery of these fractures is not merely an elective skill, but an absolute necessity for modern trauma and reconstructive practice.
While the extramedullary sliding compression hip screw (CHS) or dynamic hip screw (DHS) remains a historically viable option for highly stable fracture patterns (AO/OTA 31-A1), intramedullary nailing has unequivocally become the gold standard for unstable configurations. Unstable patterns are classically defined by the loss of the posteromedial buttress (calcar), the presence of a reverse obliquity fracture line (AO/OTA 31-A3), subtrochanteric extension, or the compromise of the lateral femoral wall. In these complex scenarios, extramedullary devices frequently succumb to catastrophic biomechanical failure, leading to excessive varus collapse, profound limb shortening, and medialization of the femoral shaft.
The transition toward intramedullary fixation is rooted in the device's superior ability to manage the immense physiological loads transmitted across the hip joint. Intramedullary devices offer distinct biomechanical advantages over their extramedullary counterparts. By placing the implant centrally within the medullary canal—closer to the mechanical axis of the lower extremity—the bending moment across the implant-bone interface is substantially reduced. Furthermore, intramedullary nails act as an unyielding internal buttress, preventing the excessive medial translation of the femoral shaft that frequently complicates the treatment of unstable fractures with a side-plate device.
Ultimately, the overarching goal of intramedullary nailing in this demographic is not merely radiographic union, but the immediate restoration of structural stability to facilitate early, unrestricted weight-bearing. Prolonged bed rest in the geriatric patient guarantees a cascade of lethal complications, including deep vein thrombosis, pulmonary embolism, hypostatic pneumonia, and decubitus ulcers. Therefore, the surgical intervention must be executed with meticulous precision, providing a construct robust enough to withstand the cyclical loading of immediate ambulation despite the presence of profound osteopenia.
Detailed Surgical Anatomy and Biomechanics
A profound comprehension of the proximal femoral anatomy and the deforming muscular forces acting upon it is paramount for executing a successful intramedullary nailing. The intertrochanteric region is a heavily vascularized, extracapsular expanse of cancellous bone situated between the greater and lesser trochanters. The primary blood supply to the femoral head—the medial femoral circumflex artery (MFCA)—courses posterior to the femoral neck. Because intertrochanteric fractures are extracapsular, the retinacular vessels are typically spared, making avascular necrosis (AVN) a rare complication compared to intracapsular femoral neck fractures.
The muscular attachments of the proximal femur dictate the predictable displacement patterns observed in intertrochanteric fractures. The proximal fragment is universally subjected to flexion, abduction, and external rotation. The iliopsoas, inserting on the lesser trochanter, forcefully flexes and externally rotates the proximal segment. Simultaneously, the powerful abductor musculature (gluteus medius and minimus), inserting on the greater trochanter, abducts the proximal fragment. Conversely, the distal femoral shaft is adducted by the adductor magnus, longus, and brevis, and shortened proximally by the pull of the rectus femoris and hamstring muscle groups. Overcoming these massive deforming forces is the primary challenge during closed reduction.
From a biomechanical perspective, the proximal femur is subjected to complex, multi-planar loading. The medial cortex (calcar femorale) experiences tremendous compressive forces, while the lateral cortex is subjected to significant tensile stresses. The concept of the "lateral wall"—defined as the intact lateral cortex of the greater trochanter extending down to the vastus ridge—is critical. Gotfried and others have demonstrated that an intact lateral wall is essential for providing a lateral buttress against the sliding of the proximal fragment. When the lateral wall is fractured or iatrogenically breached during reaming, a CHS will fail to prevent excessive sliding, resulting in catastrophic varus collapse. Intramedullary nails bypass this reliance on the lateral wall by providing an intramedullary strut that directly blocks medial shaft translation.
The radius of curvature (ROC) of the anterior femoral bow is another critical anatomical parameter that directly impacts intramedullary nailing. The average human femur has an anterior ROC of approximately 1.2 meters. Historically, many intramedullary nails were manufactured with a much straighter ROC (1.5 to 2.0 meters). Inserting a straight, rigid nail into a curved femur inevitably leads to a mismatch, causing the distal tip of the nail to impinge upon the anterior cortex. In severe cases, this mismatch results in iatrogenic anterior cortical perforation or the generation of massive hoop stresses that fracture the distal femur. Modern cephalomedullary nails have been redesigned with a more anatomical ROC (e.g., 1.0 to 1.2 meters) to mitigate this risk, though the surgeon must remain vigilant, particularly in short-statured or elderly patients with an exaggerated anterior bow.
Exhaustive Indications and Contraindications
The decision to proceed with intramedullary nailing versus extramedullary fixation requires a nuanced analysis of the fracture morphology, the patient's physiological reserve, and the surgeon's technical expertise. While the indications for intramedullary nailing have expanded broadly, it is not a panacea for all proximal femur fractures. The AO/OTA classification system remains the most reliable framework for guiding this decision-making process.
For stable intertrochanteric fractures (AO/OTA 31-A1), characterized by an intact posteromedial cortex and a robust lateral wall, both the sliding hip screw and the short intramedullary nail yield excellent, comparable clinical outcomes. However, for unstable patterns (AO/OTA 31-A2 and A3)—which include multi-fragmentary fractures with posteromedial comminution, reverse obliquity fractures, and fractures with subtrochanteric extension—intramedullary nailing is the absolute indication. In these scenarios, the nail provides superior biomechanical stability, limits excessive sliding, and significantly reduces the risk of implant cut-out and varus collapse.
Contraindications to intramedullary nailing are relatively few but must be strictly respected. Active local or systemic infection is an absolute contraindication to the placement of any internal hardware. Relative contraindications include a fundamentally narrow intramedullary canal (often seen in osteopetrosis or certain dysplasias) that precludes safe reaming, or the presence of pre-existing distal femoral hardware (such as a long-stem total knee arthroplasty) that physically blocks the trajectory of the nail. In cases of severe hip osteoarthritis combined with an intertrochanteric fracture, a calcar-replacing arthroplasty may be indicated over internal fixation.
| Parameter | Indications for Intramedullary Nailing | Contraindications (Absolute & Relative) |
|---|---|---|
| Fracture Pattern | Unstable IT fractures (AO/OTA 31-A2, A3) Reverse obliquity fractures Subtrochanteric extension Lateral wall blowout |
Absolute: Active osteomyelitis or joint sepsis Relative: Stable 31-A1 patterns (Surgeon preference) Ipsilateral femoral neck fracture (requires specialized fixation) |
| Anatomical Factors | Osteoporotic bone requiring load-sharing Need for immediate weight-bearing |
Relative: Extremely narrow medullary canal (<8mm) Severe, uncorrectable anterior femoral bow Pre-existing distal hardware blocking canal |
| Patient Factors | Polytrauma requiring rapid mobilization Pathologic fractures (prophylactic or therapeutic) |
Absolute: Medically unstable for anesthesia Relative: Severe pre-existing hip osteoarthritis (consider arthroplasty) |
Pre-Operative Planning, Templating, and Patient Positioning
Meticulous preoperative planning and precise patient positioning are the absolute foundations of a successful intramedullary nailing procedure. The axiom "the operation is won or lost before the incision is made" holds profound truth in orthopedic traumatology. Poor positioning inevitably leads to malreduction, prolonged fluoroscopy times, suboptimal implant placement, and an increased risk of catastrophic mechanical failure.
Radiographic Evaluation and Digital Templating
Preoperative imaging must include a high-quality anteroposterior (AP) view of the pelvis, an AP view of the affected hip, and a cross-table lateral view. Additionally, full-length AP and lateral radiographs of the affected femur are mandatory to assess the isthmic diameter, the radius of the anterior bow, and the presence of any distal deformities or silent lesions. Digital templating is then utilized to estimate the appropriate nail diameter, the required nail length (short vs. long), and the optimal caput-collum-diaphyseal (CCD) angle for the lag screw. The goal is to select an implant that perfectly matches the patient's native anatomy, thereby restoring the proper offset and leg length.
Patient Positioning on the Fracture Table
We universally advocate placing the patient in the supine position on a radiolucent fracture table equipped with a perineal post. While the lateral decubitus position on a flat Jackson table may be beneficial for certain highly complex subtrochanteric patterns or morbidly obese patients, the supine position allows for easier airway management by the anesthesia team and provides more reliable, reproducible orthogonal fluoroscopic imaging.
- Transfer and Padding: Carefully transfer the patient to the fracture table. Ensure all bony prominences—particularly the sacrum, the contralateral heel, and the perineum—are heavily padded to prevent pressure necrosis or pudendal neurapraxia. The perineal post must be well-padded and positioned laterally against the operative thigh to avoid direct compression of the genitalia.
- Contralateral Limb: Place the contralateral (unaffected) lower extremity in a well-padded boot and "scissor" the leg by extending the hip and dropping the leg posteriorly relative to the operative side. Alternatively, the contralateral leg can be placed in a lithotomy stirrup (the "hemilithotomy" position). Both techniques effectively remove the contralateral limb from the lateral fluoroscopic field of view.
- Operative Limb: Place the affected extremity into the traction boot after the initial gross reduction maneuver has been carried out. We typically position the affected extremity in 20 to 30 degrees of hip flexion. This slight flexion is a critical maneuver; it relaxes the deforming force of the iliopsoas muscle on the lesser trochanter, aiding significantly in the correction of the anterior angulation of the proximal fragment.
- Torso Positioning: Adduct the patient’s torso toward the operative side (creating a "banana" shape). This lateralizes the greater trochanter and allows clear, unimpeded access for the proximal reamers and the nail insertion jig, preventing impingement against the patient's flank. Secure the ipsilateral arm over the patient’s chest to keep it out of the proximal surgical field.
- Fluoroscopy Setup: Position the C-arm fluoroscopy unit on the contralateral side of the table, draped sterilely. The C-arm must be able to swing freely between the AP and lateral planes without striking the table or the patient.
🚨 SURGICAL WARNING: Adequate, crystal-clear fluoroscopy in both the anteroposterior (AP) and lateral planes must be attainable before the patient is prepped and draped. Proceeding without perfect visualization guarantees technical errors, malpositioned hardware, and ultimate construct failure.

Fracture Reduction Maneuvers
Anatomic or near-anatomic closed reduction must be achieved prior to prepping and draping. The surgeon must never rely on the intramedullary nail to "reduce" the fracture; passing a rigid nail through a malreduced fracture will simply lock the bone in a deformed state. Apply longitudinal traction to restore appropriate limb length, followed by internal rotation (typically 10 to 15 degrees) to correct the external rotation deformity and profile the femoral neck accurately on the AP fluoroscopic view. Evaluate the reduction rigorously. If closed reduction is unacceptable (e.g., persistent varus or posterior sag), percutaneous adjuncts—such as a ball-spike pusher applied anteriorly, collinear reduction clamps, or a Schanz pin placed directly into the proximal fragment as a joystick—must be utilized. If percutaneous methods fail, a formal open reduction via a limited lateral approach is mandatory.
Step-by-Step Surgical Approach and Fixation Technique
1. The Modified Medial Trochanteric Entry Portal
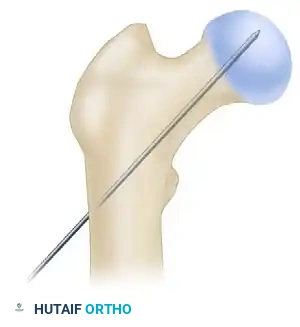
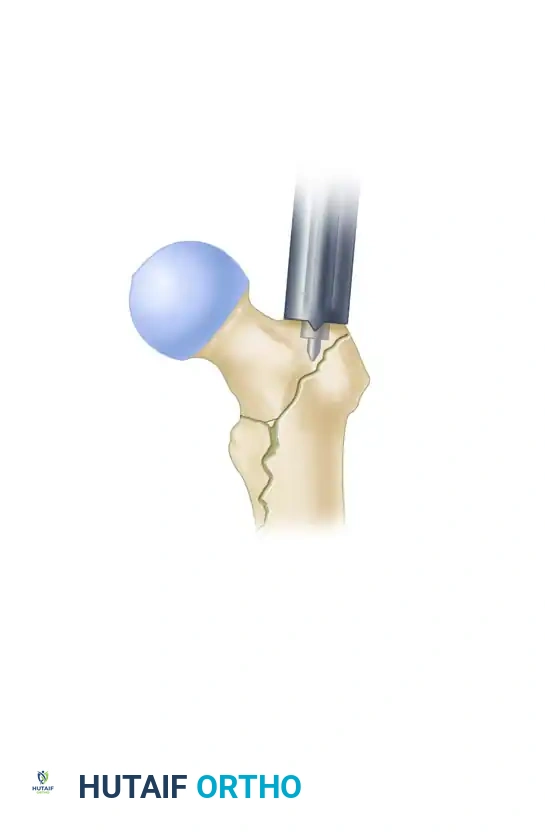
For the fixation of intertrochanteric femoral fractures, the selection of the entry portal is arguably the most critical technical step of the entire operation. An improper entry point inevitably leads to eccentric reaming, varus malreduction, iatrogenic lateral wall blowout, or anterior cortical perforation. We strongly advocate for the modified medial trochanteric portal.
Anatomical Landmarks: The modified medial trochanteric portal is located on the medial aspect of the greater trochanter, directly along the trochanteric ridge on the AP view, and perfectly in line with the central axis of the femoral shaft on the lateral view. This is in contrast to the traditional piriformis fossa entry (which is technically demanding and carries a higher risk of vascular injury to the femoral head) or the absolute tip of the greater trochanter (which often results in a varus deforming force as the nail is inserted).
💡 CLINICAL PEARL: In a landmark cadaveric study, Perez et al. demonstrated that utilizing this slightly medialized portal avoids catastrophic damage to the gluteus medius tendon insertion. This significantly reduces postoperative abductor weakness and the incidence of a persistent, debilitating Trendelenburg gait compared to the traditional tip-of-trochanter portal.
2. Incision and Guide Pin Placement
- Make an approximately 3-cm to 5-cm longitudinal incision, beginning roughly 3 cm proximal to the tip of the greater trochanter and extending proximally. (Note: This incision may need to be extended significantly in morbidly obese patients to accommodate the trajectory of the rigid reamers).
- Sharply incise the fascia lata and the aponeurosis of the gluteus maximus in line with the skin incision. Bluntly split the abductor muscle fibers (gluteus medius) along the direction of their fibers to palpate the trochanteric tip.
- Localize the entry point with a rigid guide pin on the medial aspect of the greater trochanter.
- Insert the guide pin 2 to 3 cm distally into the proximal fragment, ensuring it is perfectly collinear with the femoral shaft on both AP and lateral fluoroscopic views.
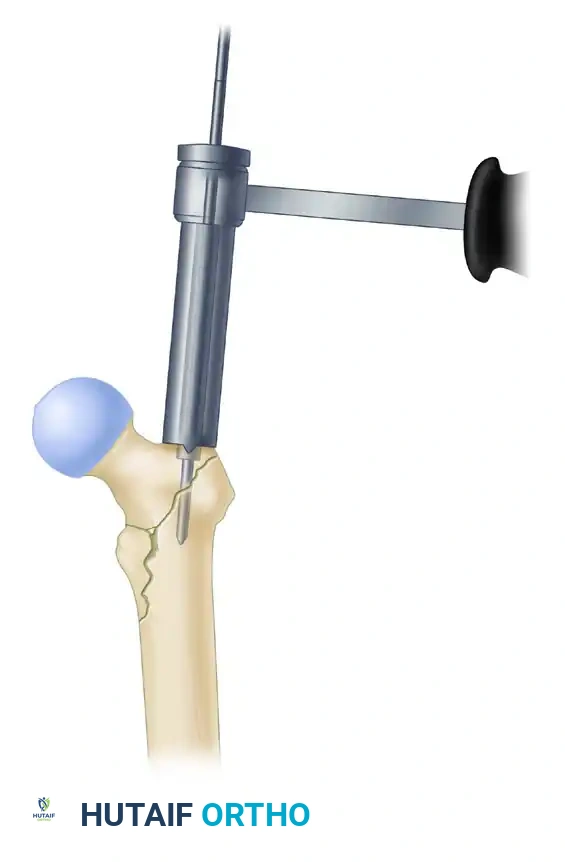
At this juncture, utilize fluoroscopy to rigorously assess the guide pin placement. Accept nothing less than perfection. An eccentric guide pin will dictate an eccentric reaming path, which cannot be corrected later in the procedure.
💡 CLINICAL PEARL: The Two-Pin Technique
If the initial guide pin trajectory is slightly malaligned, do not simply remove it and attempt to re-drill. The new pin will inevitably fall into the path of least resistance (the old hole) due to the cancellous nature of the trochanter. Instead, leave the first pin in place as a visual and physical reference. Use a honeycomb-type multi-hole drill guide placed over the first pin to accurately place a second, perfectly aligned pin. Once the second pin is confirmed fluoroscopically, remove the first. This technique saves significant fluoroscopic time and prevents catastrophic cortical blowout.
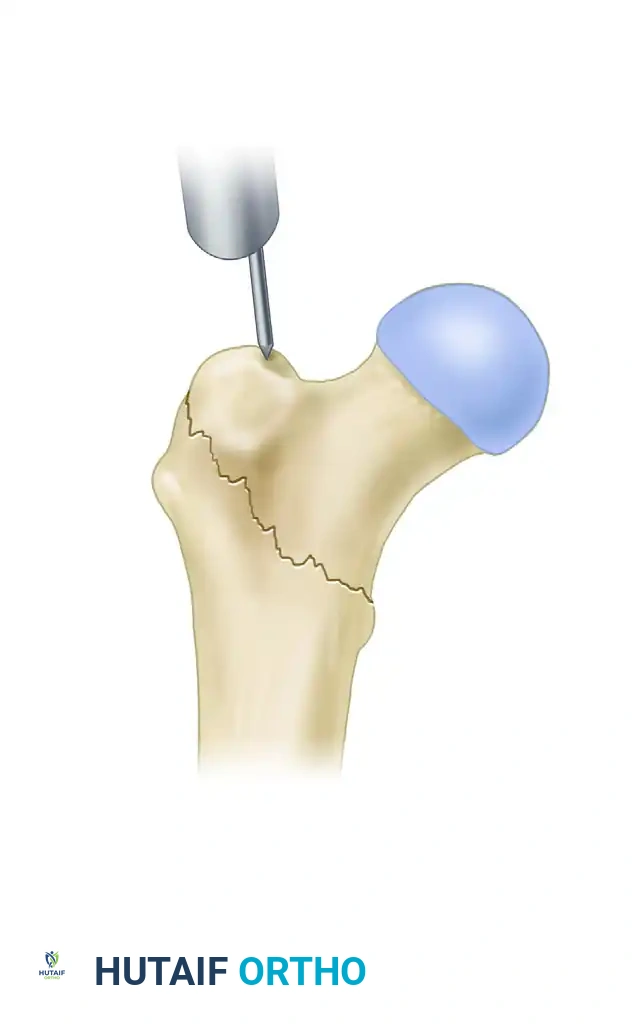
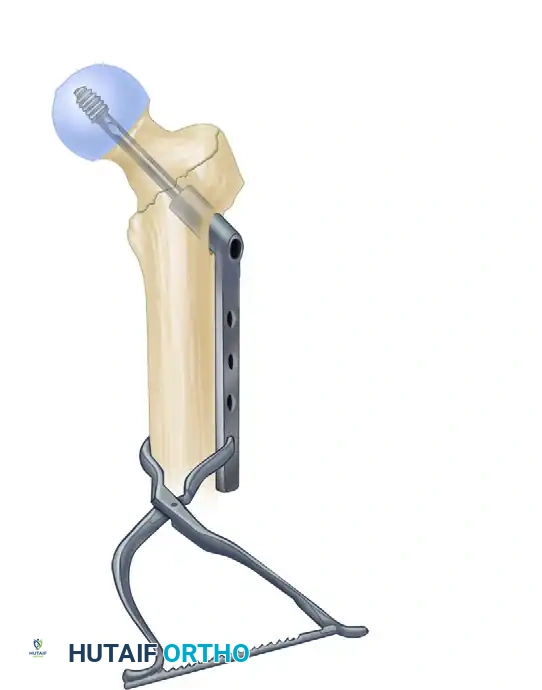
3. Proximal Reaming and Canal Preparation
- Once the guide pin is perfectly positioned, use the rigid proximal entry reamer (typically 15mm to 17mm in diameter, depending on the implant system) to ream over the guide pin. Advance the reamer through the dense cancellous bone of the trochanter to a depth just below the level of the lesser trochanter. Ensure the soft tissue sleeve is firmly seated against the bone to protect the abductor musculature from the spinning reamer flutes.
- Crucial Step: Correct any residual malreduction before passing the long ball-tip guide wire down the diaphysis. Reaming a malreduced femur will lock the fracture in a deformed position, making subsequent reduction impossible without completely withdrawing the hardware.
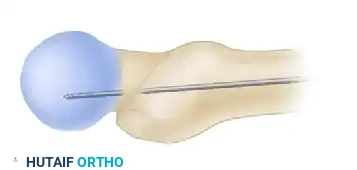
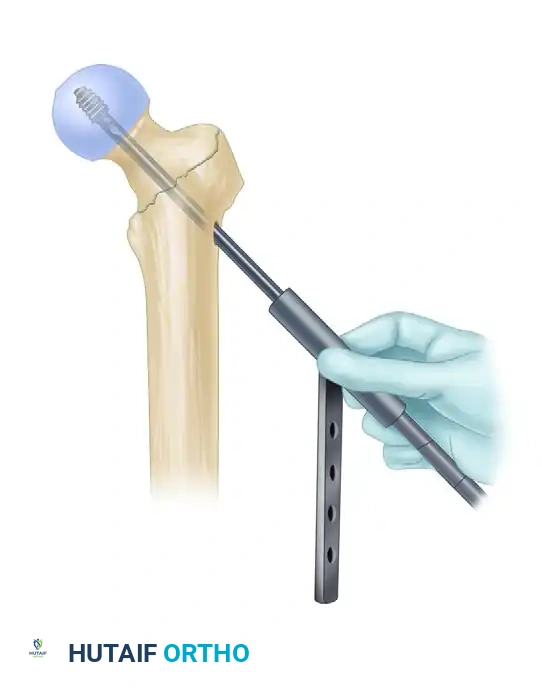
- Place a long, ball-tip guide pin down the shaft of the femur, advancing it to the level of the physeal scar (or the desired distal extent of the nail for long constructs). Ensure the ball-tip is centrally located within the distal condyles on both AP and lateral views.
- Measure the guide pin using the system's radiographic ruler to determine the appropriate length of the intramedullary nail.
- We typically utilize a 10-mm or 11-mm diameter nail for standard intertrochanteric fractures. There is rarely a biomechanical benefit to placing a massive, larger diameter nail in the elderly osteoporotic population. Attempting to force a larger nail significantly increases the risk of iatrogenic anterior cortical perforation or the generation of catastrophic hoop stress fractures during insertion.
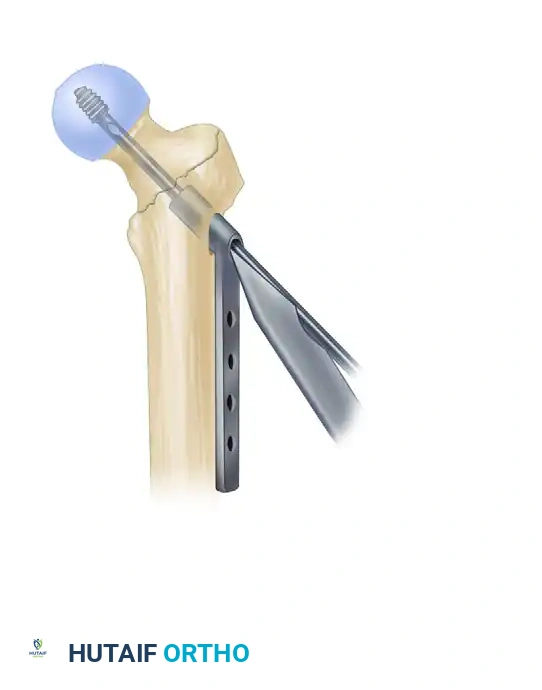
- Ream the diaphyseal canal sequentially, starting with an 8.5mm or 9.0mm flexible reamer. Advance in 0.5mm increments to a final diameter that is 1.5 mm larger than the selected diameter of the intramedullary nail.
🚨 SURGICAL WARNING: The Anterior Bow
Pay careful, continuous attention to the anterior radius of curvature (bow) of the femur on the lateral fluoroscopic view during reaming. If the patient has a pronounced anterior bow, the straight flexible reamers will chatter against the anterior cortex. In these instances, it may be necessary to over-ream by 2.0 mm larger than the nail diameter to prevent the distal tip of a relatively straight nail from impinging on and perforating the anterior cortex during insertion.
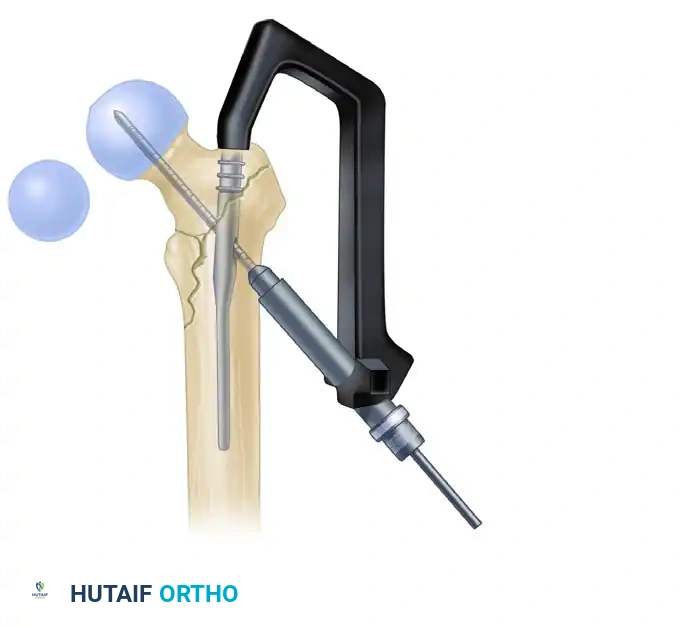
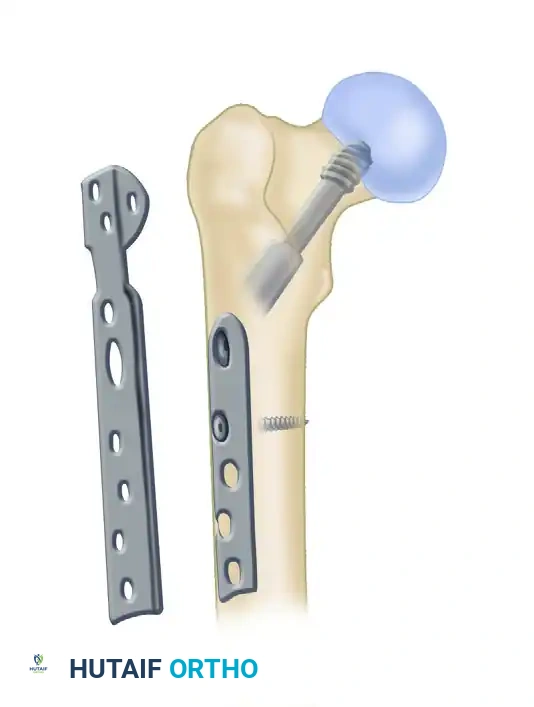
4. Intramedullary Nail Insertion
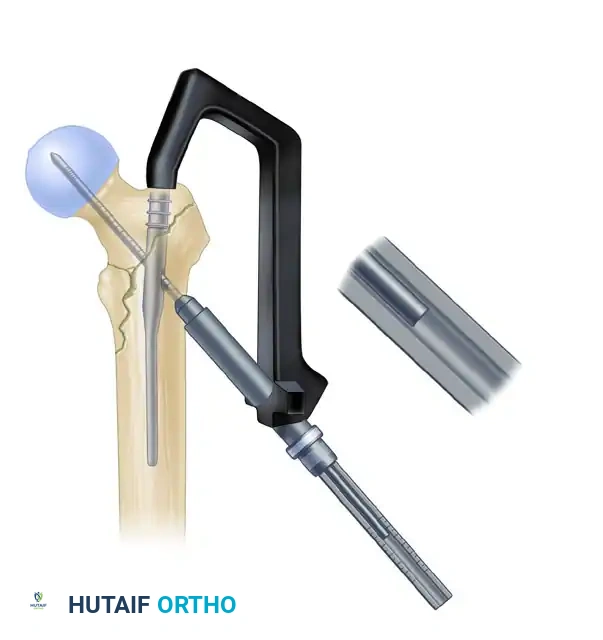
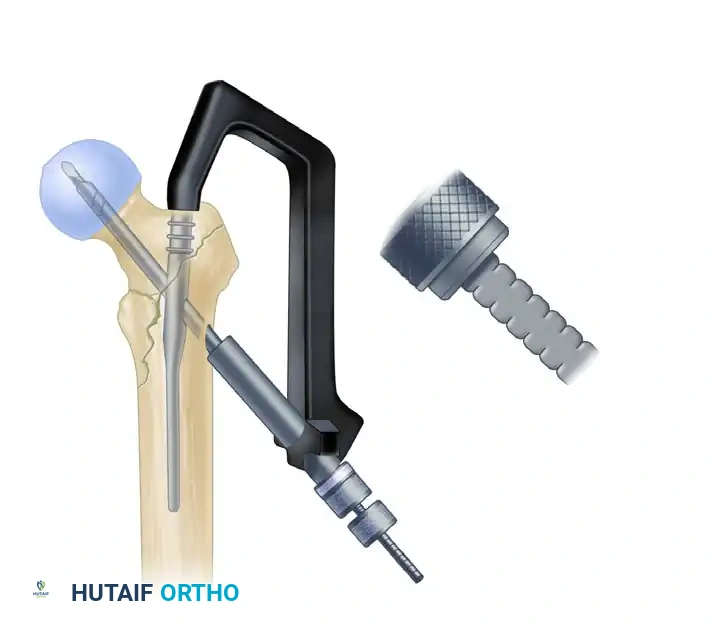
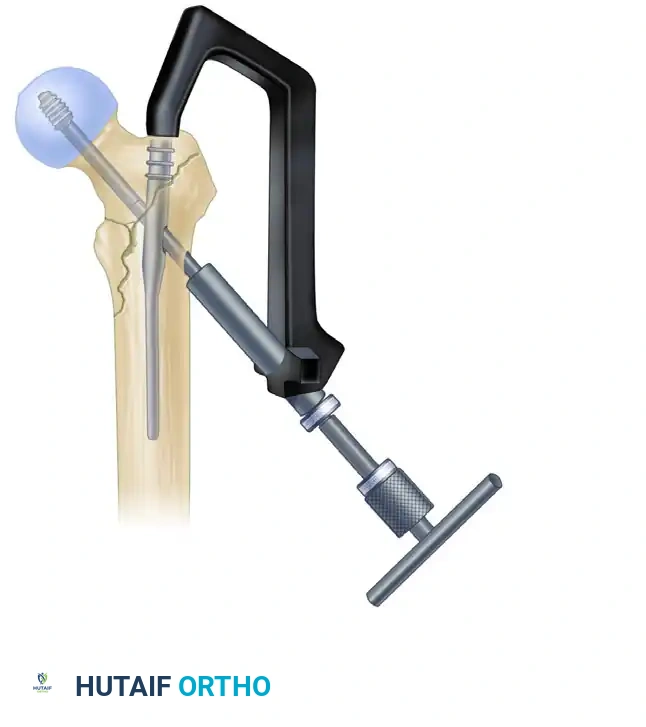
- After selecting the appropriate length and diameter based on your templating and intraoperative measurements, assemble the nail and the proximal drill guide securely on the back table. Ensure the targeting arm is tightly calibrated and that the lag screw guide pin passes perfectly through the proximal aperture of the nail before handing it to the surgeon.
- Insert the nail manually over the ball-tipped guide wire. Do not use heavy mallet strikes. The nail should advance with gentle, twisting manual pressure. If the nail does not advance easily, stop immediately. Remove the nail and ream the canal an additional 0.5 mm to 1.0 mm. Forcing a tight nail with a mallet is the leading cause of iatrogenic femoral shaft fractures.
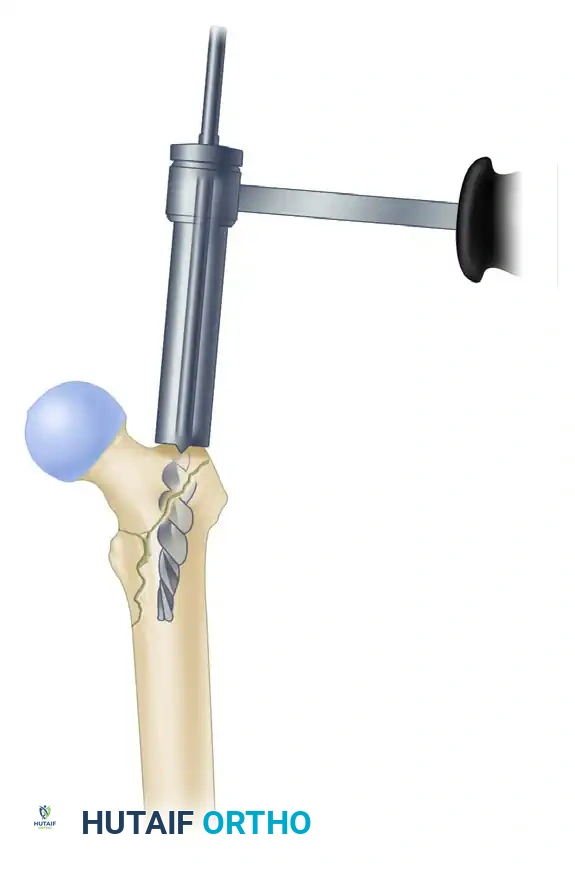
- Insertion Technique: Insert the nail with the proximal drill guide facing anteriorly (rotated 90 degrees from its final position). This utilizes the natural AP bow of the nail to navigate the complex proximal anatomy and the curve of the greater trochanter more easily. Once the nail has been inserted approximately halfway down the intramedullary canal, gently rotate the guide 90 degrees laterally into its final anatomical position.
- During nail advancement, continuously evaluate its trajectory with lateral fluoroscopy to avoid anterior cortical impingement.
- Insert the nail to a depth that allows for perfect center-center positioning of the lag screw within the femoral head. The trajectory of the proximal targeting hole must aim directly for the center of the femoral head on both the AP and lateral views. Once the correct depth is achieved, carefully remove the ball-tipped guide pin, ensuring it does not inadvertently extract the nail.
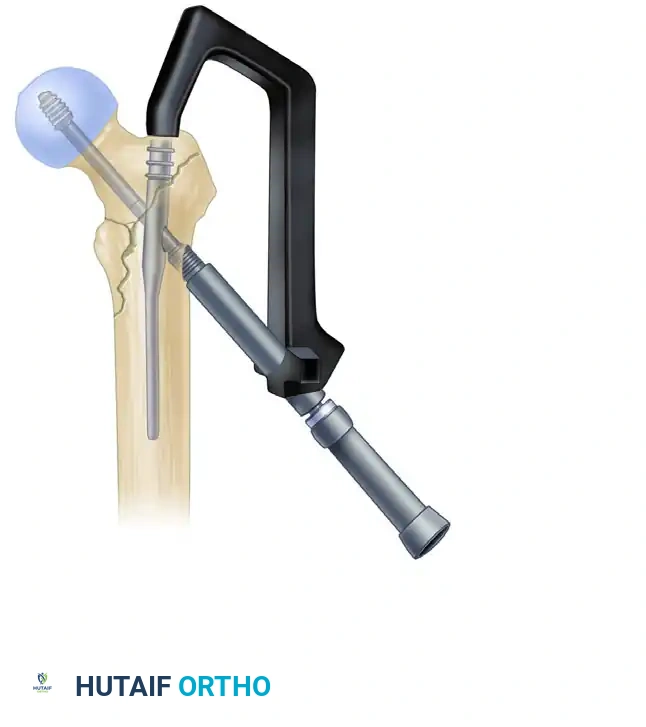
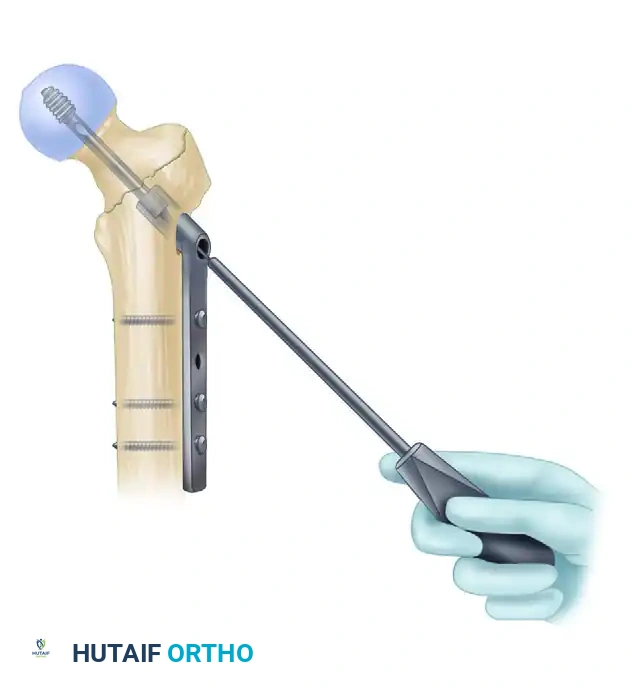
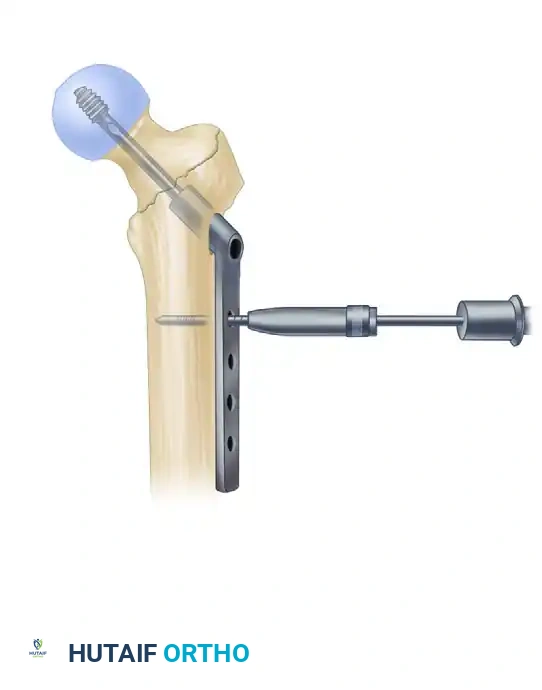
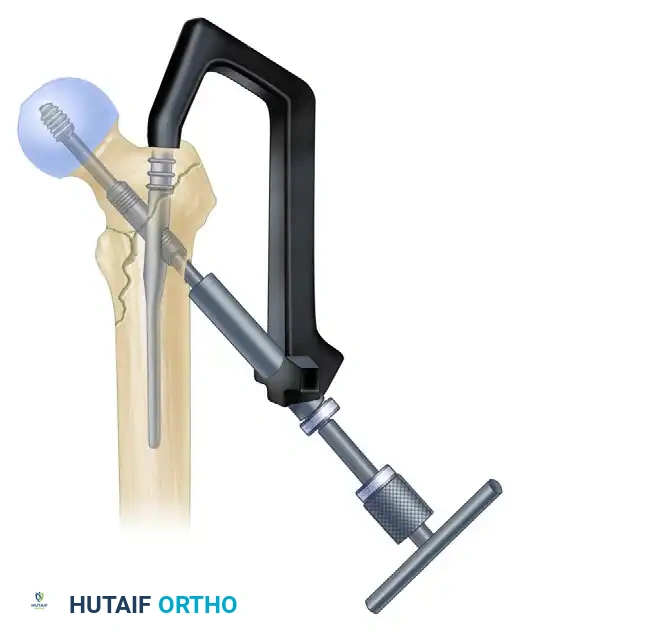
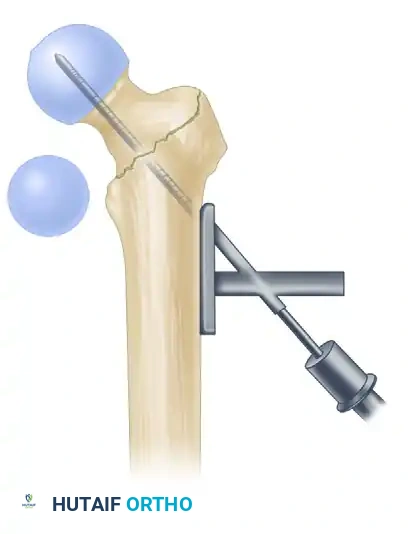
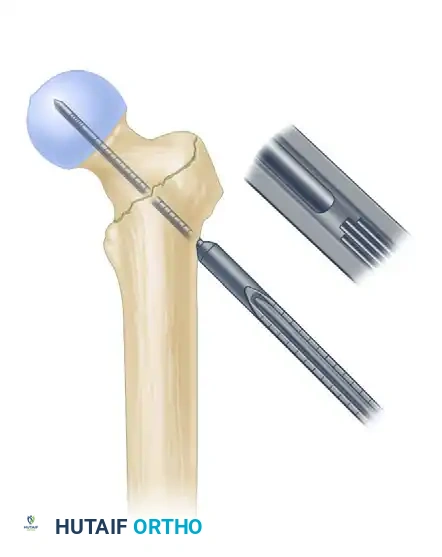
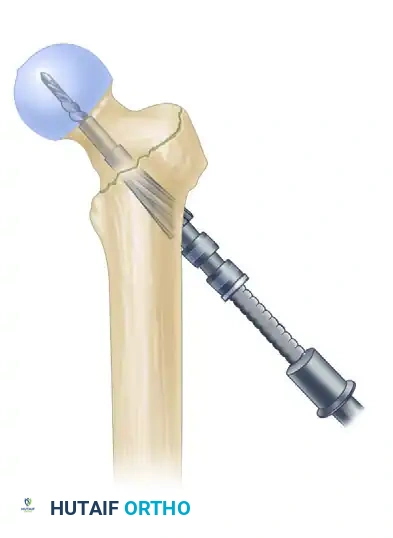
5. Lag Screw Placement and Compression
Achieving optimal lag screw placement is the single most critical factor under the surgeon's control in preventing mechanical failure, specifically lag screw cut-out. The universal goal is
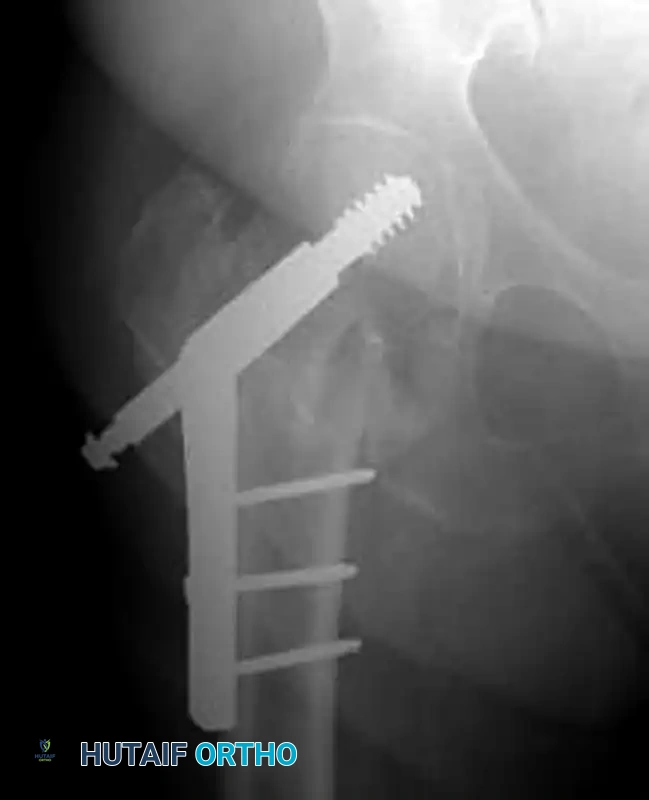
Clinical & Radiographic Imaging Archive