Proximal Mini-Invasive Plantaris Tendon Harvest: An Intraoperative Masterclass
Key Takeaway
Master the proximal mini-invasive plantaris tendon harvest. This guide details essential anatomy, patient positioning, and granular intraoperative execution, emphasizing safe dissection between gastrocnemius and soleus. Learn critical pearls for successful autografting for ligament and tendon reconstructions, minimizing donor site morbidity and ensuring optimal patient outcomes. This comprehensive approach ensures a high-quality graft for various foot and ankle procedures.
Comprehensive Introduction and Patho-Epidemiology
Welcome, colleagues and fellows, to the operating theater. Today, we embark on a detailed exploration of a fundamental, yet frequently underutilized, technique in the armamentarium of the advanced foot and ankle surgeon: the proximal mini-invasive harvest of the plantaris tendon. The pursuit of the ideal autograft for ligamentous reconstruction and tendon augmentation has historically been a balancing act between achieving sufficient biomechanical strength and minimizing donor site morbidity. While allografts offer the allure of zero donor site morbidity, concerns regarding incorporation rates, cost, and theoretical disease transmission persist. Conversely, traditional autografts like the peroneus brevis or Achilles tendon splits often carry an unacceptable risk of iatrogenic weakness, altered hindfoot kinematics, or cosmetically displeasing incisions.
The plantaris tendon emerges as an exceptional, highly specialized autograft source that elegantly circumvents these traditional compromises. Functionally vestigial in the human bipedal gait cycle, its harvest yields no discernible biomechanical deficit to the lower extremity. Yet, despite its evolutionary obsolescence, it possesses an extraordinary microarchitectural profile. Comparative biomechanical analyses have unequivocally demonstrated that the plantaris tendon exhibits the highest tensile strength per cubic millimeter (94 N/mm³) among commonly utilized autografts. This significantly eclipses the structural integrity of the peroneus longus (61 N/mm³), the peroneus brevis (41 N/mm³), Achilles tendon splits (36 N/mm³), and the fascia lata (27 N/mm³). Its highly structured, parallel collagen fibril arrangement mirrors that of major physiological load-bearing tendons, making it an optimal scaffold for cellular repopulation and ligamentization.
This robust graft is uniquely indicated in the surgical management of chronic joint instability or chronically degenerated tendon ruptures where local tissue is insufficient, attenuated, or frankly absent. When the anterior talofibular ligament (ATFL) or calcaneofibular ligament (CFL) scars in a functionally elongated state, or when the peroneal tendons demonstrate irreversible intrasubstance degeneration secondary to chronic subluxation or repeated microtrauma, primary repair is frequently doomed to failure. The plantaris autograft offers a readily available, biologically superior local solution. Crucially, it can often be harvested within the same sterile field as the primary foot and ankle procedure, avoiding the need to prep a secondary surgical site such as the knee (for hamstring harvests) or the thigh (for fascia lata).
The shift toward a proximal, mini-invasive approach represents a critical evolution in surgical technique. Historically, distal harvests near the calcaneal insertion were favored due to superficial accessibility. However, high rates of premature graft amputation and inadequate length yields plagued this approach. By transitioning to a proximal harvest strategy, we exploit the highly consistent anatomical corridor between the gastrocnemius and soleus muscles. This masterclass will meticulously deconstruct every phase of this procedure, from nuanced preoperative imaging to the precise intraoperative execution required to consistently yield a pristine, full-length autograft while preserving the delicate surrounding neurovascular structures.
Detailed Surgical Anatomy and Biomechanics
Before a scalpel ever touches the skin, a profound, three-dimensional understanding of the plantaris anatomy is paramount. This topographical knowledge is not merely academic; it is your primary defense against iatrogenic complications and the key to a seamless, efficient harvest.
Origin, Course, and Musculotendinous Junction
The plantaris muscle is a small, fusiform muscle belly that originates from the inferior aspect of the lateral supracondylar line of the femur, just superior and medial to the origin of the lateral head of the gastrocnemius muscle. It also derives partial origin from the oblique popliteal ligament and the articular capsule of the knee joint. From this proximal origin, the muscle belly courses obliquely in a distal and medial direction across the popliteal fossa.
The musculotendinous junction is remarkably proximal, typically situated just distal to the level of the knee joint line, transitioning into a long, slender tendon. This tendon then descends distally along the superficial posterior compartment of the lower leg. It is the longest tendon in the human body, typically yielding between 30 to 45 centimeters of usable graft material depending on patient height and the exact point of distal transection. This extraordinary length makes it exceptionally versatile, allowing for multi-stranded configurations or complex, multi-ligamentous reconstructions (such as combined ATFL and CFL anatomical reconstructions) from a single graft source.
Proximal and Distal Relationships
The spatial relationship of the plantaris tendon to the surrounding musculature dictates our surgical approach. Proximally, the tendon is securely nestled within a distinct, relatively avascular fascial plane located exactly between the medial head of the gastrocnemius muscle and the underlying soleus muscle. This specific intermuscular space is the critical anatomical landmark for our proximal mini-invasive approach.
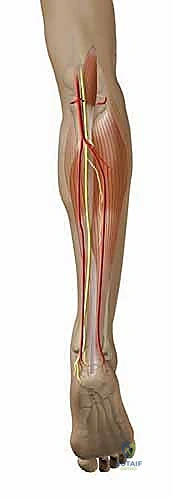
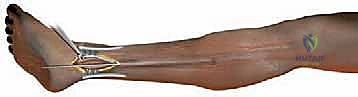
As illustrated above, the plantaris tendon is the solitary tubular structure residing within this specific interval between the gastrocnemius and soleus. This anatomical isolation is our intraoperative safety net; if you are in the correct plane, the tubular structure you palpate is the plantaris. Distally, as the tendon approaches the ankle, it emerges from this intermuscular plane to run superficially and medially, immediately adjacent to the medial border of the Achilles tendon in the distal third of the lower leg.
Insertion Variability and Embryological Context
The embryological development of the plantaris explains both its vestigial nature and its high degree of anatomical variability. It is absent in approximately 6% to 7% of the human population, a fact that underscores the necessity of preoperative clinical or radiological confirmation. However, the most significant anatomical hurdle lies in its distal insertion.
While classic anatomical texts describe the plantaris inserting into the medial aspect of the calcaneal tuberosity, independent of the Achilles tendon, surgical reality is far more complex. The distal insertion is notoriously variable. It may attach to the bursa calcanei, the flexor retinaculum, the posterior ankle joint capsule, or the plantar aponeurosis. Frequently, it fans out and intricately blends with the paratenon or the substance of the Achilles tendon itself, or merges with the deep intermuscular septum. This profound distal variability is the primary reason why traditional distal harvesting techniques suffer from a 12% to 20% failure rate. Attempting to pass a tendon stripper from distal to proximal often results in the stripper catching on these complex fascial expansions, leading to premature amputation of the graft.
Neurovascular Considerations
A thorough appreciation of the neurovascular topography is essential for a safe harvest. Deep to the soleus muscle lies the deep posterior compartment, housing the tibial nerve and the posterior tibial artery and veins. Because our dissection remains strictly superficial to the soleus, within the gastrocnemius-soleus interval, these major deep neurovascular structures are completely protected and not at risk during a properly executed procedure.
However, the proximal medial approach demands meticulous attention to superficial structures. The saphenous nerve, a major sensory branch of the femoral nerve, courses superficially along the medial aspect of the calf, providing cutaneous innervation to the medial leg and ankle. Running alongside it is the great saphenous vein. Both of these critical structures lie within the superficial subcutaneous fat layer. The primary risk during the initial surgical exposure is iatrogenic injury to the saphenous nerve, which can result in a debilitating postoperative neuroma or persistent medial calf paresthesia. Therefore, dissection through the subcutaneous tissue must be strictly blunt and oriented parallel to the anticipated course of these structures.
Exhaustive Indications and Contraindications
The decision to utilize a plantaris autograft should be driven by a careful assessment of the patient's pathology, the required biomechanical strength of the reconstruction, and the availability of local tissue.
Clinical Indications for Plantaris Autograft
The plantaris tendon is an extraordinarily versatile graft, suitable for a wide array of foot and ankle reconstructive procedures. Its high tensile strength and narrow profile make it ideal for threading through osseous tunnels without requiring massive bone resection that could compromise structural integrity.
Primary indications include the anatomical reconstruction of the lateral ankle ligament complex (ATFL and CFL) in cases of severe chronic instability where the native ligaments are entirely attenuated or absent, rendering a standard Broström-Gould repair impossible. It is equally valuable in medial-sided reconstructions, such as spring ligament augmentation in stage II adult-acquired flatfoot deformity, or deltoid ligament reconstruction. Furthermore, it is an excellent choice for tendon augmentation, particularly in the management of chronic, degenerative tears of the peroneus brevis, where the plantaris can be woven through the remaining healthy tendon to restore continuity and strength. It is also utilized in the reconstruction of chronic Achilles tendon ruptures, often utilized as a biological augment alongside V-Y advancements or turndown flaps.
Absolute and Relative Contraindications
While highly useful, the plantaris harvest is not universally applicable. The most obvious absolute contraindication is the congenital absence of the tendon, which occurs in up to 7% of patients. Previous trauma, deep infection, or extensive surgery to the posterior calf that has obliterated the intermuscular planes also serves as an absolute contraindication, as the risk of neurovascular injury or inability to isolate the tendon is unacceptably high.
Relative contraindications include severe peripheral vascular disease affecting the lower extremity, where any additional incision may suffer from compromised wound healing. Additionally, in patients requiring massive, bulky grafts (such as for large structural defects in the Achilles tendon), the relatively small diameter of the plantaris may be insufficient on its own, necessitating the use of a larger graft like a hamstring or a synthetic augment.
| Category | Specific Conditions | Rationale |
|---|---|---|
| Absolute Contraindications | Congenital absence of plantaris | No graft available for harvest. |
| Prior posterior calf compartment syndrome | Obliteration of the safe gastrocnemius-soleus fascial plane. | |
| Active local infection | Risk of seeding infection into the deep posterior compartments. | |
| Relative Contraindications | Severe Peripheral Arterial Disease (PAD) | High risk of incision site necrosis and delayed wound healing. |
| Requirement for massive structural bulk | Plantaris diameter may be insufficient for large defect spanning without multi-strand weaving. | |
| Prior deep vein thrombosis (DVT) in the ipsilateral calf | Altered venous anatomy and increased risk of post-thrombotic complications. |
Pre-Operative Planning, Templating, and Patient Positioning
Meticulous preoperative preparation is the hallmark of the master surgeon. The plantaris harvest, while straightforward in principle, benefits immensely from precise planning to avoid intraoperative frustration.
Advanced Preoperative Imaging
While empirical exploration was once the standard, modern imaging modalities allow us to definitively confirm the presence and exact location of the plantaris tendon prior to making an incision. If a Magnetic Resonance Imaging (MRI) scan was obtained to evaluate the primary foot and ankle pathology, it should be carefully reviewed. Axial T2-weighted or proton density sequences of the calf will clearly delineate the small, dark, circular cross-section of the plantaris tendon residing between the medial gastrocnemius and soleus bellies.
If an MRI is unavailable or does not extend proximally enough, high-resolution musculoskeletal ultrasound is an exceptionally powerful, cost-effective, and dynamic tool. A skilled ultrasonographer or the surgeon themselves can easily identify the tendon in the proximal calf. The ultrasound probe is placed transversely over the medial calf, identifying the classic "eye" sign—the plantaris tendon appearing as a hyperechoic dot within the hypoechoic fascial plane between the gastrocnemius and soleus. Ultrasound can also map the course of the saphenous nerve and vein, allowing the surgeon to plan an incision that explicitly avoids these structures.
Patient Positioning and Operating Room Setup
The adaptability of the plantaris harvest is one of its greatest assets; it can be performed in various positions depending on the requirements of the primary reconstructive procedure. For the vast majority of lateral ankle ligament reconstructions or peroneal tendon surgeries, the patient is positioned supine.
To facilitate access to the medial calf, a substantial gel pad or sandbag bolster is placed underneath the ipsilateral hip. This internally rotates the lower extremity, bringing the medial aspect of the calf directly into the surgeon's line of sight. The knee should be positioned in slight flexion (approximately 20 to 30 degrees). This flexion is critical; it relaxes the entire gastrocnemius-soleus complex, reducing tension on the deep fascia and making the blunt separation of the intermuscular plane significantly easier.
The entire lower extremity is meticulously prepped and draped from the mid-thigh down to the toes, ensuring circumferential access. Crucially, no tourniquet is required for the plantaris tendon harvest. The dissection is superficial and traverses relatively avascular fascial planes. Foregoing the tourniquet eliminates the risk of tourniquet-induced ischemia, reduces postoperative pain, and avoids the reactive hyperemia that can complicate hemostasis later in the procedure.
Step-by-Step Surgical Approach and Fixation Technique
We now transition to the technical execution of the proximal mini-invasive harvest. This approach is designed to maximize graft length, minimize surgical trauma, and virtually eliminate the risk of distal fascial tethering that plagues other techniques.
Initial Incision and Subcutaneous Dissection
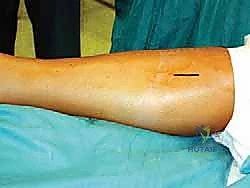
With the limb appropriately positioned and prepped, identify the medial malleolus. Using a sterile marking pen and a ruler, measure exactly 30 centimeters proximal to the tip of the medial malleolus along the medial aspect of the calf. This specific location is highly strategic; it places the incision just distal to the plantaris musculotendinous junction, ensuring we capture the tendon where it is fully formed and robust, yet proximal enough to avoid the complex distal insertions.
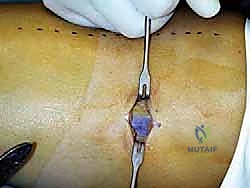
Using a No. 15 scalpel blade, make a precise, 2-centimeter longitudinal skin incision centered over the anticipated course of the tendon. The incision should be strictly limited to the dermis.
Once the dermis is breached, immediately discard the scalpel. The subsequent dissection through the subcutaneous adipose tissue must be entirely blunt. Utilizing Metzenbaum scissors or a fine hemostat, perform gentle spreading motions oriented longitudinally, parallel to the long axis of the leg. As demonstrated in the image above, this blunt technique gently sweeps the subcutaneous fat aside, seeking the glistening white surface of the deep crural fascia. This meticulous blunt dissection is the critical step to identify and protect the saphenous nerve and the great saphenous vein, which frequently traverse this exact subcutaneous zone. Retract any identified neurovascular structures gently with a Senn or Ragnell retractor.
Fascial Incision and Identification of the Intermuscular Plane
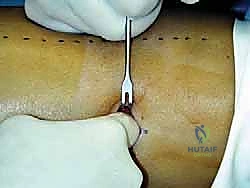
Upon clearly visualizing the deep crural fascia, ensure the field is completely dry. You will often be able to visualize the muscular fibers of the medial head of the gastrocnemius through the translucent fascia.
Using the No. 15 scalpel, make a sharp, 2-centimeter longitudinal incision directly through the deep fascia, as shown in the operative image above. Be careful not to plunge into the underlying muscle belly. Once the fascia is opened, the true elegance of this anatomical approach is revealed. Insert your index finger directly into the fascial defect. Your finger is the ultimate blunt dissecting tool. Gently sweep your finger anteriorly and posteriorly. You will immediately appreciate the distinct, yielding plane between the superficial medial head of the gastrocnemius and the deeper, more robust soleus muscle.
Mobilization and Isolation of the Plantaris Tendon
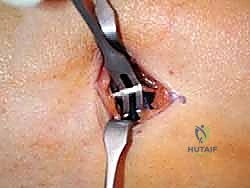
With your finger securely within the gastrocnemius-soleus interval, begin to systematically palpate the space. Sweep your finger proximally toward the knee and distally toward the ankle. Within this smooth fascial envelope, you are feeling for a distinct, taut, cord-like structure.
Because the plantaris is the only tendon residing in this specific plane, any cord-like structure you isolate here is definitively the plantaris tendon. Once palpated, hook your finger around it and gently pull it toward the fascial incision. Introduce a right-angle retractor or a blunt nerve hook to secure the tendon and bring it fully into the operative field, as depicted above. The tendon will appear pearlescent and surprisingly thin, yet it will feel remarkably unyielding under tension.
Introduction and Advancement of the Tendon Stripper
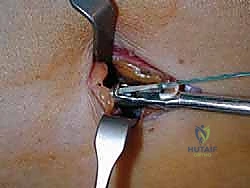
With the tendon exteriorized, we must prepare it for the stripper. Grasp the most proximal visualized aspect of the tendon with a heavy, non-absorbable suture (such as a #2 FiberWire) using a locking Krackow or whipstitch configuration, or simply clamp it securely with a heavy straight hemostat. Transect the tendon just proximal to your suture or clamp.
Now, select an appropriately sized closed-loop tendon stripper (typically a 5mm or 6mm diameter is ideal). Thread the free distal end of the tendon through the loop of the stripper. As shown above, the stripper is introduced into the wound, sliding over the tendon.

The technique of advancing the stripper is critical to prevent premature amputation. Apply firm, steady, axial tension on the proximal end of the tendon using your clamp or traction suture. The tendon must be taught like a bowstring. Simultaneously, advance the tendon stripper distally down the leg with a smooth, continuous, twisting motion.
The twisting action (supination and pronation of the wrist) is vital; it allows the sharp leading edge of the stripper to cut through any minor fascial adhesions or variable slips without biting into the substance of the tendon itself. Maintain the trajectory of the stripper strictly parallel to the course of the tendon. Do not deviate anteriorly or posteriorly, as this will force the stripper through the muscle belly or cause it to shear the tendon.
Final Harvest and Donor Site Closure
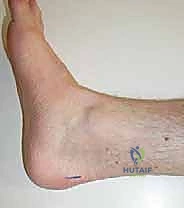
Continue advancing the stripper distally until you reach the distal third of the leg, where the plantaris begins to converge with the Achilles tendon and its paratenon. You will typically feel a sudden increase in resistance.
At this point, you have reached the complex distal insertion. Do not force the stripper further, as this frequently results in the tendon tearing at an unpredictable, frayed angle. Instead, apply maximum proximal traction on the tendon while pushing the stripper firmly against the distal resistance, effectively shearing the tendon at its most robust distal attachment point.
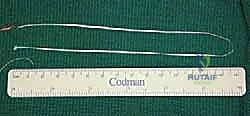
Withdraw the stripper and the harvested tendon from the proximal incision. As seen above, a successfully harvested plantaris tendon will yield a smooth, uniform graft of substantial length, typically exceeding 30 centimeters.

The graft is immediately transferred to the back table. Here, it is meticulously prepared, cleared of any residual muscle fibers, and whipstitched at both ends with high-tensile suture in preparation for the primary reconstruction. The donor site requires minimal attention. Thoroughly irrigate the proximal wound to clear any hematoma. The deep fascia is typically left open to prevent compartment syndrome. The subcutaneous tissue is approximated with interrupted absorbable sutures (e.g., 3-0 Vicryl), and the skin is closed with a subcuticular stitch or nylon sutures according to surgeon preference.
Complications, Incidence Rates, and Salvage Management
While the proximal mini-invasive plantaris harvest is heralded for its safety and low morbidity, no surgical procedure is entirely devoid of risk. A comprehensive understanding of potential pitfalls is necessary for rapid intraoperative salvage and optimal patient outcomes.
Intraoperative Complications
The most frequent intraoperative complication is premature graft amputation, occurring in approximately 2% to 5% of proximal harvests (significantly lower than the 20% seen in distal harvests). This typically happens when the tendon stripper is advanced without sufficient proximal tension, allowing the tendon to bunch up and be transected by the stripper's blade. It can also occur if the surgeon deviates from the anatomical axis of the tendon, forcing the stripper into the surrounding muscle or fascia.
If premature amputation occurs high in the calf, the resulting graft may be too short for the intended reconstruction. Salvage management in this scenario requires immediate reassessment. If a single-strand reconstruction is viable, the shortened graft may suffice. If a longer graft is mandatory, the surgeon must be prepared to harvest an alternative autograft, such as a partial peroneus brevis split, or utilize a commercially available allograft. Attempting to make a second distal incision to retrieve the remaining stump is generally discouraged, as it negates the benefits of the mini-invasive approach and is often technically difficult due to the retracted tendon end.
Another intraoperative risk is iatrogenic injury to the saphenous nerve or vein. Sharp dissection in the subcutaneous layer dramatically increases this risk. Transection of the vein can lead to troublesome hematoma formation, while nerve injury can result in a painful postoperative neuroma. If the vein is inadvertently lacerated, it must be meticulously ligated. If the nerve is cleanly transected, primary epineural repair using microsurgical techniques should be attempted if feasible, or the proximal stump should be buried in deep muscle to prevent neuroma formation.
Postoperative Complications
Postoperative complications are exceedingly rare but can include local wound issues such as superficial dehiscence or infection, typically managed with local wound care and oral antibiotics.
Deep vein thrombosis (DVT) and posterior compartment syndrome are theoretically possible due to surgical trauma in the posterior calf, but their incidence following a simple plantaris harvest is negligible. However, patients should be monitored for disproportionate calf pain.
| Complication | Estimated Incidence | Prevention Strategy | Salvage / Management |
|---|---|---|---|
| Premature Graft Amputation | 2% - 5% | Maintain rigid proximal tension; use twisting motion with stripper; stay axial. | Utilize shortened graft if possible; switch to allograft or alternative autograft (e.g., peroneus brevis). |
| Saphenous Nerve Injury / Neuroma | < 1% | Strict blunt dissection in subcutaneous tissues; parallel spreading technique. | Gabapentinoids; localized steroid injections; surgical excision of neuroma and burying of stump if refractory. |
| Postoperative Hematoma | 1% - 2% | Meticulous hemostasis; avoid tourniquet to spot bleeding early; gentle pressure dressing. | Observation for small hematomas; surgical evacuation if large, painful, or threatening wound viability. |
| Superficial Wound Infection | < 1% | Standard sterile precautions; prophylactic preoperative antibiotics. | Oral antibiotics targeting skin flora; local wound care; suture removal if necessary. |
Phased Post-Operative Rehabilitation Protocols
A distinct advantage of the plantaris tendon harvest is that the donor site itself dictates almost zero specific rehabilitation requirements. The functional absence of the plantaris muscle means there is no loss of plantarflexion strength or altered gait kinematics to overcome. Therefore, the postoperative rehabilitation protocol is entirely governed by the primary reconstructive procedure (e.g., the lateral ankle ligament reconstruction or Achilles tendon repair) for which the graft was utilized.
Immediate Postoperative Phase
In the immediate postoperative period (Weeks 0-2), the focus is on protecting the primary reconstruction and managing global lower extremity edema. The patient is typically immobilized in a well-padded short leg cast or a rigid controlled ankle motion (CAM) boot. Weight-bearing status is strictly dictated by the recipient site surgery; for example, a complex lateral ligament reconstruction may require 2 to 4 weeks of strict non-weight-bearing, whereas a simple tendon augmentation might allow earlier protected weight-bearing.
Regarding the donor site specifically, the proximal medial calf incision requires only routine postoperative wound care. A compressive dressing is applied in the operating room to minimize third-spacing and hematoma formation in the dead space left by the harvested tendon. Patients are encouraged to perform active knee range of motion exercises and straight leg raises immediately to prevent stiffness and promote venous return, as these movements do not stress the donor site or the deep posterior compartment.
Intermediate and Advanced Rehabilitation
As the patient progresses into the intermediate phase (Weeks 3-6) and advanced phase (Weeks 7+), rehabilitation shifts toward restoring range of motion, proprioception, and eventually, strength to the reconstructed joint.
The proximal calf incision will have healed completely by week 2 or 3. Patients may occasionally report a mild, transient cramping sensation in the medial gastrocn
