Proximal Metatarsal Opening Wedge Osteotomy: A Masterclass in Hallux Valgus Correction

Key Takeaway
Join us in the OR for a detailed masterclass on Proximal Metatarsal Opening Wedge Osteotomy. We'll explore intricate surgical anatomy, meticulous preoperative planning, and granular intraoperative steps for precise hallux valgus correction. Learn critical pearls, pitfalls, and comprehensive postoperative management to ensure optimal patient outcomes in this challenging foot deformity.
Comprehensive Introduction and Patho-Epidemiology
The management of symptomatic hallux valgus remains one of the most frequently encountered, yet biomechanically intricate, challenges in foot and ankle surgery. Far from a simple cosmetic blemish, hallux valgus represents a progressive, triplanar deformity characterized by the lateral deviation and pronation of the proximal phalanx, coupled with the medial deviation and supination of the first metatarsal. This pathoanatomical cascade inherently disrupts the critical windlass mechanism of the foot, leading to altered forefoot loading, transfer metatarsalgia, and progressive degeneration of the first metatarsophalangeal (MTP) joint. As orthopedic surgeons, our therapeutic mandate extends beyond mere realignment; we must restore the functional biomechanics of the first ray to ensure long-term, pain-free ambulation.
Historically, the surgical armamentarium for hallux valgus has been vast, reflecting the complex and varied nature of the deformity. While distal metatarsal osteotomies (such as the Chevron) are highly effective for mild to moderate deformities, their corrective power is mathematically limited by the width of the metatarsal head. For moderate to severe deformities, particularly those with an intermetatarsal angle (IMA) exceeding 12 to 15 degrees, a proximal approach is biomechanically advantageous. The Proximal Metatarsal Opening Wedge Osteotomy (PMOW) has emerged as a masterclass technique in this arena. By utilizing the center of rotation of angulation (CORA) principle near the apex of the deformity at the first metatarsal-cuneiform (MTC) joint, the PMOW allows for powerful correction of the IMA without the deleterious shortening of the first ray often seen with closing wedge or proximal chevron osteotomies.
The patho-epidemiology of hallux valgus is multifactorial, encompassing genetic predisposition, constrictive footwear, and intrinsic biomechanical faults such as gastrocnemius equinus or pes planovalgus. In patients with a congenitally short first metatarsal (metatarsus primus brevis), the deformity is often exacerbated as the structurally deficient first ray fails to bear its physiological share of the forefoot load. It is in this specific patient demographic that the PMOW truly excels. By opening a medial wedge, we not only correct the transverse plane deformity but also functionally lengthen the first column, thereby restoring the normal parabolic cascade of the metatarsal heads and mitigating the risk of postoperative transfer lesions.
Modern advancements in internal fixation have revolutionized the PMOW, transitioning it from a historically challenging procedure fraught with risks of dorsal elevation and malunion to a highly reproducible and stable operation. The advent of low-profile, titanium locking plate systems specifically contoured for the proximal medial first metatarsal provides rigid, multi-planar stability. This allows for early mobilization and predictable osseous union. Mastering this technique requires a profound understanding of first ray osteology, meticulous soft tissue balancing, and exacting surgical precision to harness its full corrective potential while sidestepping its inherent pitfalls.
Detailed Surgical Anatomy and Biomechanics
A profound, granular understanding of the first ray's surgical anatomy is the absolute prerequisite for executing a successful Proximal Metatarsal Opening Wedge Osteotomy. The first metatarsal is the stoutest and most critical load-bearing structural component of the forefoot. It articulates proximally with the medial cuneiform at the first MTC joint—a relatively planar joint that provides inherent stability but can be a source of pathological hypermobility in the sagittal and transverse planes. Distally, the metatarsal head articulates with the proximal phalanx and the complex bipartite sesamoid apparatus. The osteotomy is strategically planned in the proximal metaphysis, approximately 1.5 to 2.0 cm distal to the MTC joint, capitalizing on the robust cancellous bone bed that promotes rapid osteogenesis and union.
The soft tissue envelope surrounding the first MTP joint dictates the deforming forces in hallux valgus and must be meticulously addressed. The plantar plate, a confluence of the flexor hallucis brevis, abductor hallucis, adductor hallucis, and plantar aponeurosis, normally acts as a dynamic hammock stabilizing the metatarsal head. In the pathoanatomy of hallux valgus, the metatarsal head drifts medially off the sesamoid complex. The abductor hallucis, normally a medial stabilizer, subluxates plantarward, losing its abductor moment and paradoxically contributing to the pronation of the hallux. Conversely, the adductor hallucis and the lateral capsule become contracted, acting as an unyielding tether that pulls the proximal phalanx laterally. Surgical correction inherently requires releasing this lateral tether while simultaneously reefing the attenuated medial capsule to restore the joint's dynamic balance.
Neurovascular preservation is a non-negotiable tenet of this procedure. The arterial supply to the first metatarsal is predominantly derived from the first dorsal metatarsal artery, the first plantar metatarsal artery, and the superficial branch of the medial plantar artery. The principal nutrient artery typically enters the lateral aspect of the middle third of the metatarsal shaft, directing its flow distally. Consequently, aggressive periosteal stripping, particularly on the lateral and plantar aspects of the metatarsal neck and head, can severely compromise the vascularity of the capital fragment, precipitating avascular necrosis (AVN). The proximal osteotomy inherently avoids the distal vascular watershed, but meticulous handling of the soft tissues remains imperative.
Neurologically, the surgical field is traversed by critical sensory branches. The medial dorsal cutaneous nerve, a terminal branch of the superficial peroneal nerve, courses directly over the dorsomedial aspect of the first MTP joint and proximal metatarsal. Iatrogenic injury to this nerve during the dorsomedial incision can result in debilitating neuromas or painful paresthesias. Similarly, the deep peroneal nerve provides sensation to the first web space and must be protected if a lateral soft tissue release is performed. The extensor hallucis longus (EHL) tendon, running centrally over the dorsum of the first ray, serves as an anatomical landmark; the proximal incision is typically placed just medial to the EHL to safely access the metatarsal metaphysis while avoiding the dorsal neurovascular bundle.
Exhaustive Indications and Contraindications
The decision to proceed with a Proximal Metatarsal Opening Wedge Osteotomy must be rooted in a rigorous, evidence-based assessment of the patient's specific deformity and physiological status. The PMOW is a highly powerful tool, but its application must be precise. The primary indication is a moderate to severe hallux valgus deformity, universally defined as an Intermetatarsal Angle (IMA) greater than 12 to 15 degrees, and a Hallux Valgus Angle (HVA) exceeding 30 degrees. In these severe presentations, distal osteotomies simply cannot translate the metatarsal head laterally enough to restore a normal IMA without risking structural instability or completely falling off the metatarsal shaft.
A unique and highly specific indication for the PMOW is the presence of a short first metatarsal, either congenital or iatrogenic (following a previous failed bunionectomy). Traditional closing wedge osteotomies or proximal chevron procedures inherently shorten the first ray due to bone resection or geometric translation. This shortening alters the normal metatarsal parabola, transferring excessive weight-bearing forces to the lesser metatarsal heads, inevitably leading to intractable transfer metatarsalgia. The opening wedge technique, by definition, lengthens the medial column, restoring the structural integrity of the first ray and preventing this debilitating complication. Furthermore, the PMOW is an excellent adjunct procedure for congruent joint hallux valgus with an increased Distal Metatarsal Articular Angle (DMAA), often utilized in tandem with a distal biplanar chevron osteotomy to achieve comprehensive triplanar correction.
Conversely, absolute and relative contraindications must be respected to avoid catastrophic failure. The most critical contraindication is advanced osteoarthrosis of the first MTP joint (Hallux Rigidus). An osteotomy relies on a functional, mobile distal joint; performing a PMOW in the presence of severe cartilage degradation will only exacerbate joint pain and stiffness, making an MTP arthrodesis the definitive treatment of choice. Additionally, profound hypermobility or frank instability of the first MTC joint is a relative contraindication. While mild hypermobility may resolve once the deforming forces are corrected and the windlass mechanism is restored, severe sagittal plane instability necessitates a first MTC arthrodesis (Lapidus procedure) to establish a rigid foundation for the medial column.
| Parameter | Indications for PMOW | Contraindications for PMOW |
|---|---|---|
| Deformity Severity | Moderate to Severe (IMA > 12-15°, HVA > 30°) | Mild Deformity (IMA < 12°) - Better suited for distal osteotomy |
| Metatarsal Length | Short or normal first metatarsal | Excessively long first metatarsal (relative contraindication) |
| Joint Status | Preserved MTP joint cartilage, congruent or subluxated | Advanced MTP joint arthrosis (Hallux Rigidus) |
| MTC Joint Stability | Stable or mildly hypermobile first MTC joint | Frank instability or severe hypermobility of the MTC joint |
| Patient Factors | Recurrent hallux valgus, healthy bone stock | Active infection, severe peripheral vascular disease, neuropathy |
Pre-Operative Planning, Templating, and Patient Positioning
Thorough preoperative planning is the crucible in which surgical success is forged. The clinical evaluation must go beyond the great toe, encompassing a comprehensive biomechanical assessment of the entire lower extremity. The surgeon must evaluate the resting alignment, the flexibility of the deformity, and the presence of any Achilles or gastrocnemius contractures using the Silfverskiöld test. A tight gastroc-soleus complex places excessive dorsiflexory forces on the forefoot, which can compromise the osteotomy fixation and lead to dorsal malunion. Assessment of the first MTC joint for hypermobility is performed by stabilizing the lesser metatarsals and applying a dorsal-plantar translation force to the first metatarsal head. While subjective, significant excursion combined with radiographic gapping warrants consideration of a Lapidus arthrodesis instead.
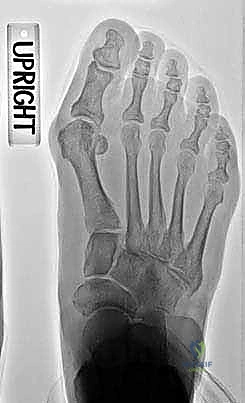
Radiographic analysis is the cornerstone of our templating process. Standardized, weight-bearing anteroposterior (AP), lateral, and sesamoid axial views are mandatory. On the AP radiograph, we meticulously measure the HVA, IMA, and the DMAA. The true mechanical axis of the first and second metatarsals must be bisected accurately. The size of the opening wedge required to correct the IMA can be mathematically templated. A general rule of thumb dictates that a 1 mm opening at the medial cortex of the proximal metatarsal equates to approximately 1 to 1.5 degrees of IMA correction, though this varies based on the metatarsal's length and the exact location of the osteotomy hinge. The lateral radiograph is scrutinized for the presence of dorsal exostoses, MTC joint gapping, and the overall sagittal elevation of the first ray (metatarsus primus elevatus).
Patient positioning and operating room setup must be optimized for efficiency and intraoperative imaging. The patient is placed supine on a radiolucent operating table. A small bump may be placed under the ipsilateral hip to internally rotate the lower extremity, bringing the foot into a true AP position relative to the ceiling, which greatly facilitates the surgeon's orientation and the accuracy of the osteotomy cuts. A well-padded pneumatic thigh tourniquet is applied to ensure a bloodless surgical field, which is critical for identifying delicate neurovascular structures and assessing the viability of the bone edges.
Fluoroscopy is an indispensable tool in the modern PMOW. The C-arm should be positioned on the contralateral side of the table, draped sterilely, and configured to easily swing into the field for AP, lateral, and oblique projections without disrupting the surgical workflow. Prior to inflation of the tourniquet, the foot is exsanguinated using an Esmarch bandage. Standard prophylactic intravenous antibiotics are administered, and a meticulous surgical prep and drape are performed, ensuring the entire foot and ankle are exposed to allow for dynamic intraoperative assessment of the foot's alignment and range of motion.
Step-by-Step Surgical Approach and Fixation Technique
Soft Tissue Dissection and Medial Eminence Resection
The procedure commences with a precise medial approach to the first MTP joint. A longitudinal incision is made centered over the medial eminence, extending from the mid-shaft of the proximal phalanx to the distal metaphysis of the first metatarsal. Deep dissection is carried out with meticulous hemostasis, taking great care to identify and retract the medial dorsal cutaneous nerve dorsally and the medial plantar nerve branches plantarward. An inverted L-shaped or lenticular capsulotomy is performed, raising a robust capsular flap that will later be utilized for medial placation. The medial eminence is exposed, revealing the pseudoexostosis.
Using an oscillating microsaw, the medial eminence is resected parallel to the medial border of the foot, preserving the sagittal groove and the viable articular cartilage. It is an absolute imperative to preserve this resected bone; it is meticulously denuded of soft tissue and morselized to serve as high-quality, osteoinductive, and osteoconductive autograft for the proximal osteotomy site. Following the exostectomy, attention is directed to the lateral soft tissues. If the lateral sesamoid remains subluxated or the toe resists manual reduction, a transarticular or dorsal first web space lateral release is executed, meticulously releasing the adductor hallucis tendon from the base of the proximal phalanx and fibular sesamoid, and sectioning the lateral metatarsosesamoid suspensory ligament.
Osteotomy Execution and Graft Placement
Attention is then shifted to the proximal metatarsal. A 3 to 4 cm dorsomedial incision is made starting just distal to the first MTC joint. The incision is placed medial to the extensor hallucis longus (EHL) tendon. The periosteum is incised longitudinally, and minimal subperiosteal flaps are elevated just enough to accommodate the osteotomy and the fixation plate, strictly avoiding aggressive stripping of the lateral and plantar cortices to preserve the metatarsal's precarious blood supply. The osteotomy site is marked approximately 1.5 cm distal to the MTC joint articulation.
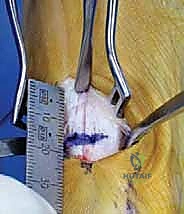
The osteotomy is initiated using a sharp, thin-bladed oscillating saw. The cut is directed from dorsomedial to plantar-lateral, maintaining a slight distal-to-proximal obliquity. The most critical technical aspect of this step is preserving a 2 to 3 mm intact lateral cortical hinge. This hinge acts as a biomechanical fulcrum, providing intrinsic stability and preventing dorsal displacement of the distal fragment. Once the osteotomy is made, a specialized smooth lamina spreader, or sequentially larger osteotomes, are gently inserted into the medial osteotomy site. The wedge is slowly and deliberately opened, allowing the intact lateral cortex to plastically deform without fracturing. The IMA is visually and fluoroscopically confirmed to be reduced to parallel with the second metatarsal. The previously harvested and morselized medial eminence autograft (or a structural allograft wedge if the autograft is insufficient) is meticulously impacted into the open wedge to maintain the correction and facilitate robust osteogenesis.
Internal Fixation and Capsulorrhaphy
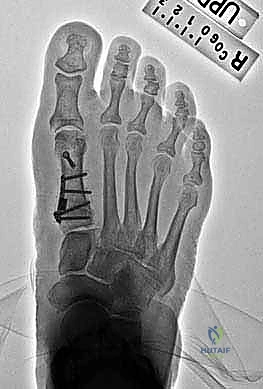
With the deformity anatomically reduced and the graft in place, rigid internal fixation is paramount. Modern techniques utilize a low-profile, titanium locking plate specifically contoured for the proximal medial first metatarsal. The plate is applied to the medial aspect of the metatarsal, spanning the osteotomy site. Temporary fixation is achieved with olive wires or provisional fixation pins. Fluoroscopy is utilized to confirm plate placement, ensuring no intra-articular penetration at the MTC joint and verifying the reduction of the IMA and sesamoid complex.
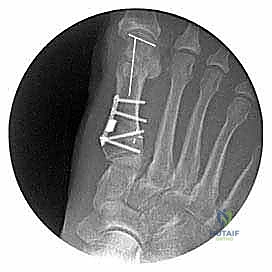
Standard non-locking or locking screws are then inserted. Typically, two screws are placed proximally into the robust cancellous bone of the metatarsal base, and two screws are placed distally into the metatarsal shaft. The locking mechanism provides a fixed-angle construct, significantly increasing the pull-out strength and resistance to dorsal elevation forces, which is particularly crucial in this load-bearing region. Once fixation is secure, the lamina spreader is removed, and final fluoroscopic images are obtained. The procedure concludes with a meticulous medial capsulorrhaphy at the MTP joint. The redundant medial capsule is excised, and the capsule is tightly imbricated using heavy absorbable sutures while the toe is held in a slightly plantarflexed and neutral alignment, effectively eliminating the valgus drift. The skin is closed in a layered fashion, and a compressive, sterile dressing is applied.
Complications, Incidence Rates, and Salvage Management
Despite meticulous surgical technique, the Proximal Metatarsal Opening Wedge Osteotomy carries a distinct profile of potential complications. The most biomechanically devastating complication is dorsal malunion (elevation of the first ray). Because the ground reaction forces exert a constant dorsiflexory moment on the first metatarsal head during the terminal stance phase of gait, any failure of the lateral hinge or inadequacy of the internal fixation can allow the distal fragment to drift dorsally. This unloads the first MTP joint and shifts the weight-bearing burden to the lesser metatarsals, resulting in severe, intractable transfer metatarsalgia. The incidence of dorsal malunion has decreased significantly with the advent of modern locking plates, but it remains a primary concern.
Nonunion and delayed union are also notable risks, particularly given the opening wedge nature of the procedure which inherently creates a gap that must be bridged by new bone. The incidence of nonunion ranges from 1% to 3% in recent literature. Factors increasing this risk include smoking, poor glycemic control, thermal necrosis from the oscillating saw, and failure to adequately pack the defect with viable osteoconductive graft. Avascular necrosis (AVN) of the first metatarsal head is rare with proximal osteotomies compared to distal procedures, but it can occur if lateral soft tissue stripping is excessively aggressive, compromising the nutrient artery.
Recurrence of the hallux valgus deformity is a frustrating complication for both the surgeon and the patient. Recurrence is often multifactorial, stemming from an undercorrection of the IMA, failure to adequately release the lateral tethering structures, or performing a joint-sparing procedure in a patient with unrecognized severe first MTC hypermobility. When recurrence happens, the deforming forces quickly overpower the medial capsulorrhaphy. Iatrogenic nerve injuries, specifically to the medial dorsal cutaneous nerve, can lead to painful neuromas that severely limit footwear and ambulation.
| Complication | Estimated Incidence | Etiology / Risk Factors | Salvage / Management Strategy |
|---|---|---|---|
| Dorsal Malunion / Elevation | 2% - 5% | Failure of lateral hinge, inadequate fixation, early weight-bearing | Plantarflexion closing wedge osteotomy, or Lapidus arthrodesis |
| Transfer Metatarsalgia | 5% - 10% | First ray shortening, dorsal malunion | Custom orthotics, lesser metatarsal Weil osteotomies, revision of first ray |
| Nonunion / Delayed Union | 1% - 3% | Smoking, poor graft placement, thermal necrosis | Revision with structural autograft (iliac crest) and robust locking revision plating |
| Hallux Valgus Recurrence | 5% - 15% | Undercorrection, unrecognized hypermobility, inadequate lateral release | Revision osteotomy, Lapidus procedure, or MTP Arthrodesis |
| Nerve Injury / Neuroma | 2% - 4% | Iatrogenic transection or traction of medial dorsal cutaneous nerve | Gabapentinoids, local steroid injection, surgical neuroma excision and burying |
Phased Post-Operative Rehabilitation Protocols
The postoperative rehabilitation following a PMOW is a highly structured, phased protocol designed to protect the osteotomy and delicate soft tissue repairs while preventing debilitating joint stiffness. The initial phase (Weeks 0-2) is focused entirely on wound healing and edema control. The patient is placed in a bulky, compressive Jones dressing and a rigid postoperative boot or short leg cast. Strict non-weight-bearing (NWB) status is enforced, utilizing crutches or a knee scooter. Elevation of the extremity above the level of the heart is critical to minimize swelling and reduce the risk of wound dehiscence.
Entering the second phase (Weeks 2-6), the initial dressings and sutures are removed. Clinical and radiographic evaluations are performed to ensure maintenance of alignment and absence of hardware failure. If the surgical wounds are impeccably healed, the patient may transition to heel-touch weight-bearing in a rigid CAM (Controlled Ankle Motion) boot. The absolute key during this phase is the initiation of passive range of motion (PROM) exercises for the first MTP joint. The surgeon or physical therapist must instruct the patient on gentle plantarflexion and dorsiflexion exercises to prevent capsular adhesions, which can severely limit functional outcomes. However, active weight-bearing through the forefoot remains strictly prohibited.
The final phases of rehabilitation (Weeks 6-12 and beyond) mark the transition to functional recovery. At the 6-week mark, repeat weight-bearing radiographs are obtained to assess for bridging callus and osseous union at the osteotomy site. Once clinical and radiographic union is confirmed, the patient is progressively transitioned to full weight-bearing in a stiff-soled supportive athletic shoe. Formal physical therapy is often initiated to focus on active range of motion, intrinsic foot muscle strengthening, and gait retraining to normalize the mechanics that were altered by years of deformity. Return to high-impact activities and sports is typically delayed until 4 to 6 months postoperatively, contingent upon the complete resolution of pain and the restoration of full biomechanical strength of the first ray.
Summary of Landmark Literature and Clinical Guidelines
The evolution of the Proximal Metatarsal Opening Wedge Osteotomy is deeply rooted in decades of rigorous orthopedic research and clinical refinement. Early iterations of proximal osteotomies, such as those described by Ludloff and later modified by Mau, demonstrated the geometric power of proximal correction but were plagued by high rates of instability and dorsal malunion due to inadequate fixation techniques (often relying on simple K-wires or cast immobilization alone). The paradigm shifted significantly with the landmark biomechanical studies by Trnka and colleagues, which elucidated the distinct advantages of the opening wedge technique in preserving metatarsal length and maintaining the critical windlass mechanism compared to closing wedge alternatives.
The introduction of modern locking plate technology catalyzed the widespread acceptance of the PMOW. Studies by Shurnas et al. and later by numerous independent orthopedic foot and ankle centers demonstrated that the utilization of a low-profile medial locking plate dramatically reduced the incidence of dorsal elevation and nonunion. These plates provide a fixed-angle construct that neutralizes the bending moments exerted on the first metatarsal during the terminal stance phase of gait. Clinical guidelines now strongly support the use of locking plate fixation as the gold standard for this procedure, emphasizing that the biomechanical stability it affords is paramount to achieving reproducible, excellent long-term outcomes.
Current clinical guidelines, as established by the American Orthopaedic Foot & Ankle Society (AOFAS), position the PMOW as a highly recommended intervention for moderate to severe hallux valgus (IMA > 13 degrees) in patients without severe MTC joint hypermobility or advanced MTP joint arthrosis. Furthermore, recent comparative literature has shown that when executed with precision and modern fixation, the PMOW yields patient-reported outcome measures (PROMs) and radiographic correction rates that are equivalent to, and in cases of short first metatarsals, superior to, the Lapidus procedure, with the added benefit of preserving motion at the first MTC joint. Mastery of the PMOW, therefore, remains an essential, advanced skill in the repertoire of the comprehensive foot and ankle surgeon.
