Revision Nerve Decompression and Barrier Procedures for Adhesive Neuralgia
Key Takeaway
Join us in the OR for an immersive masterclass on revision nerve decompression and barrier procedures for adhesive neuralgia. We'll meticulously dissect the posterior tibial, saphenous, superficial peroneal, and sural nerves, focusing on comprehensive anatomy, precise intraoperative techniques, and critical pearls for managing scarred nerves. Learn patient positioning, surgical approaches, and the intricate vein wrap procedure to prevent recurrence.
Comprehensive Introduction and Patho-Epidemiology
Adhesive neuralgia represents one of the most formidable challenges in peripheral nerve surgery of the lower extremity. Unlike primary nerve entrapment, which typically involves a discrete anatomical bottleneck compressing an otherwise healthy nerve, adhesive neuralgia is characterized by dense, fibrotic tethering of the nerve to its surrounding soft tissue bed. This condition most frequently arises as an iatrogenic complication following prior surgical interventions, such as an incomplete or complicated tarsal tunnel release, but it may also occur secondary to direct trauma, severe contusions, adjacent tendon surgery, or the resection of space-occupying lesions like ganglion cysts or neurilemmomas. The result is a profound disruption of the nerve's normal biomechanical gliding apparatus, leading to chronic mechanical irritation, ischemia, and debilitating neuropathic pain.
The pathogenesis of adhesive neuritis is rooted in the physiological response of peripheral nerves to injury and inflammation. When the epineurium is breached or subjected to sustained mechanical friction, a robust inflammatory cascade is initiated. Fibroblasts migrate into the perineural space, depositing disorganized collagen that matures into dense scar tissue. This fibrotic encasement obliterates the mesoneurium—the delicate, vascularized connective tissue that normally allows the nerve to glide smoothly during joint excursion. As the nerve becomes rigidly fixed to adjacent structures, normal physiological movements of the foot and ankle translate into pathological traction forces. This traction directly injures the intraneural microvasculature (vasa nervorum), inducing localized ischemia, breakdown of the blood-nerve barrier, intraneural edema, and subsequent Wallerian degeneration of the affected fascicles.
Epidemiologically, the posterior tibial nerve (PTN) is the most frequent victim of adhesive neuralgia in the lower extremity, heavily correlated with the rising incidence of primary tarsal tunnel surgeries. The initial surgical release, while intended to decompress the nerve, paradoxically introduces a hematoma and subsequent inflammatory milieu that can culminate in circumferential scarring. The "double crush" phenomenon further complicates the clinical picture; patients with subclinical proximal nerve compression (e.g., lumbosacral radiculopathy or diabetic sensorimotor polyneuropathy) are inherently more susceptible to developing symptomatic distal adhesive neuralgia following minor trauma or surgery. Understanding this complex interplay of mechanical tethering, vascular compromise, and underlying systemic vulnerabilities is paramount for the orthopedic surgeon attempting a revision decompression.
Detailed Surgical Anatomy and Biomechanics
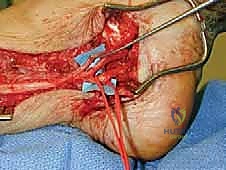
A profound mastery of regional lower extremity neuroanatomy is the cornerstone of safe and effective revision surgery. The posterior tibial nerve, a direct continuation of the sciatic nerve, courses through the deep posterior compartment of the leg before entering the retromalleolar region. Here, it traverses the tarsal tunnel—a fibro-osseous canal bordered medially by the flexor retinaculum (lancinate ligament), laterally by the medial talus and calcaneus, and anteriorly by the medial malleolus. Within this tunnel, the nerve is intimately bundled with the posterior tibial artery and accompanying venae comitantes. The typical bifurcation into the medial and lateral plantar nerves occurs within or just distal to the tarsal tunnel, though anatomical variations are exceedingly common.
The biomechanics of the peripheral nervous system rely heavily on the concepts of longitudinal excursion and transverse gliding. During normal gait, as the ankle transitions from plantarflexion to maximal dorsiflexion and eversion, the posterior tibial nerve must glide longitudinally by up to 1.5 to 2.0 centimeters to accommodate the changing length of the anatomical bed. Simultaneously, it must possess the transverse compliance to deform and flatten against the unyielding borders of the tarsal tunnel without sustaining internal pressure spikes. In adhesive neuralgia, this dynamic compliance is lost. The tethered nerve acts as a rigid bowstring. When the joint moves, the nerve undergoes severe tensile loading, which stretches the intraneural vessels, causing transient ischemia that manifests clinically as sharp, electrical pain radiating along the nerve's distribution.
Other nerves in the lower extremity are similarly vulnerable to these biomechanical insults when scarred. The saphenous nerve, traveling anteromedially, is frequently entangled in scar tissue following open reduction and internal fixation of medial malleolus fractures or medial portal placement in ankle arthroscopy. The superficial peroneal nerve, highly variable in its course as it pierces the deep crural fascia, is notoriously susceptible to adhesion following lateral compartment trauma or fibular fracture fixation. The sural nerve, draping over the lateral calcaneus and fifth metatarsal base, is at risk during extensile lateral approaches to the calcaneus or Achilles tendon procedures. Finally, the deep peroneal nerve can become adhered beneath the inferior extensor retinaculum (anterior tarsal tunnel syndrome) following anterior ankle trauma or repetitive microtrauma. In all these scenarios, the loss of the gliding layer is the fundamental biomechanical lesion that must be addressed surgically.
Exhaustive Indications and Contraindications
The decision to proceed with revision nerve decompression and barrier application is highly nuanced. It requires a definitive diagnosis of adhesive tethering and the exhaustion of all appropriate non-operative modalities. The primary indication is intractable neuropathic pain, dysesthesia, or motor weakness in the distribution of a previously operated or traumatized peripheral nerve, which has failed to improve after a minimum of 3 to 6 months of conservative management. Conservative measures should include pharmacological optimization (gabapentinoids, tricyclic antidepressants, SNRIs), targeted physical therapy focusing on nerve gliding, orthotic management to restrict mechanical strain, and possibly diagnostic/therapeutic corticosteroid injections.
A critical clinical indicator for surgical intervention is a strongly positive Tinel's sign localized to the site of suspected scarring, often accompanied by the Valleix phenomenon (pain radiating proximally and distally from the point of percussion). Furthermore, the reproduction or severe exacerbation of symptoms during passive positioning that places maximal tension on the nerve (e.g., forceful dorsiflexion and eversion for the posterior tibial nerve) confirms the mechanical nature of the tethering. Conversely, surgery is contraindicated in patients with profound, unmanaged systemic neuropathies where the primary pathology is metabolic rather than mechanical.
| Category | Specific Criteria |
|---|---|
| Absolute Indications | - Intractable neuropathic pain failing >6 months of targeted conservative care. - Progressive motor weakness or profound sensory loss in the nerve distribution. - Clinically evident mechanical tethering (positive stretch tests, localized Tinel's). - Impending irreversible nerve damage (documented by serial EMG/NCS). |
| Relative Indications | - Static, non-progressive neuropathic pain significantly impacting quality of life. - Failure of pharmacological management due to intolerable medication side effects. - Concomitant space-occupying lesion (e.g., recurrent ganglion cyst) causing secondary adhesion. |
| Absolute Contraindications | - Active, untreated local or systemic infection. - Severe peripheral vascular disease precluding adequate wound healing. - Purely psychogenic pain or severe, unmanaged psychiatric comorbidities. - Advanced, end-stage diabetic peripheral neuropathy without a focal mechanical component. |
| Relative Contraindications | - Complex Regional Pain Syndrome (CRPS) Type I (requires aggressive pre-op optimization). - Poor soft tissue envelope (may require preliminary or concurrent soft tissue coverage). - Unrealistic patient expectations regarding complete pain resolution. |
Pre-Operative Planning, Templating, and Patient Positioning
Thorough preoperative planning is the bulwark against intraoperative disasters in revision nerve surgery. The surgeon must meticulously review all prior operative notes to understand the extent of the previous dissection, the specific anatomical structures altered, and any intraoperative complications previously encountered. A comprehensive neurovascular examination is mandatory. The vascular status must be unequivocally established; if pedal pulses are diminished, non-invasive vascular studies (ABI, toe pressures) and a vascular surgery consultation are required, as a compromised vascular bed will doom a delicate nerve repair or barrier integration.
Imaging plays a supportive but vital role. While no modality perfectly visualizes microscopic adhesions, high-resolution Magnetic Resonance Imaging (MRI) is invaluable for identifying macroscopic scar tissue, retained hardware, neuromas-in-continuity, or recurrent compressive lesions such as ganglion cysts.
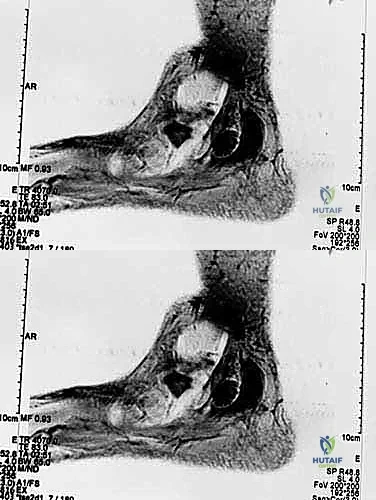
Ultrasonography, particularly when performed by an experienced musculoskeletal radiologist, offers the distinct advantage of dynamic assessment. The examiner can visualize the lack of normal longitudinal nerve excursion during passive joint movement, directly confirming the mechanical tethering. Electromyography (EMG) and Nerve Conduction Studies (NCS) are routinely obtained, not necessarily to confirm the diagnosis—as they may be falsely negative in purely dynamic tethering—but to establish a baseline of nerve function, rule out proximal radiculopathy, and quantify the degree of axonal loss.
Operating room setup demands meticulous attention to detail. The patient is positioned supine with a bump under the ipsilateral hip for lateral nerve exposures (e.g., sural, superficial peroneal) or under the contralateral hip to externally rotate the leg for medial exposures (e.g., posterior tibial, saphenous). All bony prominences must be heavily padded. A thigh tourniquet is applied but, crucially, is left uninflated at the start of the procedure. Operating without a tourniquet initially allows the surgeon to identify the vital, often engorged, microvasculature surrounding the scarred nerve, differentiating it from avascular fibrotic bands. Micro-instruments, bipolar electrocautery, and loupe magnification (minimum 3.5x) or an operating microscope must be readily available before the first incision is made.
Step-by-Step Surgical Approach and Fixation Technique
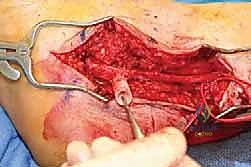
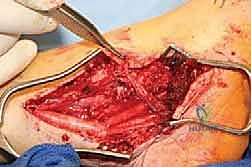
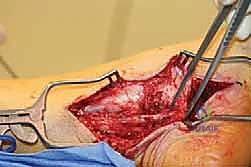
The surgical approach to revision nerve decompression is an exercise in extreme patience and microsurgical precision. The overarching philosophy is to approach the scarred epicenter from adjacent zones of normal, unscarred anatomy. This "outside-in" technique allows the surgeon to positively identify the nerve trunk in a healthy bed and trace it longitudinally into the fibrotic mass, significantly reducing the risk of iatrogenic transection.
Incision and Superficial Dissection
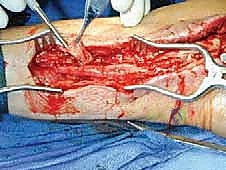
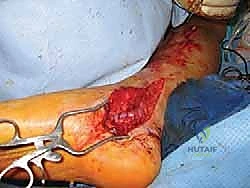
The incision typically incorporates the previous surgical scar, extending it proximally and distally into virgin tissue. For the posterior tibial nerve, this means extending proximally along the posteromedial border of the tibia and distally curving toward the plantar aspect of the foot, taking care to avoid right angles that could compromise flap viability.
Superficial dissection must proceed cautiously, as superficial nerve branches (e.g., medial calcaneal branches) may be aberrantly located or encased in subcutaneous scar from the prior procedure.
Once the deep fascia is reached, the surgeon identifies the normal nerve trunk proximally. The fascia is incised longitudinally, and the nerve is carefully mobilized.
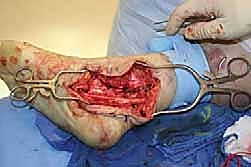
External and Internal Neurolysis
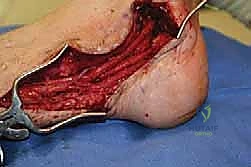
As the dissection progresses into the zone of injury, the dense, unyielding nature of the adhesive scar becomes apparent. The surgeon must employ sharp micro-dissection, utilizing fine tenotomy scissors or a scalpel, to meticulously peel the fibrotic layers away from the epineurium. Blunt dissection in this zone is strictly forbidden, as it will invariably avulse the delicate vasa nervorum or tear the epineurium itself.
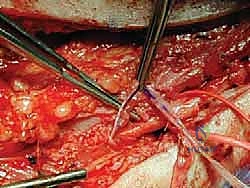
The goal of external neurolysis is to free the nerve circumferentially, restoring its ability to glide. Hemostasis must be absolute, achieved exclusively with pinpoint bipolar cautery to prevent thermal necrosis of the underlying fascicles.
In severe cases where the scar penetrates the epineurium, causing a palpable narrowing (hourglass constriction) or a firm intraneural neuroma-in-continuity, an internal neurolysis (epineurotomy) may be indicated.
This involves longitudinally incising the thickened epineurium under high magnification to decompress the individual fascicles. However, this must be balanced against the risk of creating further intraneural scarring; it is reserved only for cases with clear focal intraneural compression.
Implementation of Barrier Procedures
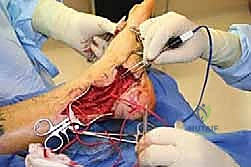
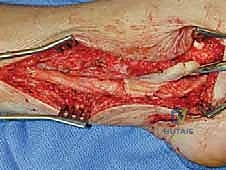
The hallmark of a modern revision nerve decompression is the application of a barrier procedure. Simply releasing the nerve from scar tissue is insufficient; without intervention, the bleeding surgical bed will inevitably form new adhesions, leading to recurrent tethering. Barrier techniques aim to interpose a biologically inert or regenerative layer between the nerve and the surrounding soft tissues, recreating a synthetic mesoneurium.

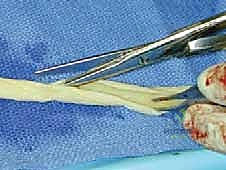
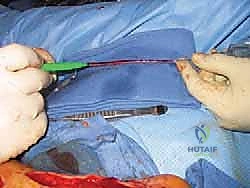
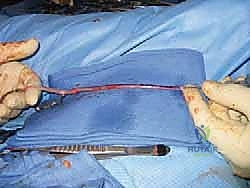
Autologous options include local muscle flaps (e.g., mobilizing a slip of the abductor hallucis to cover the medial plantar nerve), local adipofascial flaps, or autologous vein wrapping. Vein wrapping involves harvesting a segment of the great saphenous vein, splitting it longitudinally, and wrapping it around the nerve with the smooth endothelial surface facing inward. This provides an excellent, highly vascularized gliding surface but adds donor site morbidity.
Alternatively, advanced synthetic and allograft barriers are now widely utilized. These include type I collagen conduits, decellularized human amniotic/chorionic membrane wraps, and extracellular matrix (ECM) patches.
These materials are wrapped circumferentially around the neurolysed segment and secured with fine 8-0 or 9-0 non-absorbable sutures or fibrin glue.
The barrier prevents fibroblast infiltration from the surrounding wound bed while allowing nutrient diffusion to the nerve, thereby facilitating the restoration of longitudinal excursion without recurrent tethering.
Final Decompression and Closure
Following barrier placement, the entire course of the nerve is inspected to ensure no distal points of compression remain. For the posterior tibial nerve, this necessitates verifying the complete release of the deep fascia of the abductor hallucis muscle over both the medial and lateral plantar nerves.
Once decompression is deemed complete and the barrier is secure, the wound is copiously irrigated.
Closure is performed in a layered fashion. The deep retinacular structures (e.g., the lancinate ligament) are intentionally left open to prevent re-compression.
The subcutaneous tissues are approximated with absorbable sutures, and the skin is closed with non-absorbable monofilament or staples, depending on the tension and vascularity of the skin edges.
Complications, Incidence Rates, and Salvage Management
Revision peripheral nerve surgery carries an inherently higher risk profile than primary procedures. The altered anatomy, compromised vascularity, and pre-existing neuropathic state of the patient all contribute to a heightened complication rate. The most devastating complication is the iatrogenic transection of the main nerve trunk or its major branches, which can occur when dissecting through dense, unyielding scar tissue. If recognized intraoperatively, immediate primary microsurgical epineural repair is mandatory. If a gap exists, an interposition autograft (e.g., sural nerve) or a processed nerve allograft must be utilized.
Recurrent adhesive neuralgia remains a significant risk, even with meticulous technique and barrier application. Incidence rates for recurrence vary widely in the literature but can approach 15-20% in severe, multi-operated cases. If recurrence happens, tertiary procedures yield diminishing returns. Salvage options at this stage may involve more radical interventions, such as nerve resection and implantation of the proximal stump deep into adjacent muscle belly to prevent neuroma formation, though this sacrifices distal sensory and motor function.
| Complication | Estimated Incidence | Prevention Strategy | Salvage / Management |
|---|---|---|---|
| Recurrent Adhesion / Scarring | 10% - 20% | Meticulous hemostasis, "outside-in" dissection, use of biological/synthetic barrier wraps, early post-op nerve gliding. | Trial of conservative care, re-exploration with vascularized tissue flap (e.g., muscle flap) coverage. |
| Iatrogenic Nerve Injury | 2% - 5% | Loupe/microscopic magnification, avoiding blunt dissection in scar, uninflated tourniquet to identify vasa nervorum. | Immediate intraoperative microsurgical repair (primary or graft). Post-op recognition requires early re-exploration. |
| Complex Regional Pain Syndrome (CRPS) | 3% - 8% | Pre-op optimization, gentle tissue handling, adequate post-op analgesia, early mobilization. | Aggressive physical therapy, sympathetic nerve blocks, gabapentinoids, referral to pain management specialist. |
| Wound Dehiscence / Infection | 2% - 4% | Preservation of vascular flaps, avoiding tight closures, judicious use of postoperative immobilization. | Local wound care, oral/IV antibiotics, potential surgical debridement if deep infection occurs. |
| Vascular Injury (Artery/Vein) | 1% - 3% | Careful isolation of the neurovascular bundle, use of bipolar cautery only. | Primary vascular repair if limb-threatening; ligation of small unnamed venous branches is generally well-tolerated. |
Phased Post-Operative Rehabilitation Protocols
The postoperative rehabilitation following revision neurolysis and barrier placement is a delicate balancing act. The surgeon must protect the surgical wound and any delicate nerve repairs or barrier wraps while simultaneously initiating early motion to prevent the very adhesions the surgery aimed to eradicate. A rigidly phased protocol, closely supervised by a physical therapist experienced in peripheral nerve injuries, is essential for an optimal outcome.
Phase I: Protection and Wound Healing (Weeks 0-2)
Immediately postoperatively, the limb is placed in a bulky, non-compressive Jones dressing and a posterior splint or controlled ankle motion (CAM) boot. The ankle is typically maintained in a neutral position to minimize tension on the repaired or decompressed nerve. Weight-bearing is generally restricted to non-weight-bearing or strict heel-touch weight-bearing with crutches. The primary goals during this phase are edema control, strict elevation, and ensuring uncomplicated incisional healing. Active range of motion of the toes is encouraged to promote local blood flow, but ankle motion is restricted.
Phase II: Early Controlled Gliding (Weeks 3-6)
Once the sutures are removed and the incision is healed, the focus shifts to restoring the longitudinal excursion of the nerve. The patient transitions to partial weight-bearing in a CAM boot. Gentle, active-assisted range of motion of the ankle is initiated. Crucially, specific nerve gliding exercises (neural flossing) are introduced. For the posterior tibial nerve, this involves alternating between ankle dorsiflexion/eversion (tensioning) and plantarflexion/inversion (relaxing). These movements must be performed slowly, rhythmically, and strictly within a pain-free range. Pushing through pain can incite an inflammatory response and promote new scar formation.
Phase III: Strengthening and Desensitization (Weeks 6-12)
As the patient demonstrates improved tolerance to neural gliding, the protocol advances to progressive weight-bearing, aiming for full, unprotected weight-bearing by week 8. Strengthening exercises for the intrinsic foot musculature and extrinsic ankle stabilizers are incorporated. Desensitization techniques (e.g., fluidotherapy, varied texture massage) are utilized over the surgical site and the distribution of the nerve to normalize sensory processing. Patients are counseled that maximal neurological recovery, particularly the resolution of dysesthesias and return of motor function, may take up to 12 to 18 months due to the slow rate of axonal regeneration (approximately 1mm per day).
Summary of Landmark Literature and Clinical Guidelines
The evolution of revision peripheral nerve surgery is deeply rooted in decades of anatomical and clinical research. The foundational work by Dellon and Mackinnon established the critical importance of the nerve gliding apparatus and the devastating pathophysiological consequences of chronic mechanical tethering. Their studies elucidated how chronic traction leads to intraneural ischemia, providing the biological rationale for external and internal neurolysis.
The transition from simple neurolysis to the routine use of barrier procedures represents a major paradigm shift in modern orthopedic nerve surgery. Early literature heavily favored autologous vein wrapping, pioneered by essentially utilizing the smooth endothelial surface of a reversed saphenous vein graft to encase the scarred nerve. While highly effective at preventing re-adhesion and providing a neovascular supply to the ischemic nerve, the associated donor site morbidity prompted the search for alternatives.
Recent clinical guidelines and systematic reviews increasingly support the use of advanced biological and synthetic barriers. Studies evaluating processed human amniotic membrane and type I collagen conduits have demonstrated equivalent, if not superior, clinical outcomes compared to autologous vein wraps, with significantly reduced operative times and zero donor site morbidity. Current consensus among peripheral nerve surgeons dictates that any revision decompression involving significant epineural scarring should routinely incorporate a barrier procedure to optimize the microenvironment for nerve recovery and drastically reduce the incidence of recurrent adhesive neuralgia. Continuous tracking of patient-reported outcome measures (PROMs) remains essential to further refine these complex surgical interventions.
