Two-Stage Flexor Tendon Graft for Flexor Pollicis Longus: The Hunter Technique
Key Takeaway
The two-stage flexor tendon graft utilizing the Hunter silicone rod technique is indicated for extensive flexor pollicis longus (FPL) disruption, particularly when accompanied by joint contractures or the need for pulley reconstruction. Stage one involves pseudo-sheath formation via a silicone implant, followed by stage two, which replaces the implant with an autologous tendon graft. This approach restores thumb flexion biomechanics while minimizing adhesions in severely traumatized digits.
Introduction to the Two-Stage Flexor Tendon Graft
The reconstruction of a neglected, severely traumatized, or previously failed repair of the flexor pollicis longus (FPL) tendon presents a formidable challenge to the hand surgeon. In the unusual situation where there is extensive disruption of the FPL in its course from the carpal tunnel, distally through its passage beneath the thenar muscles, and to its insertion at the distal phalanx, primary repair or single-stage grafting is often doomed to failure. This is especially true if there are associated joint contractures, severe scarring of the fibro-osseous canal, or if extensive pulley reconstruction is required.
In these complex scenarios, the staged tendon grafting technique utilizing a silicone rod—pioneered by James Hunter—remains the gold standard. The Hunter technique relies on the biological principle of inducing a mesothelial-like pseudo-sheath around an inert silicone implant. This newly formed sheath provides a smooth, gliding, and highly vascularized environment for a subsequent autologous tendon graft, thereby mitigating the risk of restrictive adhesions that plague single-stage procedures in heavily scarred beds.
Surgical Anatomy and Biomechanics of the FPL
A profound understanding of the FPL anatomy and the thumb's unique pulley system is mandatory for successful reconstruction.
The Musculotendinous Unit
The FPL originates from the anterior surface of the radius and the adjacent interosseous membrane. It transitions into a tendon in the distal forearm, passing through the carpal tunnel as the most radial structure. Distal to the carpal tunnel, it dives between the superficial and deep heads of the flexor pollicis brevis (FPB) before entering the fibro-osseous sheath of the thumb.
The Thumb Pulley System
Unlike the triphalangeal digits, the thumb possesses a distinct pulley system comprising three primary structures:
1. The A1 Pulley: Located at the level of the metacarpophalangeal (MCP) joint.
2. The Oblique Pulley: Originating from the proximal half of the proximal phalanx, coursing obliquely from ulnar-proximal to radial-distal.
3. The A2 Pulley: Located just proximal to the interphalangeal (IP) joint.
💡 Clinical Pearl: The Oblique Pulley
The oblique pulley is the most critical biomechanical structure in the thumb for preventing bowstringing of the FPL tendon. During stage one of the Hunter technique, if the oblique pulley is incompetent or absent, it must be reconstructed to ensure the mechanical advantage and excursion of the future graft.
Indications and Preoperative Evaluation
Indications for the Two-Stage Approach
The two-stage silicone rod technique is specifically indicated for:
* Failed Primary Repairs: Digits with dense adhesions and a destroyed flexor sheath following a previous surgery.
* Delayed Presentations: Cases where the FPL muscle belly has retracted and myostatic contracture prevents primary end-to-end repair.
* Severe Crush Injuries: Trauma resulting in a composite loss of the tendon, sheath, and overlying soft tissue.
* Pulley Incompetence: Situations requiring the reconstruction of the oblique and/or A1 pulleys, which need time to heal over a stent before active tendon gliding is introduced.
Preoperative Optimization
Before embarking on stage one, the surgeon must ensure that the thumb has a supple soft-tissue envelope and maximum passive range of motion (ROM). Joint contractures at the MCP or IP joints must be addressed preoperatively with serial casting or splinting, or intraoperatively via capsulotomies. A two-stage graft will fail if the passive ROM is inadequate prior to the second stage.
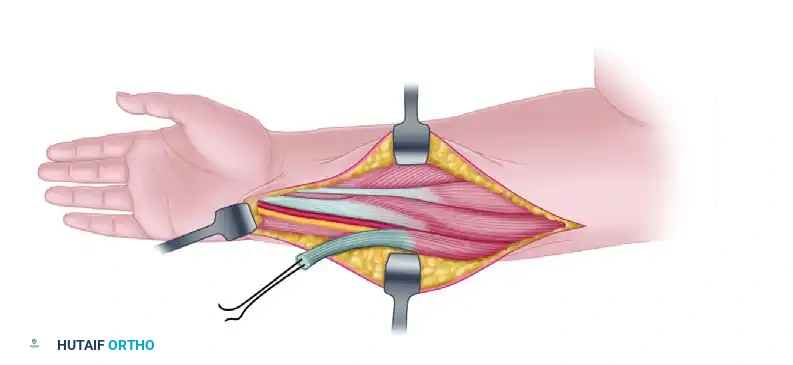
Surgical Technique: Stage One (Implant Placement)
The primary objective of stage one is to excise the scarred tendon, reconstruct the pulley system, and place the silicone rod to induce the formation of the pseudo-sheath.
Incision and Exposure
- Anesthesia and Positioning: The procedure is performed under regional or general anesthesia with the patient supine. A well-padded upper arm tourniquet is applied.
- Surgical Approach: The incision and approach to the thumb are similar to those described for a single-stage flexor tendon graft. A Brunner zigzag incision or a mid-lateral incision is utilized along the thumb, extending proximally into the thenar crease and further into the distal forearm via an extended carpal tunnel incision.
- Sheath Preparation: The scarred remnants of the FPL tendon are meticulously excised. Care is taken to preserve any intact portions of the A1, oblique, and A2 pulleys. The distal stump of the FPL is preserved (approximately 1 cm) at its insertion on the base of the distal phalanx to serve as an anchor for the silicone rod.
Pulley Reconstruction
If the oblique pulley is destroyed, it must be reconstructed. Free tendon grafts (e.g., palmaris longus) or slips of the extensor retinaculum can be woven through the periosteum or passed circumferentially around the proximal phalanx. The reconstruction is performed over the selected silicone rod to ensure adequate sizing.
Silicone Rod Sizing and Placement
- Selecting the Implant: The silicone rod must glide passively within the reconstructed sheath. An implant that is too large will cause necrosis of the reconstructed pulleys and restrict the future graft; an implant that is too small will not create a pseudo-sheath of adequate caliber.
- Distal Fixation: The silicone rod is placed beneath the intact or reconstructed pulleys. The distal end of the silicone rod is sutured securely to the 1 cm stump of the FPL tendon using nonabsorbable sutures (e.g., 4-0 braided polyester) and wire, ensuring it will not migrate proximally during the inter-stage rehabilitation.
- Proximal Passage: Pass the rod proximally through the anatomical course of the FPL—beneath the thenar muscles, between the heads of the FPB, and further proximally through the carpal tunnel into the distal forearm. The proximal end of the rod should lie adjacent to the FPL muscle belly in the distal forearm.
⚠️ Surgical Warning: Proximal Rod Placement
Do not suture the proximal end of the silicone rod to the proximal FPL tendon or muscle belly. The proximal end must remain free to glide within the forearm during passive motion. Suturing both ends will cause the rod to buckle, leading to implant failure, synovitis, and a compromised pseudo-sheath.
Closure and Stage One Postoperative Protocol
After meticulous hemostasis and wound closure, a dorsal blocking splint is applied to maintain the wrist in slight flexion (20-30 degrees) and the thumb in a relaxed, flexed posture. This provides increased length for the developing sheath of the flexor pollicis longus.
Inter-Stage Rehabilitation:
Passive motion is initiated early under the guidance of a specialized hand therapist. The patient performs passive flexion and extension of the thumb IP and MCP joints to encourage the silicone rod to glide, which stimulates the formation of a smooth, pliable pseudo-sheath. The second stage is typically performed 2 to 3 months after the first stage, provided that the wounds are completely healed, the soft tissues are supple, and full passive ROM has been achieved.
Surgical Technique: Stage Two (Tendon Grafting)
The objective of stage two is to atraumatically replace the silicone rod with an autologous tendon graft and establish secure distal and proximal fixation.
Graft Selection and Harvest
A free tendon graft of sufficient length is required. The FPL reconstruction demands a relatively long graft to bridge the gap from the distal phalanx to the distal forearm.
* Plantaris Tendon: The preferred choice due to its length and caliber. It is harvested using a tendon stripper via a small incision at the medial aspect of the Achilles tendon.
* Extensor Digitorum Longus (EDL) from a Toe: An excellent alternative if the plantaris is absent (which occurs in 15-20% of patients). The EDL to the second or third toe provides adequate length.
* Palmaris Longus: Often too short for a full FPL reconstruction from the distal phalanx to the proximal forearm, but may be used if the proximal FPL muscle belly has not retracted significantly.
Incision and Graft Passage
- Limited Incisions: Make limited incisions at the distal attachment of the thumb (to expose the distal end of the rod) and proximally at the wrist/distal forearm (to expose the proximal end of the rod and the FPL muscle belly).
- Atraumatic Technique: It is imperative not to violate the newly formed pseudo-sheath between the two incisions.
- Attaching the Graft: Suture the proximal end of the harvested tendon graft securely to the proximal end of the silicone rod.
- Distal Pull-Through: Apply gentle, steady traction to the distal end of the silicone rod at the thumb. As the rod is pulled distally out of the sheath, it draws the tendon graft through the pseudo-sheath and into position. Once the graft is fully passed, remove the rod and discard it.
🔪 Pitfall: Graft Detachment During Passage
Ensure the suture connecting the graft to the silicone rod is robust and streamlined. A bulky knot will catch on the reconstructed pulleys, while a weak suture will snap, leaving the graft stranded halfway through the pseudo-sheath. If the graft detaches, a flexible tendon passer must be used with extreme caution to avoid damaging the pseudo-sheath.
Distal and Proximal Fixation
- Distal Attachment: Complete the distal attachment using a pull-out technique similar to a single-stage graft. A Bunnell pull-out wire or a modern suture anchor is used to secure the distal end of the graft directly to the distal phalanx or the robust distal FPL stump.
- Proximal Attachment and Tensioning: The proximal end of the graft is woven into the FPL muscle belly or proximal tendon stump using a Pulvertaft weave.
Setting the Tension
Setting the correct tension is the most critical and challenging aspect of stage two.
* The tension must be set so that the thumb rests in a natural cascade of slight flexion relative to the fingers.
* The tenodesis effect must be evaluated intraoperatively: extending the wrist should cause the thumb IP joint to flex, and flexing the wrist should allow the thumb to extend fully.
* If the native FPL muscle belly is fibrotic, contracted, or lacks adequate excursion (less than 3 cm), a tendon transfer should be performed instead of grafting to the native FPL. The Flexor Digitorum Superficialis (FDS) of the ring finger is the most common and reliable donor for an FPL transfer.
Postoperative Protocol (Stage Two)
The postoperative rehabilitation following the second stage requires a delicate balance between protecting the graft integration and preventing restrictive adhesions.
- Immobilization (Days 1-3): The hand is placed in a dorsal blocking splint with the wrist in 20-30 degrees of flexion, the thumb CMC in palmar abduction, and the MCP and IP joints in slight flexion.
- Early Active Motion (Weeks 1-4): A modified early active motion protocol is initiated. Place-and-hold exercises are utilized. The patient uses their uninjured hand to passively flex the thumb, and then gently contracts the FPL to hold the position.
- Intermediate Phase (Weeks 4-6): The dorsal blocking splint is gradually discontinued during the day. Active ROM exercises are progressed. Synergistic wrist and thumb motion is encouraged to maximize tendon excursion.
- Strengthening (Weeks 8-12): Progressive resistance exercises are introduced. Full unrestricted activity is typically permitted after 12 weeks, provided clinical healing is adequate.
Complications and Salvage Procedures
Despite meticulous surgical technique, the two-stage flexor tendon graft carries inherent risks.
- Adhesions: The most common complication. If the patient fails to progress in active ROM despite aggressive hand therapy, a surgical tenolysis may be indicated, but strictly not before 6 months postoperatively to allow the graft to fully revascularize.
- Graft Rupture: Usually occurs at the distal or proximal fixation sites due to premature aggressive loading. Rupture necessitates a return to the operating room for revision fixation or a repeat two-stage procedure.
- Bowstringing: Results from failure of the reconstructed oblique pulley. This severely limits FPL excursion and pinch strength. Revision pulley reconstruction is required.
- Infection: A devastating complication, particularly during stage one, as the silicone rod acts as a foreign body. Superficial infections may be managed with antibiotics, but deep infections require immediate removal of the silicone rod, thorough debridement, and a delay of several months before attempting reconstruction again.
The Hunter two-stage flexor tendon graft remains a highly sophisticated, demanding, yet immensely rewarding procedure. By respecting the biomechanics of the thumb, meticulously handling the soft tissues, and adhering to strict postoperative rehabilitation protocols, the orthopedic surgeon can restore critical pinch and grasp functions to a severely compromised hand.
You Might Also Like