Masterclass in Flexor Tendon Repair: Tajima, Kessler, and Advanced Suture Techniques

Key Takeaway
The Tajima and Modified Kessler suture techniques are foundational to modern flexor tendon repair. By utilizing core grasping sutures with buried knots, these methods optimize biomechanical strength while minimizing gliding resistance. Advanced iterations, such as the Strickland modification, incorporate locked multi-strand configurations to withstand early active motion protocols. This guide details the indications, step-by-step surgical execution, and postoperative management required to achieve superior functional outcomes in tendon reconstruction.
PRINCIPLES OF FLEXOR TENDON REPAIR
The primary objective of flexor tendon repair is to achieve a coaptation that possesses sufficient tensile strength to withstand early active motion (EAM) while maintaining a low-profile construct that permits unhindered gliding within the fibro-osseous digital sheath. The evolution of tendon repair techniques—from the classic Kessler to the Tajima and the modern Strickland modifications—reflects a continuous biomechanical optimization aimed at reducing gap formation, minimizing the work of flexion, and preventing catastrophic rupture.
For the practicing orthopedic surgeon, understanding the nuanced differences in suture geometry, strand count, and knot placement is critical. The techniques described herein are foundational for managing lacerations, particularly in Zone II (historically termed "no man's land"), where the tolerances for tendon bulk and adhesion formation are exceptionally narrow.
💡 Clinical Pearl: The Biomechanics of Gap Formation
Gap formation greater than 3 mm at the repair site is a critical failure. It not only increases the risk of frank rupture but also disrupts the smooth gliding surface of the epitenon, leading to severe peritendinous adhesions. A meticulously executed core suture, augmented by a circumferential epitenon stitch, increases the repair strength by up to 50% and significantly reduces gap formation.
THE TAJIMA SUTURE TECHNIQUE
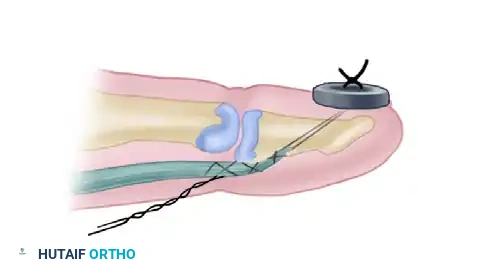
The Tajima suture is a highly versatile core grasping technique designed to place two separate pieces of suture material into the respective ends of the severed tendon. Its unique geometry offers distinct intraoperative advantages, particularly when navigating the complex anatomy of the flexor tendon sheath.
Indications and Advantages
The primary advantage of the Tajima technique is that it allows the protruding suture ends to be utilized as traction sutures. In cases where the proximal tendon stump has retracted into the palm, or when the tendon must be threaded through intact, tight pulleys (such as the A2 or A4 pulleys), the Tajima suture provides a robust lead. This eliminates the need to grasp the delicate epitenon with toothed forceps, thereby minimizing iatrogenic trauma. Furthermore, the Tajima configuration ensures that the knots are buried deep within the cut surface of the tendon, reducing surface friction during excursion.
Step-by-Step Surgical Technique (Tajima)
- Preparation: Debride the ragged edges of the severed tendon sharply with a #15 blade to create clean, perpendicular surfaces.
- Initial Needle Pass: Pass the needle into one of the cut surfaces of the tendon, directing it longitudinally to exit the epitenon surface approximately 5 to 10 mm proximal to the cut end.
- Transverse Pass: Pass the suture transversely across the tendon, taking up a small portion of the tendon fibers to create a grasping loop, and exit on the opposite side.
- Return Pass: Pass the needle back into the tendon surface and direct it longitudinally to exit through the cut surface.
- Repeat on Opposite Stump: Perform the identical sequence on the opposing tendon stump using a separate suture strand.
- Traction and Routing: Utilize the protruding suture ends to gently pull the tendon stumps through the fibro-osseous sheath and beneath the pulleys into their anatomical position.
- Approximation and Tying: Tie the corresponding suture ends together. The knots will naturally fall within the interface of the cut surfaces, leaving a smooth exterior.
🚨 Surgical Warning: Suture Material Selection
Braided synthetic sutures (e.g., Ticron or FiberWire) offer excellent tensile strength but possess a high coefficient of friction. When using the Tajima or Kessler techniques, ensure the tendon can slide smoothly along the suture material during tensioning; otherwise, the tendon ends may "bunch up," creating a bulky repair that will catch on the pulley system.
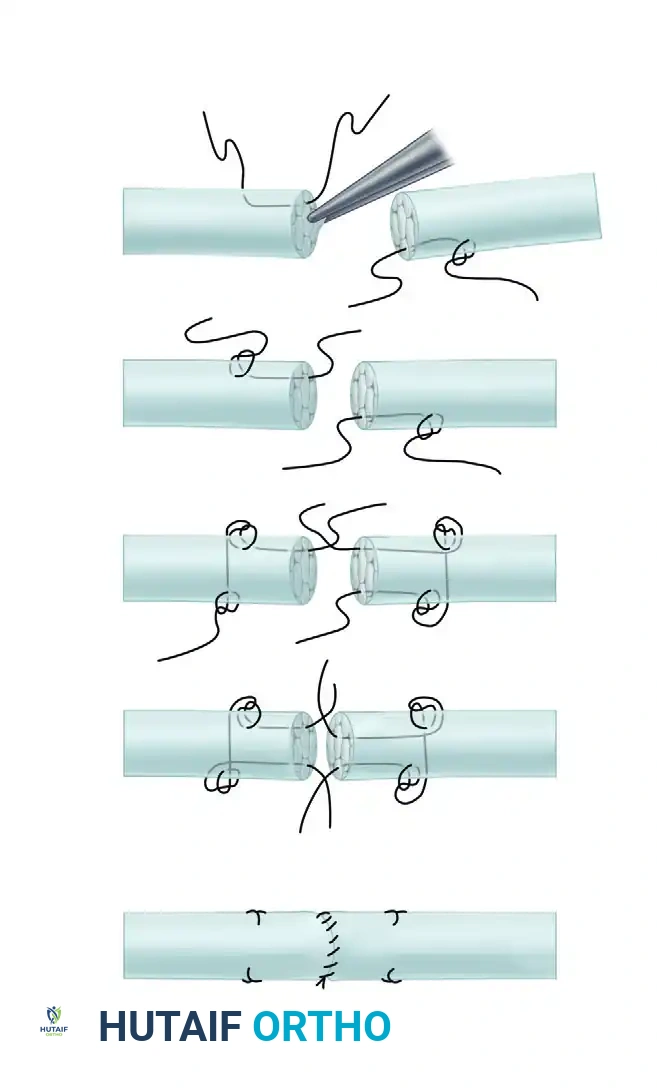
THE MODIFIED KESSLER SUTURE
The Modified Kessler suture is arguably the most universally recognized core tendon repair technique. Unlike the traditional Kessler—which was originally described as a grasping suture—the modified version utilizes a single piece of suture material and is designed to leave the knot buried within the coaptation site.
Biomechanical Considerations
The Modified Kessler relies on a locking or grasping mechanism at the corners of the repair to hold the longitudinal tendon fibers securely. While a standard 2-strand Modified Kessler provides adequate strength for passive motion protocols, it is generally considered insufficient for modern Early Active Motion (EAM) protocols. Consequently, the Smith-Evans modification incorporates a four-strand concept, doubling the tensile strength and providing a more robust construct.
Step-by-Step Surgical Technique (Modified Kessler)
- First Longitudinal Pass: Pass the needle into the cut surface of one side of the severed tendon, advancing it longitudinally to exit on the surface of the tendon 7 to 10 mm from the edge.
- First Transverse Pass: Pass the suture transversely across the tendon. To create a grasping effect, take up a small, superficial portion of the tendon surface, exiting on the opposite side.
- Second Longitudinal Pass: Pass the needle through the surface, directing it longitudinally to exit back out through the cut surface of the tendon.
- Crossing the Gap: Cross the repair site and enter the cut surface of the opposite tendon stump, repeating the longitudinal, transverse, and return longitudinal passes.
- Locking Maneuver: Ensure a locking maneuver is performed at the corners to prevent the suture from simply pulling through the parallel collagen bundles.
- Tensioning and Tying: Slide the tendon carefully along the suture material to achieve flush approximation of the cut surfaces. Tie the single knot, ensuring it is buried within the tendon interface.
THE STRICKLAND MODIFICATION (KESSLER-TAJIMA)
The Strickland modification represents a sophisticated evolution of both the Kessler and Tajima techniques. It is a 4-strand core repair that maximizes tensile strength while maintaining a meticulous, low-friction profile. This technique is highly favored for Zone II repairs where early active rehabilitation is planned.
Core Principles of the Strickland Repair
The Strickland technique utilizes separate sutures introduced into each tendon end. It relies on a precise "pass-and-lock" mechanism that grasps approximately 25% of the tendon's diameter. This specific volume of grasped tissue is critical: grasping too little results in suture pull-out, while grasping too much strangulates the tendon microcirculation and creates excessive bulk.
Step-by-Step Surgical Technique (Strickland Modification)
- Initial Placement: Introduce separate core sutures into each tendon end at a distance of 0.5 to 1.0 cm from the cut edge.
- The 25% Grasp: Ensure that approximately 25% of the diameter of the tendon is grasped by a separate needle passage. Lock this securely on the side of the tendon.
- Transverse Passage: Pass the suture transversely behind the knot, directly across the substance of the tendon.
- Second Pass-and-Lock: On the opposite side of the same tendon stump, perform a second pass-and-lock maneuver to grasp the tendon side securely.
- Return to Cut Surface: Finally, pass the suture behind the second knot and direct it longitudinally down through the tendon to exit at the cut end.
- Opposing Stump: Place a similar, mirrored suture configuration in the opposite tendon end.
- Traction and Positioning: As with the Tajima technique, use the protruding suture ends to pass the tendon through the tendon sheath and position it for final repair without needing to damage the epitenon with further instrumentation.
- Coaptation: Bring the two tendon ends together and tie the core sutures, burying the knots.
- Epitenon Repair: The repair is universally tidied up by a small, running circumferential epitenon suture (typically 5-0 or 6-0 monofilament). This step is mandatory, as it smooths the repair site, reduces bulk, and adds substantial resistance to gap formation.
💡 Clinical Pearl: The Epitenon Suture
Never omit the circumferential epitenon suture. A well-placed running, locking, or cross-stitch epitenon suture not only neatens the repair edges to prevent catching on the A2 pulley but also increases the overall biomechanical strength of the repair by 20% to 50%.
ALTERNATIVE END-TO-END SUTURE TECHNIQUES
While the Kessler, Tajima, and Strickland techniques are the gold standards for digital flexor tendon repairs, other techniques are required for specific anatomical zones or when dealing with size mismatches.
Double Right-Angled Suture
To suture the severed ends of a tendon together without shortening its resting length, a double right-angled stitch can be employed.
Indications:
This technique is highly useful proximal to the palm (Zone IV and Zone V). In the distal forearm and proximal palm, the fibro-osseous sheath is absent or more forgiving, meaning that the absolute minimization of tendon bulk is less critical than in Zone II.
Technique Overview:
The double right-angled suture functions similarly to a mattress stitch. Although the apposition of the tendon ends is not as perfectly flush or "neat" as the modified Kessler or Strickland techniques, the method is significantly faster to perform. It is the technique of choice in "spaghetti wrist" scenarios where multiple tendons (flexor digitorum superficialis, flexor digitorum profundus, and wrist flexors) have been severed simultaneously and rapid, secure coaptation is required to minimize tourniquet time.
Fish-Mouth End-to-End Suture (Pulvertaft Weave Alternative)
Tendon lacerations or reconstructions frequently involve joining tendons of disparate diameters. A classic example is grafting a small-diameter palmaris longus tendon to a larger-diameter flexor digitorum profundus stump.
Indications:
The Fish-Mouth technique is utilized to suture a tendon of small diameter to one of large diameter, ensuring a smooth biomechanical transition and preventing a bulky, abrupt step-off that could impede gliding.
Technique Overview:
1. The larger tendon stump is split longitudinally down the center (creating the "fish mouth").
2. The smaller tendon is inserted into the cleft of the larger tendon.
3. The "jaws" of the larger tendon are wrapped around the smaller tendon and sutured securely using multiple transverse and mattress sutures.
4. This creates a tapered, aerodynamic repair that distributes tension over a larger surface area, providing excellent tensile strength for tendon transfers and grafts.
SURGICAL APPROACH AND POSITIONING
Optimal outcomes in flexor tendon repair begin before the first incision is made. Meticulous surgical setup is paramount.
- Anesthesia and Tourniquet: The procedure is typically performed under regional anesthesia (axillary or supraclavicular block) or Wide Awake Local Anesthesia No Tourniquet (WALANT). If a block is used, a well-padded pneumatic upper arm tourniquet is inflated to 250 mmHg to ensure a bloodless field. WALANT is increasingly favored as it allows intraoperative active movement testing to assess repair strength and gliding through the pulleys.
- Magnification: The use of surgical loupes (minimum 2.5x to 3.5x magnification) is mandatory to visualize the epitenon and avoid iatrogenic damage to the neurovascular bundles.
- Incision: Utilize a Bruner (zigzag) incision or a mid-lateral incision. The Bruner incision is preferred for its excellent exposure of the flexor sheath. Ensure the apices of the zigzag flaps do not cross the flexion creases at a right angle to prevent postoperative flexion contractures.
- Sheath Management: Preserve the annular pulleys (specifically A2 and A4) at all costs. If the sheath must be opened to retrieve a retracted tendon, utilize L-shaped or step-cut incisions in the cruciform pulleys (C1, C2) or the membranous portions of the sheath, which can be repaired or left open without compromising biomechanics.
POSTOPERATIVE REHABILITATION PROTOCOLS
The success of a Tajima, Kessler, or Strickland repair is entirely dependent on the postoperative rehabilitation protocol. The goal is to stimulate intrinsic tendon healing and prevent peritendinous adhesions without overloading the repair and causing rupture.
Splinting
Immediately postoperatively, the hand is placed in a dorsal blocking splint.
* Wrist: 20 to 30 degrees of palmar flexion.
* Metacarpophalangeal (MCP) Joints: 70 to 80 degrees of flexion (to prevent collateral ligament contracture).
* Interphalangeal (IP) Joints: Full extension (to prevent volar plate contractures).
Motion Protocols
- Passive Motion (Duran Protocol): Involves controlled passive extension and flexion of the digits within the constraints of the dorsal block splint. Suitable for 2-strand repairs.
- Active Extension / Passive Flexion (Kleinert Protocol): Utilizes dynamic rubber band traction attached to the fingernail, pulling the digit into flexion, while the patient actively extends the digit against the resistance of the band.
- Early Active Motion (EAM): Only permissible if a robust 4-strand (or greater) core repair, such as the Strickland modification, combined with an epitenon suture, has been performed. EAM involves true active flexion of the digits by the patient's own musculature. This protocol yields the best functional results, minimizing adhesions and optimizing tendon excursion, but carries the highest risk of rupture if the surgical technique was suboptimal.
🚨 Pitfalls and Complications
Tendon Rupture: Usually occurs between days 7 and 21 postoperatively, during the fibroblastic phase of healing when the tendon softens before collagen remodeling strengthens the repair. Sudden loss of active flexion requires immediate surgical re-exploration.
Adhesion Formation: The most common complication. Results from excessive handling of the tendon, failure to close the epitenon, or delayed mobilization. If severe, a secondary tenolysis may be required 6 months postoperatively, provided the soft tissue envelope is supple and joints are passively mobile.
You Might Also Like