Mastering Flexor Tendon Repair: A Zone II Intraoperative Guide
Key Takeaway
This masterclass guides fellows through acute digital flexor tendon repair, focusing on challenging Zone II injuries. We cover detailed surgical anatomy, preoperative planning, and a granular, real-time intraoperative execution, emphasizing meticulous technique for optimal outcomes. Learn precise tendon retrieval, advanced suture methods, and critical strategies for minimizing adhesions and preventing rupture, ensuring a successful return to function.
Comprehensive Introduction and Patho-Epidemiology
The surgical management of acute digital flexor tendon disruptions remains one of the most formidable challenges in the realm of orthopedic hand surgery. Historically coined "no man's land" by the pioneering surgeon Sterling Bunnell, Zone II of the flexor tendon system represents an unforgiving anatomical landscape. In this region, the intricate, tightly constrained spatial relationship between the flexor digitorum superficialis (FDS) and the flexor digitorum profundus (FDP) within a rigid fibro-osseous sheath creates an environment where surgical error is poorly tolerated. The primary challenge lies in the paradoxical goals of the procedure: the surgeon must construct a biomechanically robust repair capable of withstanding the tensile forces of early active motion protocols, while simultaneously minimizing the volumetric bulk of the repair to permit unhindered excursion through the pulley system.
Epidemiologically, flexor tendon lacerations predominantly affect young, active individuals, frequently occurring as a result of occupational hazards, domestic accidents, or interpersonal violence. The mechanism of injury dictates the macroscopic and microscopic damage to the tendon substance. Sharp, volar lacerations typically result in clean, transverse tendon divisions, whereas crush injuries or avulsions induce extensive longitudinal intrafascicular damage, severe epitenon disruption, and a heightened inflammatory response. This distinction is critical, as the zone of injury dictates the extent of necessary debridement and directly influences the prognosis for functional recovery. The economic and psychosocial burden of these injuries is substantial, given the prolonged rehabilitation required and the potential for long-term functional impairment of the hand.
Understanding the pathophysiology of tendon healing is an absolute prerequisite for mastering this procedure. Tendon healing occurs via a dual mechanism: extrinsic and intrinsic pathways. Historically, it was believed that tendons healed exclusively through extrinsic fibroblastic ingrowth from the surrounding peritendinous tissues, an assumption that inevitably accepted adhesion formation as a necessary evil of healing. However, contemporary molecular biology has elucidated the intrinsic healing capacity of tendons, driven by the proliferation and migration of epitenon and endotenon tenocytes. This intrinsic healing is heavily dependent on the preservation of synovial fluid diffusion and the delicate microvascular supply.
Modern surgical techniques and rehabilitation protocols are explicitly designed to favor the intrinsic healing pathway. By meticulously coapting the epitenon, minimizing surgical trauma to the tendon surface, and initiating early controlled mobilization, we stimulate intrinsic tenocyte activity while simultaneously disrupting nascent extrinsic adhesions. This paradigm shift from static immobilization to early dynamic loading has revolutionized outcomes in Zone II repairs, transforming a historically dismal prognosis into one where excellent functional recovery is routinely achievable in the hands of a skilled microsurgeon.
Detailed Surgical Anatomy and Biomechanics
Before the scalpel breaches the dermis, the operating surgeon must possess a three-dimensional, encyclopedic understanding of the flexor tendon system and its surrounding neurovascular structures. This is not merely academic trivia; it is the fundamental roadmap that dictates surgical exposure, dictates the limits of safe dissection, and safeguards against catastrophic iatrogenic morbidity.
Flexor Tendon Zones and Topographical Significance
The volar aspect of the hand and forearm is topographically divided into five distinct flexor tendon zones, a classification system originally devised by Verdan to standardize the description of injuries and guide surgical decision-making. Each zone presents unique anatomical constraints and dictates specific surgical strategies. Zone V encompasses the musculotendinous junctions in the distal forearm. Zone IV represents the dense, crowded corridor of the carpal tunnel, where injuries frequently involve multiple tendons and the median nerve. Zone III is the lumbrical origin in the palm, generally carrying a favorable prognosis due to the absence of a tight retinacular sheath.
Zone II, extending from the proximal edge of the A1 pulley at the metacarpophalangeal (MP) joint to the distal insertion of the FDS at the proximal aspect of the middle phalanx, is the crux of our discussion. This zone is characterized by the presence of two independent tendons gliding within a single, unyielding synovial sheath. Zone I lies distal to the FDS insertion, involving exclusively the FDP tendon as it traverses the distal interphalangeal (DIP) joint to insert on the distal phalanx base. Recognizing the exact zone of injury preoperatively is essential for anticipating the degree of proximal tendon retraction and planning the necessary surgical exposure.
Tendon Architecture and the Chiasm of Camper
The architectural interplay between the FDS and FDP within Zone II is a masterpiece of biomechanical engineering. The FDS tendon enters the proximal aspect of the fibro-osseous sheath lying superficial (volar) to the FDP. However, to achieve its insertion on the middle phalanx, the FDS must allow the FDP to pass through it to reach the distal phalanx. This is accomplished via a complex bifurcation. At the level of the proximal third of the proximal phalanx, the FDS flattens and splits into two distinct slips.
These two FDS slips diverge, pass dorsal to the FDP tendon, and then decussate (cross over each other) to form the chiasm of Camper. This anatomical decussation essentially creates a dynamic tunnel through which the FDP emerges from deep to superficial. Following the chiasm, the FDS slips insert along the volar-lateral margins of the proximal half of the middle phalanx. This intricate relationship means that any laceration in Zone II frequently injures both tendons, and the subsequent repair must flawlessly reconstitute this spatial arrangement to prevent mechanical impingement during digital flexion.
The Fibro-Osseous Sheath and Pulley System
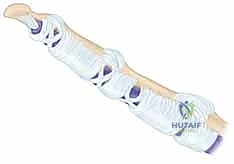
The flexor tendons do not glide in a vacuum; they are intimately constrained by the retinacular fibro-osseous sheath. This sheath is a continuous synovial-lined tunnel reinforced by focal fibrous condensations known as pulleys. The primary biomechanical function of this pulley system is to maintain the tendons in close apposition to the phalangeal longitudinal axis, thereby translating linear myotendinous excursion into angular joint rotation. Without these pulleys, the tendons would bowstring across the joints, drastically increasing the moment arm, precipitating mechanical disadvantage, and resulting in incomplete digital flexion despite maximal muscle contraction.
The pulley system comprises five annular (A1-A5) and three cruciate (C1-C3) pulleys. The annular pulleys are dense, rigid, transverse bands. The A2 pulley, located over the proximal half of the proximal phalanx, and the A4 pulley, located over the middle third of the middle phalanx, are the primary biomechanical workhorses. Preservation or reconstruction of these two critical pulleys is an absolute mandate during Zone II repairs. The cruciate pulleys are thin, flexible, crisscrossing fibers situated between the annular pulleys; their primary function is to permit the flexor sheath to collapse and conform to the digit without buckling during acute flexion.
Vascularity, Nutrition, and Neurovascular Relations
Tendon viability and intrinsic healing capacity are inextricably linked to their dual nutritional supply. Flexor tendons receive nutrition via two distinct pathways: vascular perfusion and synovial diffusion. The vascular supply is segmental, entering the dorsal, non-friction surface of the tendons through delicate mesenteric folds known as the vincula tendinum. Typically, there are two vincula for each tendon: the vinculum breve (near the insertion) and the vinculum longum (more proximal). These structures carry vessels derived from the digital arteries.
In addition to providing blood supply, the vincula act as mechanical tethers. When a tendon is lacerated, an intact vinculum can prevent the proximal stump from retracting fully into the palm or forearm, significantly facilitating surgical retrieval. However, the vascular supply is not uniform; there are distinct watershed areas on the volar aspect of the tendons within Zone II that rely almost entirely on synovial diffusion for nutrition. This diffusion is driven by the dynamic pumping action of the tendons gliding within the sheath, underscoring the physiological necessity of early postoperative mobilization.
Superficial and lateral to this entire complex lie the proper digital neurovascular bundles. The digital arteries provide the critical inflow to the digit and the vincula, while the proper digital nerves provide sensibility. These structures are highly vulnerable during the initial trauma and during surgical exposure. A meticulous, bloodless surgical field and loupe magnification are mandatory to identify and protect these structures. Unrecognized injury to a digital nerve transforms a mechanical tendon problem into a devastating sensory deficit, severely compromising the overall functional outcome of the hand.
Exhaustive Indications and Contraindications
The decision to proceed with surgical repair of a Zone II flexor tendon injury is dictated by the timing of presentation, the mechanism of injury, the physiological status of the soft tissue envelope, and the compliance capacity of the patient. Acute primary repair is universally recognized as the gold standard, offering the highest probability of restoring normal anatomy and gliding function.
Primary repair is defined as intervention occurring within the first 24 to 72 hours post-injury. Delayed primary repair, performed within the first 7 to 10 days, is also highly acceptable and sometimes preferred to allow initial edema to subside and to ensure the procedure is performed by a specialized hand surgeon under optimal elective conditions. Beyond two to three weeks, the procedure transitions into a secondary repair. At this stage, proximal muscle contracture, tendon stump edema, and established adhesions make end-to-end coaptation exceedingly difficult, often necessitating tendon grafting or staged reconstructive procedures.
Contraindications to acute primary repair are generally related to the impossibility of achieving a stable repair or the high likelihood of catastrophic failure. Severe crush injuries with extensive segmental tendon loss preclude direct repair. Similarly, injuries associated with massive soft tissue avulsion requiring complex flap coverage may necessitate a staged approach, utilizing a silicone Hunter rod to maintain the pulley system while the soft tissue envelope heals. Furthermore, patient compliance is a critical, often underappreciated, factor. Postoperative rehabilitation is rigorous and demanding; a patient who is cognitively unable or unwilling to adhere strictly to the protective splinting and mobilization protocols is at an exceptionally high risk for repair rupture, making primary repair a questionable endeavor.
| Category | Primary Indications | Absolute/Relative Contraindications |
|---|---|---|
| Timing of Presentation | Acute lacerations (< 7-10 days post-injury). | Late presentations (> 3-4 weeks) with fixed muscle contracture (Relative). |
| Mechanism of Injury | Sharp, clean, transverse or oblique lacerations; avulsions with amenable bony fragments. | Severe crush injuries with >1-2 cm segmental tendon loss; extensive intrafascicular maceration. |
| Soft Tissue Envelope | Clean wounds with adequate, viable skin coverage; stable skeletal platform. | Grossly contaminated wounds (e.g., barnyard injuries); inadequate soft tissue coverage requiring complex flaps. |
| Associated Injuries | Concomitant clean digital nerve or arterial lacerations (repaired simultaneously). | Untreated, unstable phalangeal fractures; active, uncontrolled deep space infections. |
| Patient Factors | Compliant, cognitively intact patient capable of following complex rehab protocols. | Severe psychiatric illness, dementia, or documented non-compliance precluding rehab adherence. |
Pre-Operative Planning, Templating, and Patient Positioning
The success of a Zone II flexor tendon repair is heavily predicated on meticulous preoperative evaluation and systematic surgical setup. The surgeon must enter the operating theater with a definitive understanding of the structural deficits and a clear algorithmic approach to the reconstruction.
Clinical Evaluation and Diagnostic Modalities
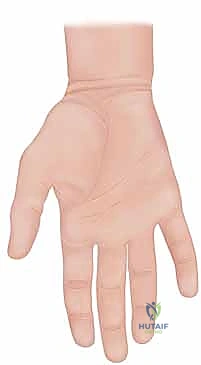
The preoperative physical examination must be systematic, isolating and testing each component of the flexor system. The resting posture of the hand is highly informative; a disruption of the normal, cascading flexion of the digits immediately localizes the injured finger. The examiner must then isolate the FDP and FDS tendons independently.
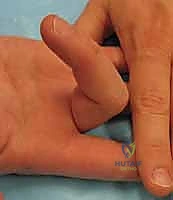
To test the FDP, the examiner stabilizes the MP and PIP joints of the affected digit in extension and asks the patient to actively flex the DIP joint. An inability to do so confirms an FDP laceration. To isolate the FDS, the examiner holds all uninjured digits in maximal extension. Because the FDP tendons to the middle, ring, and small fingers share a common muscle belly, extending the adjacent digits passively tethers the FDP of the injured digit, effectively neutralizing it. The patient is then asked to flex the PIP joint of the injured digit; failure indicates an FDS disruption.
In uncooperative patients, pediatric populations, or comatose individuals, the tenodesis effect is an invaluable diagnostic tool. Passive extension of the wrist should naturally induce flexion of the digits if the flexor continuum is intact. Alternatively, deep palpation and compression of the volar forearm muscle bellies will elicit digital flexion. Beyond tendon integrity, a rigorous assessment of two-point discrimination and capillary refill is mandatory to rule out concomitant digital nerve and arterial injuries, which must be addressed concurrently during the surgical procedure. Standard orthogonal radiographs are routinely obtained to rule out associated osseous trauma, particularly in avulsion injuries (e.g., Jersey finger) or to identify radiopaque foreign bodies.
Timing of Surgical Intervention
The temporal window for optimal intervention is narrow. The "golden period" for primary flexor tendon repair is widely considered to be within the first 7 to 10 days following the injury. During this window, the proximal tendon stumps can usually be retrieved without excessive tension, and the myotendinous units have not yet undergone irreversible contracture.
Delaying surgery beyond this period initiates a cascade of detrimental physiological changes. The proximal tendon stump retracts further into the palm or forearm, the muscle belly shortens and fibroses, and the tendon ends become edematous and friable, significantly degrading their suture-holding capacity. If presentation is delayed beyond 3 to 4 weeks, primary end-to-end repair becomes technically formidable and biomechanically perilous. In such late presentations, the surgeon must be prepared to pivot to alternative strategies, such as single-stage tendon grafting (if the pulley system is intact and supple) or two-stage reconstruction using a silicone tendon spacer.
Operative Setup and Patient Positioning
The operative environment must be optimized for microsurgical precision. The patient is positioned supine with the affected upper extremity extended onto a specialized, radiolucent hand table. A pneumatic tourniquet is applied to the proximal brachium over soft padding. Following standard surgical prep and drape, the arm is exsanguinated using an Esmarch bandage, and the tourniquet is inflated (typically to 250 mmHg, or 100 mmHg above systolic blood pressure) to provide an absolutely bloodless field.
The surgeon and assistant sit opposite each other, utilizing loupe magnification (minimum 2.5x, preferably 3.5x to 4.5x) and supplemental focal illumination (headlamp). A specialized hand positioning device, such as a malleable lead hand or a specialized retractor system, is indispensable for stabilizing the digits in extension and retracting the uninjured fingers out of the surgical trajectory. Meticulous tissue handling instruments, including fine-toothed forceps (e.g., Bishop-Harmon or Adson), delicate tenotomy scissors, and skin hooks, must be readily available on the sterile field.
Step-by-Step Surgical Approach and Fixation Technique
The execution of a Zone II flexor tendon repair is a highly choreographed sequence of maneuvers demanding absolute respect for the soft tissues and an uncompromising adherence to biomechanical principles.
Incision Strategy and Initial Exposure
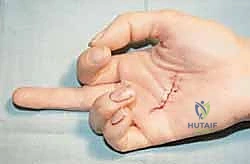
The surgical approach begins with the strategic extension of the traumatic laceration. The fundamental principle is to achieve wide, unhindered exposure while absolutely avoiding longitudinal incisions that cross flexion creases at right angles, as these will inevitably result in severe, motion-limiting scar contractures.
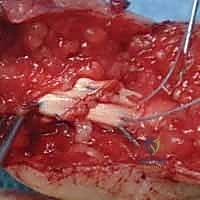
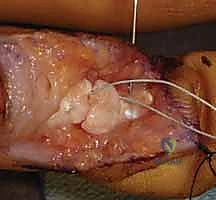
The modified Bruner (zigzag) incision is the workhorse approach for volar digital exposure. The existing laceration is incorporated into a series of volar-lateral oblique limbs that meet at the apices of the flexion creases. Alternatively, a mid-lateral incision can be utilized, creating a large volar flap. Regardless of the chosen geometry, the skin flaps are elevated at a full-thickness level, taking extreme care to leave the subcutaneous fat attached to the dermis to preserve the subdermal vascular plexus. As the flaps are raised, the neurovascular bundles are immediately identified, mobilized, and protected with vessel loops. The fibro-osseous sheath is then visualized in its entirety, allowing the surgeon to assess the integrity of the pulley system and locate the site of tendon disruption.
Tendon Retrieval and Sheath Management
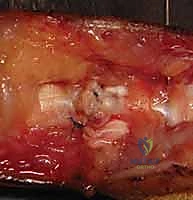
Retrieving the retracted proximal tendon stumps is frequently the most technically demanding and frustrating phase of the operation. Blind, aggressive probing with grasping forceps within the proximal sheath is strictly forbidden, as it causes devastating iatrogenic trauma to the delicate synovial lining and the epitenon, virtually guaranteeing severe postoperative adhesions.
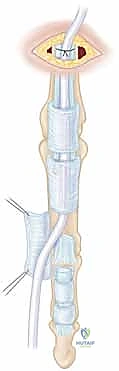
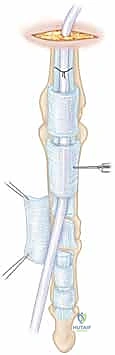
Initial retrieval efforts involve gentle "milking" of the volar forearm and palm in a distal direction, combined with passive flexion of the wrist and MP joints. If the vincula are intact, the tendons may appear at the proximal edge of the lacerated sheath. If they have retracted proximally, a transverse window may be created in the proximal palm (Zone III) to identify the tendons.
Once identified proximally, a flexible pediatric feeding catheter (typically 5 or 8 French) is passed retrogradely from the digital wound, through the intact A2 pulley, and into the palmar incision. The proximal tendon stumps are sutured to the catheter and gently shuttled distally into the digital wound. Once retrieved, the tendons are temporarily secured by passing a small, transversely oriented hypodermic needle (e.g., 25-gauge) through the tendon and the adjacent pulley or bone to relieve tension during the core suture placement. Crucially, any opening of the flexor sheath to facilitate repair must be done via L-shaped or Z-plasty incisions to allow for subsequent closure, and the critical A2 and A4 pulleys must be preserved at all costs.
Core Suture Configuration and Biomechanical Optimization
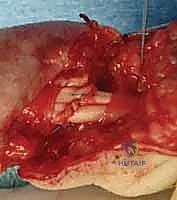
The core suture is the primary load-bearing element of the repair. Its configuration directly determines the tensile strength and gap resistance of the anastomosis. The biomechanical literature unequivocally demonstrates that the strength of a tendon repair is directly proportional to the number of suture strands crossing the repair site and the caliber of the suture material.
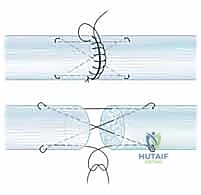
For early active motion protocols, a minimum of a four-strand core repair is universally recommended. Common configurations include the four-strand modified Kessler, the four-strand cruciate, or the Strickland technique. We typically utilize a 3-0 or 4-0 braided synthetic non-absorbable suture (e.g., Supramid, FiberWire, or Ethibond). The needle passes must be precise, engaging the volar half of the tendon to avoid disrupting the dorsal vascular supply.
The purchase of the core suture should be approximately 7 to 10 mm from the cut edge of the tendon. Locking loops are incorporated at the corners of the repair to grasp the longitudinal tendon fibers, significantly increasing resistance to suture pull-out. The knots must be meticulously buried within the repair interface to minimize friction against the pulley system. During knot tying, the surgeon must apply precise tension to bring the tendon ends into flush coaptation without causing bunching or overriding, which would dramatically increase the cross-sectional area and impede gliding.
Epitenon Repair and Gliding Surface Restoration
Following the completion of the core suture, the epitenon repair is executed. This step is not merely cosmetic; it is a critical biomechanical and physiological component of the procedure. A meticulously placed epitenon suture increases the ultimate tensile strength of the repair by 20% to 50%, significantly reduces the risk of gap formation under cyclic loading, and tucks in any frayed collagen fibrils, thereby creating a smooth, low-friction surface that facilitates gliding within the sheath.
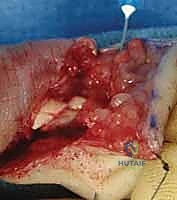
The epitenon repair is typically performed using a 5-0 or 6-0 monofilament suture (e.g., Prolene or Nylon). A continuous running, running-locking, or cross-stitch (Silfverskiöld) technique is utilized. The bites should be shallow, engaging only the epitenon and the superficial 1-2 mm of the endotenon, and spaced approximately 1-2 mm apart.

The surgeon traverses the entire circumference of the repair site, ensuring that the tendon edges are perfectly inverted and that no raw collagen is exposed. Once the epitenon repair is complete, the temporary stabilizing needles are removed, and the digit is passively taken through a full range of motion. The surgeon must directly observe the repair site as it passes beneath the A2 and A4 pulleys to ensure there is no catching, triggering, or mechanical impingement. If the repair is excessively bulky, judicious venting (partial excision) of the less critical annular pulleys (e.g., A3) or the cruciate pulleys may be required to permit unhindered excursion.
Complications, Incidence Rates, and Salvage Management
Despite flawless surgical execution, Zone II flexor tendon repairs are fraught with potential complications. The biological response of the patient and their adherence to the postoperative rehabilitation protocol are critical variables that frequently dictate the final outcome. The surgeon must be adept at recognizing these complications early and implementing appropriate salvage strategies.
The most common complication is the formation of restrictive peritendinous adhesions. Adhesions tether the repaired tendon to the surrounding fibro-osseous sheath or bone, severely limiting active excursion and resulting in a stiff digit. The incidence of clinically significant adhesions ranges from 10% to 30%, heavily dependent on the severity of the initial trauma and the timing of mobilization. The most devastating complication is repair rupture, which typically occurs between the first and third postoperative weeks when the tendon is at its weakest phase of biological healing (the inflammatory/proliferative phase transition). Rupture rates in modern series utilizing four-strand repairs and early active motion range from 3% to 7%.
Other complications include joint contractures (particularly PIP joint flexion contractures), bowstringing (due to iatrogenic or traumatic loss of the A2 or A4 pulleys), and deep space infections. Management of these complications requires highly specialized secondary interventions.
| Complication | Estimated Incidence | Etiology / Risk Factors | Salvage Management Strategy |
|---|---|---|---|
| Peritendinous Adhesions | 10% - 30% | Severe crush injury, delayed mobilization, excessive surgical trauma, prolonged immobilization. | Intensive hand therapy; surgical tenolysis (delayed until at least 3-6 months post-op, once tissue equilibrium is reached). |
| Repair Rupture | 3% - 7% | Patient non-compliance, inadequate core suture strength (< 4 strands), aggressive passive stretching, gap formation. | Prompt re-exploration and primary repair if within 1-2 weeks; staged tendon reconstruction if delayed or severely retracted. |
| PIP Joint Contracture | 15% - 25% | Failure to achieve full passive extension during rehab, volar plate scarring, flexor sheath shortening. | Dynamic extension splinting; surgical capsulotomy and flexor tenolysis if refractory to conservative measures. |
| Tendon Bowstringing | < 5% | Loss or over-venting of >50% of the A2 or A4 pulleys during the index procedure. |
