Intramedullary Fixation of Clavicle Fractures: An Operative Masterclass
Key Takeaway
This masterclass details intramedullary fixation for clavicle fractures, covering comprehensive anatomy, preoperative planning, and precise intraoperative execution. We explore patient positioning, meticulous dissection, canal preparation, and implant insertion with real-time surgical directives. Fellows will gain insights into managing potential pitfalls, ensuring optimal reduction, and navigating neurovascular structures, leading to successful patient recovery and functional outcomes.
Comprehensive Introduction and Patho-Epidemiology
Welcome, colleagues, to the operating theater and to this definitive exploration of clavicular trauma. Today, we are tackling a common yet frequently underestimated injury: the midshaft clavicle fracture. Historically relegated to benign neglect and conservative management with a simple sling or figure-of-eight bandage, our understanding of the long-term sequelae of these injuries has evolved dramatically. Our focus in this masterclass will be on intramedullary (IM) fixation, a technique offering distinct biomechanical and biological advantages in selected, well-defined cases. This operative approach is not merely about inserting metal into bone; it requires a profound understanding of clavicular anatomy, an appreciation of its unique biomechanical role within the shoulder girdle, and the execution of a precise, minimally invasive stabilization technique that facilitates excellent functional recovery while respecting the local soft tissue envelope.
The epidemiology of clavicle fractures dictates that every orthopedic surgeon must be intimately familiar with their management. They account for approximately 5% to 10% of all adult fractures and represent nearly 44% of all injuries to the shoulder girdle. The distribution is classically bimodal, with a significant peak in young, active males experiencing high-energy trauma or sports-related injuries, and a secondary peak in the elderly population sustaining low-energy falls. The midshaft region is implicated in roughly 80% of these cases. The transition from nonoperative dogma to a more aggressive surgical posture was catalyzed by landmark prospective studies demonstrating that displaced midshaft fractures, when left to heal with significant shortening or angulation, result in unacceptably high rates of symptomatic nonunion, malunion, and persistent shoulder dyskinesia.
Intramedullary fixation has emerged as a highly attractive alternative to traditional superior or anteroinferior plate osteosynthesis. By acting as an internal splint, an intramedullary device functions as a load-sharing construct, adhering to the principles of relative stability. This biomechanical environment stimulates secondary bone healing via robust callus formation. Furthermore, the intramedullary approach inherently demands less soft tissue stripping compared to plating, preserving the precarious periosteal blood supply that is critical for osteogenesis. When executed correctly, IM fixation provides a more cosmetically appealing outcome, reduces the incidence of symptomatic hardware prominence, and mitigates the stress-shielding effects that can complicate plate removal.
However, intramedullary fixation is not a panacea and requires meticulous patient selection. The surgeon must navigate a steep learning curve to master the closed or mini-open reduction techniques necessary to pass the device across the fracture site. Comminution, particularly when it compromises the cortical contact required for rotational stability, can challenge the limits of intramedullary devices. Throughout this chapter, we will dissect the nuances of this procedure, providing you with the technical armamentarium required to utilize intramedullary fixation safely and effectively, transforming a potentially debilitating injury into a predictable, successful clinical outcome.
Detailed Surgical Anatomy and Biomechanics
Osteology and Embryological Development
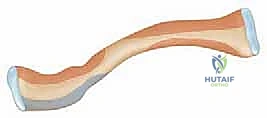
Let us begin by reviewing the clavicle itself, a fascinating and structurally unique component of the human skeleton. It holds the distinction of being the first bone to begin ossification in the embryo (around the fifth week of gestation) and the only long bone to ossify through both intramembranous and endochondral processes. This dual developmental pathway contributes to its dense, highly variable internal architecture. Its unique S-shape is not merely a morphological curiosity but a critical evolutionary adaptation: the medial curve is convex anteriorly, while the lateral curve is concave anteriorly. This double curve acts as an anatomical arch, widening the retroclavicular space to accommodate and protect vital neurovascular structures while simultaneously functioning as a shock-absorbing strut for the upper extremity.
Observe its cross-sectional anatomy, which dictates our surgical approach and implant selection. The clavicle transitions from a flat, broad structure laterally—optimized for ligamentous attachment—to a more tubular, dense form in its diaphysis, and finally to an expanded, prismatic shape at its medial sternal articulation. The midclavicular region is our primary concern in this masterclass. It represents the biomechanical "weak link" of the bone: it is the thinnest, narrowest, and most frequently fractured segment. Unlike the robustly supported proximal and distal ends, which are tethered by the sternoclavicular capsule and the coracoclavicular ligaments respectively, the midshaft lacks direct ligamentous support.
A crucial anatomical point for intramedullary fixation is the clavicle's internal bone architecture. Unlike the femur or tibia, the clavicle lacks a uniform, well-defined medullary canal. Instead, the medullary space is often entirely filled with dense, interdigitating trabecular bone, and in some robust individuals, the cortical walls may nearly converge in the narrowest portion of the isthmus. Consequently, our "reaming" technique during IM fixation is less about expanding a pre-existing hollow tube and more about carefully drilling a novel pathway through dense cancellous and endosteal bone. This requires specialized, flexible instrumentation and a tactile sensitivity to avoid inadvertent cortical perforation.
Muscular and Neurovascular Topography
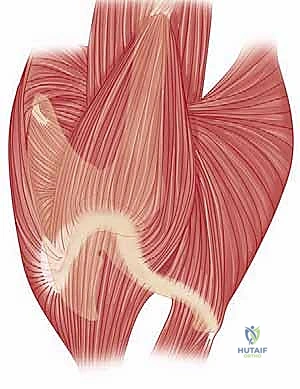
The deforming forces acting upon a midshaft clavicle fracture are predictable and dictated by its muscular attachments. Proximally, the sternocleidomastoid (SCM) exerts a powerful superior and posterior vector, consistently elevating the medial fragment. Distally, the weight of the dependent upper extremity, combined with the pull of the pectoralis major, latissimus dorsi, and deltoid, draws the lateral fragment inferiorly and medially. This opposing muscular action results in the classic clinical presentation of a foreshortened, overriding fracture with a prominent, palpable medial spike. The clavicle acts as a fixed-length strut; when this strut is compromised, the shoulder girdle collapses anteriorly and medially, fundamentally altering the resting tension and functional capacity of the rotator cuff and periscapular musculature.
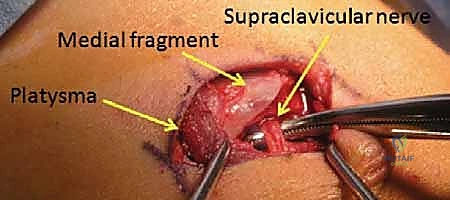
The neurovascular considerations during clavicular surgery are paramount. The bone is subcutaneous throughout its length, covered only by skin and the thin, variable platysma muscle. Deep to the platysma lie the descending branches of the supraclavicular nerves (C3-C4), which provide critical sensory innervation to the anterior chest wall and the skin overlying the deltoid. The intermediate branches are frequently encountered directly over the midclavicle and are highly susceptible to iatrogenic transection during our surgical approach. Meticulous dissection and mobilization of these nerves are essential to prevent painful postoperative neuromas and areas of localized anesthesia, which are common sources of patient dissatisfaction.
Medially and inferiorly, the clavicle serves as the primary bony shield for the thoracic outlet. Directly retroclavicular lie the subclavian artery and vein, the trunks and divisions of the brachial plexus, and the pleural dome. The subclavius muscle, investing the inferior surface of the clavicle, provides a modest but vital buffer between the bone and these catastrophic danger zones. While primary neurovascular injury is relatively rare in isolated midshaft fractures, high-energy trauma, severe displacement, or careless surgical plunging with drills or reamers can easily compromise these structures. A thorough understanding of this three-dimensional topography is the absolute prerequisite for safe intramedullary instrumentation.
Exhaustive Indications and Contraindications
Defining the Operative Threshold
Historically, nonoperative management of midshaft clavicle fractures was the unquestioned gold standard, driven by early epidemiological studies suggesting negligible nonunion rates. However, modern, rigorous prospective randomized trials have entirely dismantled this paradigm. We now recognize that nonoperative management of severely displaced fractures carries a nonunion rate approaching 15-20%, and an even higher rate of symptomatic malunion. Malunion characterized by shortening greater than 15 to 20 mm has been definitively linked to altered scapular kinematics, objective weakness in shoulder abduction and endurance, and significant patient dissatisfaction. Consequently, the indications for operative intervention have expanded significantly.
The decision to proceed with intramedullary fixation hinges on specific fracture morphometrics and patient factors. The ideal candidate for IM nailing presents with an acute, simple, two-part midshaft fracture (OTA/AO type 15-B1 or B2) or a wedge fracture where the butterfly fragment does not preclude establishing cortical contact between the primary medial and distal segments. Intramedullary devices excel in these scenarios by providing excellent bending stiffness while allowing for dynamic axial compression. In young, highly active patients or laborers who require rapid return to function, the minimally invasive nature of IM nailing offers a compelling advantage over the extensive soft tissue dissection required for plate osteosynthesis.
Conversely, we must be acutely aware of the absolute and relative contraindications to intramedullary fixation. Active surgical site infection or systemic bacteremia represents an absolute contraindication to any internal fixation. Relative contraindications specific to IM nailing include severe comminution (OTA/AO type 15-B3) where the loss of a bony cylinder prevents the implant from achieving rotational stability. If the fracture extends too far medially or laterally, there may be insufficient bone stock to accommodate the anchoring mechanism of the intramedullary device. Furthermore, patients with an obliterated medullary canal (measuring less than 2.5 mm on preoperative imaging) may not physically accommodate even the smallest available flexible nails without a high risk of iatrogenic comminution during reaming.
Indications and Contraindications Matrix
| Parameter | Indications for IM Fixation | Contraindications for IM Fixation |
|---|---|---|
| Displacement | Complete displacement (100% cortical offset) | Undisplaced or minimally displaced fractures |
| Shortening | > 15 - 20 mm of axial shortening | < 10 mm of shortening |
| Fracture Pattern | Simple 2-part midshaft, or mild wedge comminution | Severe segmental comminution lacking cortical contact |
| Location | Middle third of the clavicular diaphysis | Proximal 1/5th or Distal 1/5th of the clavicle |
| Soft Tissue | Impending skin necrosis (tenting), open fractures | Active local or systemic infection |
| Associated Injuries | Polytrauma, Floating Shoulder, Neurovascular compromise | Isolated injury in a medically unfit patient |
| Anatomical Limits | Canal diameter > 2.5 mm | Obliterated canal (< 2.5 mm) |
Pre-Operative Planning, Templating, and Patient Positioning
Radiographic Assessment and Templating
Once the decision for operative fixation is solidified, exhaustive preoperative planning is the cornerstone of a flawless execution. Diagnosis and templating rely heavily on high-quality orthogonal imaging. A standard anteroposterior (AP) view is insufficient on its own, as it frequently underestimates the true degree of displacement due to the clavicle's complex curvature. A 45-degree cephalic tilt view (Zanca view) is absolutely mandatory. This projection throws the clavicle clear of the obscuring thoracic ribs and scapular spine, providing a true orthogonal perspective of superior-inferior displacement and allowing for accurate measurement of axial shortening.
Preoperative templating is critical, particularly when utilizing rigid or semi-rigid intramedullary devices. The surgeon must scrutinize the radiographs to estimate the narrowest diameter of the medullary canal, usually located at the junction of the middle and lateral thirds. This measurement dictates the maximum diameter of the reamer and the implant. If the canal appears exceptionally narrow, alternative fixation methods (such as superior plating) must be available in the operating room. While a CT scan with 3D reconstructions offers unparalleled accuracy for assessing complex, multiplanar deformities, it is generally reserved for cases of delayed presentation, suspected nonunion, or when the degree of comminution is difficult to ascertain on plain films.
Optimal Patient Positioning Strategies
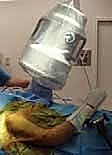
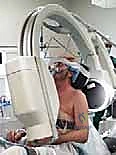
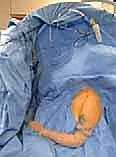
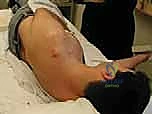
Patient positioning must facilitate not only surgical access but also unhindered, dynamic fluoroscopic imaging. The surgeon has two primary options, each with distinct advantages. The first is the supine position on a completely radiolucent Jackson table. A one-liter intravenous fluid bag is placed vertically between the scapulae, subtly elevating the shoulder girdle. This maneuver utilizes gravity to assist in reducing the posterior displacement of the lateral fragment. The affected arm is prepped free and suspended in an articulated arm holder, allowing the surgeon to manipulate the limb dynamically to aid in closed or mini-open reduction.
In the supine setup, the C-arm is brought in perpendicularly from the contralateral side of the table. This configuration keeps the bulky base of the fluoroscope out of the primary surgical field while allowing the technician to easily arc the machine to obtain the necessary AP and 45-degree cephalic tilt views without physically moving the patient or compromising the sterile field. This setup is highly efficient for bilateral injuries or polytrauma patients who cannot be safely elevated into a seated position.
The second, and often preferred, option is the Beach Chair position. The patient is placed on a specialized radiolucent shoulder table, elevated to approximately 45 to 60 degrees. This position significantly reduces venous engorgement, minimizing intraoperative bleeding, and presents the clavicle in a more anatomical, accessible plane for the surgeon. The arm is again prepped free in a sterile positioner.
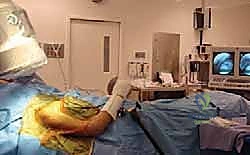
For the Beach Chair setup, the C-arm is brought in from the head of the bed, parallel to the patient's torso. The C-arm gantry is often rotated 180 degrees (upside down) and angled with a cephalic tilt to obtain the optimal trajectory. This requires careful coordination with the anesthesia team to ensure the airway remains accessible and secure during fluoroscopic maneuvering. Regardless of the chosen position, a rigorous "time-out" and a dry run of the fluoroscopic views must be completed before the first incision is made.
Step-by-Step Surgical Approach and Fixation Technique
Incision and Soft Tissue Dissection
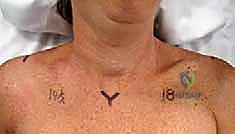
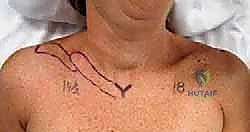
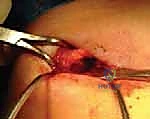
The surgical approach for intramedullary nailing is designed to be a "mini-open" technique, minimizing the biological insult to the fracture hematoma. Following sterile prep and drape, a 2 to 3-centimeter transverse incision is mapped directly over the fracture site, ideally following Langer's lines for optimal cosmesis. In cases of severe displacement, the medial fragment is often palpable just beneath the skin, serving as an excellent landmark. The skin and subcutaneous tissues are incised sharply down to the level of the platysma.
The platysma is then carefully incised in line with the skin incision. At this juncture, surgical loupes are highly recommended. The surgeon must meticulously dissect the subplatysmal plane to identify and mobilize the descending branches of the supraclavicular nerves. These nerves frequently cross directly over the fracture site. Once identified, they should be gently retracted using vessel loops; aggressive traction must be avoided to prevent neuropraxia.
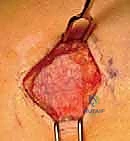
With the nerves protected, the clavipectoral fascia overlying the fracture is incised. We employ a strict "no-touch" technique regarding the periosteum. Unlike plating, where extensive subperiosteal stripping is required for plate footprint seating, IM nailing requires only enough exposure to visualize the fracture ends and facilitate reduction. The fracture hematoma is partially evacuated to allow visualization, but soft tissue attachments to any butterfly fragments are rigorously preserved to maintain their blood supply and osteogenic potential.
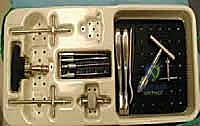
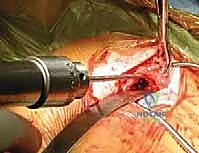
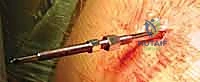
Canal Preparation and Reaming Techniques
With the fracture ends exposed, the next critical phase is the preparation of the intramedullary canal. Depending on the specific implant system utilized (e.g., Titanium Elastic Nails, Sonoma CRx, or Rockwood pins), the entry point and reaming sequence will vary slightly, but the core principles remain identical. The medial and lateral fragments are addressed independently. Using a bone tenaculum or a small pointed reduction forceps, the medial fragment is elevated and stabilized.
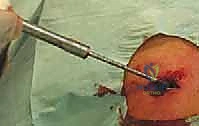
We begin by identifying the dense cancellous center of the medial fragment. A small awl or a specialized starter drill is used to breach the hard endosteal bone. Subsequently, a flexible hand reamer or a slow-speed power drill is advanced into the medial canal. It is imperative to advance the reamer with gentle, oscillating movements rather than forceful plunging. The dense trabecular bone of the clavicle can easily deflect a drill bit, leading to an inadvertent cortical blowout, usually anteriorly or inferiorly, which can compromise the entire fixation construct and endanger the subclavian vessels.
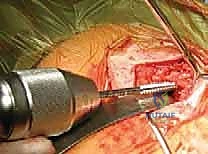

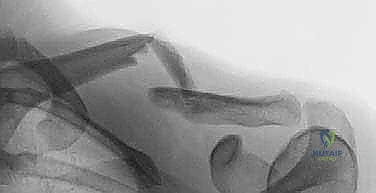
The process is then repeated for the lateral fragment. The lateral canal is typically wider and flatter, but curves posteriorly. The reamer must follow this anatomical bow. Fluoroscopy is utilized liberally during this step to confirm that the reamer remains concentric within the medullary space. We typically ream line-to-line or 0.5 mm larger than our intended implant diameter to ensure smooth passage without creating excessive hoop stresses that could propagate a longitudinal fracture.

Implant Insertion and Fracture Reduction
Once both canals are adequately prepared, the intramedullary device is introduced. For a lateral-to-medial insertion technique (common with flexible nails), the implant is driven retrograde from the fracture site out through the posterolateral cortex of the distal clavicle, emerging posterior to the acromioclavicular joint. The nail is advanced until its trailing end is flush with the fracture site.
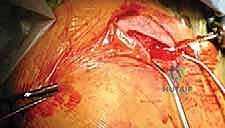
The most technically demanding portion of the procedure is the reduction and passage of the implant across the fracture gap. The arm is manipulated—typically bringing the shoulder superiorly and posteriorly—while reduction forceps are used to perfectly align the medial and lateral cortices. Once anatomical reduction is achieved and confirmed visually and fluoroscopically, the implant is driven antegrade from the lateral fragment into the prepared medial canal.
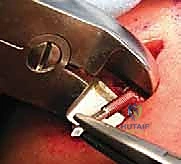
If a locking IM device is utilized, the locking mechanisms are now deployed. Some modern devices feature expanding medial talons or lateral locking screws to prevent the dreaded complication of hardware migration and to provide superior rotational stability. The fracture is manually compressed along the axis of the nail before final locking to ensure there is no residual distraction, which is a primary catalyst for delayed union.
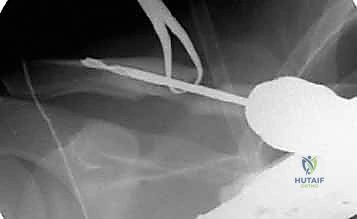
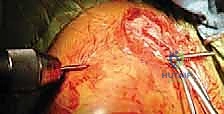
Final Fluoroscopic Evaluation and Closure
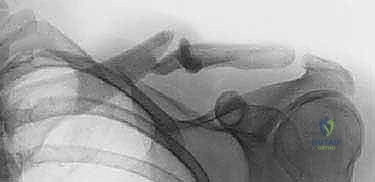
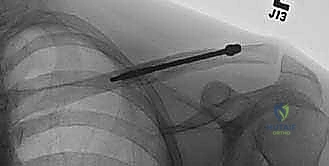
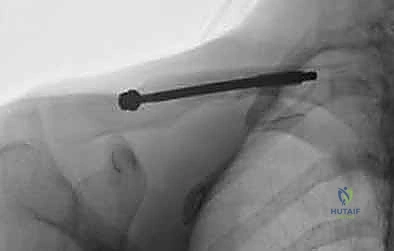
Following secure fixation, a comprehensive fluoroscopic survey is mandatory. We obtain true AP and 45-degree cephalic tilt views to confirm absolute cortical apposition, appropriate implant length, and the absence of any iatrogenic fractures. The implant should ideally span from the dense bone of the lateral metaphysis to the medial metaphysis without breaching the anterior cortex or entering the sternoclavicular joint.
Once satisfied, the wound is thoroughly irrigated with sterile saline. The clavipectoral fascia is loosely approximated if possible, followed by a meticulous closure of the platysma layer using absorbable sutures. This platysmal closure is critical for minimizing tension on the skin and preventing a widened, hypertrophic scar. The skin is closed with a running subcuticular suture, and a sterile, waterproof dressing is applied. The patient is placed in a simple arm sling before extubation.
Complications, Incidence Rates, and Salvage Management
Navigating Intraoperative and Postoperative Pitfalls
While intramedullary fixation offers excellent clinical outcomes, it is not immune to complications. The surgeon must be hyper-vigilant to recognize and manage these events promptly. Intraoperative complications primarily revolve around the challenges of canal preparation. Iatrogenic cortical perforation during reaming is a significant risk, particularly in patients with excessive clavicular bowing or an exceptionally narrow isthmus. If a minor blowout occurs, the surgeon may often bypass it with the implant; however, massive structural failure necessitates immediate conversion to open plate osteosynthesis.
Postoperatively, hardware migration was historically the Achilles heel of intramedullary clavicle fixation, particularly with unthreaded Steinmann pins. Modern flexible titanium nails and dedicated locking devices have drastically reduced, but not eliminated, this risk. Lateral migration can lead to painful skin tenting, acromioclavicular joint irritation, or frank skin breakdown. Medial migration is a catastrophic emergency, as the implant can traverse the sternoclavicular joint and enter the mediastinum, threatening the great vessels and the heart. Any evidence of medial migration on follow-up radiographs demands immediate operative retrieval.
Nonunion and malunion rates following IM nailing are generally low (less than 5%), comparable to or slightly better than plate fixation, largely due to the preservation of the fracture hematoma. However, delayed union can occur, particularly if the fracture was left distracted during the final locking sequence. Superficial infection is rare and usually responds to oral antibiotics, but deep infection requires hardware removal, aggressive debridement, and culture-directed intravenous antibiotic therapy, followed by revision fixation once the infection is eradicated.
Complications and Salvage Matrix
| Complication | Estimated Incidence | Etiology / Risk Factors | Salvage / Management Strategy |
|---|---|---|---|
| Hardware Migration (Lateral) | 5% - 10% | Failure to lock implant, excessive shoulder motion early | Minor: Observation. Major: Trim protruding end or early removal if healed. |
| Hardware Migration (Medial) | < 1% | Smooth pin use, lack of medial purchase | Surgical Emergency. Immediate operative retrieval via SC joint approach. |
| Nonunion | 2% - 5% | Distraction at fracture site, severe comminution | Exchange nailing, or conversion to compression plating with autologous bone graft. |
| Cortical Perforation | 3% - 7% | Aggressive reaming, mismatched implant curvature |
