Calcaneal Malunion Correction: Extensile Lateral Approach
Key Takeaway
The extensile lateral approach for calcaneal malunion correction provides optimal exposure for lateral wall exostectomy, subtalar arthrodesis, and hindfoot realignment. This comprehensive surgical technique addresses subfibular impingement and post-traumatic arthritis. Key steps include meticulous subperiosteal flap elevation, sural nerve protection, en bloc resection of the lateral wall exostosis for autografting, and rigid internal fixation to restore hindfoot biomechanics and alleviate chronic pain.
INTRODUCTION AND PATHOANATOMY
The management of calcaneal malunions presents one of the most formidable challenges in reconstructive foot and ankle surgery. Following nonoperative management or failed surgical fixation of displaced intra-articular calcaneal fractures, patients frequently develop a predictable and debilitating cascade of pathoanatomic changes. The classic calcaneal malunion is characterized by loss of calcaneal height, increased heel width, varus malalignment of the tuberosity, and severe post-traumatic subtalar arthritis.
Biomechanically, the loss of calcaneal height decreases the talocalcaneal angle, leading to a horizontal talus and anterior ankle impingement. The lateral blow-out of the calcaneal wall results in severe subfibular impingement, where the extruded lateral wall abuts the distal fibula, compressing the peroneal tendons and the sural nerve. This fibulocalcaneal abutment is a primary driver of chronic lateral hindfoot pain.
The extensile lateral approach remains the gold standard for addressing these complex deformities. It provides unparalleled access to the lateral wall for exostectomy, the subtalar joint for arthrodesis, and the calcaneal body for corrective osteotomies. This masterclass details the step-by-step surgical execution of calcaneal malunion correction via the extensile lateral approach, adhering to the principles popularized by Clare, Lee, and Sanders.
CLASSIFICATION OF CALCANEAL MALUNIONS
Surgical decision-making is heavily guided by the Stephens and Sanders classification of calcaneal malunions, which categorizes the deformity based on the presence of subtalar arthritis and hindfoot malalignment:
- Type I: Lateral wall exostosis with subfibular impingement, but with a preserved, congruent, and asymptomatic subtalar joint.
- Type II: Lateral wall exostosis combined with post-traumatic subtalar arthritis, requiring subtalar arthrodesis.
- Type III: Lateral wall exostosis, subtalar arthritis, and severe varus malalignment of the calcaneal tuberosity, requiring exostectomy, arthrodesis, and a corrective calcaneal osteotomy.
Clinical Pearl: In all three types of calcaneal malunions, the lateral wall exostosis must be resected to decompress the subfibular space. The excised bone should be meticulously preserved, as it serves as an excellent autologous bone block for structural grafting in Type II and Type III reconstructions.
PREOPERATIVE PLANNING AND IMAGING
Comprehensive preoperative imaging is mandatory. Standard weight-bearing radiographs must include anteroposterior (AP), lateral, and Harris axial views of the heel. The lateral view assesses the loss of Böhler’s angle, the presence of anterior ankle impingement, and subtalar joint congruency. The Harris axial view is critical for evaluating heel width, varus/valgus alignment of the tuberosity, and the degree of subfibular impingement.
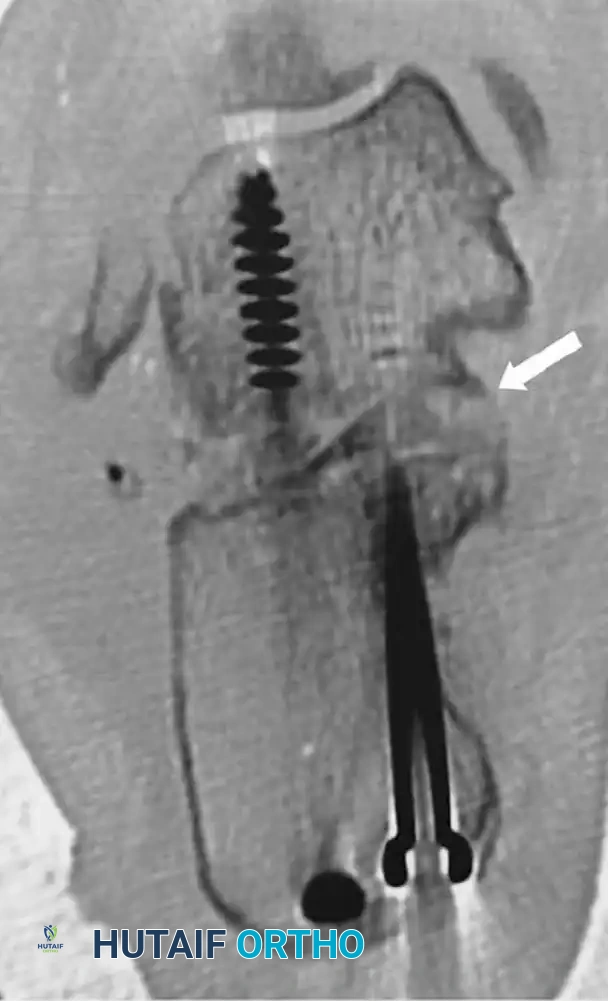
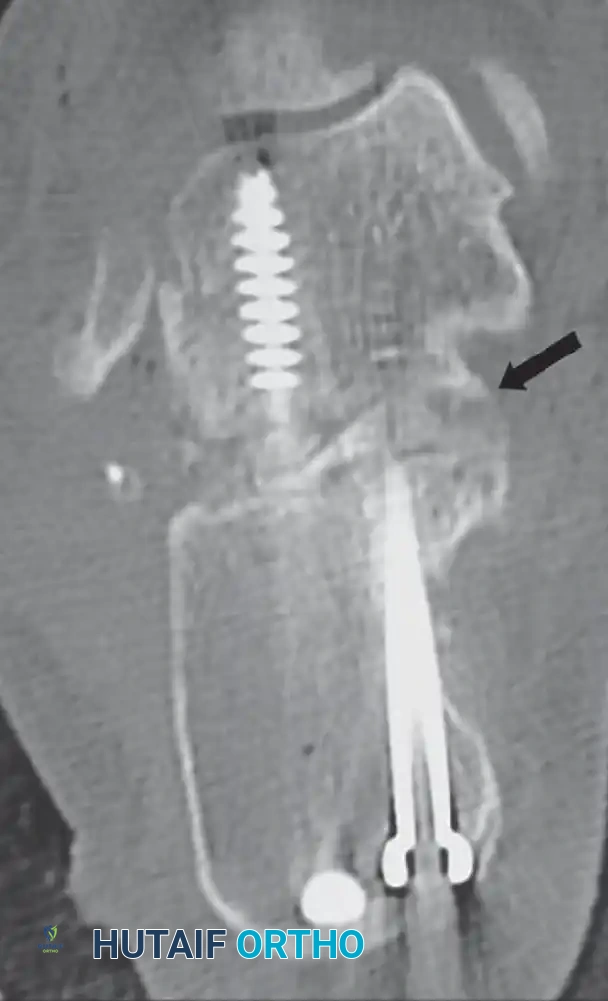
A fine-cut computed tomography (CT) scan with sagittal and coronal reconstructions is the definitive imaging modality. Coronal cuts precisely quantify the lateral wall blowout and the status of the posterior facet of the subtalar joint. Sagittal cuts evaluate the calcaneocuboid joint, which may also be arthritic and require concurrent management.
PATIENT POSITIONING AND PREPARATION
Optimal positioning is critical for adequate exposure and ease of fluoroscopic imaging.
- Positioning: Place the patient in the lateral decubitus position on a radiolucent operating table. Utilize a vacuum beanbag to secure the torso.
- Extremity Placement: The normal (contralateral) leg should be positioned down and flexed out of the way, anterior to the injured extremity. Ensure all bony prominences (e.g., fibular head, greater trochanter) are heavily padded to prevent perioperative neuropraxia.
- Tourniquet Application: Place a well-padded pneumatic tourniquet on the proximal thigh.
- Preparation: Prepare and drape the leg in a standard sterile fashion, ensuring the drape allows for visualization from the proximal third of the tibia down to the toes.
- Exsanguination: Exsanguinate the extremity using an Esmarch bandage. Inflate the thigh tourniquet to 350 mm Hg.
Surgical Warning: Prolonged tourniquet times in the setting of compromised soft tissues can exacerbate postoperative wound healing issues. Plan the surgical steps meticulously to minimize ischemic time, ideally keeping tourniquet inflation under 120 minutes.
SURGICAL TECHNIQUE: THE EXTENSILE LATERAL APPROACH
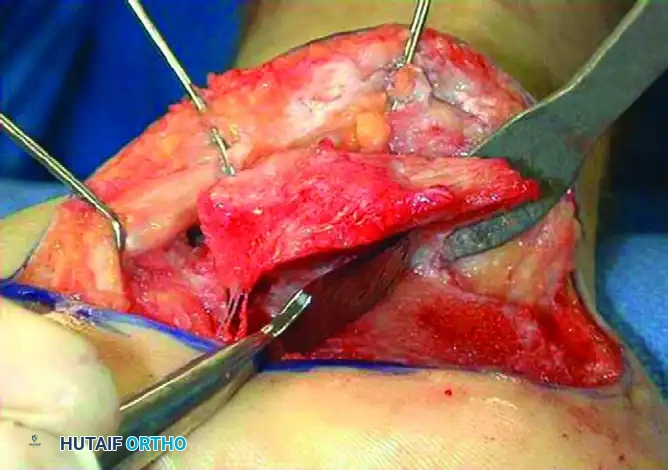
Incision and Flap Elevation
The extensile lateral approach is designed to create a robust, full-thickness fasciocutaneous flap that preserves the delicate vascular supply to the lateral hindfoot, primarily derived from the lateral calcaneal artery.
- Incision Design: Make a lateral extensile L-shaped incision over the calcaneus.
- The vertical limb should be placed just anterior to the lateral border of the Achilles tendon and posterior to the anticipated course of the sural nerve. This posterior placement allows the sural nerve to be safely elevated within the full-thickness flap.
- The horizontal limb extends distally, in line with the base of the fifth metatarsal, remaining strictly at the junction of the glabrous (plantar) and non-glabrous (lateral) skin.
- Flap Elevation: Deepen the incision directly to the periosteum of the calcaneus without creating any subcutaneous planes. Raise a full-thickness subperiosteal flap off the lateral wall of the calcaneus.
- Nerve Protection: Avoid violation of the sural nerve at the terminal portion of the horizontal limb of the incision. The nerve frequently crosses the surgical field distally near the calcaneocuboid joint.
Flap Retraction
To maintain exposure without causing crush injury to the flap edges, self-retaining retractors should be avoided. Instead, utilize the "no-touch" K-wire retraction technique.
- Place three 1.6-mm (0.062-inch) Kirschner wires to retract the subperiosteal flap and the peroneal tendons superiorly.
- Wire 1: Drive the first wire into the distal fibula.
- Wire 2: Drive the second wire into the talar neck.
- Wire 3: Drive the third wire into the cuboid.
- Bend the wires carefully to hold the flap out of the surgical field, providing panoramic access to the lateral calcaneal wall, subtalar joint, and calcaneocuboid joint.
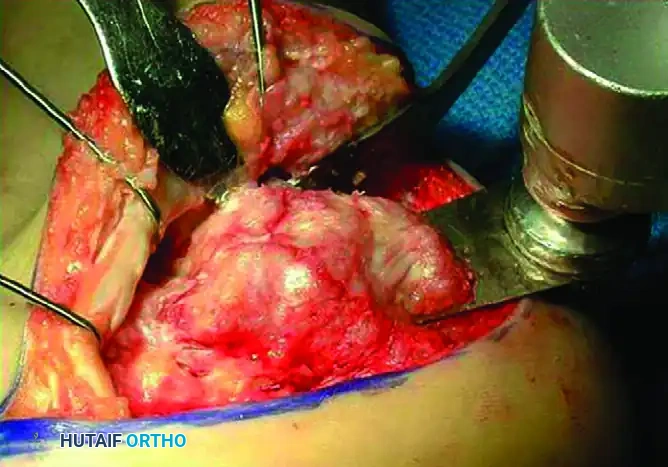
Lateral Wall Exostectomy (Decompression)
In all types of calcaneal malunions, the lateral wall exostosis must be resected to relieve subfibular impingement and decompress the peroneal tendons.
- Soft Tissue Clearance: Carefully free the lateral wall of the calcaneus of all adjacent soft tissue, dissecting as far distally as the calcaneocuboid articulation.
- Retractor Placement: Place a Hohmann retractor on the plantar aspect of the calcaneus to protect the plantar neurovascular bundle. Place a second Hohmann retractor over the anterior process of the calcaneus.
- Osteotomy Execution: Perform the exostectomy using a thin-bladed AO osteotomy saw (e.g., Synthes USA, Paoli, PA).
- Start posteriorly and advance distally.
- Angle the saw blade slightly medially relative to the longitudinal axis of the calcaneus. This trajectory leaves more residual bone plantarly while aggressively decompressing the area of impingement in the superior subfibular region.
- Critical Step: Do not violate the talofibular joint during the superior aspect of the saw cut.
Management of the Calcaneocuboid Joint
The distal extension of the malunion frequently involves the calcaneocuboid joint, which must be addressed to restore lateral column biomechanics.
- Continue the exostectomy distally to the level of the calcaneocuboid joint. The residual overhang of the lateral wall in this region often results in a mechanical osseous block to the motion of the calcaneocuboid joint.
- Remove the overhang and the lateral one-fourth of the distal aspect of the calcaneus. The articulation of this lateral portion with the cuboid is almost always severely arthritic and non-functional following a displaced fracture.
En Bloc Removal and Graft Preservation
- Complete the exostectomy distally using a sharp osteotome rather than the saw. This prevents inadvertent saw blade damage to the articular surface of the cuboid.
- Remove the lateral wall fragment en bloc.
Clinical Pearl: The excised lateral wall fragment should be maintained as a single, intact piece whenever possible. In Type II and Type III malunions, this dense, cortical-cancellous fragment serves as an ideal autograft bone block to restore calcaneal height and correct varus deformity during the subtalar arthrodesis.

SUBTALAR ARTHRODESIS AND DEFORMITY CORRECTION (TYPES II & III)
In Type II and Type III calcaneal malunions, the subtalar joint is irreversibly damaged by post-traumatic arthritis and requires arthrodesis.
Joint Preparation
- Direct attention to the posterior facet of the subtalar joint.
- Insert a lamina spreader into the posterior facet to distract the joint and improve visualization.
- Meticulously debride the remaining articular cartilage and subchondral bone from both the talar and calcaneal sides of the joint using a sharp periosteal elevator, curettes, and an osteotome. Penetrate the subchondral bone with a high-speed burr or drill to expose bleeding cancellous bone, optimizing the biological environment for fusion.
Correction of Varus Malalignment (Type III Malunions)
Type III malunions present with severe varus malalignment of the hindfoot, which must be corrected to prevent lateral column overload and recurrent ankle instability. This is typically addressed via a Dwyer-type closing wedge osteotomy or an opening wedge osteotomy utilizing the harvested bone block.
- Osteotomy: If a closing wedge is required to correct severe varus, perform a laterally based wedge osteotomy of the calcaneal tuberosity (Dwyer osteotomy).
- Graft Insertion: Alternatively, to restore calcaneal height and correct varus simultaneously, insert the previously harvested lateral wall bone block into the distracted subtalar joint or into an opening wedge osteotomy site. The graft acts as a structural strut, lateralizing the tuberosity and restoring the talocalcaneal angle.
Internal Fixation
- Once the deformity is corrected and the graft is positioned, provisionally fix the subtalar joint with large-fragment K-wires or guide pins.
- Verify the correction of the varus deformity, the restoration of calcaneal height, and the decompression of the subfibular space using intraoperative fluoroscopy (AP, lateral, and Harris axial views).
- Definitively fix the subtalar arthrodesis using two or three large-diameter (6.5 mm or 7.3 mm) cannulated, partially threaded cancellous screws. Insert the screws from the calcaneal tuberosity, directing them anteriorly and superiorly into the body and neck of the talus to achieve maximal compression across the arthrodesis site.
CLOSURE AND POSTOPERATIVE PROTOCOL
Wound Closure
The closure of the extensile lateral approach is as critical as the exposure. Wound dehiscence and infection are the most devastating complications of this procedure.
- Thoroughly irrigate the surgical site with sterile saline.
- Place a closed-suction drain deep to the flap to prevent postoperative hematoma formation, which can compromise flap perfusion.
- Release the tourniquet and achieve meticulous hemostasis prior to closure.
- Close the flap in a layered fashion. Use deep absorbable sutures (e.g., 2-0 Vicryl) for the subcutaneous tissues.
- Close the skin using the modified Allgöwer-Donati technique with non-absorbable monofilament sutures (e.g., 3-0 Nylon). This suturing technique minimizes strangulation of the dermal capillary plexus on the flap edge.
Postoperative Rehabilitation
- Immediate Post-op: Apply a bulky, well-padded posterior splint with the ankle in neutral position. Elevate the extremity strictly for the first 48 to 72 hours to minimize edema.
- 2 Weeks: Remove the splint and sutures. Assess wound healing. If the wound is completely healed, transition the patient to a short-leg cast or a rigid fracture boot.
- Weight-Bearing Status: The patient must remain strictly non-weight-bearing (NWB) for a minimum of 8 to 10 weeks to allow for incorporation of the bone graft and consolidation of the subtalar arthrodesis.
- 8 to 12 Weeks: Obtain follow-up radiographs. If clinical and radiographic evidence of fusion is present, initiate progressive weight-bearing in a CAM boot, advancing to full weight-bearing in standard footwear with supportive orthotics by 12 to 14 weeks.
- Physical Therapy: Initiate physical therapy focusing on ankle and midfoot range of motion, peroneal tendon strengthening, and proprioceptive retraining once weight-bearing is permitted.
COMPLICATIONS AND PITFALLS
- Wound Necrosis/Dehiscence: The most common complication. Mitigate this risk by adhering to the "no-touch" retraction technique, avoiding sharp angles in the incision, and utilizing the Allgöwer-Donati closure.
- Sural Neuritis: Can occur from direct intraoperative injury or postoperative scar tethering. Ensure the vertical limb of the incision is placed posterior to the nerve's course.
- Nonunion of Arthrodesis: Risk factors include smoking, diabetes, and inadequate joint preparation. Meticulous debridement to bleeding subchondral bone and rigid compression are mandatory.
- Inadequate Decompression: Failure to resect the lateral wall sufficiently, particularly at the calcaneocuboid junction, will result in persistent subfibular impingement and lateral foot pain. Always verify decompression fluoroscopically and directly palpate the subfibular space prior to closure.
You Might Also Like
