Elbow Arthroscopy & Arthroscopic Knot Tying: A Surgical Guide
Key Takeaway
Elbow arthroscopy is a highly sophisticated surgical technique requiring meticulous portal placement and a profound understanding of periarticular neurovascular anatomy. This guide details evidence-based indications, patient positioning strategies—including supine, prone, and lateral decubitus—and advanced arthroscopic knot-tying techniques such as the Duncan loop, SMC, and Roeder knots. Mastery of these principles ensures optimal visualization, minimizes neurovascular complications, and provides robust tissue fixation in complex elbow pathologies.
ELBOW ARTHROSCOPY: PRINCIPLES AND PRACTICE
Arthroscopic evaluation and treatment of the elbow has advanced significantly in both popularity and surgical sophistication. Historically viewed as a joint with limited arthroscopic potential due to its tight capsular volume and the intimate proximity of major neurovascular structures, the elbow is now routinely managed via minimally invasive techniques. New portals, advanced fluid management systems, and highly refined surgical techniques have been described, yielding a profound understanding of intraarticular pathological findings.
For the practicing orthopedic surgeon, mastery of elbow arthroscopy requires a rigorous understanding of three-dimensional anatomy, precise portal placement, and advanced arthroscopic tissue manipulation, including secure knot-tying techniques.
INDICATIONS FOR ELBOW ARTHROSCOPY
Elbow arthroscopy has proven to be highly efficacious across a broad spectrum of traumatic, degenerative, and inflammatory conditions. Current evidence-based indications include:
- Evaluation and Removal of Loose Bodies: The most common indication. The arthroscope allows for dynamic visualization of the anterior and posterior compartments, ensuring complete extraction of chondral or osteochondral fragments.
- Osteochondritis Dissecans (OCD) of the Capitellum: Arthroscopy facilitates staging, loose body removal, and marrow stimulation techniques (e.g., microfracture) for unstable lesions, particularly in adolescent throwing athletes.
- Chondral or Osteochondral Lesions of the Radial Head: Allows for precise debridement, chondroplasty, or fragment excision.
- Excision of Osteophytes: Highly effective for valgus extension overload syndrome in overhead athletes, allowing for resection of posteromedial olecranon osteophytes and coronoid impingement lesions.
- Partial Synovectomy: Indicated for inflammatory arthropathies, particularly rheumatoid arthritis, to delay joint destruction and alleviate pain.
- Arthroscopic Capsular Release (Arthrofibrosis): Débridement and lysis of adhesions in posttraumatic or degenerative stiffness. This requires meticulous technique to avoid neurovascular injury during anterior capsulectomy.
- Tennis Elbow Release: Arthroscopic resection of the extensor carpi radialis brevis (ECRB) origin for recalcitrant lateral epicondylitis.
- Diagnostic Evaluation: Utilized for the painful elbow when advanced imaging (MRI/CT) and other diagnostic tests remain inconclusive.
- Advanced Procedures: Débridement of inflamed olecranon bursae, arthroscopic stabilization procedures (e.g., lateral ulnar collateral ligament plication), and the assisted reduction and internal fixation of specific intraarticular fractures (e.g., radial head or capitellar fractures).
CONTRAINDICATIONS
While the scope of elbow arthroscopy continues to expand, strict adherence to contraindications is paramount to prevent catastrophic complications.
- Absolute Contraindications:
- Active periarticular or intraarticular infection (unless the procedure is specifically for irrigation and debridement of a septic joint).
- Severe bony ankylosis that physically prevents the safe introduction of the arthroscope and instruments.
- Relative Contraindications:
- Severe fibrous ankylosis, which obliterates the normal capsular distension required for safe portal placement.
- Previous surgery that alters normal elbow anatomy. A classic example is a prior anterior transposition of the ulnar nerve. This completely alters the medial anatomical landmarks, eliminating the safe use of standard medial portals and significantly increasing the risk of iatrogenic nerve transection.
Surgical Warning: Always document a thorough preoperative neurovascular examination. If a patient has a history of medial elbow surgery, the ulnar nerve must be assumed to be in an anomalous position until proven otherwise.
PREOPERATIVE SETUP AND ANESTHESIA
Elbow arthroscopy can be performed with the patient in the supine, prone, or lateral decubitus position on a standard operating room table.
Anesthesia Selection
General anesthesia is most commonly utilized because it affords complete muscle relaxation, eliminates intraoperative patient discomfort, and allows for immediate postoperative neurological assessment.
While local or regional anesthesia (e.g., interscalene, axillary, or Bier block) can be used, they carry distinct disadvantages:
* Neurological Assessment: Interscalene and axillary blocks preclude an accurate neurovascular examination immediately after surgery, which is critical for ruling out iatrogenic nerve injury or compartment syndrome.
* Tourniquet Tolerance: Some patients experience severe tourniquet pain with an axillary block.
* Operative Field Compromise: With a Bier block, the required double tourniquet system can crowd the proximal arm and compromise the operative field.
Tourniquet and Fluid Management
A sterile tourniquet is used to control bleeding and is placed as high as possible on the arm to avoid crowding the operative field.
Equipment:
* Standard 4.0-mm, 30-degree arthroscopes are used for the majority of the procedure.
* A 2.7-mm, 70-degree wide-angle arthroscope is invaluable for visualizing tight recesses, such as the radiocapitellar joint or the deep anterior compartment.
* Cannulas: Maintaining established portals with interchangeable cannulas or cannulas with rubber diaphragms is essential. This reduces the risk of damaging adjacent neurovascular structures with repeated instrument passage and minimizes fluid extravasation.
Clinical Pearl - Fluid Extravasation: The elbow capsule has a maximum volume of only 25 to 30 mL. Inflow may be managed by gravity or an arthroscopic pump set to low pressure (40 to 50 mm Hg). Throughout the procedure, carefully monitor the tension of the soft tissues, especially in the antecubital fossa. Excessive fluid extravasation risks neurovascular compression and compartment syndrome. If extravasation becomes excessive, the procedure must be aborted immediately.
PATIENT POSITIONING AND SURGICAL APPROACHES
The choice of patient positioning depends on the surgeon's training, the specific pathology being addressed, and the need for airway access.
1. Supine Position
With the patient supine, the hand and forearm are placed in a sterile, waterproof stockinette suspension device connected to a rope and pulley system. Approximately 5 to 6 lbs of weight is applied for balanced suspension.
- Positioning Details: The patient is positioned so that the arm hangs free off the side of the table. The shoulder is placed in neutral rotation and 90 degrees of abduction. The elbow is flexed at 90 degrees.
- Biomechanical Advantage: This position provides excellent access to both the medial and lateral sides of the elbow. Crucially, 90 degrees of flexion relaxes the neurovascular structures in the antecubital fossa, allowing the anterior capsule to distend safely away from the median and radial nerves.
- Surgeon Ergonomics: The surgeon sits on a rolling stool with the elbow at chest level, allowing fluid movement to either side of the joint. The monitor is placed on the opposite side of the patient.
2. Prone Position
Introduced by Poehling et al. in 1989, the prone position is highly favored for its superior access to the posterior compartment.
- Positioning Details: The patient is placed prone on chest rolls. An arm board is placed parallel to the operating table at the level of the arm. The shoulder and proximal arm are elevated on a sandbag placed on the arm board. No traction is used. The arm is positioned with the shoulder in neutral rotation and 90 degrees of abduction, and the elbow is flexed 90 degrees with the hand pointing toward the floor.
- Advantages: It improves arthroscopic mobility, makes joint manipulation easier, and provides exceptionally complete viewing of the intraarticular structures, particularly the olecranon fossa and posteromedial gutter.
- Surgeon Ergonomics: The surgeon stands with the operating table at chest level to prevent contamination of the dependent hand.
3. Lateral Decubitus Position
Developed as a modification of the prone position, the lateral decubitus setup offers a balance between posterior access and anesthetic safety.
- Positioning Details: The patient is stabilized in the lateral decubitus position using a beanbag and kidney rest. The arm is placed over a bolster attached to the bed. The bolster must be small enough to remain out of the operative site, allowing the elbow to hang freely at 90 degrees of flexion.
- Advantages: Maintains mobility of the patient for airway management during the procedure while providing unobstructed access to both anterior and posterior portals. While some authors advocate for traction, manual distraction is often sufficient to improve joint visualization.
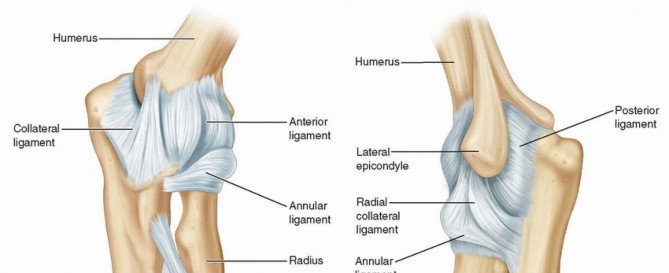
Portal Anatomy and Placement
After exsanguination and tourniquet inflation, bony landmarks must be meticulously outlined with a marking pen:
* Lateral: Lateral epicondyle and radial head.
* Medial: Medial epicondyle and ulnar nerve.
* Posterior: Olecranon tip.
The most commonly utilized portals include:
1. Anterolateral Portal: Established first for joint distension. Located 3 cm distal and 1 cm anterior to the lateral epicondyle. At risk: Radial nerve.
2. Anteromedial Portal: Created under direct intraarticular visualization. Located 2 cm distal and 2 cm anterior to the medial epicondyle. At risk: Medial antebrachial cutaneous nerve (MACN) and median nerve.
3. Posterolateral Portal: Located 3 cm proximal to the olecranon tip, just lateral to the triceps margin. At risk: Posterior antebrachial cutaneous nerve.
4. Straight Posterior Portal: Located 3 cm proximal to the olecranon tip, directly through the triceps tendon.
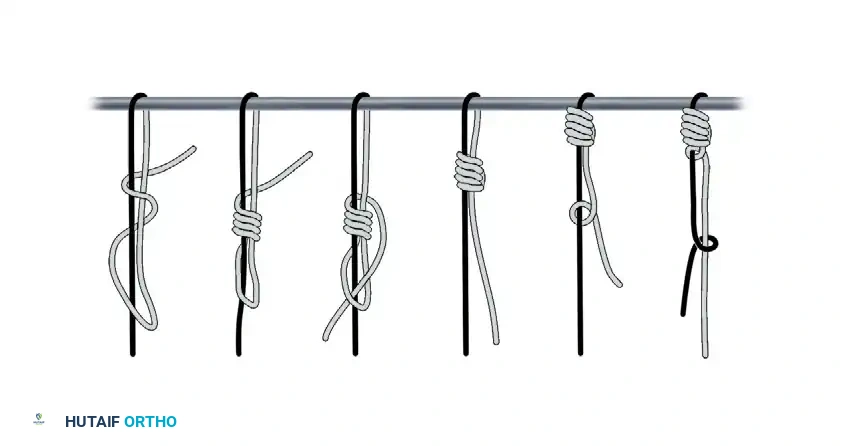
ADVANCED ARTHROSCOPIC KNOT TYING
As elbow arthroscopy evolves to include stabilization procedures (e.g., capsular plication, ligamentous repair), mastery of arthroscopic knot tying is mandatory. Arthroscopic knots must provide high initial loop security, resist slippage under cyclic loading, and maintain a low profile to prevent chondral abrasion.
The Duncan Loop
The Duncan loop is a highly reliable sliding knot used to secure tissue to bone anchors. Before tying, verify that the suture is free to slide through the anchor eyelet and that there is no soft tissue entanglement.
Surgical Technique:
1. Begin with two uneven parallel sutures. The "post" strand should be one-half as long as the "loop" strand as it protrudes from the operative cannula.
2. Grasp the sutures between the thumb and index finger, creating a small loop by passing the loop strand over the post.
3. Follow this by a succession of four loops wrapped around both the post and the loop strands.
4. Pass the tail of the loop strand through the original loop created, and pull on the loop limb to tighten the knot configuration.
5. Once tightened, gently advance the knot down the cannula by pulling on the post strand. Maintain strict tension on the post during the locking sequence.
Figure: Duncan loop sliding knot sequence. A-D demonstrate the creation of the loops and passage of the tail. E-F demonstrate the application of locking half-hitches.
The SMC Knot
The SMC (Seoul Medical Center) knot is an advanced slipknot featuring a self-locking mechanism, providing superior resistance to cyclic displacement.
Surgical Technique:
1. Create an underhand throw with the loop strand passing under both the loop and post strands.
2. Make a second underhand throw with the loop strand passing under the post strand.
3. Make a final underhand throw with the loop strand under the post strand, positioned behind the second throw.
4. Dress the knot and advance it down the post strand.
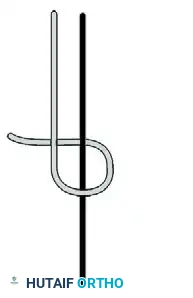
Figure: SMC knot configuration. (A) First underhand throw. (B) Second underhand throw. (C) Final underhand throw behind the second.
The Roeder Knot
The Roeder knot is another classic sliding knot utilized in arthroscopic surgery, characterized by its distinct locking loop that prevents premature deployment during advancement.
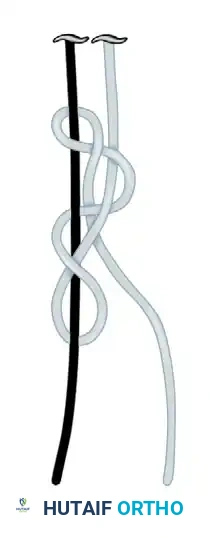
Figure: Roeder knot configuration, demonstrating the internal locking loop.
Securing the Knot: Half-Hitches and Locking Sequences
A sliding knot alone is insufficient for definitive tissue fixation. It must be backed up by a meticulously applied series of half-hitches.
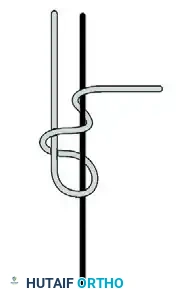
Figure: Application of alternating half-hitches.
Rules for Secure Knot Tying:
To prevent catastrophic knot slippage, the surgeon must adhere to the following biomechanical principles:
1. Reverse the Direction: Always reverse the half-hitch direction (over, then under the post) for every throw after securing the first half-hitch following a slipknot.
2. Alternate the Posts: Change the post strand and place the opposite throw (overhand/underhand) over the new post. Tension and advance into position.
3. Minimum Throws: Use at least three to four half-hitches on alternating posts on top of the sliding knot.
4. Reverse Loops: Reverse loops to secure slipknots effectively.
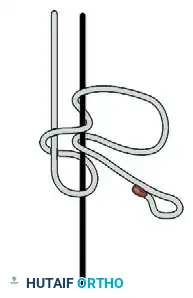
Figure: Final locking sequence demonstrating alternating posts and reversed half-hitch directions.
Surgical Warning: The knot passer must pass smoothly. The suture must slide freely through the anchor eyelet to allow for an initial slipknot. Surgeons are strongly recommended to practice and examine pusher-tied knots on a dry model for consistency before attempting them clinically in the tight confines of the elbow joint.
POSTOPERATIVE PROTOCOL
Postoperative management is dictated by the specific pathology addressed.
* Debridement/Loose Body Removal: Patients are placed in a soft bulky dressing. Immediate active and active-assisted range of motion (ROM) is encouraged to prevent capsular adhesions.
* Capsular Release: Continuous passive motion (CPM) machines or dynamic splinting may be initiated in the recovery room. Indomethacin or other NSAIDs are routinely prescribed to prevent heterotopic ossification.
* Tissue Repair/Ligament Plication: The elbow is immobilized in a posterior splint at 90 degrees of flexion for 1 to 2 weeks to protect the arthroscopic knots and tissue repair, followed by a phased, supervised rehabilitation program focusing on progressive ROM and eventual strengthening.
Meticulous attention to portal site healing and early edema control is critical to achieving optimal functional outcomes following elbow arthroscopy.
You Might Also Like