MPFL Repair & Reconstruction: A Masterclass in Patellar Instability Surgery
Key Takeaway
This masterclass guides fellows through medial patellofemoral ligament (MPFL) repair and reconstruction for patellar instability. We'll cover comprehensive surgical anatomy, meticulous preoperative planning, and granular intraoperative execution from a surgeon's perspective. Expect detailed steps on incision, dissection, hardware application, and critical decision-making. We'll also delve into pearls, pitfalls, and holistic postoperative rehabilitation strategies for optimal patient outcomes.
Comprehensive Introduction and Patho-Epidemiology
Patellar instability represents a formidable challenge in orthopedic surgery, demanding a profound understanding of complex biomechanics, dynamic joint tracking, and precise surgical execution. Far from a simple "kneecap dislocation," this pathology involves a catastrophic failure of the medial capsuloligamentous constraints, most notably the Medial Patellofemoral Ligament (MPFL). As orthopedic surgeons, our mandate is to restore the delicate equilibrium of the extensor mechanism, preventing the devastating long-term sequelae of recurrent instability, which inevitably leads to progressive patellofemoral arthrosis and severe functional debilitation.
The epidemiology of patellar dislocation reveals a distinct predilection for the young, active population, with an incidence rate ranging from 5.8 to 29 per 100,000 in the general population, surging significantly higher in adolescent athletes. The classic mechanism of traumatic dislocation involves a non-contact pivoting injury—specifically, internal rotation of the femur on a fixed, externally rotated tibia, coupled with valgus stress and early knee flexion. This vector intimately mirrors the mechanism of anterior cruciate ligament (ACL) rupture, making meticulous clinical differentiation paramount. Alternatively, a direct, high-energy blow to the medial aspect of the patella can force it laterally out of the trochlear groove, though this is less frequent.
The natural history of a primary, first-time patellar dislocation is a subject of intense academic debate. Historically treated with cast immobilization or bracing, contemporary longitudinal studies reveal that non-operative management yields a recurrence rate approaching 40% to 50%, particularly in patients with underlying pathoanatomic risk factors such as trochlear dysplasia or patella alta. Furthermore, even in the absence of recurrent macroscopic dislocation, many patients suffer from chronic subluxation, apprehension, and debilitating anterior knee pain. This high rate of failure has prompted a paradigm shift toward earlier surgical intervention, specifically targeting the anatomic restoration of the MPFL.
Understanding the distinction between traumatic and atraumatic instability is critical for surgical decision-making. Traumatic dislocations typically occur in structurally normal knees subjected to supraphysiologic forces, resulting in distinct, repairable or reconstructable ligamentous tears. Conversely, atraumatic or habitual dislocations are frequently driven by profound underlying anatomical aberrations—such as high-grade trochlear dysplasia (Dejour Types B, C, or D), severe patella alta (Caton-Deschamps index > 1.2), or an excessive tibial tubercle-trochlear groove (TT-TG) distance (> 20 mm). In these complex scenarios, isolated MPFL reconstruction is doomed to fail; it must be conceptualized as an adjunct to primary bony realignment procedures, such as a tibial tubercle osteotomy or trochleoplasty.
Detailed Surgical Anatomy and Biomechanics
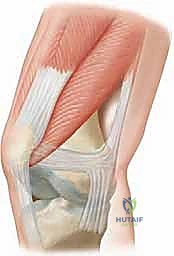
A masterful surgical reconstruction is predicated upon an intimate, three-dimensional comprehension of the medial knee anatomy. The medial capsuloligamentous complex is classically described by Warren and Marshall as consisting of three distinct layers. The MPFL resides within Layer 2, situated deep to the superficial medial collateral ligament (sMCL) and the medial retinaculum, but superficial to the true joint capsule (Layer 3). It is a distinct, flat, fibrous band that acts as a hammock, suspending the patella within the trochlear groove during early flexion.
The patellar insertion of the MPFL is broad and robust, fanning out to attach to the superior two-thirds of the medial patellar border, interdigitating intimately with the undersurface of the vastus medialis obliquus (VMO) tendon. This broad footprint is biomechanically critical, as it distributes tensile forces across a wide surface area, preventing localized stress risers that could lead to tissue failure or patellar fracture. When reconstructing the ligament, recreating this broad, anatomic footprint is essential for restoring native kinematics.
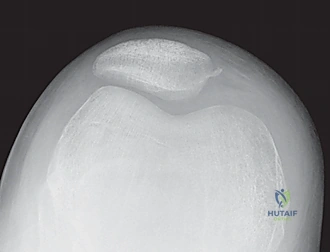
The femoral origin, however, is the crux of the operation. The MPFL originates from a highly specific, saddle-shaped depression located between the medial epicondyle and the adductor tubercle. Radiographically, this is defined by Schöttle's point: 1 mm anterior to the posterior cortical line of the femur, 2.5 mm distal to the posterior origin of the medial femoral condyle, and proximal to the level of the posterior point of Blumensaat's line. In skeletally immature patients, it is imperative to recognize that this origin lies distal to the distal femoral physis. Anatomic placement of the femoral tunnel is the single most critical factor in a successful MPFL reconstruction; a tunnel placed even a few millimeters too proximal or anterior will result in a graft that tightens excessively in flexion, leading to medial compartment overload, loss of flexion, and eventual graft failure or patellofemoral arthritis.
Biomechanically, the MPFL is the primary static restraint to lateral patellar translation, contributing 50% to 80% of the restraining force at 0 to 30 degrees of knee flexion. Beyond 30 degrees, the patella engages the bony architecture of the trochlear groove, and the reliance on the MPFL diminishes as bony stability takes over. This dynamic interplay dictates our surgical tensioning strategy: the graft must only be tensioned in early flexion (typically 30 degrees) to ensure it acts as a check-rein against lateral translation without over-constraining the joint during deep flexion.
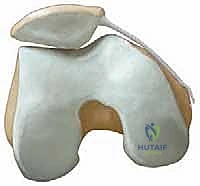
Concomitant injuries are the rule rather than the exception in acute patellar dislocations. As the patella violently exits and re-enters the trochlea, it frequently shears off osteochondral fragments.
These sheer forces commonly result in fractures of the medial patellar facet or the lateral femoral condyle.
The lateral femoral condyle fracture, often located at the sulcus terminalis, is a signature injury indicating that the dislocation occurred at roughly 70 to 80 degrees of flexion.
Additionally, avulsion fractures of the MPFL from the medial patella can occur, presenting as nonarticular, pathognomonic bony fragments.
Osteochondral defects (OCDs) must be meticulously evaluated, as large, weight-bearing lesions necessitate concurrent surgical fixation.
Exhaustive Indications and Contraindications
The decision algorithm for surgical intervention in patellar instability requires a sophisticated synthesis of patient history, physical examination, advanced imaging, and an understanding of the patient's functional demands. Not every dislocated patella requires a knife; however, failing to recognize the indications for surgery can condemn a young joint to rapid degeneration.
| Parameter | Indications for MPFL Repair / Reconstruction | Contraindications |
|---|---|---|
| Clinical History | Recurrent lateral patellar dislocations; Failed 3-6 months of dedicated physical therapy; First-time dislocation with an un-reducible patella. | Isolated, vague patellofemoral pain without documented instability events; Voluntary habitual dislocators (often psychiatric overlay). |
| Anatomic Factors | Normal or mild trochlear dysplasia (Dejour A); Normal TT-TG distance (< 15-20 mm); Normal patellar height (Caton-Deschamps 0.8 - 1.2). | Severe bony malalignment requiring primary correction (TT-TG > 20mm requires TTO); High-grade trochlear dysplasia requiring trochleoplasty. |
| Concomitant Injuries | Acute dislocation with a large (>1cm) displaced osteochondral loose body requiring fixation/removal; Bony avulsion of the MPFL. | Advanced, end-stage patellofemoral osteoarthritis (requires arthroplasty consideration). |
| Skeletal Maturity | Skeletally mature patients (standard techniques); Skeletally immature patients (requires specialized physeal-sparing techniques). | Standard transosseous or interference screw femoral fixation in patients with widely open distal femoral physes. |
Acute MPFL repair is a highly debated topic and is generally reserved for a very specific subset of patients. The ideal candidate for a primary repair is a patient with an acute, first-time traumatic dislocation who presents with a clear, robust bony avulsion of the MPFL from either the patellar or femoral attachment. Mid-substance tears or chronic, attenuated ligaments have unacceptably high failure rates with primary repair and should be treated with formal reconstruction.
MPFL reconstruction is the gold standard for recurrent patellar instability. It is indicated in patients who have failed conservative management, demonstrating persistent apprehension, subluxation, or frank dislocation. The presence of an attenuated, incompetent MPFL on MRI, combined with a positive apprehension test, solidifies the indication. It is crucial to emphasize that MPFL reconstruction is a soft-tissue procedure designed to correct a soft-tissue deficit.
Contraindications to isolated MPFL reconstruction primarily revolve around failing to address severe underlying bony malalignment. If a patient possesses a TT-TG distance exceeding 20 mm, an isolated MPFL graft will be subjected to immense lateralizing vector forces and will inevitably stretch out and fail. In such cases, a tibial tubercle osteotomy (anteromedialization) is mandatory. Similarly, severe patella alta requires distalization of the tubercle. Performing an isolated MPFL reconstruction in the face of uncorrected, severe anatomic abnormalities is a critical surgical error.
Pre-Operative Planning, Templating, and Patient Positioning
Clinical Evaluation and Physical Examination
A rigorous preoperative evaluation is the blueprint for surgical success. The history must elucidate the exact mechanism of injury, the frequency of events, and the presence of mechanical symptoms (catching, locking) which highly suggest an intra-articular loose body. On physical examination, the presence of an acute hemarthrosis strongly correlates with an osteochondral fracture or a massive retinacular tear.
The cornerstone of the physical exam is the patellar apprehension test. With the patient relaxed and the knee flexed to 20-30 degrees over a bolster (to disengage the patella from the trochlea), a gentle lateral translation force is applied. A positive test elicits severe apprehension, guarding, and often a reflex contraction of the quadriceps to pull the patella back into the groove. The lateral glide test quantifies laxity; translation of the patella laterally by more than two quadrants (50% of its width) compared to the contralateral knee indicates significant medial restraint incompetence. Furthermore, the surgeon must evaluate for the "J-sign"—a sudden, lateral subluxation of the patella as the knee approaches terminal extension, indicative of patella alta and a lateralized tibial tubercle.
Advanced Imaging Protocols
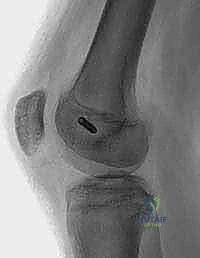
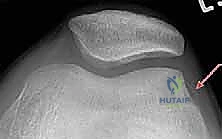
Standard radiographic evaluation must include weight-bearing anteroposterior (AP), true lateral, and axial (Merchant or Sunrise) views. The true lateral radiograph is critical for assessing patellar height using the Caton-Deschamps or Insall-Salvati indices, and for evaluating the trochlear bump or crossing sign indicative of trochlear dysplasia. The axial view, taken at 30 to 45 degrees of flexion, evaluates lateral patellar tilt and subluxation.
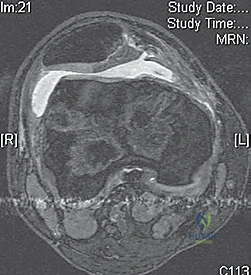
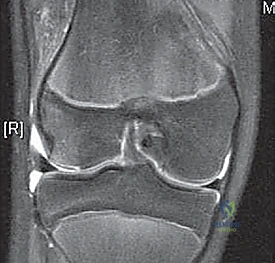
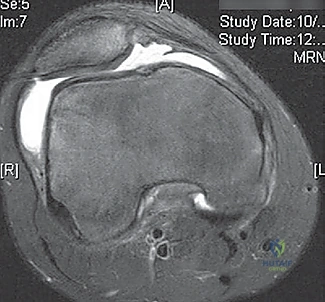
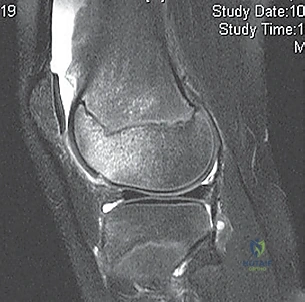
Magnetic Resonance Imaging (MRI) is absolutely mandatory for all acute traumatic dislocations with an effusion. MRI is exquisitely sensitive for identifying the classic "kissing" bone bruise pattern on the anterolateral aspect of the lateral femoral condyle and the inferomedial aspect of the patella.
Crucially, MRI defines the exact location of the MPFL rupture—whether it is a femoral avulsion, a mid-substance tear, or a patellar avulsion.
Furthermore, MRI allows for the precise evaluation of articular cartilage, identifying osteochondral lesions that plain radiographs frequently miss. For patients with suspected complex malalignment, a fine-cut Computed Tomography (CT) scan is utilized to accurately measure the TT-TG distance and femoral version.
Operating Room Setup and Patient Positioning
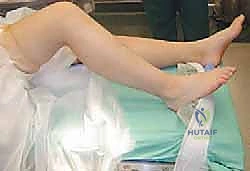
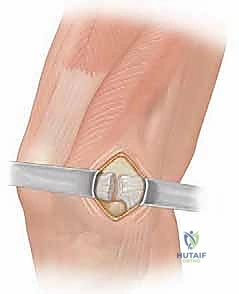
The patient is positioned supine on a standard operating table. A critical element of the setup is ensuring unhindered, orthogonal access for the C-arm fluoroscope, which will be brought in from the contralateral side. The table must not have metal artifacts near the knee joint.
A high-thigh tourniquet is applied over copious padding. Instead of a rigid leg holder, which can distort the extensor mechanism and restrict dynamic assessment, the leg is kept free. A sterile bump or an IV fluid bag is taped to the table to allow the knee to rest comfortably at roughly 30 to 45 degrees of flexion. This specific angle is vital, as it represents the position at which the MPFL graft will eventually be tensioned and fixed. The contralateral leg is well-padded and secured. The operative limb is prepped and draped using an impervious U-drape and extremity drape, ensuring the surgeon can freely manipulate the knee from full extension to deep, 120-degree flexion throughout the procedure.
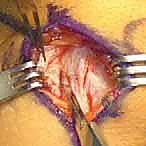
Step-by-Step Surgical Approach and Fixation Technique
Diagnostic Arthroscopy and Chondral Assessment
Every MPFL procedure commences with a comprehensive diagnostic arthroscopy. Standard anterolateral and anteromedial portals are established. The primary objective is to thoroughly evaluate the articular surfaces, meticulously searching for occult osteochondral fragments that may have sheared off during the dislocation event.
If a large, viable osteochondral fragment is identified, particularly from a weight-bearing zone of the lateral femoral condyle or the central patella, it must be anatomically reduced and fixed using headless compression screws or bioabsorbable pins.
Smaller, non-viable fragments are excised, and the resulting defect is debrided to stable, vertical margins.
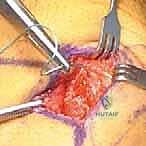
The arthroscope is also utilized to dynamically assess patellar tracking. Viewing from the anterolateral portal while ranging the knee provides real-time feedback on lateral subluxation and the engagement of the patella into the trochlear groove.
Medial Patellofemoral Ligament Repair
As previously noted, acute repair is reserved for discrete bony avulsions. A longitudinal incision is made over the site of the avulsion (either the medial patellar border or the medial epicondyle). The retinacular layers are carefully dissected to expose the avulsed fragment and the torn edge of the MPFL.
The footprint is decorticated to a bleeding bony bed to promote healing. Fixation is typically achieved using one or two small-diameter (e.g., 3.0 mm or 4.75 mm) suture anchors double-loaded with high-strength suture. The sutures are passed through the ligamentous stump using a Krackow or locking whipstitch configuration. The knee is flexed to 30 degrees, and the patella is held in a centralized position while the sutures are tied, ensuring the repair is secure but not over-tensioned.
Medial Patellofemoral Ligament Reconstruction
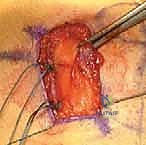
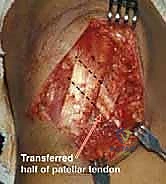
For the vast majority of patients, anatomic MPFL reconstruction is the procedure of choice. Graft selection typically involves an autologous gracilis or semitendinosus tendon, though allografts are frequently utilized to decrease donor site morbidity. The graft is harvested, whipstitched at both ends, and sized.
The procedure begins with patellar fixation. A 2-3 cm longitudinal incision is made along the superior two-thirds of the medial patellar border. The medial capsule is incised, exposing the bony edge of the patella. Two transverse, parallel guide pins are placed into the medial patella, ensuring they do not breach the anterior cortex or the articular cartilage. These are over-reamed (typically to 4.5 mm), and the two ends of the graft are docked into the patella and secured with biocomposite interference screws or suture anchors, creating a loop of graft that will be passed to the femur.
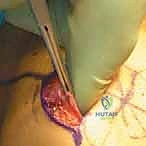
Next, the femoral footprint is identified. A 2 cm incision is made between the medial epicondyle and the adductor tubercle. The VMO is elevated, and Layer 2 of the medial capsule is identified. A blunt hemostat is used to create a tunnel between Layer 2 and Layer 3, passing from the patellar incision to the femoral incision. The looped end of the graft is passed through this soft-tissue tunnel.
The critical step of identifying Schöttle's point is now performed using strict lateral fluoroscopy. A true lateral image is obtained, ensuring the posterior condyles are perfectly superimposed. A guide pin is placed at the radiographic intersection: 1 mm anterior to the posterior cortical line, 2.5 mm distal to the posterior origin of the medial femoral condyle, and proximal to Blumensaat's line.
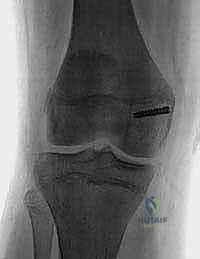
Once the pin placement is radiographically confirmed, it is over-reamed to match the diameter of the folded graft (typically 6-7 mm) to a depth of 25-30 mm. A passing suture is used to shuttle the graft into the femoral socket.
Tensioning the graft is the final, and arguably most delicate, step. The knee is placed at exactly 30 degrees of flexion. The surgeon must ensure the patella is centralized in the trochlea, but crucially, it must not be pulled tightly against the medial facet. The graft should only have enough tension to act as a check-rein, allowing approximately 1 to 2 quadrants of lateral glide. Over-tensioning will pull the patella medially, causing severe iatrogenic medial compartment arthritis and loss of flexion. Once the perfect tension is achieved at 30 degrees, a biointerference screw is deployed into the femoral tunnel to secure the graft.
The knee is then cycled through a full range of motion. The surgeon must verify that the graft remains isometric or slightly slackens in deep flexion; if the graft becomes bowstring-tight in deep flexion, the femoral tunnel is non-anatomic (usually too proximal), and the fixation must be revised immediately. Once kinematics are confirmed, the wounds are thoroughly irrigated and closed in layers.
Complications, Incidence Rates, and Salvage Management
Despite high success rates when performed correctly, MPFL reconstruction carries a distinct complication profile. The majority of these complications are iatrogenic, stemming from technical errors in tunnel placement or graft tensioning.
| Complication | Estimated Incidence | Etiology and Pathomechanics | Salvage / Management Strategy |
|---|---|---|---|
| Post-operative Stiffness / Loss of Flexion | 5% - 15% | Over-tensioning of the graft at the time of fixation; Non-anatomic femoral tunnel placement (too proximal or anterior) causing the graft to tighten excessively as the knee flexes. | Aggressive physical therapy. If refractory after 3-6 months, arthroscopic lysis of adhesions or formal open graft release/lengthening may be required. |
| Recurrent Instability | 2% - 8% | Failure to address underlying bony malalignment (e.g., ignoring a TT-TG > 20mm); Femoral tunnel placed too distal/posterior (graft is lax in extension); Traumatic graft rupture. | Comprehensive re-evaluation with CT/MRI. Revision MPFL reconstruction combined with a Tibial Tubercle Osteotomy (TTO) to normalize biomechanical vectors. |
| Patellar Fracture | 1% - 3% | Transverse tunnels placed too close together, creating a stress riser; Breaching the anterior patellar cortex during reaming; Utilizing excessively large diameter tunnels (>4.5mm) in a small patella. | Undisplaced: Knee immobilizer and restricted weight-bearing. Displaced: Open Reduction Internal Fixation (ORIF) with tension band wiring or cannulated screws. |
| Medial Patellofemoral Arthrosis | Unknown (Long-term) | Chronic over-constraint of the medial compartment pulling the medial patellar facet aggressively against the medial trochlea. | Non-operative management initially. In severe, end-stage cases, patellofemoral arthroplasty or total knee arthroplasty may be indicated. |
Patellar fracture is one of the most devastating complications. To mitigate this risk, many surgeons have transitioned away from transosseous tunnels, favoring surface fixation with small suture anchors or soft-tissue docking techniques on the medial margin of the patella. If tunnels are used, fluoroscopy must confirm that the guide pins remain strictly within the cancellous bone, equidistant from the anterior and articular surfaces.
Recurrent instability usually indicates a failure of surgical decision-making rather than a failure of the graft itself. If a surgeon attempts an isolated MPFL reconstruction on a patient with a TT-TG distance of 24 mm and severe patella alta, the graft will inevitably stretch out and fail due to the overwhelming
