Amputations of Single Fingers and Ray Resections: A Masterclass in Surgical Technique

Key Takeaway
Single finger amputations and ray resections require meticulous surgical planning to optimize hand biomechanics, grip strength, and cosmesis. This comprehensive guide details the indications, precise surgical techniques, and postoperative protocols for index ray amputation, middle finger ray resection, index transposition, and the management of ring finger avulsion injuries. Mastery of these procedures ensures functional preservation and minimizes complications such as intrinsic overpull or rotational deformity.
AMPUTATIONS OF SINGLE FINGERS: BIOMECHANICAL AND CLINICAL PRINCIPLES
The amputation of a single digit profoundly alters the biomechanics, functional capacity, and aesthetic appearance of the hand. The decision to perform a simple phalangeal amputation versus a formal ray resection (removal of the digit along with its corresponding metacarpal) requires a nuanced understanding of hand anatomy, the patient’s occupational demands, and the specific digit involved.
While preserving length is a fundamental tenet of hand surgery, a stiff, insensate, or painful stump can be more detrimental to overall hand function than a well-executed ray amputation. A retained proximal stump, particularly of the border digits (index and small fingers), often bypasses participation in power grip and obstructs fine pinch kinematics. Conversely, the loss of a central digit (middle or ring finger) creates a functional "hole" in the hand, allowing small objects to slip through during cupping or scooping maneuvers, and destabilizes the transverse metacarpal arch.
Clinical Pearl: The primary goal of any digital amputation is to provide a painless, sensate, and highly functional hand. Cosmesis, while important—especially in women and non-manual laborers—must never supersede the biomechanical integrity required for the patient's specific activities of daily living.
THE INDEX FINGER: INDICATIONS FOR RAY AMPUTATION
When the index finger is amputated at the proximal interphalangeal (PIP) joint or at a more proximal level, the remaining stump is functionally obsolete. It actively hinders the precision pinch mechanism between the thumb and the middle finger. The patient will instinctively bypass the index stump, utilizing the middle finger for key and tip-to-tip pinch.
In most instances where a primary amputation must be performed at such a proximal level, a secondary elective amputation should be executed through the base of the second metacarpal. This procedure, known as an Index Ray Amputation, is highly desirable for cosmetic reasons, as it creates a smooth, three-fingered hand contour that is far less conspicuous than a prominent, non-functional stump.
Contraindications and Biomechanical Trade-offs
Because an index ray amputation is a more extensive surgical intervention than a simple transphalangeal amputation, it carries specific risks and contraindications:
* Stiffness: The extensive soft tissue dissection can induce stiffness in the adjacent middle and ring fingers.
* Arthritic Hands: It is generally contraindicated in patients with severe osteoarthritis or rheumatoid arthritis, where baseline stiffness and compromised grip strength are already present.
* Heavy Manual Laborers: Men past middle age or individuals engaged in heavy manual labor may prefer to retain the metacarpal to preserve the absolute width of the palm, which contributes to torque generation and power grip.
Surgical Warning: Unless the surgeon’s knowledge of the local neurovascular anatomy is precise, the branch of the median nerve supplying the second web space can be inadvertently transected. Furthermore, improper management of the first dorsal interosseous muscle can result in a sunken, aesthetically displeasing dorsal scar or severe intrinsic overpull.
SURGICAL TECHNIQUE: INDEX RAY AMPUTATION (TECHNIQUE 14-10)
Preoperative Preparation and Positioning
- Anesthesia: Regional brachial plexus block or general anesthesia.
- Positioning: Supine with the operative arm extended on a radiolucent hand table.
- Tourniquet: A well-padded pneumatic tourniquet is applied to the upper arm and inflated to 250 mm Hg after exsanguination with an Esmarch bandage.
- Magnification: Surgical loupes (2.5x to 3.5x) are highly recommended for neurovascular dissection.
Incision Planning
Fig. 14-13A: Dorsal skin incisions planned with a marking pen. The palmar skin incision can be outlined in a matching zigzag fashion to reduce longitudinal skin suture line contracture.
- With a sterile marking pen, meticulously outline the planned incisions.
- Palmar Incision: Begin the palmar line in the second web space at the radial base of the middle finger. Continue this line proximally to the midpalmar area, ensuring it does not cross the palmar flexion creases at a 90-degree angle. Begin a second palmar line approximately 1 cm distal to the proximal flexion crease at the radial base of the index finger, extending it proximally to meet the first incision in the midpalmar area. Utilizing zigzag incisions in the palmar skin significantly lessens the incidence of longitudinal scar contractures.
- Dorsal Incision: Outline the dorsal component of the incision extending from the palmar lines, converging at a point directly over the index carpometacarpal (CMC) joint dorsally.
Deep Dissection and Tendon Management
- Make the incisions exactly as outlined through the dermis and epidermis.
- Identify, ligate, and divide the dorsal venous network. At a more proximal level, carefully identify and divide the branches of the superficial radial nerve supplying the index finger. Apply traction to the nerve ends, transect them sharply, and allow them to retract deep into the soft tissues to prevent painful neuroma formation.
- Identify the index extensor digitorum communis (EDC) and the extensor indicis proprius (EIP) tendons. Retract them distally, sever them under tension, and allow them to retract proximally into the forearm.
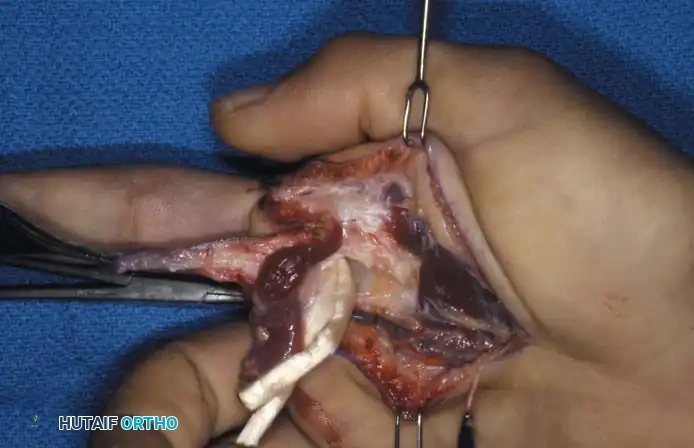
Fig. 14-13B: Flexor digitorum superficialis and flexor digitorum profundus tendons severed proximal to the lumbrical origin after isolation and division of appropriate neurovascular structures.
Osteotomy and Intrinsic Muscle Management
- Detach the tendinous insertion of the first dorsal interosseous muscle from the proximal phalanx. Carefully dissect the muscle belly proximally from the shaft of the second metacarpal.
- Detach the volar interosseous muscle from the same metacarpal shaft.
- Identify and divide the deep transverse metacarpal ligament connecting the second and third metacarpal heads. Crucial Step: Take extreme care not to damage the radial digital nerve of the middle finger during this release.
- Expose the base of the second metacarpal. Using an oscillating saw, carefully divide the second metacarpal obliquely from dorso-radial (proximally) to volar-ulnar (distally), approximately 2 cm distal to its base.
- Do not disarticulate the bone at its proximal CMC joint. Retaining the base preserves the insertion of the extensor carpi radialis longus (ECRL) and maintains the integrity of the distal carpal row. Smooth any rough bony edges with a rongeur or rasp to prevent soft tissue irritation.
- Apply distal traction to both the flexor digitorum superficialis (FDS) and flexor digitorum profundus (FDP) tendons of the index finger, divide them sharply, and allow them to retract into the palm.
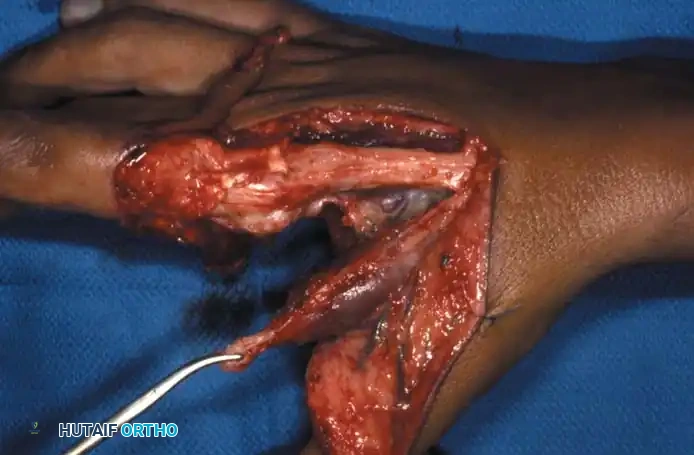
Fig. 14-13C: First dorsal interosseous retained for insertion into the radial base of the middle finger proximal phalanx.
Neurovascular Management and Closure
- Isolate, ligate, and divide the digital arteries to the index finger.
- Carefully identify and divide both digital nerves. Leave sufficient length so that their proximal ends can be buried deep within the interosseous muscle bellies, mitigating the risk of symptomatic neuromas.
- Intrinsic Reattachment: Anchor the tendinous insertion of the first dorsal interosseous to the radial base of the proximal phalanx of the middle finger.
> Pitfall: Do not anchor the first dorsal interosseous to the extensor tendon or the sagittal band hood. Doing so will inevitably cause intrinsic overpull, leading to a swan-neck deformity or severe rotational malalignment of the middle finger. - With a running absorbable suture, approximate the muscle bellies of the first dorsal interosseous and the volar interossei in the dead space previously occupied by the second metacarpal shaft. This prevents a cosmetically displeasing "sunken" appearance on the dorsum of the hand.
- Deflate the tourniquet, achieve meticulous hemostasis using bipolar electrocautery, and insert a small closed-suction drain or Penrose drain.
- Approximate the skin edges with non-absorbable sutures.
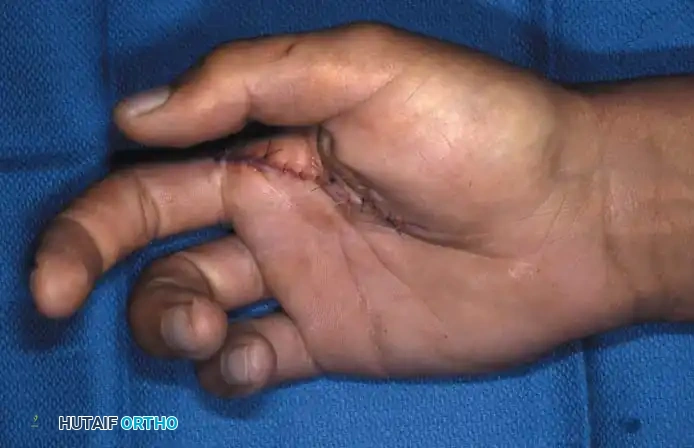
Fig. 14-13D: Final clinical appearance after index ray amputation, demonstrating a smooth, natural contour of the new first web space.
Postoperative Protocol (Aftertreatment)
- Apply a well-molded, bulky wet-to-dry dressing that conforms precisely to the wide, newly created web space between the middle finger and the thumb.
- Support the wrist in a neutral to slightly extended position using a plaster splint.
- Elevate the hand strictly for the first 48 hours to minimize edema.
- Remove the surgical drain at 24 to 48 hours.
- Initiate digital motion therapy for the remaining digits at 5 to 7 days postoperatively to prevent stiffness.
MIDDLE OR RING FINGER RAY AMPUTATIONS
In stark contrast to the index finger, the proximal phalanges of the middle and ring fingers are of paramount functional importance. Their absence creates a central defect—a "hole"—through which small objects can easily pass when the hand is utilized as a cup or during a scooping maneuver. Furthermore, the absence of a central ray removes the lateral support for the adjacent digits, causing them to progressively deviate toward the midline of the hand (scissoring).
The third and fourth metacarpal heads are critical keystones; they stabilize the transverse metacarpal arch by providing robust attachments for the deep transverse metacarpal ligament.
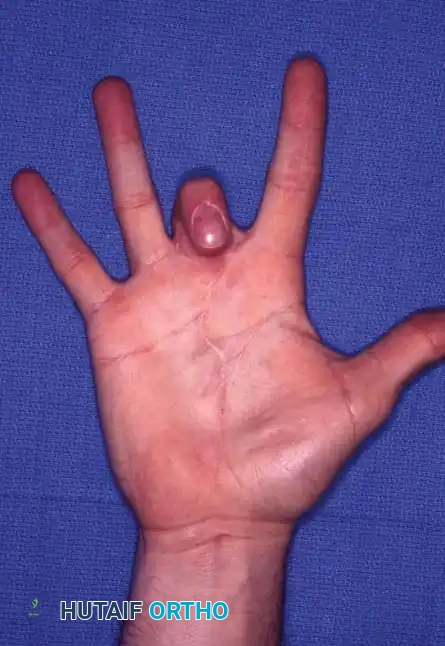
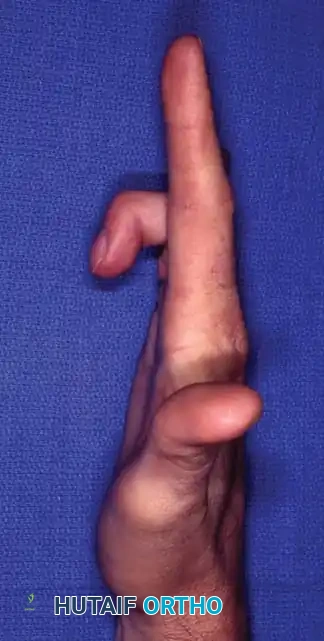
Fig. 14-14 A and B: Clinical appearance of an unsalvageable, contracted, and stiff middle finger following a severe gunshot wound to the hand.
Index Transposition for Middle Finger Loss
In a child or a woman, when the middle finger has been amputated proximal to the PIP joint—and especially when amputated proximal to the metacarpal head—transposing the index ray ulnarward to replace the third ray is highly indicated. This complex operation closes the central defect, results in natural symmetry, removes the conspicuous stump, and makes the presence of a three-fingered hand remarkably less obvious.
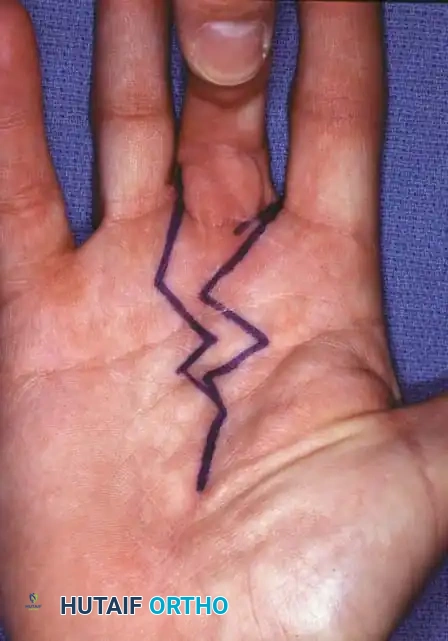

Fig. 14-14 C and D: Planned palmar and dorsal incisions for middle finger ray resection and index transposition.
Biomechanical Considerations and Complications:
Transposition of the index metacarpal is technically demanding and carries significant potential complications. Achieving proper rotational alignment and solid bony fixation is paramount. Nonunion of midshaft metacarpal osteotomies is a known complication; therefore, metaphyseal fixation is strongly recommended.
Furthermore, excising the third metacarpal shaft removes the origin of the adductor pollicis muscle, which significantly weakens key pinch. The index ray should not be transposed unless this adductor origin can be securely reattached.
Contraindication: Index ray transposition is strictly contraindicated if the patient requires the hand for heavy manual labor, as the loss of palm width and pinch strength will be functionally devastating.
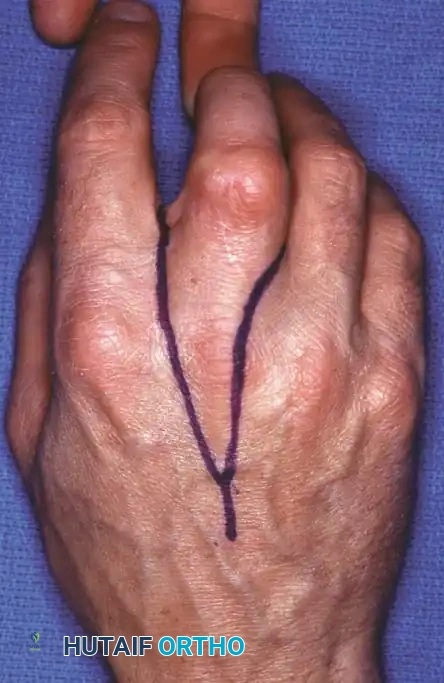
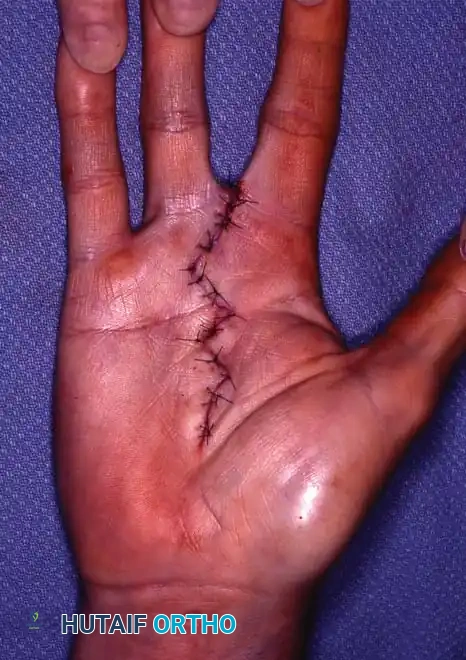
Fig. 14-14 E and F: Excellent cosmetic and functional appearance after partial middle finger metacarpal amputation and index transposition.
SURGICAL TECHNIQUE: TRANSPOSING THE INDEX RAY (PEACOCK TECHNIQUE 14-11)
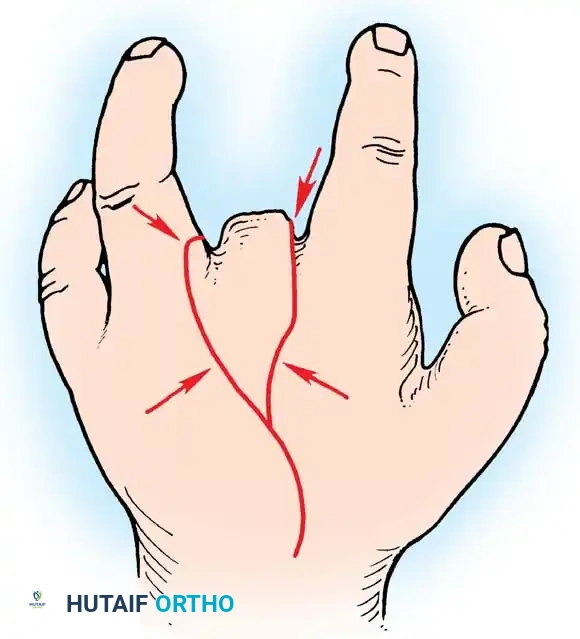
Fig. 14-16: Peacock technique of transposing the index ray. The dorsal incision is shown; arrows indicate points along the skin edges that will be brought together to form the new web space.
Incision and Exposure
- Plan the incisions so that a wedge of skin is removed from both the dorsal and volar surfaces of the hand.
- Plot the exact points in the region of the transverse metacarpal arch that must be approximated to form a smooth, continuous arch across the dorsum of the hand when the second and fourth metacarpal heads are brought together.
- Curve the proximal end of the dorsal incision slightly toward the base of the second metacarpal to facilitate exposure.
- Fashion the distal end of the incision to excise a small triangle of skin from the ring finger. This will receive a corresponding triangle of skin from the stump area, preventing the final suture line from passing directly through the depths of the newly reconstructed web space (which could lead to web creep or contracture).
- Elevate the dorsal and volar skin flaps. Expose the third metacarpal through a longitudinal incision in its periosteum.
Osteotomy and Ray Resection
- The index ray will be the correct length when its metacarpal is transposed directly to the base of the third metacarpal.
- Using an oscillating saw under continuous saline irrigation, divide the third metacarpal transversely as close to its base as possible.
- Excise the third metacarpal shaft along with the interosseous muscles dedicated to the middle finger. Warning: Exercise extreme caution to preserve the interosseous muscles supplying the remaining index and ring fingers.
- Identify the neurovascular bundles of the middle finger. Individually ligate the arteries and veins. Divide the digital nerves sharply and allow them to retract deep into the proximal musculature.
- Flex the wrist to relieve tension, draw the flexor tendons of the middle finger distally as far as possible, and divide them sharply.
Index Metacarpal Transposition and Fixation
- Retract the extensor tendons of the index finger. Expose the base of the second metacarpal and divide the bone at the exact same level as the third metacarpal osteotomy.
- From the radial aspect of the second metacarpal, gently dissect the intrinsic muscles just enough to allow the metacarpal to be transposed onto the base of the third metacarpal without placing undue tension on the muscle bellies or their neurovascular pedicles.
- Obliquely bevel the remaining base of the second metacarpal to produce a smooth, non-prominent contour on the radial side of the hand.
- From the excised third metacarpal shaft, fashion a small cortical "key graft" to bridge the osteotomy site between the transposed second metacarpal and the third metacarpal base, enhancing rotational stability and union rates.
Osteosynthesis and Alignment Check
- Insert a Kirschner wire (K-wire) longitudinally through the metacarpophalangeal (MCP) joint of the transposed index ray. Drive it retrograde out the dorsum of the flexed wrist, then advance it proximally through the metacarpal until its distal tip is just proximal to the MCP joint articular surface.
- With the wrist flexed, cut the proximal end of the wire and allow it to retract beneath the skin.
- Critical Step: Flex all remaining fingers simultaneously into the palm. This is mandatory to ensure correct rotational alignment of the transposed ray. The digits must point toward the scaphoid tubercle without overlapping.
- Once rotation is confirmed, insert a second K-wire transversely through the necks of the fourth and the transposed second metacarpals to lock the rotation.
- Alternative Fixation: Bony fixation with a small dynamic compression plate (DCP) or locking plate and screws can be utilized. This requires precise technique. Attaching the plate to the distal fragment first, fully flexing the MCP joints to confirm rotation, and then securing the proximal plate fixation significantly reduces the risk of malrotation.
- Close the skin meticulously over a rubber drain. Apply a soft, bulky pressure dressing.
Postoperative Protocol (Peacock Technique)
- Remove the rubber drain at 48 hours.
- At 8 to 10 days, remove the entire bulky dressing and the skin sutures.
- Apply a custom-molded light volar thermoplastic or plaster splint to maintain the wrist in a neutral position and support the transposed ray.
- The splint must be removed daily for meticulous hygiene and active range-of-motion exercises of the small joints to prevent stiffness.
- At approximately 5 to 6 weeks, once radiographic evidence of metacarpal union is confirmed, the K-wires are removed under local anesthesia in the clinic.
RING FINGER AVULSION INJURIES AND RAY RESECTION
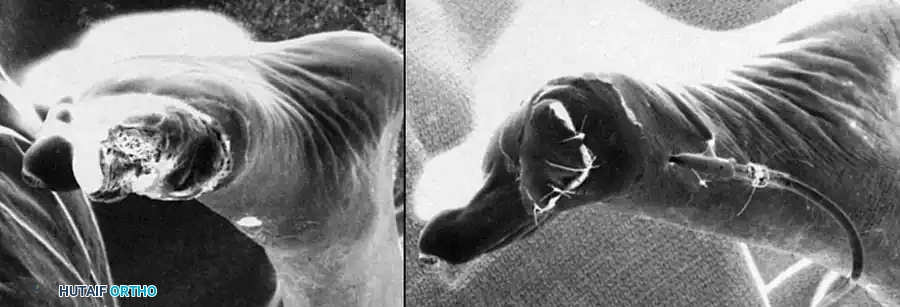
Ring finger avulsion injuries represent a devastating spectrum of soft tissue and vascular trauma. The soft tissue envelope of the ring finger is forcefully avulsed at its base when a metal ring worn on the digit catches on a rigid object (e.g., a nail, hook, or machinery) while the patient's body weight or momentum continues to move.
The applied force is usually sufficient to cause circumferential separation of the skin and nearly always obliterates the delicate vascular supply to the distal tissues. Fractures, joint dislocations, and severe ligamentous damage frequently accompany the soft tissue degloving. Interestingly, the flexor and extensor tendons possess high tensile strength and are often the last structures to separate.
Surgical Decision Making
Attempts at non-microsurgical salvage routinely fail, leading to dry gangrene, infection, and severe morbidity. Even with successful microvascular replantation (arterial and venous anastomosis), profound stiffness, cold intolerance, and abnormal sensation are virtually unavoidable.
- Women and Children: Amputation of the fourth ray with primary closure of the web space is the procedure of choice. It provides a highly functional, aesthetically pleasing three-fingered hand.
- Heavy Laborers: Simple transmetacarpal or transphalangeal amputation, rather than a formal ray resection, may be indicated. Studies comparing metacarpal amputation with ray resection suggest that despite the poor cosmesis and potential for "palmar incompetence" (objects falling through the gap), retaining the metacarpal preserves greater absolute grip strength and palm width.
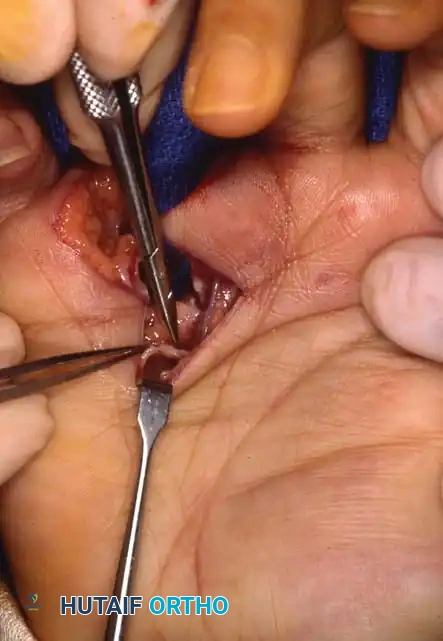
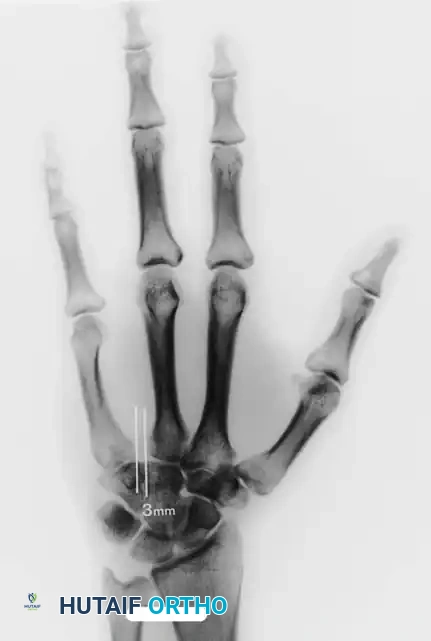
Fig. 14-15 A and B: Palmar and dorsal views of a patient’s hand following a severe Class III ring avulsion injury with complete vascular compromise.
Surgical Technique: Ring Finger Ray Amputation
By resecting the fourth ray at its base or directly at the carpometacarpal (CMC) joint, the fifth ray can be "folded in" to close the gap without the need for a formal surgical transposition of the fifth metacarpal.
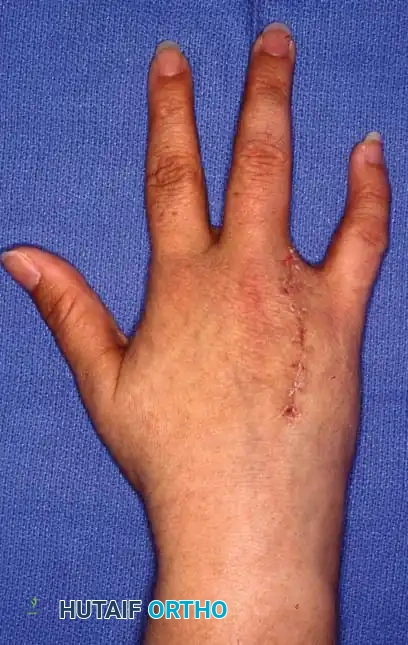
Fig. 14-15 C: En bloc disarticulation of the ring finger at the carpometacarpal joint, accompanied by proximal division of the flexor and extensor tendons.
- Perform an elliptical incision encompassing the avulsed base of the ring finger, extending proximally over the fourth metacarpal dorsally.
- Disarticulate the fourth metacarpal at the CMC joint.
- Biomechanics of Closure: Disarticulation of the ring finger at the CMC joint allows the base of the small finger (fifth) metacarpal to shift radially over the hamate facet. This anatomical shift essentially eliminates the radial deviation of the fifth ray that would otherwise occur if the fourth metacarpal base were left intact.

📚 Medical References
- ray amputation, J Hand Surg 21B:675, 1996.
- Ma FY, Cheng CY, Chen Y, et al: Fingertip injuries: a prospective study on seven methods of treatment on 200 cases, Ann Acad Med Singapore 11:207, 1982.
- Matev I: Wringer injuries of the hand, J Bone Joint Surg 49B:722, 1967.
- Mathes SJ, Buchannan R, Weeks PM: Microvascular joint transplantation with epiphyseal growth, J Hand Surg 5:586, 1980.
- May JW Jr, Chait LA, Cohen BE, et al: Free neurovascular fl ap from the fi rst web of the foot in
You Might Also Like