Operative Management of Thumb Deformities: Flexor Pollicis Longus Abductorplasty and Extensor Pollicis Longus Redirection
Key Takeaway
Flexor pollicis longus (FPL) abductorplasty and extensor pollicis longus (EPL) redirection are powerful tendon transfer techniques utilized to correct severe thumb adduction-flexion deformities. By altering the biomechanical vectors of these tendons, surgeons can restore dynamic thumb abduction and extension. This guide details the precise surgical steps, anatomical considerations, and postoperative rehabilitation protocols required to achieve optimal functional outcomes in complex thumb reconstruction.
INTRODUCTION TO THUMB ADDUCTION-FLEXION DEFORMITIES
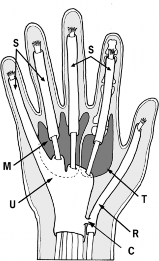
The "thumb-in-palm" deformity is a complex, multi-planar contracture frequently encountered in patients with upper motor neuron lesions, such as cerebral palsy, traumatic brain injury, or cerebrovascular accidents. This debilitating posture severely compromises hand function, negating the ability to perform pinch, grasp, or release maneuvers. The deformity is primarily driven by the spastic overactivity of the adductor pollicis, flexor pollicis brevis (FPB), and flexor pollicis longus (FPL), coupled with the relative weakness or flaccidity of the abductor pollicis longus (APL), extensor pollicis brevis (EPB), and extensor pollicis longus (EPL).
Surgical intervention is indicated when conservative measures, including orthotic splinting and botulinum toxin injections, fail to provide a functional or hygienic hand position. The operative strategy must be comprehensive, addressing both the static contractures (via soft tissue releases) and the dynamic imbalances (via tendon transfers or redirections).
Two highly effective, textbook-standard procedures for restoring dynamic balance to the spastic thumb are the Flexor Pollicis Longus Abductorplasty (Smith Technique) and the Redirection of the Extensor Pollicis Longus (Manske Technique).
FLEXOR POLLICIS LONGUS ABDUCTORPLASTY (SMITH TECHNIQUE)
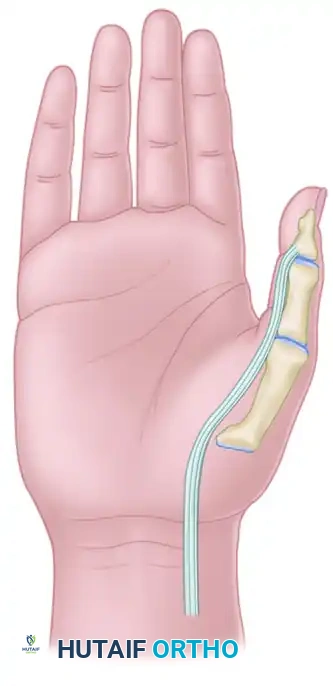
The Smith FPL abductorplasty is a profound biomechanical alteration designed to eliminate the deforming volar-ulnar force of a spastic FPL and convert it into a powerful radial abductor. By rerouting the FPL tendon to the dorsoradial aspect of the metacarpophalangeal (MCP) joint, the tendon's moment arm is shifted, augmenting thumb abduction while simultaneously mitigating the flexion-adduction contracture.
💡 Clinical Pearl: The Rationale for IP Joint Stabilization
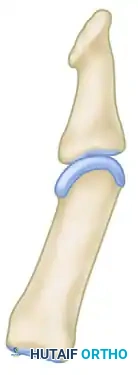
A critical component of the FPL abductorplasty is the management of the interphalangeal (IP) joint. Because the FPL is detached from its distal insertion, the IP joint loses its primary active flexor. More importantly, without stabilization, the redirected FPL and the intact EPL can create a severe hyperextension deformity at the IP joint. Therefore, arthrodesis (in adults) or tenodesis (in children) of the IP joint is mandatory to improve the lever arm of the EPL on the MCP joint and ensure a stable post for pinch kinematics.
Preoperative Biomechanical State
Before surgical intervention, the spastic FPL acts as a dominant flexor and adductor, pulling the thumb into the palm and overpowering the weaker dorsal extensors.
Step-by-Step Surgical Technique
1. Distal Incision and Exposure
- Positioning: The patient is placed supine with the arm on a radiolucent hand table. A well-padded pneumatic tourniquet is applied to the proximal arm.
- Incision: Make a precise radial midlateral incision starting from the middle of the distal phalanx of the thumb and extending proximally to the neck of the first metacarpal.
- Dissection: Carefully elevate a volar skin flap. Identify and protect the radial digital neurovascular bundle. Retract the bundle volarly to expose the flexor tendon sheath.
- Transection: Incise the A2 and A3 pulleys to expose the FPL tendon. Transect the FPL tendon sharply opposite the proximal phalanx, preserving a sufficient distal stump for subsequent tenodesis if operating on a pediatric patient.
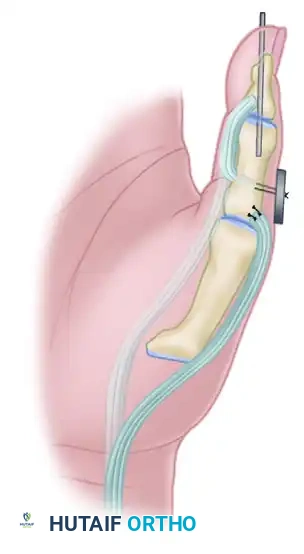
2. Interphalangeal Joint Management
The management of the IP joint depends strictly on the skeletal maturity of the patient.
For Adults (Skeletal Maturity Achieved): Arthrodesis
- Expose the IP joint by elevating the extensor apparatus dorsally or through the existing midlateral approach.
- Denude the articular cartilage of the head of the proximal phalanx and the base of the distal phalanx down to bleeding subchondral bone using a rongeur or a small oscillating saw.
- Coapt the bony surfaces in approximately 15 degrees of flexion.
- Fix the joint securely using a retrograde crossed Kirschner wire (K-wire) technique or a headless compression screw.
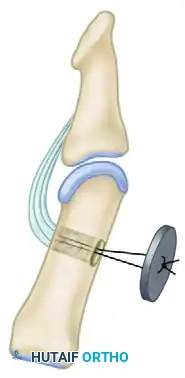
For Children (Open Physes): Tenodesis
- To avoid iatrogenic injury to the open physis of the distal phalanx, an arthrodesis is contraindicated.
- Instead, perform a tenodesis of the distal FPL stump to the proximal phalanx.
- Suture the FPL stump to the periosteum or through drill holes in the proximal phalanx, securing the IP joint in 15 degrees of flexion. Alternatively, a pull-out button technique can be utilized for rigid temporary fixation while the tenodesis heals.
3. Proximal Tendon Harvest
- Incision: Make a longitudinal incision in the volar forearm, positioned just radial to the tendon of the flexor carpi radialis (FCR). Curve the distal portion of this incision ulnarward to avoid crossing the wrist flexion creases at a perpendicular angle.
- Dissection: Incise the antebrachial fascia. Retract the FCR ulnarward and the radial artery radially.
- Identification: Identify the FPL tendon at its musculotendinous junction. Apply distal traction to the transected tendon in the thumb to confirm its identity in the forearm.
- Withdrawal: Carefully draw the FPL tendon out of the carpal tunnel and into the forearm incision. Ensure there are no adhesions or vincula tethering the tendon distally.
4. Subcutaneous Tunneling and Rerouting
- Create a generous subcutaneous tunnel using blunt dissection (e.g., with a curved Kelly clamp or tendon passer).
- The tunnel must originate from the forearm incision, pass along the radial aspect of the wrist and thumb, and terminate at the lateral (radial) side of the metacarpophalangeal (MCP) joint.
- Crucial Step: Ensure the tunnel is wide enough to allow unimpeded gliding of the FPL tendon. Pass the FPL tendon through this tunnel from proximal to distal.
5. Tendon Fixation and Tensioning
- Positioning for Tensioning: Hold the wrist in a neutral position (0 degrees of flexion/extension) and place the thumb in 50 degrees of palmar abduction.
- Attachment: Identify the dorsoradial aspect of the MCP joint capsule and the extensor aponeurotic hood.
- Suturing: Weave the FPL tendon into the dorsoradial capsule and extensor hood using a Pulvertaft weave or a robust side-to-side anastomosis with non-absorbable braided sutures (e.g., 3-0 or 4-0 polyester).
- Tension: The tendon must be sutured with tension to ensure that the resting posture of the hand maintains the thumb out of the palm.
⚠️ Surgical Warning: Tensioning the Transfer
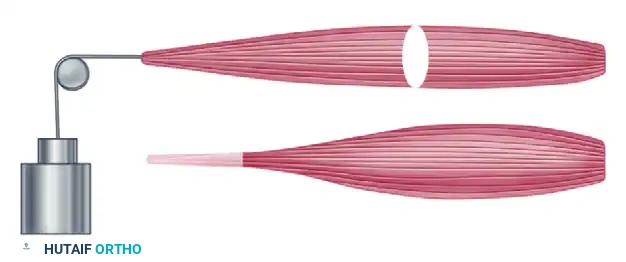
Setting the correct tension is the most technically demanding aspect of any tendon transfer. If the FPL is sutured too loosely, the transfer will fail to abduct the thumb dynamically. If sutured too tightly, it may create a fixed abduction deformity, preventing the thumb from opposing the digits for pinch. The Blix curve dictates that the muscle must be tensioned at its optimal resting length.
Postoperative Care for FPL Abductorplasty
- Immobilization: Immediately postoperatively, the hand is placed in a bulky, well-padded short-arm cast or rigid splint.
- Positioning: The thumb is immobilized in maximum palmar abduction, and the wrist is positioned in 30 degrees of flexion to relieve tension on the transferred FPL tendon.
- Duration: This rigid immobilization is maintained for exactly 6 weeks.
- Transition: After 6 weeks, the cast is removed. The K-wires (if used for adult arthrodesis) may be extracted once radiographic union is confirmed.
- Orthotic Management: The thumb is transitioned to a custom-molded thermoplastic splint featuring a C-bar in the first web space to maintain abduction. This splint is worn continuously for an additional 6 weeks, removed only for supervised active range-of-motion (ROM) exercises.
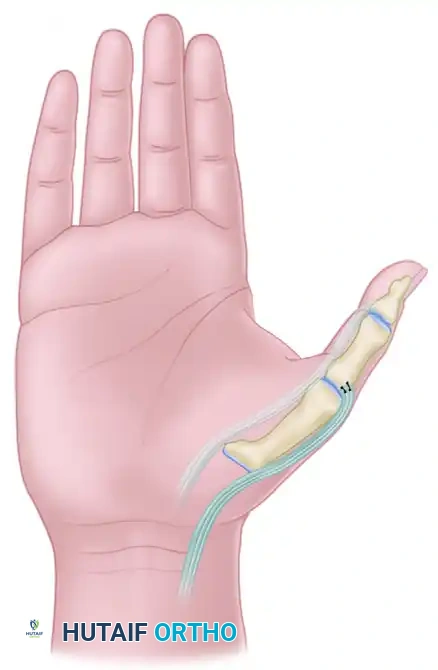
REDIRECTION OF EXTENSOR POLLICIS LONGUS (MANSKE TECHNIQUE)
While the Smith procedure addresses the volar deforming forces, the Manske technique focuses on optimizing the dorsal extensor mechanics. In the normal hand, the EPL tendon (residing in the third dorsal compartment) acts as an adductor and extensor of the thumb. In the spastic hand, this adduction vector exacerbates the thumb-in-palm deformity.
By surgically releasing the EPL from the third compartment and redirecting it through the first dorsal compartment, its vector is shifted radially. The EPL is transformed from an adductor-extensor into a pure abductor-extensor, providing a powerful dynamic force to pull the thumb out of the palm.
Step-by-Step Surgical Technique
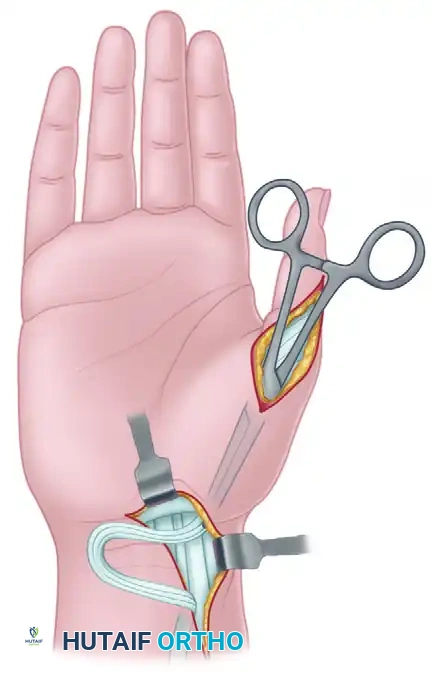
1. Volar Soft Tissue Release (Matev and Swanson)
Tendon transfers will universally fail if they are expected to overcome fixed soft-tissue contractures. Therefore, aggressive release of the spastic adductors is the mandatory first step.
- Incision: Make a palmar incision along the thenar crease, extending proximally toward the carpal tunnel if necessary.
- Dissection: Identify the neurovascular bundles to the thumb and index finger and protect them meticulously.
- Release: Isolate the adductor pollicis muscle. Release its transverse and oblique heads from their origins on the third metacarpal and capitate.
- Proceed to identify and release the deep head of the flexor pollicis brevis (FPB). Ensure the first web space can be passively opened to at least 45 degrees of palmar abduction without resistance.
2. Dorsal Soft Tissue Release
- Incision: Make a longitudinal incision on the dorsum of the thumb over the first metacarpal.
- Release: Identify the first dorsal interosseous muscle. Release its origin from the ulnar aspect of the first metacarpal shaft. This further decompresses the first web space and eliminates secondary adduction forces.
3. Distal EPL Dissection
- Exposure: Extend the dorsal thumb incision distally over the MCP joint to the proximal phalanx, fully exposing the extensor aponeurotic hood.
- Identification: Identify the EPL tendon as it crosses the MCP joint and inserts into the distal phalanx.
- Dissection: Carefully dissect the EPL tendon out from the extensor aponeurosis. Continue this dissection for a distance of 10 mm distal to the MCP joint.
- Defect Management: This dissection will leave a longitudinal defect approximately 4 mm wide in the extensor hood. It is imperative to preserve the radial and ulnar margins of the aponeurosis sufficiently to allow for subsequent closure and stabilization of the redirected tendon.
4. Proximal EPL Harvest
- Incision: Make a separate longitudinal incision over the distal radius, centered over Lister's tubercle.
- Identification: Open the third extensor retinacular compartment. Identify the EPL tendon.
- Withdrawal: Apply traction to the EPL tendon at the thumb incision, confirm its identity at the wrist, and withdraw the tendon proximally into the forearm incision.
5. Rerouting the EPL Tendon
- Preparation of the Pulley: The first extensor retinacular compartment (housing the APL and EPB) will serve as the new anatomical pulley for the EPL.
- Passage: Pass a curved hemostat or a specialized tendon passer from the dorsal incision on the thumb, routing it proximally along the anatomical course of the extensor pollicis brevis (EPB) tendon.
- Through the Compartment: Direct the instrument through the first extensor compartment until it emerges at the distal radius incision.
- Redirection: Grasp the free end of the EPL tendon with the hemostat. Retract the instrument distally, pulling the EPL tendon through the first extensor compartment and out into the dorsal thumb wound.
💡 Clinical Pearl: The First Compartment Pulley
Utilizing the first extensor compartment as a pulley is the genius of the Manske procedure. It permanently alters the line of pull of the EPL. However, the surgeon must ensure the compartment is not overly tight. If the addition of the EPL to the APL and EPB causes severe friction (iatrogenic De Quervain's-like impingement), a partial step-cut lengthening or partial release of the retinaculum may be required to ensure smooth tendon gliding.
6. Final Fixation
- Positioning: Place the thumb in maximum radial and palmar abduction, with the wrist in neutral extension.
- Suturing: Lay the redirected EPL tendon back into the 4 mm defect created in the extensor aponeurotic hood.
- Suture the EPL to the preserved margins of the aponeurosis using non-absorbable sutures. Ensure the tension is set so that the resting tone of the EPL maintains the thumb in an abducted, extended posture.
Postoperative Care for EPL Redirection
- Initial Immobilization: The hand is immobilized in a bulky dressing and a volar splint with the thumb in maximum abduction and extension.
- Orthotic Management: Once the initial postoperative swelling subsides (typically 10-14 days), the patient is transitioned to a long opponens splint modified by the addition of a C-bar, or a custom-molded plastic orthosis.
- Rehabilitation Phase: This orthosis is worn continuously between supervised exercise periods for the next 4 to 6 weeks. The exercises focus on active thumb extension and abduction, training the brain to utilize the redirected EPL in its new biomechanical role.
- Long-Term Splinting: After the initial 6-week period, daytime splinting is gradually weaned. However, night splinting in the opponens orthosis is continued strictly until skeletal growth is completed (in pediatric patients) or until dynamic muscular balance is definitively attained and stabilized (in adults).
CONCLUSION
The surgical correction of the spastic thumb-in-palm deformity requires a deep understanding of hand biomechanics and a meticulous surgical technique. The Smith Flexor Pollicis Longus Abductorplasty and the Manske Extensor Pollicis Longus Redirection are two highly effective procedures that, when combined with appropriate soft tissue releases and rigid postoperative protocols, can dramatically improve the functional capacity and hygiene of the afflicted hand. Proper tensioning, precise routing, and rigorous adherence to rehabilitation timelines are the cornerstones of successful outcomes in these complex reconstructive endeavors.
You Might Also Like