Flexor and Extensor Tendon Injuries: Operative Principles and Techniques
Key Takeaway
Flexor and extensor tendon injuries require meticulous surgical technique and a profound understanding of hand biomechanics. Successful outcomes depend on preserving the delicate vascular supply, utilizing robust core suture configurations, and implementing early active motion protocols. This guide details the critical anatomy, diagnostic maneuvers, step-by-step surgical approaches, and evidence-based rehabilitation strategies essential for orthopedic surgeons managing complex tendon lacerations.
Introduction to Flexor Tendon Injuries
The management of flexor and extensor tendon injuries remains one of the most exacting disciplines within orthopedic hand surgery. A profound, three-dimensional understanding of the anatomy of the flexor tendons—particularly within the forearm, wrist, and hand—is an absolute prerequisite for successful surgical intervention. The surgeon must possess a comprehensive grasp of the essential biomechanical aspects of the flexor digitorum profundus (FDP) and flexor digitorum superficialis (FDS) function within the digital sheath.
Historically, outcomes in flexor tendon surgery, particularly in Zone II (often referred to as "No Man's Land"), were fraught with complications such as profound stiffness or secondary rupture. Today, advancements in our understanding of tendon nutrition, intrinsic healing mechanisms, and the biomechanical superiority of multi-strand core suture techniques have revolutionized patient outcomes, allowing for early active motion protocols that mitigate adhesion formation.
Tendon Nutrition and Vascularity
Tendon nutrition is a dual-source system, relying on both vascular perfusion and synovial diffusion. The relative contribution of each source varies depending on the anatomical zone of the tendon.
- Synovial Diffusion: Within the digital fibro-osseous sheath, the tendons are bathed in synovial fluid produced by the tenosynovial lining. Diffusion of nutrients from this fluid is facilitated by the pumping action of digital flexion and extension, making early mobilization critical for tendon viability and healing.
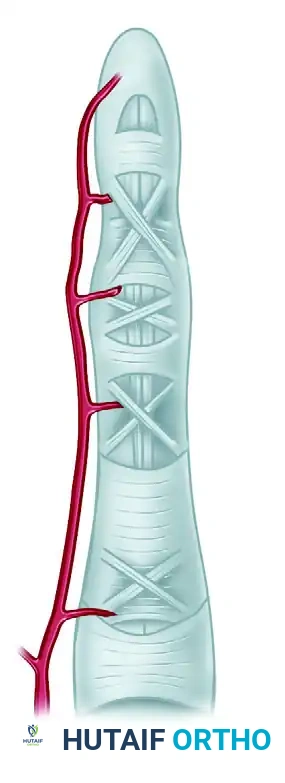
- Vascular Perfusion: Blood supply is provided through longitudinal vessels in the paratenon, intraosseous vessels at the tendon insertion, and the highly specialized vincular circulation.
The vascular supply to the flexor tendons is segmentally provided by four transverse communicating branches of the digital arteries. These branches feed the vincula system, which consists of the vinculum breve profundus (VBP), vinculum breve superficialis (VBS), vinculum longum profundus (VLP), and vinculum longum superficialis (VLS).
Despite this intricate vascular network, distinct watershed areas exist. An ischemic zone is present in the flexor digitorum superficialis beneath the A2 pulley at the proximal phalanx. Similarly, two zones of relative ischemia are present in the flexor digitorum profundus: one beneath the A2 pulley and another beneath the A4 pulley. These avascular zones rely heavily on synovial diffusion and are particularly susceptible to rupture or delayed healing following repair.
Phases of Tendon Healing
Tendon healing is a complex biological cascade driven by both extrinsic and intrinsic mechanisms. It predictably occurs in three overlapping phases:
- Inflammatory Phase (48 to 72 hours): Characterized by the migration of erythrocytes and inflammatory cells to the repair site. The strength of the repair during this phase relies entirely on the surgical suture material.
- Fibroblastic Phase (5 days to 4 weeks): Fibroblasts synthesize disorganized type III collagen. The intrinsic mechanism (driven by epitenon and endotenon fibroblasts) and the extrinsic mechanism (driven by peripheral fibroblasts from the sheath and surrounding tissues) compete. The extrinsic mechanism is the primary driver of restrictive scar and adhesion formation.
- Remodeling Phase (4 weeks to ~3.5 months): Type III collagen is gradually replaced by longitudinally oriented type I collagen. The tensile strength of the tendon increases significantly during this period.
Clinical Pearl: Experiments suggest that cyclic tension applied to healing tendons stimulates the intrinsic healing response more effectively than a lack of tension. This mechanotransduction is the biological foundation for modern early active motion (EAM) rehabilitation protocols.
While tendon adhesions are associated with tendon injury and healing, they are not essential to the tendon repair process itself. Experimental models have demonstrated that tendon injury alone is insufficient to produce adhesions; however, tendon injury combined with synovial sheath disruption and rigid immobilization inevitably leads to extensive, motion-limiting adhesions.
Clinical Examination and Diagnosis
The diagnosis of a tendon laceration begins with meticulous observation before any physical manipulation occurs.
Resting Posture and Tenodesis Effect
When a normal hand rests supinated on the examining table, the fingers assume a natural cascade of increasing flexion from the index to the little finger. This posture is maintained by the resting tone of the flexor tendons.
* If a flexor tendon is severed, the affected finger will lie in an abnormal posture of greater unopposed extension compared to the adjacent digits.
* Gentle compression of the volar forearm muscle mass will normally produce concomitant flexion of the digits (the tenodesis effect). If the injured finger fails to flex during this maneuver, complete separation of the tendon ends is highly probable.
* Gently pressing the volar fingertip of each digit will reveal a loss of normal resting tension in the injured finger.
Specific Tendon Evaluation
Evaluating tendon function via voluntary active movements directed by the examiner can be unreliable, particularly in an excited child, an anxious patient, or an intoxicated individual. Demonstrating the requested maneuvers on the examiner’s hand or the patient’s uninjured hand prior to evaluating the injured hand is highly recommended.
Evaluating the Flexor Digitorum Profundus (FDP):
If the wound is distal to the wrist, the injured finger must be stabilized to isolate specific joint movements. To test the FDP, the examiner stabilizes the proximal interphalangeal (PIP) joint in extension. The FDP is presumed severed if the patient cannot actively flex the distal interphalangeal (DIP) joint. If neither the PIP nor the DIP joint can be actively flexed with the metacarpophalangeal (MCP) joint stabilized, both the FDS and FDP tendons are likely severed.
Evaluating the Flexor Digitorum Superficialis (FDS):
To demonstrate the transection of an FDS tendon with an intact FDP tendon, the examiner must neutralize the FDP's influence. This is achieved by maintaining the adjacent, uninjured fingers in complete hyperextension. Because the FDP tendons share a common muscle belly (particularly for the middle, ring, and little fingers), anchoring the adjacent profundus tendons in extension effectively tethers the FDP of the injured finger. The patient is then asked to flex the injured finger. If the FDS is severed, flexion at the PIP joint is usually impossible.
Diagnostic Pitfall: The index finger FDP often has an independent muscle belly. Therefore, the standard FDS isolation test may yield a false negative in the index finger.
Lister’s Test for the Index Finger:
To evaluate an isolated FDS injury in the index finger, a technique advocated by Lister is employed. The patient is asked to pinch and pull a sheet of paper with each hand using the index fingers and thumbs.
* In an intact finger, this pinch is accomplished by the FDS, allowing the FDP to relax and the DIP joint to hyperextend, maximizing pulp contact with the paper.
* If the FDS is injured, the patient will compensate by using the FDP, resulting in hyperflexion of the DIP joint and an extended posture of the PIP joint.
Evaluating the Flexor Pollicis Longus (FPL):
To check the integrity of the FPL tendon in the thumb, the MCP joint of the thumb is stabilized. If the FPL tendon is divided, active flexion at the interphalangeal (IP) joint will be absent.
Wrist Level Injuries:
If a laceration occurs at the level of the wrist, a patient may occasionally demonstrate active flexion of a finger even if the specific tendons to that finger are severed. This phenomenon is the result of intercommunication of the flexor profundus tendons at the wrist, particularly between the little and ring fingers.
Partial Lacerations
A definitive clinical diagnosis of a complete flexor tendon transection is usually straightforward; however, partial lacerations present a diagnostic challenge. A partially divided tendon usually remains functional, but finger motion may be limited by pain or triggering. The examination may indicate tendon injury without allowing a definite diagnosis of the extent of the transection. While Ultrasound and MRI can be helpful adjuncts, they are not always required. When a definite diagnosis cannot be made clinically, and the mechanism of injury suggests significant trauma, surgical exploration is indicated to prevent delayed rupture.
Surgical Indications and Timing
The timing of flexor tendon repair is dictated by the nature of the injury, wound contamination, and the availability of appropriate surgical expertise.
- Primary Repair (Within 24 hours): Indicated for clean, sharp lacerations with minimal tissue crushing.
- Delayed Primary Repair (1 to 14 days): Often preferred if the wound is contaminated, requiring initial irrigation and debridement, or if a specialized hand surgeon is not immediately available. Tendon ends remain pliable and can usually be approximated without tension.
- Secondary Repair (2 to 4 weeks): Tendon retraction and muscle contracture make end-to-end repair challenging.
- Late Reconstruction (>4 weeks): Primary repair is rarely possible due to severe muscle contracture and sheath collapse. Two-stage tendon grafting using a silicone Hunter rod is typically required.
Patient Positioning and Preparation
Optimal surgical outcomes demand meticulous preparation and a bloodless field.
1. Anesthesia: General anesthesia or regional block (axillary or supraclavicular) is preferred. Wide-awake local anesthesia no tourniquet (WALANT) is increasingly popular, allowing intraoperative active motion testing to assess repair strength and glide.
2. Positioning: The patient is positioned supine with the arm extended on a radiolucent hand table.
3. Tourniquet: A pneumatic upper arm tourniquet is applied and inflated to 250 mm Hg (or 100 mm Hg above systolic pressure) after exsanguination with an Esmarch bandage.
4. Magnification: Surgical loupes (minimum 2.5x to 3.5x magnification) are mandatory for identifying the epitenon and preserving the vincular blood supply.
Surgical Approach and Repair Techniques
Incision and Exposure
Surgical exposure must be extensile without compromising the vascularity of the skin flaps.
* Brunner Zig-Zag Incisions: The standard approach utilizes volar zig-zag incisions. The apices of the flaps must end at the mid-lateral line of the digit, never crossing the flexion creases at a right angle to prevent flexion contractures.
* Mid-Lateral Incisions: An alternative approach that places the scar dorsal to the neurovascular bundle.
Once the skin flaps are elevated, the neurovascular bundles are identified and protected. The flexor tendon sheath is exposed.
Sheath Management and Tendon Retrieval
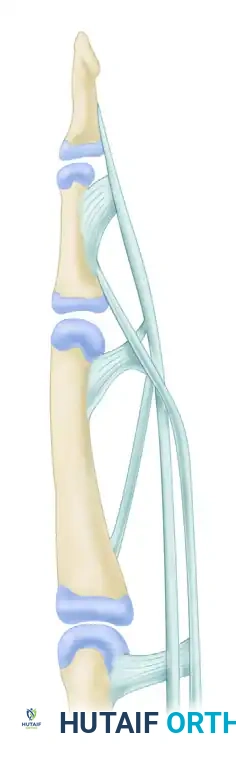
The fibro-osseous sheath consists of five annular (A1-A5) and three cruciform (C1-C3) pulleys.
* Crucial Pulleys: The A2 (proximal phalanx) and A4 (middle phalanx) pulleys are biomechanically critical to prevent tendon bowstringing and must be preserved or reconstructed.
* Windowing: Access to the tendon ends is achieved by creating L-shaped or transverse windows in the cruciform pulleys (e.g., C1 or C2) or the membranous portions of the sheath.
If the proximal tendon end has retracted into the palm, it can often be retrieved by milking the palm distally or using a flexible tendon retriever. If it cannot be easily passed back through the intact A2 pulley, a small counter-incision in the palm may be necessary. A pediatric feeding tube can be passed retrograde through the sheath, sutured to the tendon, and used to pull the tendon distally into the repair zone.
Suture Configuration and Core Techniques
The goal of tendon repair is to provide sufficient tensile strength to withstand the forces of early active motion while maintaining a smooth profile to allow gliding within the sheath.
Core Suture:
The strength of the repair is directly proportional to the number of suture strands crossing the repair site and the caliber of the suture.
* Material: A 3-0 or 4-0 braided non-absorbable synthetic suture (e.g., Ticron, Ethibond, or FiberWire) is standard.
* Configuration: A minimum of a 4-strand core repair is required for early active motion. 6-strand repairs (e.g., Lim-Tsai or double modified Kessler) provide superior strength but increase the bulk of the tendon, potentially impeding glide.
* Purchase: The core suture should grasp at least 7 to 10 mm of tendon on each side of the laceration.
Epitendinous Suture:
A peripheral epitendinous suture is mandatory. It serves two critical functions:
1. It increases the tensile strength of the repair by 10% to 50%.
2. It tucks in the frayed edges of the tendon, creating a smooth, streamlined surface that minimizes friction and adhesion formation.
* Material: A 5-0 or 6-0 monofilament suture (e.g., Prolene or Nylon).
* Configuration: A running locking (cross-stitch or Silfverskiöld) or simple running over-and-over technique is utilized, circumferentially capturing the epitenon 1-2 mm from the repair edge.
Surgical Warning: Avoid excessive handling of the tendon ends with toothed forceps. Crush injury to the epitenon severely exacerbates extrinsic scarring and adhesion formation. Use a hypodermic needle to temporarily pin the tendon ends to the adjacent phalanx to relieve tension during the suturing process.
Postoperative Protocols and Rehabilitation
The success of a technically perfect surgical repair can be entirely undone by improper postoperative rehabilitation. The paradigm has shifted from prolonged immobilization to controlled early mobilization.
Splinting
Immediately postoperatively, the hand is placed in a dorsal blocking splint.
* Wrist: 20 to 30 degrees of flexion.
* MCP Joints: 70 to 80 degrees of flexion.
* IP Joints: Full extension.
This position minimizes tension on the flexor tendon repair while preventing PIP joint flexion contractures.
Rehabilitation Protocols
- Modified Duran Protocol: Focuses on early passive motion. The patient uses their uninjured hand to passively flex and extend the PIP and DIP joints of the injured finger within the constraints of the dorsal blocking splint. This provides 3-5 mm of tendon excursion, which is sufficient to prevent restrictive adhesions.
- Kleinert Protocol: Utilizes dynamic traction. An elastic band is attached to the fingernail and anchored to the proximal volar forearm. The patient actively extends the digit against the resistance of the band, and the band passively pulls the digit back into flexion.
- Early Active Motion (EAM): Reserved for robust (4-strand or 6-strand) repairs in compliant patients. Under the strict supervision of a certified hand therapist, the patient performs controlled, active "place-and-hold" exercises. EAM has been shown to yield the best functional outcomes, maximizing intrinsic healing and minimizing adhesions, but carries the highest risk of rupture if the core repair is inadequate or the patient is non-compliant.
At 4 to 6 weeks, the dorsal blocking splint is discontinued, and active composite flexion and extension exercises are progressed. Resistive strengthening is typically delayed until 8 to 10 weeks postoperatively, with a return to unrestricted heavy labor or sports at 12 weeks.
You Might Also Like
