Femoral Valgus Osteotomy for Perthes Disease: An Intraoperative Masterclass
Key Takeaway
This masterclass details femoral valgus osteotomy for Perthes disease, a salvage procedure for hinge abduction. We cover comprehensive anatomy, meticulous preoperative planning, exact patient positioning, and a granular, step-by-step intraoperative execution. Learn crucial pearls, pitfalls, and postoperative care, ensuring optimal outcomes for patients with advanced femoral head deformity and impingement.
Welcome, colleagues, to the operating theater. Today, we are undertaking a masterclass in the execution of a highly technical and biomechanically demanding procedure: the femoral valgus osteotomy for advanced Legg-Calvé-Perthes disease (LCPD). Specifically, we are addressing the debilitating phenomenon of hinge abduction. It is paramount to understand from the outset that this is not a primary containment procedure aimed at molding a pliable, fragmented femoral head. Rather, it is a critical salvage operation reserved for hips where the femoral head has already developed significant, irreversible deformity and an ossified lateral ridge. This deformity leads to painful impingement, joint incongruity, and rapid cartilage degradation. Our surgical objective is precise: to relieve that lateral hinging, medialise the mechanical axis, improve hip joint congruency, and ultimately, mitigate pain while delaying the onset of early osteoarthritis.
Comprehensive Introduction and Patho-Epidemiology
Before we make our first incision, we must deeply understand the underlying pathophysiology that mandates this intervention. In severe Legg-Calvé-Perthes disease, profound osteonecrosis of the femoral head epiphysis leads to recurrent subchondral fractures, catastrophic loss of epiphyseal height, and a morphologic transformation from a normal spherical contour to an oval, flattened, or mushroom-shaped configuration. This structural collapse causes the femoral head to migrate both proximally and laterally within the acetabulum, progressively uncovering its lateral aspect and altering the fundamental biomechanics of the hip joint.
Compounding this structural collapse, the early and intermediate stages of Perthes disease are frequently characterized by exuberant cartilaginous overgrowth, particularly in the lateral and anterior quadrants of the femoral head. As the biologic healing process advances into the reossification phase, this hypertrophic cartilage ossifies, forming a rigid, unyielding lateral bony ridge. When the patient attempts active or passive abduction, this prominent lateral aspect of the femoral head—the ossified ridge—impinges directly against the lateral margin of the acetabulum. Instead of the normal concentric, gliding articulation where the lateral femoral head slips smoothly beneath the acetabular sourcil, this impingement creates a pathological fulcrum, or "hinge."
This lateral hinge acts as a lever during abduction, forcefully pulling the inferomedial portion of the femoral head away from the acetabular fossa. This results in an immediate loss of articular contact, abnormal stress distribution across the remaining cartilage, and severe pain. This is the precise mechanical definition of hinge abduction. Patients typically present in their second decade of life, often years after their initial LCPD diagnosis, complaining of progressive, activity-related groin or lateral hip pain that is only partially relieved by rest.
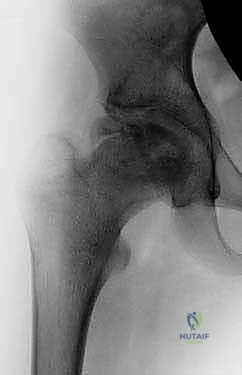
Clinically, these patients exhibit a dramatic and notable limitation in hip abduction. They are frequently unable to reach a neutral coronal position, and any forced attempted abduction is exquisitely painful. Observation of their gait reveals a pronounced antalgic pattern, with the affected hip held rigidly in adduction. A positive Trendelenburg sign is almost universally present, secondary to severe abductor weakness stemming from the shortened lever arm and the altered biomechanics of the proximal femur. Radiographically, we observe gross hinge abduction, characterized by a lateral prominence of the femoral head impinging on the acetabulum, often accompanied by a widened medial joint space.
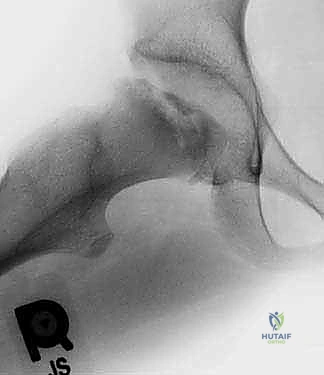
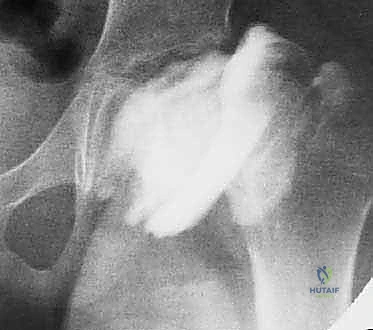
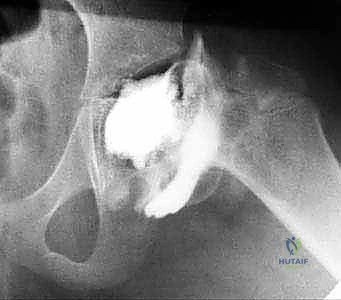
An arthrogram is the definitive diagnostic modality. Dynamic fluoroscopic arthrography will demonstrate a pooling of radiopaque dye in the medial joint space during abduction—confirming the hinge effect—which subsequently resolves as the hip is brought into adduction, demonstrating improved sphericity and congruency in this position.
Detailed Surgical Anatomy and Biomechanics
A flawless execution of a valgus-producing proximal femoral osteotomy requires an intimate, three-dimensional understanding of the surgical anatomy and the biomechanical forces we are manipulating. We are fundamentally altering the proximal femoral geometry to optimize joint reaction forces.
Osteology and Articular Geometry
We will be operating on the proximal femur, specifically targeting the subtrochanteric region. The surgeon must maintain a precise spatial awareness of the relationship between the greater trochanter, the lesser trochanter, the femoral neck axis, and the diaphyseal shaft. The osteotomy itself will be positioned just distal to the lesser trochanter. This specific location is chosen to ensure that there is adequate, robust cortical bone stock remaining in the proximal fragment to securely accommodate the insertion of the blade plate seating chisel and the final implant into the femoral neck. While we are not directly operating on the acetabulum, its spatial relationship with the deformed femoral head dictates the exact degree and orientation of our corrective osteotomy. Our ultimate goal is to rotate the femoral head such that the impingement-free, congruent portion of the articular surface is brought into the weight-bearing zone of the acetabular dome.
Muscular Intervals and Soft Tissue Envelopes
The surgical approach traverses several critical muscular intervals. The superficial dissection involves standard skin and subcutaneous tissue layers. Deep to this, we encounter the fascia lata, a dense, unyielding fibrous sheath that encases the musculature of the thigh. We will incise this fascia longitudinally, strictly in line with its fibers, to expose the underlying vastus lateralis. The vastus lateralis is a massive muscle originating from the intertrochanteric line, the anterior and inferior borders of the greater trochanter, the gluteal tuberosity, and the lateral lip of the linea aspera. We will elevate it anteriorly from the lateral intermuscular septum and the vastus ridge. This subperiosteal elevation provides a safe, avascular plane to access the lateral aspect of the femoral shaft. Proximally, the gluteus medius and minimus insert onto the greater trochanter; their integrity is vital for postoperative gait and must be protected.
Neurovascular Considerations
The lateral approach to the proximal femur is generally safe, but specific neurovascular structures demand respect. The Lateral Femoral Cutaneous Nerve (LFCN), a purely sensory nerve, typically emerges from beneath the inguinal ligament medial to the ASIS and courses laterally and distally. While usually anterior to our incision, its course is highly variable, and proximal extensions of the incision can place it at risk. Deep in the wound, as we elevate the vastus lateralis from the lateral intermuscular septum, we will invariably encounter perforating branches of the profunda femoris artery and vein. These substantial vessels pierce the vastus lateralis to supply the posterior compartment. They must be meticulously identified, isolated, and ligated or heavily cauterized to maintain a dry surgical field and prevent postoperative hematoma.
Crucially, we must consider the blood supply to the femoral head. In LCPD, the primary vascularity from the medial femoral circumflex artery (MFCA) via its retinacular branches has already been compromised. Fortunately, our subtrochanteric osteotomy is distal to the femoral neck and the hip capsule, meaning we are not directly jeopardizing these critical vessels. However, rough handling of the proximal fragment, excessive traction, or inadvertent proximal dissection into the trochanteric fossa must be strictly avoided to prevent further vascular insult.
Biomechanical Rationale of Valgus Osteotomy
The biomechanical genius of the valgus osteotomy lies in its ability to simultaneously address multiple pathological factors. By creating a valgus angulation at the subtrochanteric level, we effectively rotate the femoral head within the acetabulum. This rotation moves the lateral ossified ridge superiorly and centrally, away from the lateral acetabular margin, thereby eliminating the mechanical hinge. Furthermore, the valgus correction brings the relatively uninvolved, congruent anteromedial portion of the femoral head into the primary weight-bearing dome of the acetabulum. Additionally, this osteotomy often results in a relative lengthening of the limb, which helps correct the leg length discrepancy frequently seen in collapsed Perthes hips. Finally, by medializing the femoral shaft relative to the head (often achieved via the offset of the blade plate), we optimize the abductor moment arm, improving the mechanical advantage of the gluteus medius and reducing the overall joint reaction forces.
Exhaustive Indications and Contraindications
Patient selection is the absolute cornerstone of success in salvage procedures for LCPD. The valgus osteotomy is a powerful tool, but applying it to the wrong patient will yield disastrous results. The decision-making process relies heavily on clinical symptomatology combined with dynamic radiographic imaging.
Indications for Valgus Osteotomy
The primary indication is symptomatic hinge abduction in a patient with late-stage or healed LCPD. These patients typically fall into Stulberg Class III, IV, or occasionally V classifications. They present with intractable pain exacerbated by weight-bearing and activity, a pronounced limp, and a clinically demonstrable loss of abduction. The critical radiographic prerequisite is an arthrogram that clearly demonstrates hinge abduction in the neutral or abducted position, but crucially, shows significantly improved joint congruency and spherical seating of the femoral head when the hip is placed in adduction and, frequently, slight flexion. If adduction does not improve congruency, a valgus osteotomy will merely shift the impingement without providing a stable, congruent articulation.
Contraindications for Valgus Osteotomy
Absolute contraindications include the presence of active, untreated joint infection, or a hip that is globally stiff and ankylosed without a demonstrable hinge mechanism. If the arthrogram shows that the femoral head is perfectly spherical and congruent in all positions (which is rare in late LCPD but possible), a valgus osteotomy is unnecessary and potentially harmful. Relative contraindications include profound, uncorrectable abductor weakness or severe, advanced secondary osteoarthritis where the articular cartilage is completely denuded; in such cases, arthrodesis or total hip arthroplasty (THA) may be the only viable salvage options.
| Category | Specific Parameters | Clinical Implications |
|---|---|---|
| Primary Indications | Symptomatic hinge abduction; Painful limp; Loss of abduction ROM. | Patient is experiencing mechanical failure of the joint due to lateral impingement. |
| Radiographic Indications | Arthrogram showing medial dye pooling in abduction, resolving in adduction. | Confirms that valgus repositioning will place a congruent portion of the head into the acetabular dome. |
| Absolute Contraindications | Active joint infection; Global hip ankylosis; Spherical congruency. | Surgery will fail or exacerbate the condition; alternative salvage (e.g., THA) required. |
| Relative Contraindications | End-stage osteoarthritis (bone-on-bone); Severe, irreversible abductor paralysis. | The biological envelope or muscular mechanics are too degraded to support a joint-preserving osteotomy. |
Pre-Operative Planning, Templating, and Patient Positioning
The success of a valgus osteotomy is dictated in the templating room long before the patient enters the operating theater. We must meticulously plan every bony cut, every angle, and the exact trajectory of our hardware to achieve the desired biomechanical correction.
Imaging Review and Dynamic Arthrogram Analysis
The foundation of our plan rests on high-quality plain radiographs (AP and true lateral of the proximal femur) and, most importantly, the dynamic arthrogram. We scrutinize the AP and lateral radiographs to confirm the presence of hinge abduction, assess the Stulberg classification, quantify the lateral prominence, and measure any associated limb shortening. The arthrogram images, taken in varying degrees of abduction, adduction, flexion, and extension, are analyzed to identify the "sweet spot"—the exact spatial orientation of the femur that maximizes articular congruency and completely relieves lateral impingement. Typically, this optimal position is found in adduction. The degree of adduction required to achieve this congruency dictates the precise amount of valgus correction we must build into our osteotomy.
Precision Templating and Hardware Selection
We utilize digital templating software or precise physical acetate overlays of our chosen blade plate system. We place the template over the patient's AP radiograph and digitally or manually rotate the proximal femur into the predetermined angle of adduction to simulate the desired correction. We must ensure that in this new position, the hip can be abducted at least 10 to 15 degrees past neutral without the lateral ridge impinging on the acetabulum. In a typical severe LCPD case, this requires approximately 20 to 30 degrees of valgus correction.
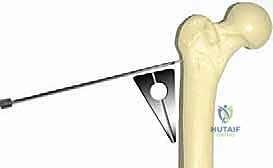
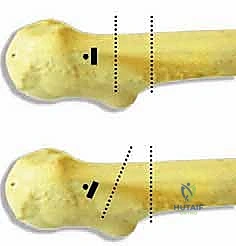
We must carefully plan the osteotomy limbs. The proximal limb is an oblique cut originating just distal to the lesser trochanter. The distal limb is a transverse cut designed so that, upon closure of the wedge, the final osteotomy site is parallel to the ground during weight-bearing, maximizing compressive forces and stability. I strongly advocate for a 120-degree fixed-angle blade plate with a lateral step-off. The step-off is critical as it medializes the distal femoral shaft, shifting the mechanical axis medially, improving acetabular coverage, and lengthening the abductor moment arm.
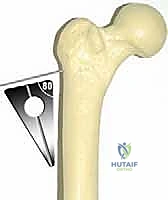
The mathematics of blade plate insertion are unforgiving. The fixed angle of the plate (e.g., 120 degrees) dictates the final construct. To achieve a planned 25-degree valgus correction, the seating chisel (and subsequently the blade) must be inserted into the femoral neck at an angle equal to the plate angle minus the desired correction. Therefore, 120° - 25° = 95°. The chisel must be driven into the neck at exactly 95 degrees relative to the lateral femoral shaft. When the lateral bone wedge is removed and the shaft is abducted to meet the plate, exactly 25 degrees of valgus will be achieved. We also measure the exact base width of the lateral cortical wedge that must be excised to permit this closure.
Operating Room Setup and Patient Positioning
The patient is brought to the operating room and positioned supine on a fully radiolucent surgical table. This is non-negotiable, as we require absolute, unrestricted fluoroscopic visualization from the iliac crest down to the distal femur. The C-arm fluoroscopy unit is positioned on the contralateral side of the patient, draped sterilely, and configured to swing seamlessly between AP and true lateral projections without requiring any movement of the patient's limb.
A soft bump or a meticulously folded blanket is placed securely under the affected ipsilateral hemipelvis. This slight elevation serves to bring the proximal femur parallel to the floor, neutralizing the natural external rotation of the relaxed limb and greatly facilitating true AP fluoroscopic imaging. The entire affected lower extremity, from the costal margin down to the toes, is prepped and draped free in a sterile fashion. The draping must allow for aggressive, full range of motion of the hip—particularly extreme abduction and adduction—which will be required to physically close the osteotomy and assess the final reduction. Before the first incision is made, a mandatory fluoroscopic "time-out" is performed to verify that perfect AP and lateral images of the femoral head, neck, and planned osteotomy site can be obtained effortlessly.
Step-by-Step Surgical Approach and Fixation Technique
With our blueprint finalized and the patient optimally positioned, we proceed with the surgical execution. This requires meticulous soft tissue handling and absolute precision with our osteotomes and power equipment.
1. Incision and Initial Exposure
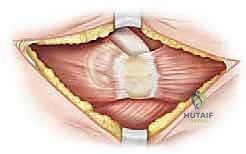
We begin with a straight lateral longitudinal skin incision. Palpating the tip of the greater trochanter, the incision starts approximately 2 to 3 cm distal to this landmark and extends distally along the lateral midline of the femoral shaft for roughly 10 to 12 cm. This length provides generous exposure of the subtrochanteric region without unnecessary proximal dissection. We carry the dissection sharply through the subcutaneous adipose tissue, utilizing electrocautery to achieve meticulous hemostasis of superficial bleeding vessels. We then identify the glistening white fibers of the fascia lata. Using a scalpel, we incise the fascia lata longitudinally, strictly in line with its fibers, and then extend this incision proximally and distally using Mayo scissors, revealing the vastus lateralis muscle belly beneath.
2. Deep Dissection and Femoral Exposure
The key to a bloodless and safe exposure of the lateral femur is the proper elevation of the vastus lateralis. We utilize electrocautery to create a precise "L-shaped" or "hockey-stick" incision in the epimysium of the vastus lateralis. The transverse limb of this incision starts anteriorly along the vastus ridge (the bony prominence at the base of the greater trochanter), and the longitudinal limb turns distally, running along the anterior border of the muscle belly, just posterior to the lateral intermuscular septum.
Using a broad Cobb elevator, we strictly maintain a subperiosteal plane, elevating the vastus lateralis from anterior to posterior off the lateral and anterior aspects of the femoral shaft. As we reflect the muscle mass posteriorly, we will encounter the perforating vessels from the profunda femoris. These must be isolated, clamped, and securely ligated or heavily coagulated. We place blunt Hohmann retractors anteriorly over the femoral neck and posteriorly behind the shaft to maintain a wide, clear view of the planned osteotomy site.
3. Guide Wire Placement and Chisel Seating
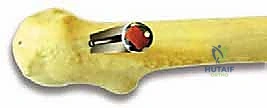
This is the most critical juncture of the operation. The trajectory of the seating chisel dictates the final three-dimensional orientation of the proximal fragment. Under strict biplanar fluoroscopic guidance, we introduce a threaded guide wire into the lateral cortex, aiming up into the center of the femoral neck and head. The entry point is typically 1.5 to 2 cm distal to the vastus ridge.
We must execute our preoperative mathematical plan perfectly. If we planned a 95-degree insertion angle to achieve a 25-degree valgus correction with a 120-degree plate, we use a sterile goniometer or an angled guide to ensure the guide wire enters the shaft at exactly 95 degrees in the coronal plane. In the axial/sagittal plane, the wire must run perfectly parallel to the anterior aspect of the femoral neck to avoid introducing unwanted retroversion or anteversion.
Once the guide wire is perfectly positioned and verified on AP and lateral fluoroscopy, we use a cannulated drill to open the lateral cortex. We then assemble the seating chisel and the router guide. The chisel is driven over the wire (or parallel to it, depending on the system) into the femoral neck. The surgeon must constantly monitor the rotational alignment of the chisel handle; it must remain perfectly parallel to the longitudinal axis of the femoral shaft to prevent rotational malalignment. The chisel is driven to the pre-measured depth, ensuring it occupies 50% to 75% of the femoral neck width on the lateral view for maximum biomechanical purchase.
4. Osteotomy Execution and Wedge Resection
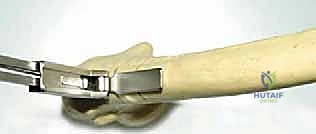
With the seating chisel securely in place, acting as our definitive reference for the proximal fragment, we proceed with the osteotomy. Using an oscillating saw equipped with a sharp, saline-cooled blade, we make our first cut. The proximal limb of the osteotomy is an oblique cut made just distal to the entry point of the chisel, exiting medially just below the lesser trochanter.
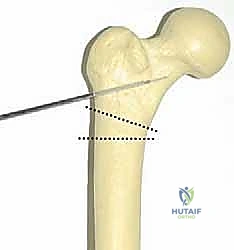
Next, we execute the distal transverse cut. The distance between the proximal oblique cut and this distal transverse cut on the lateral cortex corresponds exactly to the base width of the lateral closing wedge we calculated during templating.
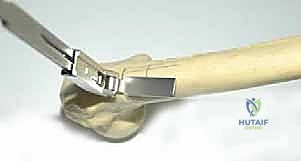
We carefully remove the lateral cortical wedge. It is imperative to complete the medial cortical cut cleanly; leaving a medial hinge can lead to uncontrolled fracturing when attempting to close the osteotomy. We use broad osteotomes to gently complete the cut and mobilize the fragments.
5. Blade Plate Insertion and Osteotomy Reduction
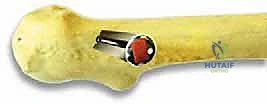
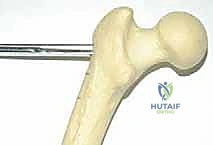
We carefully extract the seating chisel, maintaining the exact rotational alignment. The chosen 120-degree blade plate is immediately inserted into the precisely prepared track in the proximal fragment. The plate is gently impacted until the shoulder of the plate sits perfectly flush against the lateral cortex of the proximal fragment.
Now, the reduction maneuver. The distal femoral shaft is grasped, and the limb is brought into abduction. As the limb is abducted, the lateral gap of the osteotomy closes, and the lateral aspect of the distal femoral shaft is brought into direct contact with the side plate of the hardware. Because of our precise 95-degree chisel insertion, when the shaft meets the 120-degree plate, exactly 25 degrees of valgus correction is achieved. The osteotomy surfaces should compress tightly, and the medial step-off created by the plate design should be evident, medializing the shaft.
6. Final Fixation and Closure
Once the osteotomy is visually and fluoroscopically reduced, we secure the side plate to the distal femoral shaft. We utilize a Verbrugge or bone holding forceps to clamp the plate to the bone, ensuring excellent compression across the osteotomy site. We drill, measure, tap, and insert cortical screws through the plate into the distal fragment, typically requiring 3 to 4 bicortical screws for rigid fixation.
A final fluoroscopic check is mandatory. We verify the AP and lateral profiles, confirming the valgus correction, the secure seating of the blade within the neck, and the integrity of the fixation. We then perform a dynamic clinical examination, taking the hip through a full range of motion. We should note a dramatic improvement in abduction and a complete resolution of the lateral impingement that was present preoperatively. The wound is irrigated copiously. The vastus lateralis is allowed to fall back over the plate, and its fascia is closed meticulously with heavy absorbable sutures. The fascia lata is closed, followed by the subcutaneous tissues and skin.
Complications, Incidence Rates, and Salvage Management
While highly effective, the valgus osteotomy is a technically demanding procedure with a recognized complication profile. Meticulous surgical technique and rigorous patient selection are the primary defenses against these adverse events.
Hardware Failure and Nonunion
Because this osteotomy is performed in cortical bone at the subtrochanteric level, it is subjected to massive bending moments and shear forces. If the osteotomy is not perfectly compressed, or if the patient is non-compliant with postoperative weight-bearing restrictions, hardware failure (plate bending or screw pullout) or delayed union/nonunion can occur. The incidence of nonunion is generally low (<5%) if rigid internal fixation and a closing wedge technique are utilized. Management of a nonunion typically requires revision surgery with bone grafting and potentially exchanging the hardware for a more robust construct.
Malunion and Leg Length Discrepancy
Inaccurate preoperative templating or intraoperative execution can lead to malunion. Insufficient valgus correction will
