Scaphoid Nonunion Grafting: The Tomaino Volar Wedge Technique
Key Takeaway
Scaphoid nonunion with humpback deformity often leads to dorsal intercalated segment instability (DISI). The Tomaino volar wedge grafting technique addresses this by percutaneously pinning the lunate to the radius in a neutral position before addressing the scaphoid defect. A tricortical iliac crest bone graft is then sculpted and impacted into the volar defect, followed by rigid internal fixation using a cannulated headless compression screw to restore carpal kinematics and promote union.
Introduction to Scaphoid Nonunion and Carpal Collapse
Scaphoid fractures are the most common of all carpal bone fractures, yet they remain notoriously prone to delayed union and nonunion. The unique retrograde intraosseous blood supply, combined with the complex biomechanical forces transmitted across the radiocarpal and midcarpal joints, creates a hostile environment for fracture healing. When a scaphoid nonunion is left untreated, the inherent volar compressive forces across the wrist lead to progressive volar comminution and the classic "humpback" deformity.
This structural collapse disrupts the scaphoid’s critical role as the mechanical tie-rod stabilizing the proximal and distal carpal rows. Consequently, the lunate, freed from the stabilizing influence of the intact scaphoid, follows the triquetrum into an extended position, resulting in Dorsal Intercalated Segment Instability (DISI).
The Tomaino et al. modification of the volar wedge grafting technique is a masterclass in biomechanical restoration. It emphasizes a critical, often overlooked principle: the lunate malalignment must be anatomically reduced and provisionally stabilized prior to addressing the scaphoid defect. Failing to correct the lunate extension before inserting the volar graft will inevitably lock the wrist in a DISI deformity, accelerating the progression of Scaphoid Nonunion Advanced Collapse (SNAC) arthritis.
Pathoanatomy and Biomechanical Rationale
To execute this procedure flawlessly, the operating surgeon must possess a profound understanding of carpal kinematics. The scaphoid bridges the proximal and distal carpal rows. When a fracture occurs, typically at the waist, the distal pole tends to flex along with the distal carpal row (driven by the scaphoid-trapezium-trapezoid ligament complex). Conversely, the proximal pole extends along with the lunate.
Over time, the volar cortex of the scaphoid resorbs, creating a wedge-shaped defect. Attempting to simply compress this nonunion without structural grafting will shorten the scaphoid, alter carpal kinematics, and fail to correct the DISI deformity.
Clinical Pearl: The primary objective of volar wedge grafting is not merely to achieve bone union, but to restore the three-dimensional anatomy of the scaphoid. Restoring the volar length of the scaphoid automatically realigns the carpal kinematic chain, provided the lunate has been appropriately derotated.
Preoperative Planning and Patient Positioning
Imaging and Templating
Standard posteroanterior (PA), lateral, and scaphoid-view radiographs are mandatory. A fine-cut computed tomography (CT) scan in the sagittal plane along the longitudinal axis of the scaphoid is highly recommended to accurately quantify the volume of the volar defect, assess the degree of humpback deformity, and evaluate the presence of cystic changes or avascular necrosis (AVN) in the proximal pole. Magnetic Resonance Imaging (MRI) may be utilized if the vascularity of the proximal pole is highly questionable, although intraoperative assessment of punctate bleeding remains the gold standard.
Anesthesia and Positioning
- The patient is placed in the supine position on the operating table with the affected upper extremity extended on a radiolucent hand table.
- Regional anesthesia (supraclavicular or axillary brachial plexus block) or general anesthesia is administered based on patient and anesthesiologist preference.
- The ipsilateral anterior iliac crest is meticulously prepped and draped to allow for the harvest of a tricortical corticocancellous bone graft.
- The operative limb is exsanguinated using an elastic Esmarch bandage, and a pneumatic tourniquet is inflated to 250 mm Hg (or 100 mm Hg above systolic blood pressure).
Surgical Technique: Step-by-Step Masterclass
1. The Volar Approach (Modified Russe)
The volar approach provides direct access to the scaphoid waist and distal pole, making it the optimal trajectory for addressing humpback deformities.
- Make a longitudinal palmar skin incision, approximately 4 to 5 cm in length, positioned between the flexor carpi radialis (FCR) tendon and the radial artery. The incision should extend from about 2 cm proximal to the radial styloid to approximately 1 cm distal to the scaphoid tuberosity.
- Carefully dissect through the subcutaneous tissues. Identify and protect the palmar cutaneous branch of the median nerve, which typically lies ulnar to the FCR tendon.
- Incise the FCR tendon sheath longitudinally and retract the FCR tendon ulnarly. This maneuver protects the median nerve and provides a safe internervous plane.
- Retract the radial artery radially, taking care to ligate any small transverse crossing branches if necessary.
2. Capsulotomy and Joint Exposure
- Deep to the FCR bed, identify the volar wrist capsule and the robust radioscaphocapitate (RSC) ligament.
- Incise the palmar capsule and the RSC ligament longitudinally, directly in line with the skin incision.
- Extend this capsular incision distally to expose the proximal pole of the trapezium and the scaphotrapezial (ST) joint.
- Elevate the capsular flaps sharply to expose the underlying scaphoid nonunion site.
Surgical Warning: The RSC ligament is a critical secondary stabilizer of the wrist. Ensure that the capsulotomy leaves sufficient tissue margins on both the radial and ulnar sides to allow for a robust, watertight repair at the conclusion of the procedure. Failure to repair the RSC ligament can lead to iatrogenic carpal instability.
3. Correction of Lunate Malalignment (The Tomaino Maneuver)
This is the defining step of the Tomaino technique. The DISI deformity must be corrected before the scaphoid is manipulated.
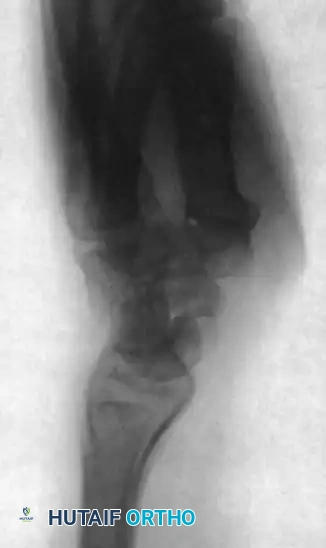
FIGURE 69-42 A: Lateral radiograph of the wrist with a scaphoid nonunion and humpback deformity. Note the severe lunate extension secondary to carpal collapse.
- To correct the lunate extension, maximally flex the wrist joint. This maneuver utilizes the intact dorsal radiocarpal ligaments to pull the extended lunate out of its dorsiflexed position and derotate it into a neutral alignment.
- While holding the wrist in maximum flexion, percutaneously pass a 1.1-mm (0.045-inch) Kirschner wire (K-wire) through the radial aspect of the distal radius, directing it ulnarly and distally into the lunate fossa and securing it into the body of the lunate.
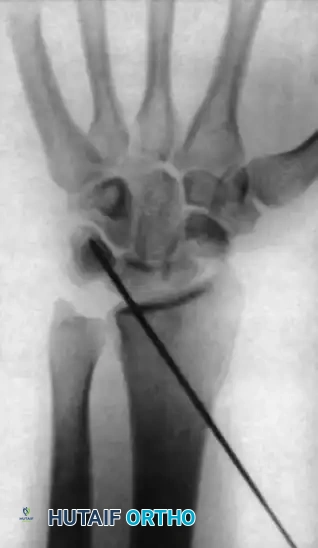
FIGURE 69-42 B: Posteroanterior radiograph demonstrating the Kirschner wire placed percutaneously through the radial side of the radius into the lunate, locking it in the corrected position.
- Nerve Protection: Extreme caution must be exercised during the percutaneous passage of this K-wire to protect the superficial branch of the radial nerve (SBRN). A small stab incision and blunt dissection down to the bone with a hemostat is highly recommended before driving the wire.
- Utilize the C-arm fluoroscope to obtain a strict lateral image. Confirm that the lunate is now in neutral alignment (collinear with the radius) and that the radiolunate angle has been anatomically restored.
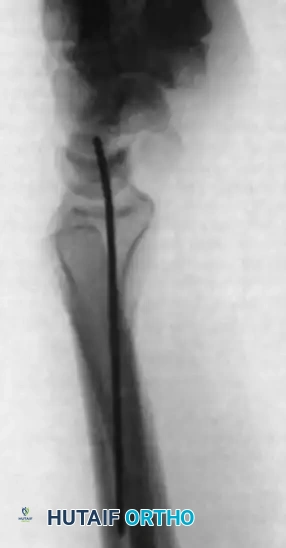
FIGURE 69-42 C: Lateral radiograph confirming that the normal radiolunate angle has been successfully restored prior to scaphoid grafting.
4. Preparation of the Scaphoid Defect
With the lunate securely pinned in a neutral position, the scaphoid nonunion can now be addressed without the risk of locking the wrist in a DISI deformity.
- Supinate the forearm and maximally extend the wrist. Because the proximal pole of the scaphoid is tethered to the now-neutral lunate (via the intact scapholunate interosseous ligament), extending the wrist will hinge open the volar scaphoid nonunion site, fully revealing the extent of the humpback defect.
- Using a combination of a microsagittal saw, sharp curettes, and a high-speed burr, meticulously resect the fibrotic nonunion tissue.
- Debride both the proximal and distal fragments until healthy, viable, punctate bleeding bone is encountered (the "paprika sign").
- Assessment of Vascularity: If the proximal pole is sclerotic and completely avascular (no bleeding after tourniquet deflation), a vascularized bone graft (e.g., 1,2-Intercompartmental Supraretinacular Artery [1,2-ICSRA] graft) may be indicated instead of a standard non-vascularized graft.
- Measure the resulting three-dimensional gap in the scaphoid (length, width, and depth) using a sterile ruler or caliper. This measurement dictates the exact dimensions of the required wedge graft.
- Distally, use a small rongeur to create a subtle notch in the proximal lip of the trapezium. This notch is essential to allow the correct trajectory for the subsequent placement of a cannulated headless compression screw (e.g., Herbert-Whipple) along the central axis of the scaphoid.
5. Graft Harvest and Sculpting
- Direct attention to the prepped ipsilateral iliac crest. Make an incision approximately 2 cm posterior to the Anterior Superior Iliac Spine (ASIS) to avoid injury to the lateral femoral cutaneous nerve.
- Dissect down to the iliac crest and incise the periosteum.
- Using an oscillating microsagittal saw, harvest a tricortical corticocancellous block of bone that slightly exceeds the measured dimensions of the scaphoid defect.
- Thermal Protection: Continuously irrigate the saw blade with chilled sterile saline during the osteotomy to prevent thermal necrosis of the osteogenic cells within the graft.
- On the back table, use a rongeur or a fine burr to sculpt the graft into a precise wedge shape that perfectly matches the defect. The cortical surface of the graft will reconstruct the volar cortex of the scaphoid, while the cancellous portion will fill the central void.
6. Graft Insertion and Provisional Fixation
- Gently impact the sculpted wedge graft into the scaphoid defect. Ensure that the inner (cancellous) surface is facing dorsally toward the capitate, and the cortical surface is flush with the volar aspect of the scaphoid.
- Pitfall Avoidance: Carefully inspect the dorsal and ulnar surfaces of the scaphoid via the nonunion site before final impaction. Avoid any prominence of the graft protruding into the midcarpal joint, as this will cause severe mechanical impingement and rapid chondrolysis of the capitate.
- Once the graft is perfectly seated, pass a single 1.1-mm (0.045-inch) K-wire eccentrically down the longitudinal axis of the scaphoid (from distal to proximal) to provisionally hold the distal pole, the graft, and the proximal pole in rigid alignment.
- At this stage, remove the radiolunate K-wire that was placed in Step 3. Removing this wire frees the wrist joint, allowing the surgeon to move the wrist freely to obtain multiple fluoroscopic views to confirm the trajectory of the scaphoid guidewire.
7. Definitive Internal Fixation
Rigid internal fixation is paramount for the incorporation of the non-vascularized graft. A cannulated headless compression screw is the implant of choice.
- Using C-arm fluoroscopy, introduce the guidewire for the headless compression screw through the previously created notch in the trapezium.
- Drive the guidewire from distal-volar to proximal-dorsal, aiming for the absolute central axis of the proximal pole. Central placement is biomechanically superior, offering the highest resistance to bending and torsional forces.
- Confirm the central placement of the guidewire in all planes (PA, lateral, and pronated oblique views).
- Measure the length of the guidewire.
- Critical Sizing Adjustment: Anticipate that it is necessary to reduce the selected screw length by 4 to 6 mm from the measured length. This subtraction ensures that both the leading and trailing threads of the headless screw are completely buried beneath the subchondral bone, preventing catastrophic articular impingement at the scaphotrapezial or radioscaphoid joints.
- Drill over the guidewire using the cannulated drill bit, and insert the appropriate length headless compression screw.
- Verify under fluoroscopy that the fracture site and the graft are dynamically compressed and that the screw threads are fully intraosseous.
8. Final Assessment and Closure
- Inspect the volar surface of the reconstructed scaphoid. Use a small, high-speed diamond burr to smooth any prominent edges of the cortical graft on the radial and volar surfaces.
- Take the wrist through a full, passive range of motion—assessing flexion, extension, radial deviation, and ulnar deviation.
- Observe the radiocarpal joint closely to ensure the grafted scaphoid is not impinging on the radial styloid during radial deviation. If impingement is noted, perform a limited radial styloidectomy (resecting no more than 3-4 mm to preserve the origin of the radioscaphocapitate ligament).
- Thoroughly irrigate the joint to remove all bone debris.
- Meticulously repair the palmar capsule and the radioscaphocapitate ligament using non-absorbable or slowly absorbing braided sutures (e.g., 3-0 Ethibond or Vicryl). A robust repair prevents volar carpal subluxation.
- Loosely reapproximate the sheath of the flexor carpi radialis.
- Deflate the pneumatic tourniquet, obtain meticulous hemostasis using bipolar electrocautery, and close the subcutaneous tissues and skin in a standard layered fashion.
- Apply a sterile compressive dressing and a well-padded, short-arm thumb spica splint with the wrist in slight extension and the thumb in a functional position.
Postoperative Care and Rehabilitation Protocol
The postoperative management following a volar wedge graft is a delicate balance between protecting the structural integrity of the graft and preventing debilitating wrist stiffness.
- Phase I (0 to 2 Weeks): The patient remains strictly immobilized in the postoperative short-arm thumb spica splint. Elevation and active digital range of motion (fingers) are highly encouraged to minimize edema and prevent tendon adhesions.
- Phase II (2 to 10/12 Weeks): At the 2-week follow-up, the initial splint and skin sutures are removed. Clinical evaluation of the incision is performed.
- For highly compliant patients, a custom-molded, removable short-arm thermoplastic thumb spica splint is fabricated. The patient is instructed to remove the splint only for hygiene and gentle, supervised active range-of-motion exercises.
- For noncompliant patients, or in cases where fixation was deemed tenuous, the wrist is rigidly immobilized in a fiberglass short-arm thumb spica cast.
- Heavy lifting, gripping, and weight-bearing through the affected extremity are strictly prohibited.
- Phase III (10 to 12+ Weeks): Radiographic assessment (and ideally a fine-cut CT scan) is performed at 10 to 12 weeks to evaluate for trabecular bridging across both the proximal and distal graft interfaces.
- Once solid bone union is confirmed radiographically, the splint is discontinued.
- The patient is transitioned to a formal physical therapy program focusing on progressive strengthening, proprioception, and maximizing terminal range of motion. Return to heavy manual labor or contact sports is typically delayed until 4 to 6 months postoperatively, contingent upon complete radiographic consolidation and clinical recovery.
You Might Also Like
