Masterclass in Flexor Tendon Repair: Zones I and II Surgical Techniques
Key Takeaway
Flexor tendon injuries in Zones I and II demand meticulous surgical technique to restore digital biomechanics and prevent adhesions. Zone I repairs focus on the flexor digitorum profundus insertion, while Zone II—historically termed "no man's land"—requires precise management of both the profundus and sublimis tendons within the fibroosseous sheath. Successful outcomes rely on atraumatic tendon retrieval, robust multi-strand core suturing, preservation of the A2 and A4 pulleys, and early active motion protocols.
INTRODUCTION TO FLEXOR TENDON ZONES I AND II
The surgical management of flexor tendon lacerations, particularly within Zones I and II, represents one of the most exacting challenges in hand surgery. Historically, Zone II was famously dubbed "no man's land" by Sterling Bunnell due to the high rates of postoperative adhesions and poor functional outcomes following primary repair. Today, advancements in our understanding of tendon nutrition, the biomechanics of the fibroosseous sheath, multi-strand core suturing techniques, and early active motion (EAM) protocols have revolutionized the standard of care, making primary repair the gold standard.
This comprehensive guide details the evidence-based surgical techniques for repairing the flexor digitorum profundus (FDP) in Zone I and both the FDP and flexor digitorum sublimis (FDS) in Zone II.
Clinical Pearl: The ultimate goal of flexor tendon repair is to achieve a construct strong enough to withstand the forces of early active motion while maintaining a low-profile repair that glides seamlessly through the preserved pulley system.
SURGICAL ANATOMY AND BIOMECHANICS
A profound understanding of the flexor tendon anatomy is non-negotiable for successful repair.
The Fibroosseous Sheath and Pulley System
The flexor tendons are enclosed within a synovial sheath that provides both nutrition (via synovial diffusion) and a low-friction gliding environment. The sheath is reinforced by a retinacular system composed of five annular (A1-A5) and three cruciate (C1-C3) pulleys.
* A2 and A4 Pulleys: These arise from the periosteum of the proximal and middle phalanges, respectively. They are biomechanically critical for preventing tendon bowstringing and maintaining the mechanical advantage (moment arm) of the flexor tendons. They must be preserved or reconstructed.
* Cruciate Pulleys: The thin, filamentous C1, C2, and C3 pulleys are highly compliant. These are the optimal sites for surgical incisions (windows) to access retracted tendons without compromising digital biomechanics.
Camper's Chiasm and the FDS Spiral
In Zone II, the FDS bifurcates at the level of the proximal third of the proximal phalanx, allowing the FDP to pass through it. The two slips of the FDS then rotate 180 degrees (the FDS spiral) to insert into the volar base of the middle phalanx. This creates Camper's chiasm. Failure to recognize and anatomically restore this spiral during FDS repair will result in binding of the FDP tendon.
REPAIR IN ZONE I
Zone I extends from the insertion of the FDS on the middle phalanx to the insertion of the FDP on the distal phalanx. Injuries here exclusively involve the FDP tendon.
Surgical Approach and Exposure
When the flexor profundus tendon has been injured in Zone I at or near its insertion, the surgical approach must provide adequate exposure while protecting the delicate neurovascular structures of the distal pulp.
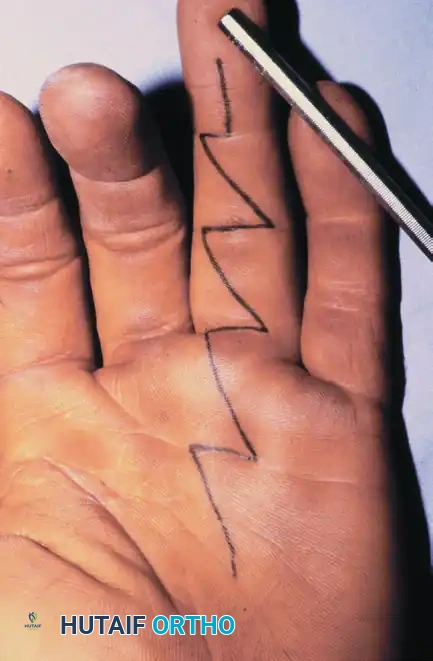
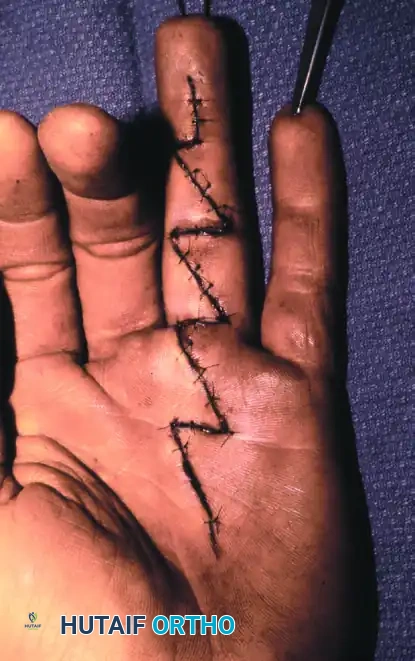
- Incision Design: Approach the distal end of the finger by extending the laceration with an oblique incision into the central portion of the pulp, or utilize a midradial or midulnar incision. Proximally, extend the incision using a volar zigzag (Bruner) or midline oblique incision.
Incision outlined on the digit and palm utilizing a classic volar zigzag (Bruner) approach.
- Flap Elevation: Elevate the skin flap by dissecting either dorsal or volar to the neurovascular bundle. Avoid injury to the terminal branches of the digital nerve, and strictly avoid devascularizing any elevated skin flaps.
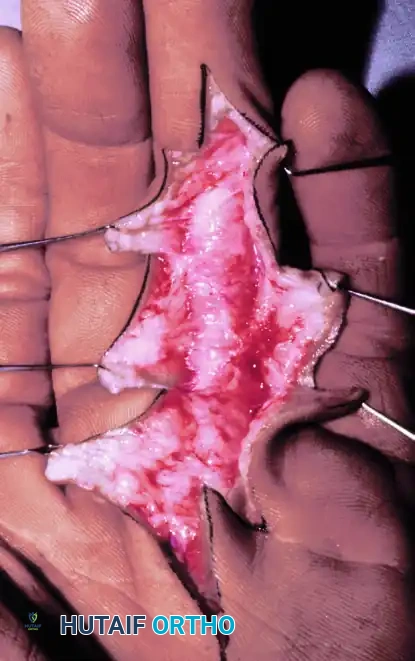
Exposure of the fibroosseous flexor tendon sheath after meticulous flap elevation.
Tendon Retrieval and Sheath Management
Usually, the insertion footprint of the flexor profundus is easily visualized. At times, the proximal stump of the tendon will have retracted only minimally.
- Expose the Fibroosseous Sheath: If the proximal end of the tendon can be seen, attempt to deliver it into the wound by grasping it gently with small, atraumatic forceps (e.g., Adson or fine tissue forceps).
- Proximal Extension: If the tendon has retracted more proximally, extend the incision as needed in a midradial/midulnar fashion or by extending the volar zigzag, strictly avoiding injury to the neurovascular bundle.
- Sheath Window: Open the thin cruciform portion of the sheath to assist in delivering the tendon. Create an L-shaped incision or a trapdoor with a Z-plasty arrangement to allow for easier closure later. It is critical to preserve the A4 pulley during this exposure.
Tendon Stabilization and Repair
If the tendon has retracted, place a core grasping suture in its end.
Surgical Warning: Repeated, traumatic grasping of the tendon ends with heavy forceps will crush the epitenon, leading to severe adhesions. Always handle the tendon by its cut surface or use a core suture for traction.
- Temporary Fixation: If the flexor tendon cannot be maintained in the repair zone easily, insert a small-gauge (25- or 26-gauge) hypodermic needle transversely through the skin, through the tendon, and out the opposite side of the finger. This acts as a temporary retention device, removing tension during the repair.
- Direct Repair vs. Bone Anchor: If there is sufficient distal stump (>1 cm), a direct tendon-to-tendon repair is performed using a 4-0 core suture. If the laceration is flush with the insertion, the proximal end must be reattached to the distal phalanx.
- Pull-Out Technique: Historically, a Bunnell retrograde pull-out wire was used. Modern alternatives include antegrade pull-out techniques or the use of small suture anchors. If using a pull-out technique, drill a tunnel in the bone, pass the needles through the tunnel, and exit through the fingernail or around the distal phalanx, tying over a button.
- Closure: After ascertaining satisfactory rotation and secure attachment of the tendon, remove the temporary retention needles. Close the wound with fine 4-0 or 5-0 monofilament nylon sutures.
Closed incision demonstrating tension-free skin approximation.
REPAIR IN ZONE II (THE STRICKLAND TECHNIQUE)
Zone II extends from the proximal edge of the A1 pulley (distal palmar crease) to the FDS insertion. Lacerations here frequently involve both the FDS and FDP tendons.
Incision and Exposure
In Zone II, the traumatic wound usually must be extended with proximal and distal incisions to achieve adequate exposure.
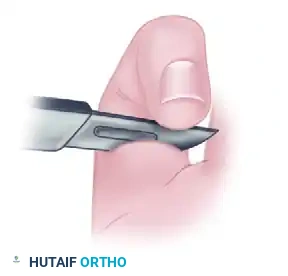
Knife laceration through Zone II with the digit in full flexion at the time of injury.
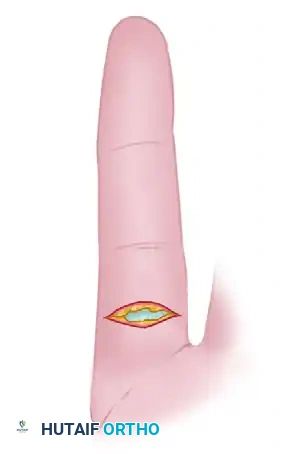
Level of flexor tendon retraction of the same finger after digital extension. Note the mismatch between the skin laceration and the tendon stumps.
- Approach: Regardless of whether a Bruner or midaxial approach is used, carefully reflect the skin flaps.
Green lines depict radial and ulnar incisions to allow wide exposure of the flexor tendon system.
- Neurovascular Management: If digital nerves have been transected, gently dissect them and tag them. Delay digital nerve repair until after the tendons are repaired to avoid disrupting the delicate nerve anastomosis during tendon manipulation.
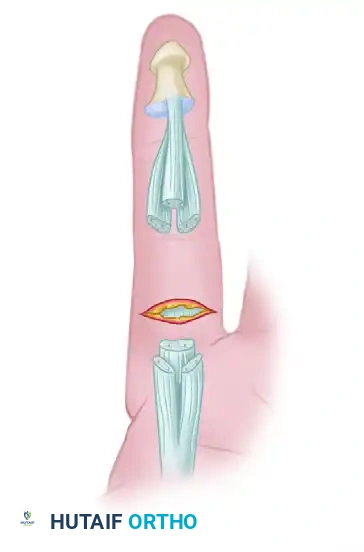
Flexor tendon system of the involved finger after reflection of skin flaps. The laceration has occurred through the C1 cruciate pulley area.
Sheath Management and Tendon Retrieval
Expose the flexor sheath sufficiently proximal and distal to locate the tendon ends. The distal tendon end can usually be identified easily with passive flexion of the distal interphalangeal (DIP) joint.
- Cruciate Windows: If opening the flexor sheath is required, this is best done in the filamentous cruciate areas (C1, C2, C3). Avoid injury to the A2 and A4 pulleys.
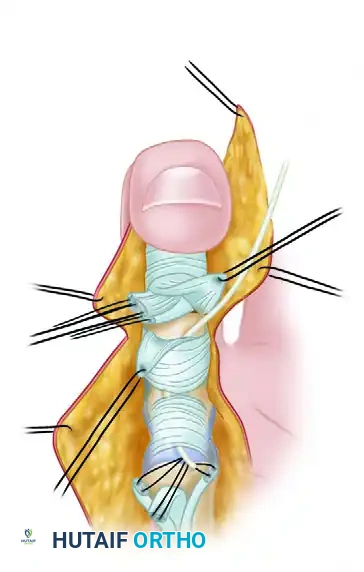
Reflection of small triangular flaps at the cruciate-synovial sheath allows distal flexor tendon stumps to be delivered into the wound.
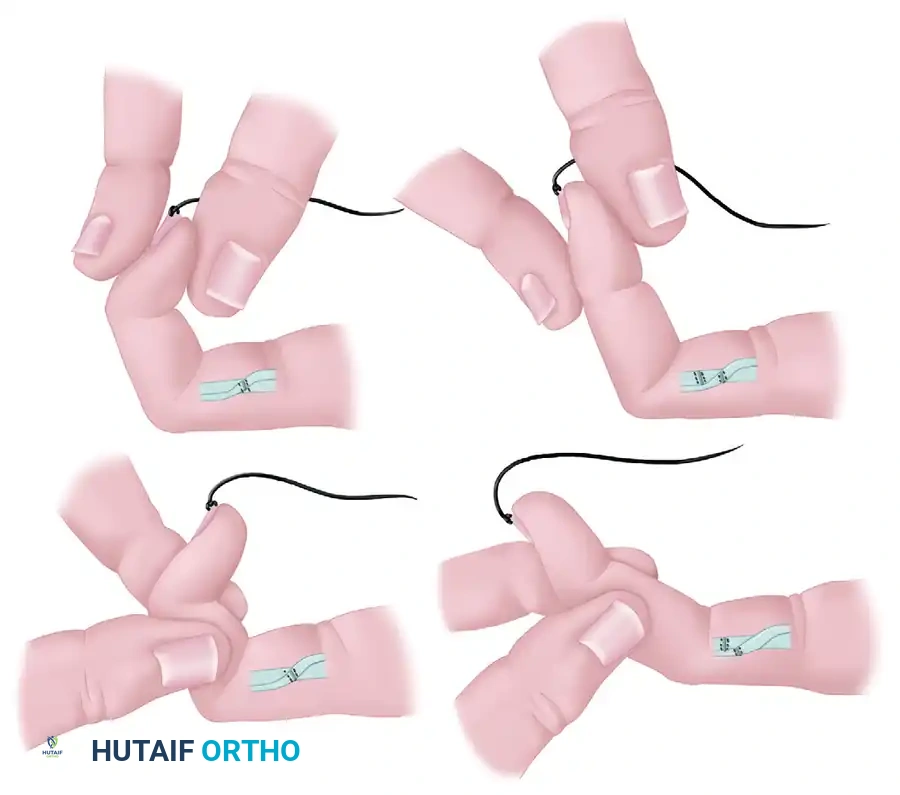
- Retrieval Techniques: Deliver the flexor tendon into the finger by "milking" the forearm, hand, and wrist, and flexing the wrist and fingers. In a fresh, acute injury, passage is usually straightforward.
- Catheter Technique: If the tendon has retracted into the palm, pass a piece of pediatric feeding tubing or a plastic IV catheter proximally through the sheath. Once the proximal tendon is found in the palm (often requiring a separate transverse incision at the distal palmar crease), place a core suture into the tendon, pass the suture into the tubing, and "lead" the tendon distally through the sheath.
Tendon Stabilization
Once the proximal ends of the FDS and FDP have been delivered to the repair site, secure them to prevent re-retraction.
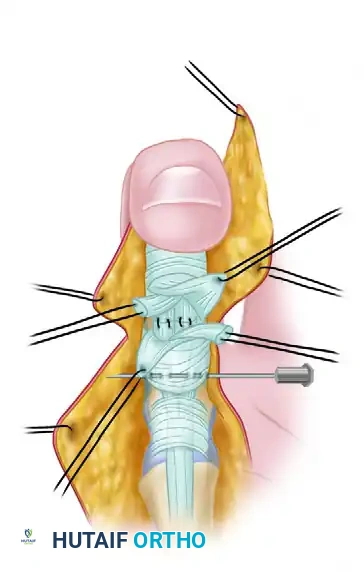
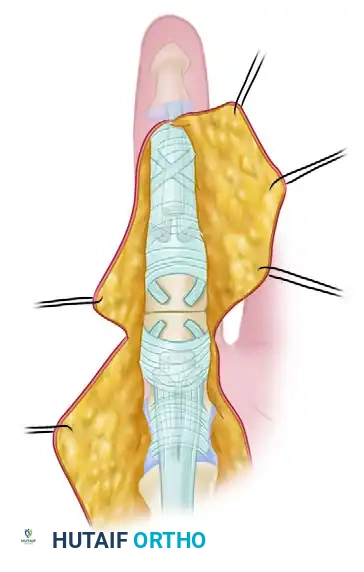
Proximal flexor tendon stumps are maintained at the repair site by means of a transversely placed small-gauge hypodermic needle.
Repairing the Flexor Digitorum Sublimis (FDS)
The FDS is typically repaired before the FDP to restore the anatomical bed.
Surgical Pitfall - The FDS Spiral: If the FDS is transected proximal to the PIP joint, you must respect the FDS "spiral." The FDS winds around the FDP, decussating to insert on the volar middle phalanx. A laceration here allows the proximal and distal ends to rotate 90 degrees in opposite directions. If sutured in this malrotated alignment, it will create a mechanical block, binding the FDP tendon. Always match the contour of the cut ends perfectly.
- If the FDS is transected very distally near its insertion, the tendon slips are thin and flat. Place a locked core suture, or use small suture anchors if bone stock permits.
- While excision of the FDS was historically performed to prevent crowding in the sheath, modern consensus strongly favors FDS repair to preserve independent PIP flexion and enhance overall grip strength. Excision is reserved only for cases where severe crushing prevents a smooth repair that would otherwise compromise FDP gliding.
Repairing the Flexor Digitorum Profundus (FDP)
Introduce the core suture into the FDP using a robust four-strand to eight-strand method (e.g., modified Kessler, cruciate, or Strickland technique) using 3-0 or 4-0 non-absorbable braided suture.
- Rotation: Ensure the FDP is not malrotated. Referencing the vincular attachments and its relationship to the sublimis is highly helpful.
- Epitendinous Repair: Tie the core knots securely. Complete the tendon repair with a circumferential 5-0 or 6-0 monofilament nylon inverting suture or a cross-stitch. The epitendinous suture is mandatory; it adds up to 30% to the tensile strength of the repair and tucks in the raw tendon edges, significantly reducing gliding resistance and adhesion formation.
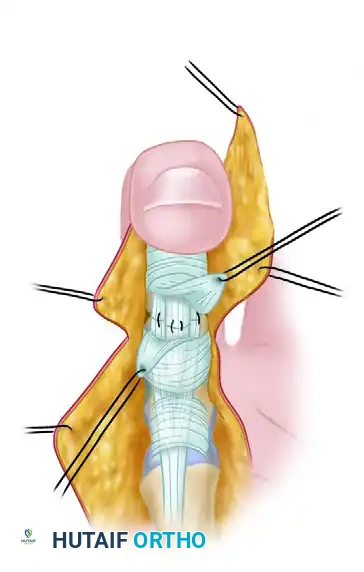
Completed repair of both tendons with the distal interphalangeal joint in full flexion.
Dynamic Testing and Closure
Once the repair is complete, remove the temporary retaining needles. Extend the digit to observe the repair gliding under the intact pulley system.
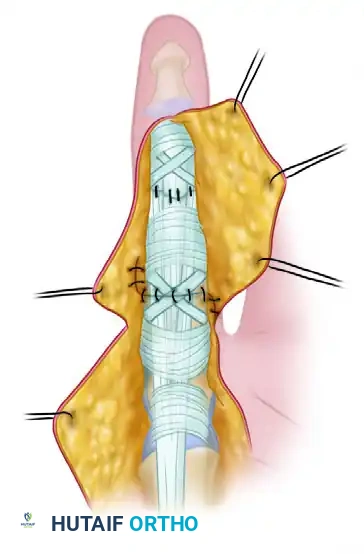
Extension of the distal interphalangeal joint delivers the repair under the intact distal flexor tendon sheath. Repair of the cruciate (C1) synovial pulley has been completed.
- Sheath Closure: If conditions permit and it does not constrict the tendon, repair the sheath windows with 5-0 or 6-0 nylon to restore the synovial boundary.
- Skin Closure: Close the skin flaps with interrupted 5-0 nylon.
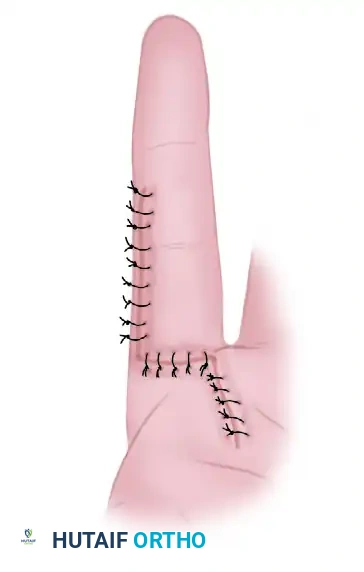
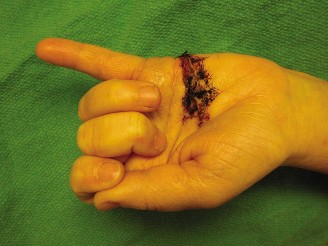
Wound repair at the conclusion of the procedure, demonstrating excellent approximation of the Bruner flaps.
POSTOPERATIVE PROTOCOL
The success of a Zone I or II flexor tendon repair relies as much on the postoperative rehabilitation as it does on the surgical execution. The limb is immobilized in a dorsal blocking splint with the wrist in 20-30 degrees of flexion, MCP joints in 70 degrees of flexion, and IP joints in neutral extension.
Modern protocols favor Early Active Motion (EAM), provided a robust 4-strand or greater core repair was achieved. Protocols such as the Belfast or modified Duran allow for controlled, synergistic active flexion and extension within the constraints of the dorsal block splint. This controlled stress stimulates intrinsic tendon healing, increases tensile strength, and minimizes restrictive peritendinous adhesions.
You Might Also Like