Percutaneous Pinning for Proximal Humerus Fractures: An Intraoperative Masterclass
Key Takeaway
Welcome, fellows, to an immersive intraoperative masterclass on percutaneous pinning for proximal humerus fractures. We'll meticulously review surgical anatomy, patient positioning, and the step-by-step execution of this minimally invasive technique. Learn to navigate complex fractures, mitigate risks, and ensure optimal patient outcomes through precise reduction and stabilization. This session covers everything from initial incision to post-operative rehabilitation, preparing you for clinical excellence.
Welcome, fellows, to the operating theater. Today, we are going to tackle a common yet biomechanically and biologically challenging injury: the proximal humerus fracture. Specifically, we will be performing a percutaneous pinning, a technique that, when applied judiciously and executed with precision, offers excellent clinical outcomes with minimal soft tissue disruption. This procedure is not merely about inserting Kirschner wires; it is an exercise in applied biomechanics, a deep understanding of three-dimensional anatomy, and the art of closed reduction through a limited, percutaneous approach. Let us scrub in and dissect the nuances of this masterclass technique.
Comprehensive Introduction and Patho-Epidemiology
Proximal humerus fractures represent approximately 5% to 6% of all adult fractures, making them the third most common fracture pattern seen in elderly patients, trailing only proximal femur and distal radius fractures. These injuries exhibit a classic bimodal epidemiologic distribution. In younger cohorts, they are typically the sequelae of high-energy trauma, such as motor vehicle collisions or falls from a significant height. These high-energy injuries frequently present with severe fragment displacement, comminution, soft tissue stripping, and concomitant injuries, making closed reduction and percutaneous pinning exceptionally challenging, though not impossible in the hands of a skilled surgeon.
Conversely, the vast majority of these fractures are "fractures of senescence," occurring in older, osteopenic, or osteoporotic individuals following low-energy mechanisms, most commonly a simple fall from standing height onto an outstretched upper extremity. In this demographic, the fracture displacement is often manageable, and crucially, the periosteal sleeve between the fracture fragments may remain largely intact. This intact periosteal hinge is the biological savior that makes minimally invasive techniques like percutaneous pinning highly successful, as it preserves the precarious residual blood supply to the humeral head.
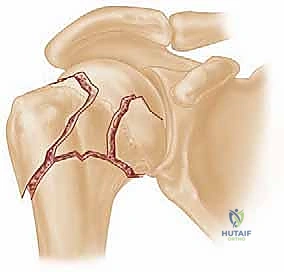
The classification of these fractures remains deeply rooted in the framework established by Codman and later popularized by Neer. The Neer classification system is based on the four fundamental anatomic "parts" of the proximal humerus, which correspond to distinct embryonic centers of ossification: the articular segment (humeral head), the greater tuberosity, the lesser tuberosity, and the humeral diaphysis (shaft). A fracture is only considered a distinct "part" if it is displaced by more than 1 centimeter or angulated by more than 45 degrees. However, it is paramount to understand that displacement is a radiographic classification criterion, not an absolute, isolated indication for surgical intervention. The decision to proceed with percutaneous pinning must synthesize the fracture morphology, the patient's physiologic age, bone quality, and functional demands.
Detailed Surgical Anatomy and Biomechanics
Before we even consider placing a pin or manipulating a fragment, a profound, three-dimensional understanding of the proximal humerus anatomy is mandatory. The success of percutaneous pinning hinges entirely on respecting the soft tissue envelope and utilizing muscular deforming forces to our advantage during reduction.
Osteology and Ossification Centers
The proximal humerus develops from four distinct centers of ossification, which directly correlate to the four fracture parts described by Neer. The articular surface of the humeral head is retroverted approximately 20 to 30 degrees relative to the transepicondylar axis of the distal humerus, and it has a neck-shaft angle of roughly 130 degrees. Recognizing these native angular relationships is critical when utilizing fluoroscopy to judge the adequacy of your closed reduction.
The rotator interval is a critical anatomical space located between the superior border of the subscapularis and the anterior border of the supraspinatus. The long head of the biceps tendon lies within the bicipital groove on the anterior proximal humerus and enters the glenohumeral joint through this interval. Understanding the position of the bicipital groove is essential, as the fracture line separating the greater and lesser tuberosities typically propagates just posterior to this groove. When placing anterior pins, the surgeon must be acutely aware of this anatomy to avoid iatrogenic injury to the biceps tendon.
Neurovascular Considerations
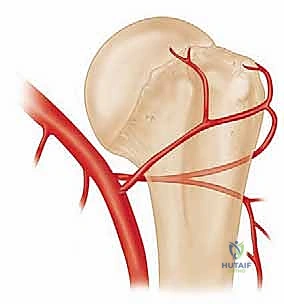
The vascular supply to the humeral head is the most critical factor in predicting the risk of post-traumatic avascular necrosis (AVN). The anterolateral ascending branch of the anterior humeral circumflex artery is historically considered the primary workhorse, providing approximately 80% to 85% of the blood supply to the humeral head. This vessel travels superiorly along the lateral aspect of the biceps groove and enters the head at its most proximal aspect.
However, recent microvascular studies have highlighted the significant contribution of the posterior humeral circumflex artery, which provides robust collateral flow via vessels entering the inferomedial quadrant of the humeral head. This posterior supply becomes the vital lifeline in specific fracture patterns, such as valgus-impacted fractures, where the medial periosteal hinge remains intact. Preserving this medial hinge during reduction is paramount; over-distraction or aggressive varus manipulation can tear these remaining vessels, guaranteeing AVN.
From a neurologic standpoint, the axillary nerve is the structure at greatest risk during both the injury and the subsequent percutaneous pinning. The axillary nerve courses anterior to posterior, wrapping around the surgical neck of the humerus approximately 5 to 7 centimeters distal to the lateral edge of the acromion. It innervates the deltoid and teres minor muscles. When inserting lateral pins, the entry point must be carefully selected to avoid this nerve. We utilize blunt dissection down to the bone and employ soft tissue protectors to mitigate the risk of iatrogenic axillary nerve injury.
Muscular Attachments and Deforming Forces
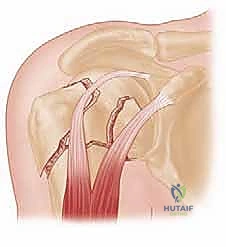
Understanding the muscular attachments is the key to predicting fracture displacement and formulating a rational reduction strategy. The proximal humerus is a battleground of opposing muscular forces. The greater tuberosity serves as the insertion site for the superior and posterior rotator cuff—the supraspinatus, infraspinatus, and teres minor. When fractured, the greater tuberosity is predictably pulled superiorly and posteriorly.
The lesser tuberosity is the sole insertion site for the subscapularis. An isolated lesser tuberosity fracture will be pulled medially and anteriorly. In a classic two-part surgical neck fracture, the pectoralis major, which inserts on the lateral lip of the bicipital groove on the proximal shaft, exerts a massive deforming force, pulling the humeral shaft anteriorly and medially.
Simultaneously, the deltoid muscle pulls the proximal shaft superiorly, leading to shortening and the classic "apex anterior and varus" deformity. To achieve a closed reduction, the surgeon must reverse these deforming vectors, typically utilizing longitudinal traction, flexion, and carefully controlled rotation to align the distal shaft with the proximal articular segment.
Exhaustive Indications and Contraindications
Patient selection is the cornerstone of successful percutaneous pinning. This technique is not a panacea for all proximal humerus fractures; it requires strict adherence to specific indications. The ideal candidate is a physiologically younger or active older patient with a two-part surgical neck fracture, a three-part fracture, or a valgus-impacted four-part fracture where the medial periosteal hinge is intact.
The quality of the bone stock is a critical determinant. In patients with severe osteoporosis, the "eggshell" cortex of the humeral head may not provide sufficient purchase for Kirschner wires or Schanz pins, leading to early construct failure, pin migration, and loss of reduction. In such cases, locked plating or arthroplasty (hemiarthroplasty or reverse total shoulder arthroplasty) may be more appropriate.
Furthermore, the patient must be cognitively intact and compliant. Percutaneous pinning relies on a relatively tenuous biomechanical construct compared to rigid internal fixation. If a patient cannot adhere to strict post-operative immobilization and rehabilitation protocols, the risk of hardware failure is unacceptably high.
| Indication / Contraindication Parameter | Percutaneous Pinning Suitability | Rationale / Clinical Note |
|---|---|---|
| 2-Part Surgical Neck Fracture | Ideal Indication | Highly amenable to closed reduction. Pins provide excellent stability against bending and torsional forces when placed in a divergent/convergent multi-planar construct. |
| Valgus-Impacted 4-Part Fracture | Strong Indication | The medial periosteal hinge is intact, preserving blood supply. Elevation of the articular segment and pinning yields excellent results with low AVN rates. |
| Severe Osteopenia/Osteoporosis | Relative Contraindication | Poor cancellous bone density within the humeral head leads to inadequate pin purchase, high risk of pin back-out, and loss of reduction. |
| Anatomic Neck Fractures | Absolute Contraindication | High rate of AVN and virtually impossible to secure adequate fixation purely percutaneously due to lack of bone stock in the head fragment. |
| Head-Splitting Fractures | Absolute Contraindication | Requires direct visualization for articular reduction and rigid fixation, or primary arthroplasty. |
| Non-Compliant Patient | Absolute Contraindication | The construct requires strict adherence to immobilization protocols. Premature loading will result in catastrophic construct failure. |
Pre-Operative Planning, Templating, and Patient Positioning
Thorough preoperative planning is the difference between a smooth, efficient procedure and an intraoperative disaster. This begins with a meticulous clinical evaluation and a comprehensive imaging series.
Imaging and Diagnostic Studies
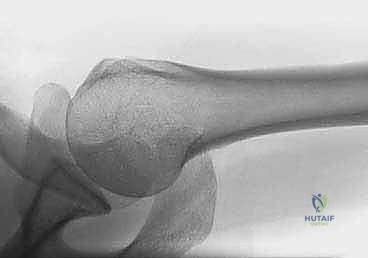
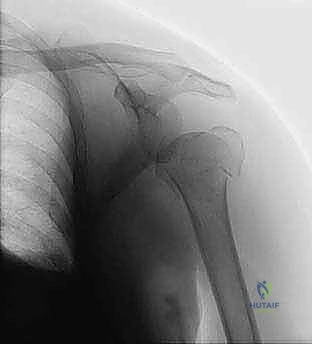
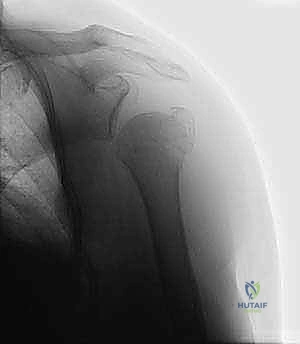
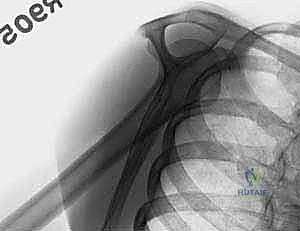
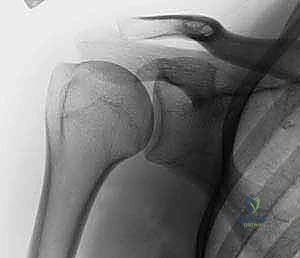
A standard shoulder trauma series is non-negotiable. This must include a true anteroposterior (Grashey) view, a scapular Y view, and an axillary lateral view. The axillary view is absolutely critical; it is the only radiograph that reliably demonstrates the relationship of the humeral head to the glenoid (ruling out subtle posterior dislocations) and accurately depicts the displacement of the greater and lesser tuberosities in the axial plane.
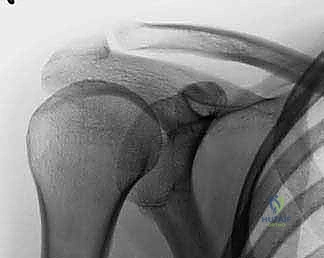
If the plain radiographs are equivocal, or if there is a suspicion of a complex three- or four-part fracture pattern, a Computed Tomography (CT) scan without contrast is mandatory. We routinely utilize 3D reconstructions with digital subtraction of the scapula. This allows for a 360-degree virtual inspection of the fracture lines, the degree of comminution, and the exact position of the tuberosity fragments.
Preoperative templating, while more commonly associated with arthroplasty, is highly beneficial here. We use the digital imaging software to measure the neck-shaft angle on the contralateral, uninjured side to establish our reduction goal. We also plan our pin trajectories, noting the optimal entry points on the lateral cortex to achieve maximum spread within the humeral head while avoiding the axillary nerve.
Anesthesia and Patient Positioning
The procedure is typically performed under general anesthesia, supplemented by an interscalene regional nerve block. The block provides profound intraoperative muscle relaxation, which is essential for overcoming the massive deforming forces of the pectoralis major and deltoid during closed reduction. It also affords excellent post-operative analgesia.
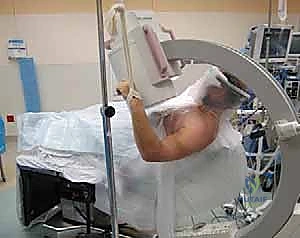
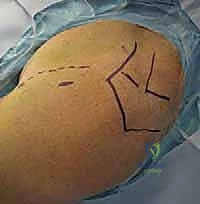
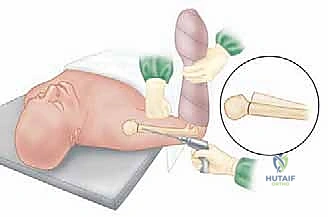
Patient positioning is a matter of surgeon preference, but the beach-chair position is overwhelmingly favored for this technique. The patient is positioned with the backrest elevated to approximately 45 to 60 degrees. The injured arm must be completely free and draped into the sterile field to allow for unrestricted manipulation.

The positioning of the fluoroscopy unit (C-arm) is just as critical as the positioning of the patient. The C-arm should be brought in from the head of the bed or from the contralateral side, depending on the room setup. The surgeon must verify that perfect AP and axillary views can be obtained without compromising the sterile field or the ability to manipulate the arm. We perform a "dry run" with the C-arm before draping to ensure all necessary radiographic angles are easily achievable.
Step-by-Step Surgical Approach and Fixation Technique
The execution of percutaneous pinning is a delicate dance between closed reduction maneuvers and precise, multi-planar hardware placement. It requires patience, spatial awareness, and a deep understanding of fluoroscopic anatomy.
Closed Reduction Maneuvers
The reduction begins with longitudinal traction applied to the arm, combined with varying degrees of forward flexion and abduction. For a standard surgical neck fracture with apex anterior angulation, the surgeon applies traction while gently flexing the shoulder, effectively using the intact posterior periosteum as a tension band to reduce the head onto the shaft.
If simple traction and manipulation fail, we employ percutaneous "joystick" techniques. A 3.0 mm or 4.0 mm Schanz pin is inserted percutaneously into the humeral head fragment, taking extreme care not to breach the articular surface. A second Schanz pin can be placed into the humeral shaft. By manipulating these pins, the surgeon gains powerful, multi-planar control over the fragments, allowing for precise correction of varus/valgus and flexion/extension malalignment.
In valgus-impacted fractures, the articular segment is driven down into the metaphysis. Here, a blunt elevator or a specialized tamp can be inserted through a small lateral cortical window to gently disimpact and elevate the head fragment back to its anatomic neck-shaft angle, preserving the critical medial periosteal hinge.
Percutaneous Pin Insertion Strategy
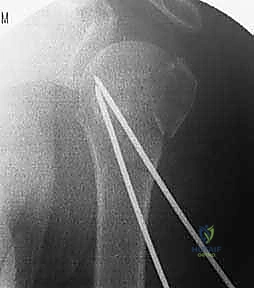
Once an acceptable reduction is achieved and provisionally held (either manually or with joysticks), we proceed with definitive fixation. We typically utilize 2.5 mm or 3.0 mm terminally threaded Kirschner wires. The threaded tips provide superior purchase in the cancellous bone of the humeral head and resist back-out better than smooth pins.
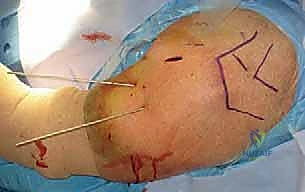
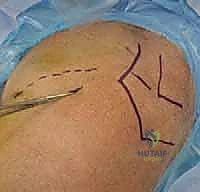
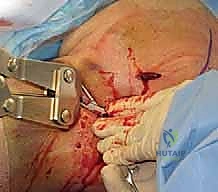
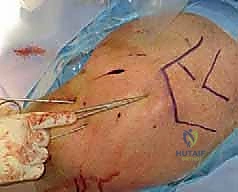
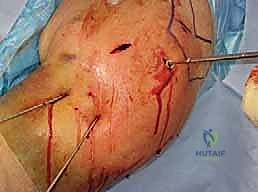
The standard construct involves two or three lateral pins and one or two anterior pins. The lateral pins are inserted starting from the lateral cortex of the shaft, distal to the axillary nerve (at least 5-7 cm below the acromion). A small stab incision is made, and blunt dissection is carried down to the bone using a hemostat. A tissue protector is inserted to safeguard the soft tissues and the axillary nerve during drilling.
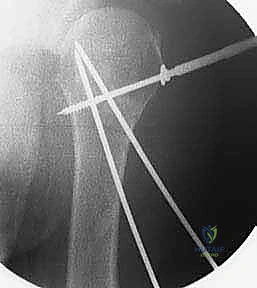
The lateral pins are directed proximally and medially, aiming for the subchondral bone of the inferomedial quadrant of the humeral head. It is vital that these pins diverge within the humeral head to maximize biomechanical stability and rotational control.
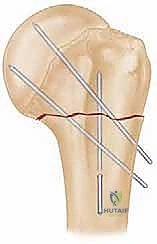
Next, the anterior pins are placed. These are inserted through the anterior cortex of the proximal shaft, lateral to the bicipital groove to avoid the biceps tendon and the ascending branch of the anterior humeral circumflex artery. These pins are directed proximally, posteriorly, and slightly laterally, aiming for the superior-posterior aspect of the humeral head.
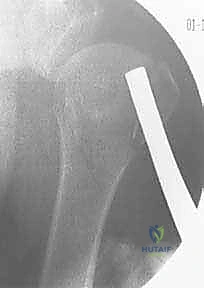
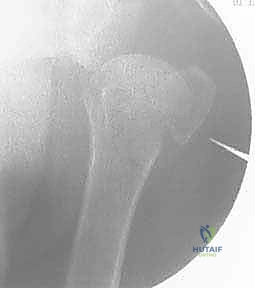
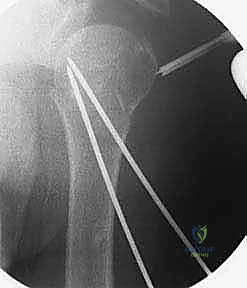
Intraoperative Fluoroscopic Verification
Throughout the pin insertion process, continuous orthogonal fluoroscopic imaging is mandatory. An AP view confirms the correction of varus/valgus alignment and the medial-lateral placement of the pins. The axillary view is crucial for confirming the correction of anterior/posterior translation, the reduction of the tuberosities, and ensuring that the pins have not breached the articular surface anteriorly or posteriorly.
A common pitfall is the "missed" articular penetration. Because the humeral head is spherical, a pin may appear to be perfectly positioned on an AP and axillary view, yet still be proud of the articular cartilage in an oblique plane. To prevent this, the surgeon must dynamically rotate the arm under live fluoroscopy (the "roll test") to visualize the pin tips across the entire contour of the humeral head.
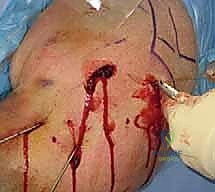
Once all pins are satisfactorily placed, they are cut beneath the skin surface to minimize infection risk, or left protruding through the skin and bent to facilitate easy removal in the clinic. If left proud, meticulous pin site care is required. Finally, the shoulder is taken through a gentle range of motion under fluoroscopy to confirm construct stability before the patient is awakened.
Complications, Incidence Rates, and Salvage Management
Despite meticulous technique, percutaneous pinning of the proximal humerus carries a distinct complication profile. The surgeon must be vigilant in both preventing and managing these issues. The most frequent complication is pin migration, which can occur in up to 10% to 15% of cases, particularly in osteoporotic bone. Pins can back out laterally, causing soft tissue irritation, or migrate medially into the glenohumeral joint, causing catastrophic chondral damage.
Infection is another significant concern, particularly when pins are left protruding through the skin. Superficial pin tract infections are relatively common (up to 5%) and can usually be managed with oral antibiotics and local wound care. However, deep infections tracking into the joint or fracture site necessitate immediate pin removal, surgical debridement, and intravenous antibiotics.
Avascular necrosis (AVN) of the humeral head is the most dreaded long-term complication. Its incidence is directly correlated with the initial fracture severity (highest in 4-part anatomic neck fractures) and the degree of iatrogenic soft tissue stripping during reduction. If AVN leads to symptomatic collapse of the articular surface, salvage options are typically limited to shoulder arthroplasty.
| Complication | Estimated Incidence | Prevention Strategy | Salvage Management |
|---|---|---|---|
| Pin Migration / Loosening | 10% - 15% | Use terminally threaded pins; achieve divergent spread in the head; avoid in severe osteoporosis. | Early pin removal if fracture is sticky; revision to locked plating or arthroplasty if reduction is lost. |
| Superficial Infection | 2% - 5% | Bury pins beneath skin if possible; meticulous post-op pin site care if left proud. | Oral antibiotics; increased frequency of pin site cleaning. |
| Deep Infection / Septic Arthritis | < 1% | Strict sterile technique; minimize operative time. | Immediate hardware removal; arthroscopic or open I&D; IV antibiotics. |
| Axillary Nerve Injury | 1% - 3% | Blunt dissection down to bone for lateral pins; use soft tissue drill sleeves; avoid entry < 5cm from acromion. | Usually neurapraxia that resolves spontaneously. Observation and EMG at 6 weeks if no recovery. |
| Avascular Necrosis (AVN) | 5% - 15% (varies by fracture type) | Gentle closed reduction; preserve medial periosteal hinge; avoid excessive varus manipulation. | Observation if asymptomatic. Hemiarthroplasty or Reverse Total Shoulder Arthroplasty for symptomatic collapse. |
Phased Post-Operative Rehabilitation Protocols
The biomechanical construct of percutaneous pins is inherently less rigid than locked plates; therefore, the post-operative rehabilitation protocol must be carefully phased to protect the fixation while preventing devastating shoulder stiffness.
Phase I (0 to 4 weeks) is focused entirely on protection and passive mobilization of adjacent joints. The patient is immobilized in a sling or shoulder immobilizer at all times. Active and active-assisted range of motion of the shoulder is strictly prohibited. However, patients are instructed to immediately begin active range of motion of the elbow, wrist, and hand to
Clinical & Radiographic Imaging Archive