Percutaneous Midfoot Osteotomy with External Fixation: An Intraoperative Masterclass
Key Takeaway
Join us in the OR for a detailed masterclass on percutaneous midfoot osteotomy using the Gigli saw and external fixation. We'll cover intricate anatomy, meticulous surgical steps from initial incision to hardware application, critical pearls, and comprehensive postoperative management to correct complex midfoot deformities effectively and safely, preserving joint function and minimizing soft tissue insult.
Comprehensive Introduction and Patho-Epidemiology
Welcome, colleagues, to the operating theater. Today, we are undertaking a highly challenging yet profoundly rewarding surgical intervention: the percutaneous midfoot osteotomy with external fixation. This masterful technique, which ingeniously utilizes the venerable Gigli saw, offers a minimally invasive, biologically friendly solution for complex uniplanar and multiplanar midfoot deformities. For decades, traditional open osteotomies of the midfoot have been plagued by catastrophic wound complications, particularly in patients with compromised soft tissue envelopes. By shifting our paradigm to a percutaneous approach combined with the mechanical versatility of circular external fixation, we achieve a significant improvement over historical open methods. Our primary surgical directives are to restore pedal alignment, optimize weight-bearing kinematics, alleviate recalcitrant pain, and re-establish a functional, plantigrade gait, all while meticulously preserving adjacent joint motion and the vital soft tissue vascularity.
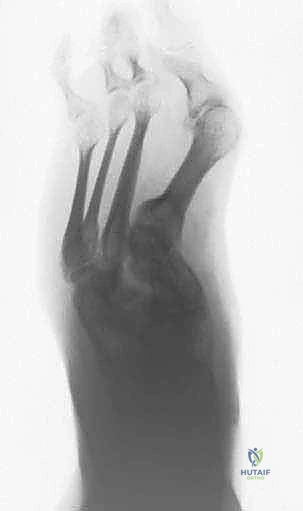
The patho-epidemiology of midfoot deformities necessitating such radical correction is diverse and complex. We frequently encounter these deformities in the setting of Charcot neuroarthropathy, where the midfoot arch collapses into a classic "rocker-bottom" deformity, leading to recurrent, limb-threatening plantar ulcerations. Beyond the diabetic population, post-traumatic malunions, neglected or relapsed congenital clubfoot (talipes equinovarus), and severe cavovarus deformities secondary to neuromuscular disorders (such as Charcot-Marie-Tooth disease) represent a significant portion of our surgical census. In these pathologies, the midfoot osseous architecture becomes rigidly distorted, rendering conservative orthotic management futile and necessitating structural realignment.
The superiority of the percutaneous approach lies in its respect for the angiosomes of the foot. Open midfoot reconstructions require extensive subperiosteal stripping and large incisions, which invariably disrupt the delicate microvasculature. In vasculopathic or diabetic patients, this is a well-documented catalyst for wound dehiscence, deep infection, and subsequent amputation. The percutaneous Gigli saw technique circumvents this by creating precise osteotomies through millimeter-length incisions, leaving the periosteal and muscular blood supply largely undisturbed. This preservation of the biological envelope accelerates osseous consolidation and drastically minimizes the risk of postoperative soft tissue disasters.
Furthermore, the integration of circular external fixation—whether traditional Ilizarov apparatus or modern hexapod computer-assisted frames—provides unparalleled biomechanical advantages. It allows for multi-planar deformity correction, either acutely in the operating room or gradually over weeks, depending on the tension tolerance of the neurovascular structures. The frame provides absolute stability for the osteotomy while simultaneously allowing for immediate weight-bearing, a critical factor in promoting osteogenesis and preventing disuse osteopenia in our complex patient demographic.
Detailed Surgical Anatomy and Biomechanics
Before a single incision is planned, an exhaustive, three-dimensional understanding of midfoot anatomy and its dynamic biomechanics is paramount. The midfoot serves as the critical structural and functional bridge connecting the hindfoot to the forefoot. It extends from the midtarsal joint (Chopart's joint) distally to the tarsometatarsal joint (Lisfranc joint) proximally. It is comprised of the navicular, the cuboid, and the three cuneiform bones (medial, intermediate, and lateral). Normal human gait relies entirely on the complex, synergistic actions of these articulations to transition the foot from a flexible shock absorber at heel strike to a rigid lever arm at toe-off.
Osteology and Keystone Articulations
The osseous architecture of the midfoot is arranged in a transverse and longitudinal arch, heavily dependent on the intrinsic shapes of the bones and their robust ligamentous restraints.
* Navicular: This boat-shaped bone acts as the medial keystone. It articulates with the convex talar head proximally, forming the talonavicular joint (the highly mobile medial column of Chopart's joint), and with the three cuneiforms distally.
* Cuboid: Functioning as the lateral column's foundation, the cuboid articulates with the calcaneus proximally and the fourth and fifth metatarsals distally. It also maintains a crucial medial articulation with the lateral cuneiform and navicular, linking the medial and lateral columns.
* Cuneiforms (Medial, Intermediate, Lateral): These wedge-shaped bones articulate with the navicular proximally and the first, second, and third metatarsals distally. Their trapezoidal geometry is fundamental to the stability of the transverse metatarsal arch.
The specific osteotomy level we select—be it the talocalcaneal neck, cuboid-navicular, or cuboid-cuneiform—depends entirely on the deformity's apex (Center of Rotation of Angulation, or CORA) and the preoperative mobility of the subtalar joint. For rigid, fused, or severely arthritic subtalar joints, a more proximal talocalcaneal neck osteotomy may be indicated. However, in the presence of a mobile subtalar joint, our surgical focus shifts distally to the cuboid-navicular or cuboid-cuneiform levels to meticulously preserve hindfoot kinematics.
Muscular Intervals and Tendon Protection
The percutaneous nature of this procedure demands an intimate, almost tactile knowledge of the surrounding tendinous anatomy to ensure the safe passage of our instruments and the Gigli saw without direct visualization.
* Dorsal Aspect: The Tibialis Anterior (TA) tendon runs medially and inserts rigidly onto the medial cuneiform and first metatarsal base. We must ensure our dorsal medial dissection passes strictly deep to this tendon to avoid catastrophic rupture. Centrally and laterally, the Extensor Hallucis Longus (EHL) and Extensor Digitorum Longus (EDL) traverse the dorsum; our lateral dorsal dissection must similarly pass deep to these structures, resting directly on the periosteum.
* Lateral Aspect: The Peroneus Longus and Brevis tendons run intimately along the lateral aspect of the calcaneus and cuboid. Extreme caution is mandated here to avoid laceration or thermal necrosis, particularly at the moment the Gigli saw breaches the lateral cortex of the bone.
* Plantar Aspect: The plantar vault houses the intrinsic foot musculature, the robust plantar fascia, and the deep flexor tendons (Flexor Digitorum Longus and Flexor Hallucis Longus). The Abductor Hallucis muscle borders the medial plantar aspect. Our technique relies on sweeping these structures away from the bone via a strictly subperiosteal tunnel.
Neurovascular Risks and Safe Zones
Protecting the neurovascular bundles is the absolute highest priority during any foot surgery, but it becomes exponentially more critical with percutaneous, fluoroscopically guided techniques where direct visualization is impossible.
* Dorsal Neurovascular Structures: The Dorsalis Pedis Artery, a direct continuation of the anterior tibial artery, runs along the dorsum of the foot between the EHL and EDL tendons, accompanied by the Deep Peroneal Nerve. These structures lie deep to the superficial fascia but superficial to the periosteum. Thus, our subperiosteal dissection plane safely bypasses them. The Superficial Peroneal Nerve branches (intermediate and medial dorsal cutaneous nerves) are highly susceptible to iatrogenic injury during the initial skin incisions; sharp dissection must be limited to the epidermis, followed by blunt spreading.
* Plantar Neurovascular Structures: The Medial and Lateral Plantar Arteries and Nerves, terminal branches of the posterior tibial neurovascular bundle, run deep within the plantar vault. Our subperiosteal dissection across the plantar aspect is designed specifically to protect these vital, limb-sustaining structures by staying directly on the osseous surface. Any transgression or superficial deviation from the subperiosteal plane risks devastating ischemic or neuropathic consequences.
Exhaustive Indications and Contraindications
Patient selection is the cornerstone of success in percutaneous midfoot reconstruction. This procedure is not a universal panacea; it requires a highly specific patho-anatomical profile and a patient capable of tolerating the rigors of external fixation. The ideal candidate presents with a rigid midfoot deformity that is unbraceable, resulting in pain, instability, or recurrent ulceration, yet possesses adequate vascularity to support osteogenesis.
The most frequent indication is the chronic, coalescent phase of Charcot neuroarthropathy. In these patients, the midfoot has collapsed, creating a bony prominence on the plantar aspect that leads to recalcitrant ulceration. By performing a percutaneous osteotomy, we can elevate the collapsed arch and restore a plantigrade foot without the massive soft tissue morbidity associated with open plating. Other robust indications include severe, rigid pes planovalgus, neglected clubfoot deformities in adults, and post-traumatic midfoot malunions where the soft tissue envelope is heavily scarred or previously compromised.
Conversely, absolute contraindications must be strictly respected. Severe peripheral arterial disease (PAD) that precludes healing of K-wire tracts or the osteotomy site is an absolute contraindication; vascular bypass or endovascular intervention must precede any orthopedic correction. Active, deep-seated osteomyelitis at the planned osteotomy site is also a contraindication for acute correction, though external fixation may be used in a staged approach following aggressive debridement and antibiotic spacer placement.
Psychiatric instability or profound non-compliance is a major relative contraindication. The patient must be capable of performing daily pin-site care, managing the mechanical bulk of the frame, and adhering to strict weight-bearing protocols. Failure to do so invariably leads to pin tract infections, frame failure, or nonunion.
| Category | Indications | Contraindications (Absolute & Relative) |
|---|---|---|
| Pathology | Rigid Charcot neuroarthropathy (rocker-bottom); Neglected/relapsed clubfoot; Post-traumatic midfoot malunion; Severe rigid cavovarus/planovalgus. | Active deep osteomyelitis at osteotomy site (Absolute); Severe, uncorrectable peripheral arterial disease (Absolute). |
| Clinical Presentation | Recurrent plantar ulceration due to bony prominence; Unbraceable foot deformity; Intractable midfoot pain with altered gait mechanics. | Active systemic sepsis (Absolute); Florid, uncontrolled local soft tissue infection (Relative - requires staging). |
| Patient Factors | Adequate bone stock for wire/pin purchase; Patient willing and able to manage external fixation device. | Severe psychiatric disorders precluding compliance (Relative); Inability to perform pin-site care (Relative). |
| Soft Tissue | Compromised soft tissue envelope (prior flaps, severe scarring, venous stasis) that precludes open surgical approaches. | Lack of adequate soft tissue coverage over planned wire insertion sites (Relative). |
Pre-Operative Planning, Templating, and Patient Positioning
Thorough, obsessive preoperative planning separates the master surgeon from the novice. The success of a percutaneous osteotomy and external fixation construct is determined long before the patient enters the operating theater.
Clinical and Radiographic Assessment
Clinical examination is our first diagnostic pillar. We meticulously assess the patient's gait (if ambulatory), joint range of motion, and the flexibility of the deformity. The Silfverskiöld test is performed to evaluate for gastrocnemius equinus, which frequently accompanies midfoot deformities and may necessitate a concurrent percutaneous Achilles tendon lengthening or gastrocnemius recession. Vascular status is assessed via palpable pulses and Doppler ultrasound; Ankle-Brachial Indices (ABI) or Transcutaneous Oximetry (TcPO2) are mandatory in diabetic or vasculopathic patients.
Radiographic planning requires high-quality, weight-bearing anteroposterior (AP), lateral, and oblique views of the foot and ankle. In complex, multiplanar deformities, a fine-cut Computed Tomography (CT) scan with 3D reconstruction is invaluable for mapping the precise osseous anatomy and identifying areas of spontaneous autofusion.
The Center of Rotation of Angulation (CORA) is precisely determined from the orthogonal radiographs. The CORA dictates the ideal level for our osteotomy. According to the principles of deformity correction, placing the osteotomy at or immediately adjacent to the CORA allows for pure angular correction without inducing secondary translational deformities.
Templating is non-negotiable. We utilize radiographic templates or advanced digital software to conceptualize the correction, estimate the exact degree of angulation or translation required, and plan the external fixator construct. We must pre-determine ring sizes, wire trajectories, and the location of hinges or struts if utilizing a hexapod system. For example, in a midfoot adduction deformity, we meticulously measure the angle between the talonavicular and calcaneocuboid axes, planning our osteotomy to achieve a perfectly straight lateral border of the foot.
Patient Positioning and Setup
The patient is placed in a supine position on a completely radiolucent operating table. This configuration allows unrestricted, 360-degree fluoroscopic imaging throughout the procedure, which is the "eyes" of the percutaneous surgeon. A small hemisacral bump is placed under the ipsilateral hip. This subtly internally rotates the lower extremity, bringing the foot out of its natural external rotation and into a neutral, forward-facing position. This simple maneuver greatly facilitates obtaining true AP fluoroscopic images of the foot without requiring the radiology technician to awkwardly tilt the C-arm.
A non-sterile thigh tourniquet is applied over heavy padding. While we will inflate it immediately prior to the osteotomy phase to ensure a bloodless field and prevent hematoma formation, keeping it non-sterile allows us to flex the patient's knee to 90 degrees intraoperatively. This knee flexion is highly advantageous for optimizing AP fluoroscopic views of the foot, especially when targeting the hindfoot or proximal midfoot. The C-arm is positioned on the contralateral side of the table, draped sterilely, and tested for optimal AP and lateral views before prepping. Standard sterile preparation and draping encompass the entire lower extremity, from the tourniquet down to the toes, ensuring adequate exposure for both the osteotomy incisions and the extensive K-wire insertions required for the external fixator.
Step-by-Step Surgical Approach and Fixation Technique
Alright, fellows, let's get scrubbed in. We've planned this meticulously. The goal here is absolute precision and uncompromising protection of the soft tissues.
Identifying the Osteotomy Level
First, we bring in the C-arm. We must obtain crystal-clear AP and lateral fluoroscopic views of the midfoot. I will take a 1.8-mm Ilizarov K-wire and, under direct live fluoroscopic guidance, place this wire directly on the skin, aligning it precisely with our preoperatively determined CORA and planned osteotomy level. This wire serves as our absolute reference line. Using a sterile marking pen, we mark the exact trajectory of the osteotomy on both the dorsal, plantar, medial, and lateral aspects of the foot, corresponding to the wire's position. This ensures our four percutaneous incisions and the subsequent saw passage are perfectly coplanar.
The Percutaneous Gigli Saw Technique
This highly specialized technique requires four precise, 1-centimeter transverse percutaneous incisions and meticulous, strictly subperiosteal dissection to protect all vital structures.
Incision 1: Plantar Lateral Border. I make the first transverse incision at the plantar lateral border of the foot, directly over our marked osteotomy line. I then introduce a sturdy, slightly curved periosteal elevator through this incision and perform a meticulous subperiosteal dissection. We must hug the bone tightly, creating a subperiosteal tunnel across the entire plantar vault of the foot. This subperiosteal plane is critical; it protects the delicate plantar neurovascular bundles and flexor tendons by keeping them superficial to our dissection. I rock the elevator gently against the bone to ensure complete separation of the periosteum, advancing across the plantar arch until I feel it tent the skin on the plantar medial aspect.
Incision 2: Plantar Medial. Where the skin is tented by the periosteal elevator on the plantar medial side, I make our second transverse incision. Once this incision is made, I push the elevator through and remove it. We now possess a clear, safe subperiosteal tunnel across the entire plantar aspect of the midfoot.
Incision 3: Dorsal Medial. Reintroducing the periosteal elevator through Incision 2, I now direct it dorsally and laterally, strictly maintaining the subperiosteal plane. The critical maneuver here is to pass deep to the tibialis anterior tendon. I advance the elevator until it tents the skin just lateral to the TA tendon on the dorsum of the foot, making our third incision here. Passing below the TA protects this crucial tendon and creates a plane that inherently avoids the dorsalis pedis artery and deep peroneal nerve.
Incision 4: Dorsal Lateral. From Incision 3, I extend the periosteal elevator further laterally, subperiosteally, across the dorsum of the foot, passing deep to the extensor tendons (EDL, EHL). I advance it until it exits at the level just dorsal to the cuboid, aligning with our first incision. Here, the fourth transverse incision is made. This completes our circumferential subperiosteal tunnels, creating a continuous, safe passage for the Gigli saw.
Passing the Saw and Performing the Osteotomy
Now for the delicate process of threading the Gigli saw. I take a No. 2 Ethibond suture and, using a curved tonsil hemostat, pass it through the plantar tunnel from Incision 1 to Incision 2. Next, from Incision 3, I pass the tonsil subperiosteally to Incision 2, grasp the suture, and pull it dorsally. We tie one end of the Gigli saw securely to the Ethibond suture. With gentle, steady tension, we pull the suture back through Incision 2 towards Incision 3, drawing the Gigli saw from medial to lateral, subperiosteally, across the dorsum of the foot. Finally, passing the tonsil from Incision 4 to Incision 3, we grasp the free end of the Gigli saw and pull it out laterally. The saw is now circumferentially positioned around the midfoot bones. We mandate a fluoroscopic check here to ensure the saw has not migrated from our marked osteotomy level.
We attach the T-handles to the Gigli saw. Using a smooth, reciprocating, long-stroke motion, we begin cutting the midfoot bones from medial to lateral. The motion must be controlled; aggressive, short strokes generate excessive thermal energy. As the saw approaches the lateral side of the foot, just before it completely exits the bone laterally, I take a periosteal elevator. I place it between Incision 4 and Incision 1, crossing over the Gigli saw. This elevator acts as a shield to protect the peroneal tendons and sural nerve as the saw breaches the lateral cortex, preventing catastrophic soft tissue laceration.
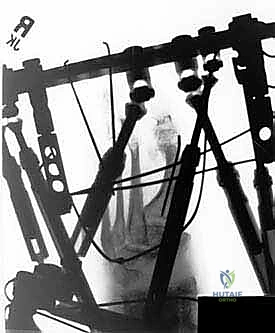
External Fixation Application
With the osteotomy complete and the deformity mobilized, we proceed to external fixation. The specific frame construct depends on the deformity, but typically involves a tibial block (two rings) and a foot block. The foot block usually consists of a half-ring or U-plate securing the calcaneus with opposing olive wires, and a forefoot half-ring securing the metatarsals.

Smooth 1.8-mm Ilizarov wires are passed under fluoroscopic guidance, ensuring bicortical purchase. We utilize olive wires to provide interfragmentary compression or to translate osseous segments. Crucially, wire insertion must be meticulously performed to avoid thermal necrosis: we pulse the drill, frequently clear bone debris, and immediately cool the wire with sterile saline. Once positioned, the wires are attached to the rings and tensioned to 110-130 kg using a dynamometer, transforming the flexible wires into rigid structural beams. If acute correction is planned, the deformity is manually reduced, and the frame is locked. If gradual correction is required (due to severe soft tissue contractures), hinges and compression/distraction rods or hexapod struts are applied, and the patient will begin turning the struts postoperatively following a brief latency period.
Complications, Incidence Rates, and Salvage Management
Despite the minimally invasive nature of the percutaneous osteotomy, the application of a complex circular external fixator carries a distinct and well-documented complication profile. The surgeon must be acutely aware of these risks, actively work to prevent them during the intraoperative phase, and possess the clinical acumen to manage them swiftly when they arise.
Superficial pin tract infections are the most ubiquitous complication, occurring in up to 80% of patients. While common, they are rarely limb-threatening if managed aggressively. They typically present with focal erythema, serous or purulent drainage, and localized pain. Prevention relies on meticulous intraoperative wire insertion techniques (avoiding thermal necrosis) and strict, daily postoperative pin-site care by the patient. Management usually involves oral antibiotics targeting common skin flora (Staphylococcus aureus) and increased frequency of local cleaning.
Deep infections or ring sequestra are far more severe, often resulting from untreated superficial infections traversing the pin tract into the medullary canal. This requires immediate wire removal, surgical debridement of the tract, and intravenous antibiotics. If frame stability is compromised, K-wires K-wires K-wires... wait, K-wires are insufficient for salvage; a new tensioned wire must be placed in a virgin anatomical location to maintain the construct's integrity.
Delayed union or nonunion at the osteotomy site occurs in approximately 5-10% of cases, particularly in diabetic populations with compromised intrinsic healing capacity. If radiographic consolidation is lacking at 12 weeks, frame dynamization (releasing axial stiffness to promote micromotion) is initiated. If nonunion persists, biological adjuncts such as percutaneous injection of bone marrow aspirate concentrate (BMAC) or a limited open procedure for autologous bone grafting may be required.
| Complication | Estimated Incidence | Prevention Strategies | Salvage / Management Protocol |
|---|---|---|---|
| Superficial Pin Tract Infection | 60% - 80% | Avoid thermal necrosis during wire insertion; strict post-op pin care protocols. | Oral antibiotics (e.g., Cephalexin, Doxycycline); increased local pin care; chlorhexidine washes. |
| Deep Infection / Osteomyelitis | 2% - 5% | Prompt treatment of superficial infections; avoid placing wires through compromised skin. | Immediate wire removal; surgical debridement of pin tract; IV antibiotics; place new wire at distant site. |
| Neurovascular Injury | < 2% | Strict adherence to subperiosteal dissection planes; use of protective elevators during saw exit. | Immediate intraoperative repair if recognized; frame adjustment if nerve tension neuropraxia occurs post-op. |
| Delayed Union / Nonunion | 5% - 10% | Optimize host biology (glycemic control, smoking cessation); ensure adequate frame stability. | Frame dynamization; percutaneous orthobiologics (BMAC); limited open bone grafting. |
| Hardware Failure (Wire Breakage) | 5% - 8% | Proper wire tensioning (110-130 kg); avoiding excessive cantilever loading. | Exchange broken wire in the operating room or clinic under local anesthesia; re-tension construct. |
Phased Post-Operative Rehabilitation Protocols
The surgical procedure is merely the first step; rigorous, phased postoperative rehabilitation is critical to achieving a functional, plantigrade foot. The rehabilitation protocol is heavily dependent on whether the deformity was corrected acutely intraoperatively or is undergoing gradual correction via distraction osteogenesis principles.
Phase 1: Acute Post-Operative Care (Weeks 0-2)
Immediately postoperatively, the limb is elevated strictly above the level of the heart to mitigate edema, which can be severe following external fixation application. If gradual correction is planned, this period serves as the "latency phase," allowing the inflammatory cascade to initiate the early stages of callus formation before distraction begins. Pin-site care is initiated on postoperative day 2, utilizing a mixture of sterile saline and dilute hydrogen peroxide or chlorhexidine, depending on institutional protocol. The patient is typically restricted to non-weight-bearing (NWB) or touch-toe weight-bearing (TTWB) during this acute inflammatory phase.
Phase 2: Correction and Early Consolidation (Weeks 2-6)
For patients undergoing gradual correction, strut adjustments commence according to the computer-generated prescription, typically at a rate of 0.75 to 1.0 mm per day, divided into three or four increments. The patient is seen weekly in the clinic for radiographic monitoring to ensure the regenerate bone is forming appropriately and that no secondary subluxations are occurring. Once the desired anatomical alignment is achieved, the frame is locked, entering the consolidation phase. Weight-bearing is progressively advanced. The inherent stability of the circular frame actually promotes osteogenesis through axial micromotion, so weight-bearing as tolerated (WBAT) with crutches or a walker is actively encouraged once the acute pain subsides.
Phase 3: Late Consolidation and Dynamization (Weeks 6-12+)
During this phase, the focus is on achieving robust osseous union at the osteotomy site. Radiographs are obtained every 3-4 weeks. We look for bridging trabeculae across at least three of the four cortices. If healing appears sluggish, the frame may be "dynamized." This involves loosening the axial struts or hinges slightly to allow for increased load-sharing across the osteotomy site, stimulating secondary bone healing according to Wolf's Law. Physical therapy focuses on maintaining range of motion in the knee and hip, as well as the toes, to prevent contractures.
Phase 4: Frame Removal and Transition
Frame removal is indicated only when definitive clinical and radiographic union is confirmed. Clinically, the patient should be able to bear full weight on the frame without pain at the osteotomy site. Removal is typically performed in the clinic or under light sedation in the operating room. Following removal, the limb is extremely vulnerable to mechanical failure or fracture through the pin tracts. The patient is immediately transitioned into a total contact cast (TCC) or a rigid CAM boot for an additional 4 to 6 weeks. Custom orthotics and specialized diabetic footwear are prescribed long-term to accommodate any residual architectural changes and prevent future ulcerations.
Summary of Landmark Literature and Clinical Guidelines
The evolution of percutaneous midfoot osteotomies and external fixation is heavily documented in modern orthopedic literature, transitioning from a niche technique to a gold-standard approach for specific complex deformities. The foundational principles were largely derived from the work of Gavriil Ilizarov, whose concepts of distraction osteogenesis and tension-
