Percutaneous In Situ Cannulated Screw Fixation for Slipped Capital Femoral Epiphysis: An Intraoperative Masterclass
Key Takeaway
This masterclass guides fellows through percutaneous in situ cannulated screw fixation for Slipped Capital Femoral Epiphysis (SCFE). We meticulously cover surgical anatomy, preoperative planning, and real-time intraoperative execution, emphasizing precision guidewire and screw placement. Key pearls, pitfalls, and post-operative protocols are detailed to ensure optimal patient outcomes and minimize complications in this adolescent hip disorder.
Comprehensive Introduction and Patho-Epidemiology
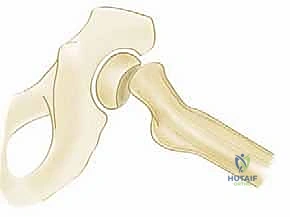
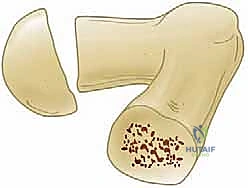
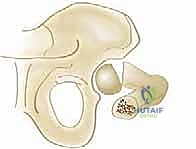
Welcome, fellows, to the operating theater. Today, we are addressing a common yet critical adolescent hip disorder: Slipped Capital Femoral Epiphysis, or SCFE. This condition is characterized by the displacement of the femoral neck and shaft relative to the proximal femoral epiphysis, most commonly translating into varus and extension. Our definitive goal is to achieve rigid, stable fixation with percutaneous in situ cannulated screws, thereby preventing further mechanical slippage, facilitating premature physeal closure, and mitigating long-term catastrophic complications such as avascular necrosis (AVN) and early-onset osteoarthritis.
To master the surgical management of SCFE, one must first deeply understand the underlying patho-epidemiology. Histologically, the physis in an affected patient appears pathologically widened, demonstrating severely abnormal chondrocyte maturation and defective endochondral ossification. The actual mechanical failure and subsequent slip occur predominantly through the hypertrophic zone of the physis. This zone is inherently the weakest link in the growth plate complex, as it is composed of enlarged, structurally compromised chondrocytes lacking the robust extracellular matrix found in the proliferative zone. The perichondrial ring of LaCroix, which typically provides circumferential stabilizing support to the physis, also becomes attenuated during the adolescent growth spurt, further contributing to the mechanical vulnerability of the proximal femur.
Patients typically present with insidious or acute hip, groin, thigh, or even referred knee pain. The pain is often exertional and usually manifests without a clear history of acute trauma. You will observe an antalgic gait in stable slips or a frank inability to bear weight in unstable cases. The clinical presentation is heavily dictated by the Loder classification, which categorizes SCFE into two primary groups based strictly on weight-bearing status. A "Stable SCFE" denotes a patient who experiences pain but remains able to bear weight, with or without crutches. The risk of osteonecrosis in these stable slips is exceptionally low, approaching zero. Conversely, an "Unstable SCFE" describes a patient completely unable to bear weight, even with assistive devices. This represents a true orthopedic emergency, as unstable slips carry a significantly higher risk of osteonecrosis, historically approaching 50%, due to the abrupt disruption of the precarious epiphyseal blood supply.
Duration of symptoms provides a secondary, descriptive classification: Chronic (symptoms > 3 weeks), Acute (symptoms < 3 weeks), and Acute-on-Chronic (longstanding mild symptoms with a sudden, acute exacerbation). While these temporal terms are clinically useful for history-taking, they correlate less directly with the devastating risks of AVN and chondrolysis compared to the binary Loder classification. Demographically, SCFE is more prevalent in males, who account for approximately 60% of cases. The average age of presentation aligns with the pubertal growth spurt: roughly 13.5 years for males and 12.0 years for females. A significant majority of these patients present with a body mass index (BMI) in the 90th to 95th percentile. Furthermore, SCFE presents bilaterally in up to 25% of patients, necessitating rigorous clinical and radiographic evaluation of the contralateral hip. For any patient presenting with SCFE under the age of 10, or those with a profoundly atypical habitus, a thorough endocrinologic workup is mandatory to rule out hypothyroidism, renal osteodystrophy, or panhypopituitarism.
Detailed Surgical Anatomy and Biomechanics
Understanding the intricate, unforgiving anatomy of the proximal femur and its surrounding vascular envelope is paramount for safe and effective SCFE fixation. The proximal femoral physis and epiphysis are uniquely situated entirely within the confines of the hip capsule. While this physis contributes to the longitudinal growth and morphological shaping of the femoral neck, the vast majority of SCFEs occur in late adolescence when its remaining growth potential is rapidly waning. The physis is subjected to massive forces; during normal adolescent development, the physis transitions from a relatively horizontal orientation to a more oblique angle. When combined with the increased mechanical load of adolescent obesity and relative femoral retroversion, the shear forces across the hypertrophic zone exponentially increase, eventually overcoming the intrinsic strength of the cartilage.
The true life-or-death anatomical detail for the femoral head lies in its critical blood supply. The primary vascular lifeline to the proximal femoral epiphysis is derived from the medial femoral circumflex artery (MFCA). The extracapsular MFCA travels posteriorly along the intertrochanteric crest, deep to the quadratus femoris muscle, before piercing the capsule. Once intracapsular, it gives rise to the retinacular vessels. The most significant contributors are the lateral epiphyseal vessels (posterosuperior retinacular arteries), which enter the epiphysis posterosuperiorly. These delicate vessels are tethered to the femoral neck periosteum and are highly vulnerable to stretching, tearing, or iatrogenic transection during any manipulation, reduction maneuver, or errant hardware placement.
Secondary, albeit minor, vascular contributions come from the vessels of the ligamentum teres (which provide a variable supply that diminishes with age) and the posterior inferior epiphyseal vessels. Iatrogenic or traumatic injury to this delicate capsular and epiphyseal blood supply is the direct, unyielding cause of avascular necrosis of the femoral head. This risk is profoundly elevated in unstable slips where the initial displacement may have already stretched the vessels to their physiological limit. Our percutaneous, in situ fixation technique is explicitly designed to minimize this risk by completely avoiding open capsular dissection, preventing intra-articular pressure spikes, and strictly avoiding any forceful reduction attempts that could further compromise the lateral epiphyseal vessels.
From a musculoskeletal perspective, our percutaneous approach is minimally invasive, targeting the lateral aspect of the proximal thigh. The trajectory traverses the skin, subcutaneous adipose tissue, and the fascia lata. Deep to the fascia lata, we bluntly dissect through the muscle fibers of the vastus lateralis to dock onto the lateral femoral cortex. This lateral trajectory keeps us safely away from the anterior femoral neurovascular bundle (femoral nerve, artery, and vein) and the posterior sciatic nerve. The lateral femoral cutaneous nerve (LFCN) is theoretically at risk with higher or more anterior incisions, but our precise, small lateral incision minimizes this danger. While perforating branches of the profunda femoris artery traverse the vastus lateralis, blunt dissection parallel to the muscle fibers effectively mitigates the risk of clinically significant hemorrhage.
Exhaustive Indications and Contraindications
The decision-making process for surgical intervention in SCFE requires a nuanced understanding of the patient's chronologic age, bone age, slip severity, and bilateral risk profile. The gold standard treatment for almost all forms of SCFE is surgical stabilization to prevent slip progression.
Indications and Contraindications Profile
| Category | Specific Parameters | Clinical Rationale |
|---|---|---|
| Absolute Indications | Stable SCFE (Mild, Moderate, Severe) | Halts progression, promotes premature physeal closure, prevents further deformity. |
| Unstable SCFE | Orthopedic emergency. Urgent in situ fixation (or gentle incidental reduction via positioning) to stabilize the physis and attempt to preserve the tenuous blood supply. | |
| Relative Indications | Prophylactic Fixation of Contralateral Hip | Strongly considered in high-risk patients (modified Oxford bone age score <16, endocrinopathies, poor follow-up compliance, obesity). |
| Absolute Contraindications | Active systemic or local joint infection | Hardware placement through an infected field will result in septic arthritis and catastrophic joint destruction. |
| Relative Contraindications | Severe metabolic bone disease | Profound osteopenia may preclude adequate screw purchase, requiring alternative fixation strategies or medical optimization first. |
The debate surrounding prophylactic pinning of the contralateral hip remains a cornerstone of pediatric orthopedic discourse. Given that up to 25% of patients will develop a contralateral slip—often asymptomatically until significant deformity has occurred—many surgeons advocate for prophylactic pinning in patients with open triradiate cartilages or specific endocrinopathies. The morbidity of a single percutaneous screw is weighed against the devastating potential of a missed, severe contralateral slip leading to early osteoarthritis.
For unstable slips, the timing of surgery and the role of capsulotomy remain highly debated. However, the consensus heavily favors urgent intervention (within 24 hours) to unkink the retinacular vessels and evacuate any intracapsular hematoma. While some centers advocate for open reduction and internal fixation via a surgical hip dislocation (the Dunn procedure) for severe unstable slips, percutaneous in situ fixation remains the most universally applied, reproducible, and arguably safest initial approach in the hands of the general orthopedic surgeon, prioritizing vascular preservation over anatomical restoration.
Preoperative Planning, Templating, and Patient Positioning
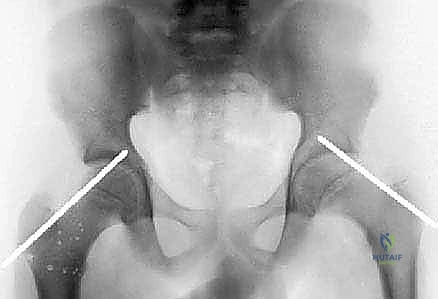
Thorough preoperative planning is the absolute cornerstone of a successful, complication-free outcome. We begin by meticulously scrutinizing all available imaging modalities. Plain radiographs, specifically a true anteroposterior (AP) of the pelvis and a frog-leg lateral view of both hips, are mandatory.
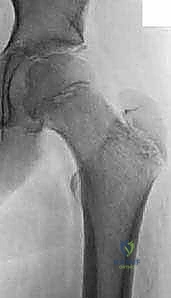
On the AP radiograph, we look for early indicators such as a widened, irregular physis. We critically evaluate the Klein Line—a line drawn along the superior cortex of the femoral neck. In a normal hip, this line must intersect a portion of the lateral epiphysis. In a patient with SCFE, the epiphysis drops below this line, a pathognomonic sign of displacement.
We also look for the metaphyseal blanch sign of Steel, a crescent-shaped double density visible on the AP view caused by the superimposition of the displaced epiphysis over the metaphysis. Severity is templated using the Southwick slip angle, calculated on the frog-leg lateral radiograph by measuring the epiphyseal-shaft angle difference between the affected and normal hips (Mild <30°, Moderate 30-50°, Severe >50°).
Proper patient positioning is arguably as critical as the surgical technique itself. The patient must be transferred to the operating table with extreme care, maintaining strict non-weight bearing status to prevent iatrogenic conversion of a stable slip to an unstable one.
- Operating Table Selection: We place the patient supine on a completely radiolucent, flat operating room table. We strictly avoid the use of a fracture table with boots and traction. A fracture table restricts the necessary freedom of movement required to obtain dynamic, orthogonal fluoroscopic views. Furthermore, inadvertent traction applied on a fracture table can inadvertently reduce an unstable slip, stretching the already compromised retinacular vessels and precipitating AVN.
- Draping and Preparation: The entire affected lower extremity is prepped and draped free from the toes to the umbilicus. This allows the surgeon complete freedom to manipulate the leg—specifically flexing, internally, and externally rotating the hip—which is essential for obtaining accurate fluoroscopic views and confirming that hardware has not penetrated the joint space.
- Fluoroscopy Setup: The C-arm is brought in from the contralateral side. The monitor is positioned at the head of the bed, directly in the surgeon's line of sight. We must verify that we can easily obtain a true AP and a true lateral (by flexing the hip 90 degrees and abducting 45 degrees, or by rolling the C-arm over if the leg cannot be manipulated) without obstruction.
Step-by-Step Surgical Approach and Fixation Technique
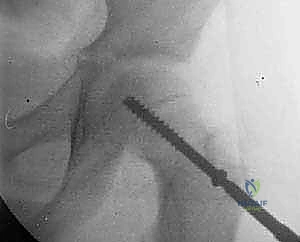
Alright, fellows, we are scrubbed in and the patient is prepped. Our primary biomechanical objective is to place a single, large-diameter (typically 6.5mm or 7.3mm) cannulated screw across the physis. The ideal trajectory places the screw in the central third of the epiphysis on both the AP and lateral views (the "center-center" position), perpendicular to the physis, with the threads crossing the physis and the tip resting approximately 3 mm to 5 mm from the subchondral bone.
Step 1: Fluoroscopic Mapping and Trajectory Planning
We begin by establishing the "Neck Horizontal" position. Under live fluoroscopy, the assistant gently internally or externally rotates the freely draped leg until the femoral neck appears at its maximum length on the AP view. This means the femoral neck is horizontal to the floor and perfectly perpendicular to the fluoroscopic beam, compensating for the patient's inherent femoral retroversion.
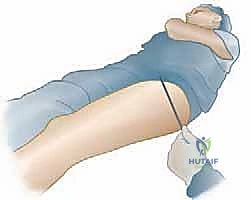
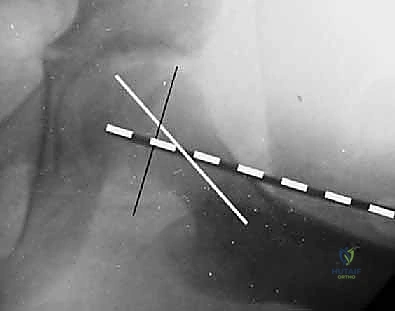
Once this optimal view is achieved, we hold the leg strictly in this position. We then take a long, sterile guidewire and lay it directly onto the patient's anterior thigh. We align the tip of the wire over the center of the femoral head and the shaft of the wire over the central axis of the femoral neck.
We mark this trajectory on the skin. Next, we rotate the C-arm to obtain a true lateral view of the proximal femur. We repeat the mapping process, laying the guidewire on the lateral aspect of the thigh to ensure our planned trajectory will pass centrally through the neck and into the center of the displaced epiphysis on the sagittal plane.
Step 2: The Approach and Guidewire Insertion
Based on our biplanar mapping, we identify our entry point on the lateral thigh. This is typically distal to the vastus ridge, aiming for an entry point on the anterior half of the lateral femur to accommodate the posterior displacement of the epiphysis. We make a sharp 1 to 2 cm longitudinal incision through the skin and subcutaneous tissue.
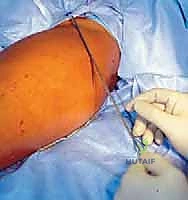
Using a hemostat, we bluntly dissect through the fascia lata and split the fibers of the vastus lateralis until we feel the hard, unyielding surface of the lateral femoral cortex. We then insert our drill guide down to the bone.
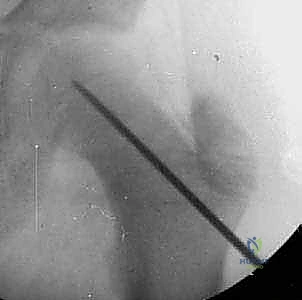
We advance a threaded guidewire through the guide, engaging the lateral cortex. Under continuous or frequent pulsed fluoroscopy, we advance the wire up the femoral neck.
The goal is to remain strictly "center-center". If the wire trajectory is slightly off, we do not bend the wire; we withdraw, adjust our starting point or angle, and re-advance. We must be particularly cautious of the "blind spot" in the anterosuperior quadrant of the femoral head, where a wire might appear intraosseous on standard views but is actually protruding into the joint.
As the wire approaches the dense, sclerotic physis, you will feel increased resistance. We advance the wire through the physis and into the epiphysis, stopping exactly 3 to 5 mm short of the subchondral bone.
Step 3: Measurement, Drilling, and Screw Insertion
Once perfect guidewire placement is confirmed on both AP and lateral views, we utilize a cannulated depth gauge to determine the appropriate screw length. We slide the gauge over the wire down to the lateral cortex and read the measurement. We typically subtract 2 to 4 mm from this measurement to account for compression and to ensure the screw head sits flush against the lateral cortex without penetrating the joint space distally.
Next, we pass the cannulated drill over the guidewire. It is imperative to drill through the dense lateral cortex to prevent the screw from binding and inadvertently distracting the fracture/slip site. We drill up to, but generally not across, the physis to maintain maximum thread purchase in the epiphysis.
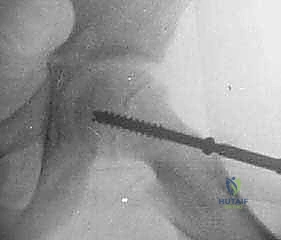
We select a partially threaded cannulated screw (typically 16mm or 32mm thread length). The thread length must be chosen carefully so that all threads fully cross the physis and reside entirely within the epiphysis. If threads span across the physis, the screw will act as a lag screw and fail to compress, or worse, hold the physis distracted. We advance the screw over the guidewire under fluoroscopic guidance.
As the screw head engages the lateral cortex, we watch the fluoroscopy closely to ensure the guidewire does not inadvertently advance into the joint. Once the screw is fully seated, we remove the guidewire.
Step 4: Final Verification and the "Approach-Withdraw" Maneuver
With the screw seated, we must unequivocally confirm that the screw has not penetrated the articular surface. Joint penetration is a catastrophic complication leading to rapid chondrolysis. We perform the "approach-withdraw" maneuver. Under live fluoroscopy, the surgeon takes the freely draped leg and moves the hip through a full, continuous arc of internal and external rotation, as well as flexion and extension.
During this dynamic movement, the tip of the screw must remain within the confines of the femoral head at all times. If the screw tip appears to touch or cross the subchondral line at any point during this rotational arc, it is intra-articular and must be backed out immediately.
Finally, we capture our final static AP and true lateral radiographs to document the center-center placement, the distance from the subchondral bone, and the flush seating of the screw head on the lateral cortex.


The wound is irrigated and closed in layers. A single stitch for the fascia and a subcuticular stitch for the skin are usually sufficient.
Complications, Incidence Rates, and Salvage Management
Despite meticulous surgical technique, SCFE and its treatment carry significant inherent risks. The complications can be devastating and life-altering for the adolescent patient.
Major Complications and Management Strategies
| Complication | Estimated Incidence | Pathophysiology & Salvage Management |
|---|---|---|
| Avascular Necrosis (AVN) | Stable: <1% Unstable: 10-50% |
Disruption of the lateral epiphyseal vessels. Results in segmental collapse of the femoral head. Salvage includes core decompression (early), proximal femoral osteotomies, or eventually Total Hip Arthroplasty (THA). |
| Chondrolysis | 5-7% | Rapid, progressive loss of articular cartilage. Historically linked to unrecognized intra-articular hardware penetration or severe initial trauma. Management involves NSAIDs, aggressive ROM physical therapy, and hardware removal if penetrating. Often progresses to severe stiffness requiring arthrodesis or THA. |
| Femoroacetabular Impingement (FAI) | Up to 30% in moderate/severe slips | The slipped metaphysis creates a prominent anterior "cam" lesion that abuts the acetabulum during flexion. Leads to labral tears and early OA. Salvage involves arthroscopic or open osteochondroplasty to recontour the femoral neck. |
| Slip Progression | 1-2% | Failure of fixation, often due to utilizing a single screw in a massively unstable slip, or hardware failure (screw breakage). Requires revision fixation, potentially with two screws or a more robust construct. |
The most feared complication is Avascular Necrosis. When AVN occurs, the structural integrity of the femoral head is compromised, leading to subchondral collapse, severe pain, and rapid arthritic degeneration. The risk is exponentially higher in unstable slips. If AVN develops, joint-preserving procedures such as vascularized fibular grafting or intertrochanteric osteotomies may be attempted, but many of these young patients will ultimately require a total hip arthroplasty in early adulthood.
Chondrolysis presents as acute joint stiffness and progressive narrowing of the joint space on radiographs, independent of AVN. While the exact etiology remains partially idiopathic, iatrogenic joint penetration by the guidewire or screw is a known, preventable trigger. This underscores the absolute necessity of the dynamic "approach-withdraw" fluoroscopic maneuver prior to leaving the operating room.
Furthermore, the altered biomechanics of a healed SCFE often result in Femoroacetabular Impingement (FAI). The prominent anterior metaphysis acts as a cam deformity, causing repetitive shear trauma to the acetabular labrum and adjacent cartilage during hip flexion and internal rotation. Recognizing this morphological consequence is critical, as many patients will benefit from a subsequent osteochondroplasty once the physis has closed and the hardware is removed.
Phased Post-Operative Rehabilitation Protocols
Post-operative rehabilitation is carefully phased to protect the fixation while restoring joint mobility and muscular strength. The protocol is heavily dependent on whether the initial presentation was a stable or unstable slip.
Phase 1: Immediate Post-Operative Period (Weeks 0-6)
For patients with a stable SCFE, we generally permit immediate weight-bearing as tolerated (WBAT) with the assistance of crutches. The mechanical stability provided by the central cannulated screw is sufficient to withstand axial loading, which can actually promote beneficial compression across the physis. For patients with an unstable SCFE, the protocol is far more conservative. These patients are maintained strict toe-touch weight-bearing (TTWB) or completely non-weight-bearing (NWB) for a minimum of 6 weeks to protect the tenuous vascularity and prevent catastrophic hardware failure before early physeal consolidation begins. Gentle active and active-assisted range of motion exercises are initiated to prevent capsular contracture.
Phase 2: Intermediate Rehabilitation (Weeks 6-12)
At the 6-week mark, clinical and radiographic evaluations are performed. We look for signs of early physeal fusion and ensure there is no hardware migration or slip progression. Unstable SCFE patients are gradually transitioned to WBAT. Physical therapy intensifies, focusing on restoring full active range of motion, particularly internal rotation and abduction, which are often limited. Strengthening protocols target the gluteus medius, quadriceps, and core musculature to normalize gait mechanics.
Phase 3: Advanced Return to Activity (Months 3-6)
Return to high-impact sports or heavy physical labor is generally restricted until there is radiographic evidence of complete physeal closure, which typically occurs 3 to 6 months post-fixation. Premature return to collision sports places the femur at risk for peri-implant fractures.
The issue of routine hardware removal remains controversial. While some surgeons advocate for the removal of asymptomatic screws once the physis is closed to prevent future stress risers or complications during subsequent arthroplasty, the general consensus leans toward
