Mastering Percutaneous Achilles Tendon Repair: An Intraoperative Masterclass

Key Takeaway
This masterclass details percutaneous Achilles tendon repair, guiding fellows through crucial anatomy, meticulous preoperative planning, and precise intraoperative execution. We explore two techniques: the three transverse and five stab incisions, emphasizing sural nerve protection, suture placement, and tensioning. Learn to manage complications and optimize postoperative rehabilitation for superior patient outcomes in acute ruptures.
Comprehensive Introduction and Patho-Epidemiology
Welcome, esteemed colleagues and fellows, to the operating theater. Today, we are undertaking a rigorous examination of a pathology that is as ubiquitous as it is unforgiving when mismanaged: the acute rupture of the Achilles tendon. Historically, the orthopedic community has been engaged in a perpetual pendulum swing regarding the optimal management of this injury, oscillating between the aggressive open surgical repairs of the late 20th century and the purely conservative functional rehabilitation protocols championed in recent decades. However, our focus today is on the elegant middle ground—percutaneous Achilles tendon repair. This technique offers the undeniable functional benefits and lower re-rupture rates associated with open repair, while simultaneously mitigating the devastating wound healing complications that plague extensive posterior ankle incisions. Achieving this delicate balance requires not only technical dexterity but a profound, three-dimensional understanding of the underlying anatomy and biomechanics.
The incidence of acute Achilles tendon ruptures has seen a steady and measurable rise over the past three decades, currently estimated at 18 to 32 per 100,000 population annually. This demographic shift is largely driven by the "weekend warrior" phenomenon—middle-aged individuals engaging in episodic, high-intensity, explosive sports such as basketball, squash, and tennis. The classic patient is a male in his fourth or fifth decade of life, though we are increasingly seeing this injury in female athletes and older cohorts remaining active later in life. The pathophysiology typically involves a sudden eccentric load applied to a dorsiflexed ankle, overwhelming the tensile capacity of the tendon. Alarmingly, despite its classic presentation, over 20% of acute injuries are initially misdiagnosed in the emergency department or primary care setting. These missed diagnoses inexorably lead to chronic, neglected ruptures characterized by massive tendon retraction, fatty infiltration of the muscle belly, and a substantially more complex reconstructive challenge requiring allografts or tendon transfers.
Understanding the cellular and structural precursors to rupture is critical for the operating surgeon. Rarely does a perfectly healthy Achilles tendon spontaneously rupture under physiologic loads. Histological analysis of ruptured tendons consistently reveals pre-existing degenerative changes, termed hypoxic tendinopathy or tendinosis. These changes include mucoid degeneration, lipoid infiltration, and a disorganized collagen matrix with an increased ratio of Type III to Type I collagen. This degenerative cascade compromises the mechanical integrity of the tendon, predisposing it to catastrophic failure during sudden acceleration or deceleration maneuvers. Therefore, when we perform a percutaneous repair, we must remain acutely aware that we are suturing tissue that is fundamentally diseased, necessitating meticulous handling and robust, load-sharing suture constructs to facilitate biological healing.
Detailed Surgical Anatomy and Biomechanics
To master percutaneous repair, one must possess an encyclopedic knowledge of the Achilles tendon's surgical anatomy and its surrounding neurovascular landscape. The Achilles tendon is the thickest and strongest tendon in the human body, measuring approximately 15 cm in length. It is formed by the confluence of the gastrocnemius and soleus muscle aponeuroses. The gastrocnemius, comprising medial and lateral heads originating from the respective femoral condyles, crosses three joints (knee, ankle, subtalar), making it highly susceptible to stretch-induced injuries. Its fleshy belly extends to the mid-calf, transitioning into a broad aponeurosis. Lying deep to the gastrocnemius, the soleus muscle—originating from the posterior tibia and fibula—contributes significantly to the deep (anterior) surface of the tendon throughout its length.
A unique and biomechanically vital feature of the Achilles tendon is the spiral orientation of its fibers. As the tendon descends toward its insertion on the posterior calcaneal tuberosity, the fibers rotate approximately 90 degrees internally. Specifically, the fibers from the medial gastrocnemius rotate to insert posteriorly, while the soleus fibers rotate to insert medially. This spiraling architecture provides a distinct mechanical advantage, increasing the tendon's ability to store and release elastic strain energy during the stretch-shortening cycle of human locomotion. However, this same spiraling creates areas of concentrated shear stress, which may contribute to the pathogenesis of tendinopathy and subsequent rupture. Furthermore, the Achilles tendon lacks a true synovial sheath; instead, it is enveloped by a paratenon—a highly vascularized layer of loose areolar tissue that allows for a gliding excursion of up to 1.5 cm. Preservation of this paratenon is a paramount objective of the percutaneous technique, as it provides the critical extrinsic vascular supply necessary for primary tendon healing.
The vascular watershed area of the Achilles tendon is a critical anatomical concept. Angiographic studies have demonstrated a region of relative hypovascularity located 2 to 6 cm proximal to the calcaneal insertion. This zone relies heavily on the precarious blood supply from the anterior mesotenon. Unsurprisingly, this is the exact anatomical location where the vast majority of acute ruptures occur.
Neurovascular Risks and Osteology
The most critical structure to identify and protect during any posterior ankle approach is the sural nerve. This sensory nerve, formed by the union of the medial sural cutaneous nerve and the sural communicating branch, typically crosses the lateral border of the Achilles tendon approximately 9.8 cm (ranging from 7 to 13 cm) proximal to its calcaneal insertion. It then courses distally along the lateral aspect of the tendon, accompanied by the small saphenous vein. Iatrogenic injury to the sural nerve during percutaneous suturing is the most feared complication of this technique, leading to chronic neuropathic pain, dysesthesia, or numbness along the lateral foot. Our surgical incisions and suture passes must be meticulously planned to avoid this structure.
Anterior to the Achilles tendon, nestled between the posterior aspect of the tibia, the superior aspect of the calcaneus, and the deep surface of the tendon, lies Kager's fat pad. This fat-filled, triangular space is a vital radiographic landmark. On a normal lateral ankle radiograph, Kager's triangle appears as a sharply defined radiolucent area. In the setting of an acute rupture, edema, hemorrhage, and loss of tendon tension obliterate the sharp margins of this triangle, providing a subtle but highly reliable radiographic sign of injury. Additionally, the retrocalcaneal bursa lies strategically between the anterior-inferior aspect of the Achilles tendon and the superior-posterior calcaneal tuberosity, reducing friction at the insertion site.
Exhaustive Indications and Contraindications
The decision to proceed with percutaneous repair must be predicated on a rigorous evaluation of patient-specific factors, injury chronicity, and anatomical considerations. While percutaneous repair is highly versatile, it is not a panacea and must be applied judiciously to achieve optimal outcomes.
Indications for Percutaneous Repair
The ideal candidate for a percutaneous Achilles tendon repair is an active, healthy individual presenting with an acute rupture, typically defined as occurring within 2 to 3 weeks of the initial injury. During this acute window, the tendon ends are generally mobile, and the hematoma has not yet organized into dense, unyielding scar tissue, allowing for anatomical reduction via closed manipulation and percutaneous suturing. Furthermore, the presence of a palpable gap in the tendon substance confirms the diagnosis and provides a necessary landmark for our percutaneous incisions. High-demand athletes, manual laborers, and patients who prioritize a rapid return to functional activities and possess a strong desire to minimize the risk of re-rupture are excellent candidates. The percutaneous approach is also highly advantageous for patients who may be at a slightly elevated risk for wound complications with an open approach, provided their skin envelope is currently intact and healthy.
Contraindications for Percutaneous Repair
Absolute contraindications include chronic or neglected ruptures presenting beyond 3 to 4 weeks post-injury. In these scenarios, the tendon ends have retracted significantly, and the intervening gap is filled with fibrous scar tissue. Percutaneous techniques cannot bridge massive defects or safely mobilize heavily scarred tendon stumps without direct visualization. Active local skin infections, severe peripheral vascular disease, or profound peripheral neuropathy (such as advanced diabetic Charcot neuroarthropathy) absolutely preclude any surgical intervention, open or percutaneous. Relative contraindications include a history of local corticosteroid injections, which severely degrade collagen quality and compromise suture purchase, and patients who are medically non-compliant or unable to adhere to the strict postoperative rehabilitation protocols, as premature weight-bearing will inevitably lead to construct failure.
| Parameter | Indications for Percutaneous Repair | Contraindications for Percutaneous Repair |
|---|---|---|
| Chronicity | Acute ruptures (< 2-3 weeks old) | Chronic/neglected ruptures (> 4 weeks old) |
| Anatomy | Palpable gap, easily reducible tendon ends | Massive gap, severe retraction, interposed tissue |
| Patient Profile | Active, high-demand, athletes, compliant | Sedentary, uncooperative, severe psychiatric illness |
| Skin Quality | Intact, healthy overlying skin envelope | Active cellulitis, severe abrasions, blistering |
| Vascular Status | Normal peripheral pulses, good capillary refill | Severe peripheral arterial disease (PAD) |
| Medication | No recent local corticosteroid use | History of multiple local corticosteroid injections |
Pre-Operative Planning, Templating, and Patient Positioning
Meticulous preoperative planning is the bedrock of a successful percutaneous Achilles tendon repair. Once the diagnosis is suspected, a comprehensive clinical evaluation is mandatory.
Clinical Assessment and Diagnostic Modalities
The physical examination must be thorough and systematic. Documentation of the patient's preoperative neurovascular status, particularly the sensory distribution of the sural nerve, is an absolute medicolegal and clinical necessity. The classic signs of rupture include a palpable gap in the tendon substance, usually 2 to 6 cm proximal to the insertion. However, in delayed presentations, organizing hematoma and edema may obscure this gap.
We rely heavily on provocative testing. The Calf Squeeze Test (Thompson Test) is the gold standard. With the patient prone, squeezing the fleshy muscle belly of the calf should elicit passive plantarflexion of the foot via the intact Achilles tendon. An absence of plantarflexion indicates a complete rupture. The Matles Test is equally valuable; with the patient prone, actively flexing the knees to 90 degrees will cause the foot on the injured side to fall into neutral or dorsiflexion due to the loss of resting resting tension, whereas the uninjured foot will remain in slight plantarflexion. It is vital to warn junior staff that active plantarflexion is often preserved despite a complete Achilles rupture, due to the compensatory actions of the tibialis posterior, flexor hallucis longus, and flexor digitorum longus muscles. Relying on active range of motion will lead to misdiagnosis.
While the diagnosis is primarily clinical, imaging can be a useful adjunct in equivocal cases. High-resolution musculoskeletal ultrasound is rapid, cost-effective, and allows for dynamic assessment of the tendon gap during passive ankle motion. Magnetic Resonance Imaging (MRI) is generally reserved for subacute or chronic cases, or when the physical exam is obscured by massive swelling, to precisely delineate the extent of retraction and the degree of tendinosis.
Anesthesia and Patient Positioning
This procedure offers flexibility regarding anesthetic choice. While general anesthesia or a spinal block are frequently utilized, percutaneous repair can be executed elegantly under local anesthesia with conscious sedation. For local infiltration, we advocate a generous 50:50 mixture of 10 mL of 2% lidocaine hydrochloride and 10 mL of 0.25% bupivacaine hydrochloride with epinephrine. This is infiltrated strategically into the subcutaneous tissues surrounding the rupture site, extending 8 to 10 cm proximally and distally, providing profound intraoperative anesthesia and durable postoperative analgesia.
Patient positioning is critical for optimal access and dynamic assessment of tendon tension. The patient is positioned prone on the operating table. Crucially, a firm bolster or pillow is placed beneath the anterior aspect of the distal tibias. This elevates the lower legs and allows the feet to hang freely over the edge of the bolster. This free-hanging position is non-negotiable, as it allows the surgeon to continually assess the resting equinus of the ankle during suture tensioning. We routinely angle the operating table down approximately 20 degrees cranially (a modified reverse Trendelenburg position). This subtle tilt facilitates venous drainage from the lower extremities, significantly reducing intraoperative bleeding and minimizing postoperative edema. A thigh tourniquet is generally avoided in percutaneous techniques. The absence of a tourniquet allows for better assessment of tissue viability and ensures that the muscle bellies are not artificially tethered, which could alter the perceived resting tension of the tendon during repair.
Step-by-Step Surgical Approach and Fixation Technique
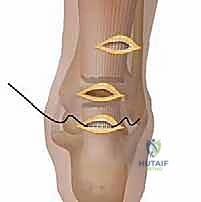
Now, let us delve into the intraoperative execution. We will detail the Modified Webb and Bannister technique, which utilizes three strategically placed transverse incisions. This approach provides a robust, locked suture construct while preserving the critical paratenon and minimizing the risk to the sural nerve.
Incision Planning and Tissue Dissection
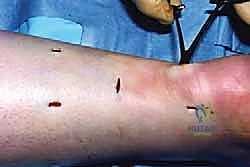
- Topographical Mapping: Begin by carefully palpating the defect. Mark the palpable gap with a sterile surgical pen. Make your middle incision directly over this defect. This incision should be strictly transverse and approximately 3 cm in length.
- Proximal and Distal Incisions: Measure exactly 4 cm proximal to the middle incision and make your proximal incision (3 cm, transverse). Measure 4 cm distal to the middle incision and make your distal incision (3 cm, transverse).
- Surgical Pearl: The proximal incision must be placed slightly medial to the midline of the calf. The sural nerve courses laterally as it descends; shifting the proximal incision medially is a critical maneuver to keep your instruments and sutures safely away from the nerve's trajectory.
- Blunt Dissection: Through each of the three incisions, introduce a small, curved hemostat. Gently spread the subcutaneous fat down to the level of the paratenon. Do not incise the paratenon sharply. Instead, use the hemostat to bluntly sweep the paratenon off the underlying tendon sheath, creating a safe, subcutaneous working channel between the incisions. This blunt dissection pushes the sural nerve laterally, out of harm's way, and preserves the vascular envelope of the tendon.
Suture Passage: Securing the Distal Stump
We utilize a heavy, non-absorbable or slowly absorbable suture. A #1 PDS II (polydioxanone) double-strand suture on a large, curved cutting needle provides excellent tensile strength and handles smoothly through the tendon substance.
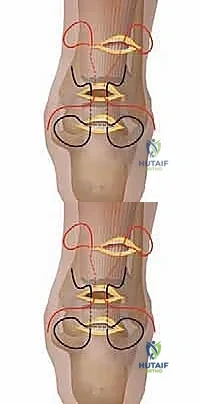
- The Transverse Anchor Pass: Introduce the needle through the distal incision. Pass it transversely through the thick, tendinous substance of the distal stump, ensuring a deep, secure bite of tissue. The needle enters and exits through the same distal incision.
- The Medial Longitudinal Locking Pass: Rethread the suture strand protruding from the medial side of the distal incision onto the needle. Re-introduce the needle into the distal incision, but pierce the tendon at a different entry point, slightly proximal to the transverse pass. Drive the needle longitudinally and proximally through the core substance of the tendon. The needle must exit out of the ruptured end of the distal stump and be retrieved through the middle incision. This creates a locking loop that resists pull-out.
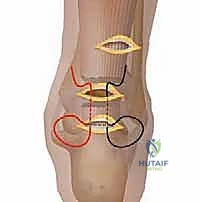
- The Lateral Longitudinal Locking Pass: Take the remaining suture strand protruding from the lateral side of the distal incision. Rethread it. Re-introduce it into the distal incision, pierce the tendon laterally, and drive it longitudinally and proximally through the tendon substance, exiting the ruptured end into the middle incision. You have now created a modified, percutaneous Kessler-type grasping stitch in the distal stump.
Suture Passage: Securing the Proximal Stump
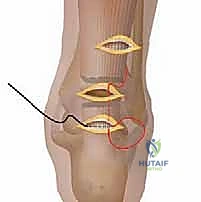
The process is meticulously repeated for the proximal stump, working between the proximal and middle incisions.
- Proximal Transverse Pass: Pass a new #1 PDS II double-strand suture transversely through the proximal tendon stump via the proximal incision.
- Proximal Longitudinal Passes: Shuttle the medial and lateral strands longitudinally down through the core of the proximal tendon stump, exiting the ruptured end into the middle incision.
- Surgeon's Directive: As you drive the needle distally from the proximal incision, you must maintain tactile awareness. The needle should feel firm as it passes through the tendon. If it feels too soft, you are in muscle or subcutaneous fat; if you feel sudden resistance, you may be tethering the paratenon.
- Surgeon's Directive: As you drive the needle distally from the proximal incision, you must maintain tactile awareness. The needle should feel firm as it passes through the tendon. If it feels too soft, you are in muscle or subcutaneous fat; if you feel sudden resistance, you may be tethering the paratenon.
Suture Retrieval, Tensioning, and Knot Tying
All four suture strands (two from the proximal stump, two from the distal stump) are now residing within the middle incision.
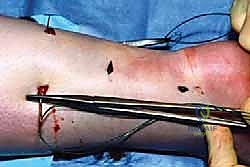
- Tensioning: Grasp the corresponding medial and lateral strands. Apply firm, steady traction to assess the security of your tissue bites. You should feel a solid, unyielding stop.
- Setting the Equinus: This is the most critical step for functional outcome. The assistant must passively plantarflex the ankle. Compare the resting posture of the injured foot to the contralateral, uninjured foot. The goal is to tie the sutures under sufficient tension to perfectly replicate the resting equinus of the normal side. Overtensioning leads to a stiff, plantarflexed ankle; undertensioning results in a lengthened, weak Achilles and a permanent limp.
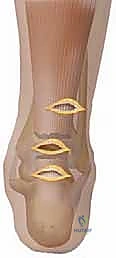
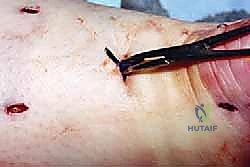
- Knot Tying: With the ankle held securely in the desired degree of plantarflexion, tie the medial proximal strand to the medial distal strand using a secure surgeon's knot. Repeat for the lateral strands. The knots should bury deeply into the tendon defect within the middle incision.
- Final Assessment: Release the foot. Verify that the resting tension matches the contralateral side and that a robust, palpable tendon contour has been restored.
- Closure: Copiously irrigate the incisions. Close the skin using an undyed 3-0 or 4-0 absorbable subcuticular suture (e.g., Monocryl or Vicryl) to minimize scarring and avoid the need for suture removal. Apply sterile steri-strips.
Complications, Incidence Rates, and Salvage Management
While percutaneous repair dramatically reduces the incidence of catastrophic soft tissue complications compared to open repair, it is not without its specific risks. A comprehensive understanding of these complications is mandatory for informed consent and prompt intraoperative or postoperative management.
The most notorious complication specific to percutaneous and minimally invasive techniques is iatrogenic injury to the sural nerve. Because the procedure relies on indirect visualization, aberrant needle passes can easily ensnare or transect the nerve. Incidence rates in early literature were reported as high as 10-15%, though modern techniques (such as the medialized proximal incision and blunt paratenon dissection described above) have reduced this to approximately 2-5%. If a patient reports sharp, radiating lateral foot pain immediately postoperatively or upon waking, a suture entrapment must be suspected. Immediate re-exploration and release of the offending suture is required to prevent permanent neuropathy.
Re-rupture remains a significant concern, though rates following percutaneous repair (typically 2-4%) are statistically comparable to open repair and significantly lower than non-operative management (which can approach 10-12% in some series). Re-ruptures usually occur due to premature weight-bearing, failure of the suture construct before biological healing has occurred, or an uncoordinated sudden eccentric load during the rehabilitation phase. Salvage of a re-rupture almost universally requires an open approach, often necessitating V-Y fascial advancement, flexor hallucis longus (FHL) transfer, or allograft reconstruction due to the poor quality of the remaining tissue.
Wound infections and skin necrosis, the bane of open Achilles surgery, are exceedingly rare in percutaneous repairs (incidence < 1%). When they do occur, they are typically superficial and respond well to oral antibiotics and local wound care. Deep infections involving the suture material are catastrophic and require formal surgical debridement, removal of the suture construct, and delayed reconstruction once the infection is eradicated.
Deep Vein Thrombosis (DVT) and Pulmonary Embolism (PE) are inherent risks of any lower extremity immobilization. The incidence of symptomatic VTE is roughly 1-3%. Chemical prophylaxis (e.g., low molecular weight heparin or direct oral anticoagulants) should be strongly considered for patients with elevated risk factors (obesity, oral contraceptive use, history of VTE), guided by institutional protocols and risk stratification tools like the Caprini score.
| Complication | Estimated Incidence | Etiology / Risk Factors | Salvage Management / Prevention |
|---|---|---|---|
| Sural Nerve Injury | 2% - 5% | Blind needle pass, lateral incision placement | Prevention: Medialize proximal incisions, blunt dissection. Salvage: Immediate re-exploration and suture release if entrapped. |
| Re-rupture | 2% - 4% | Premature weight-bearing, poor tissue quality | Salvage: Open reconstruction (V-Y advancement, FHL transfer, allograft). |
| Wound Infection | < 1% | Poor sterile technique, severe diabetes | Salvage: Oral/IV antibiotics. Deep infections require surgical debridement and hardware removal. |
| Tendon Elongation | 3% - 5% | Undertensioning at surgery, aggressive early stretching | Prevention: Match resting equinus intraoperatively. Salvage: Custom orthotics; rarely, late operative shortening. |
| DVT / PE | 1% - 3% | Immobilization, hypercoagulable state | Prevention: Early mobilization, chemical prophylaxis based on risk stratification. |
Phased Post-Operative Rehabilitation Protocols
The success of a percutaneous Achilles repair is inextricably linked to the postoperative rehabilitation protocol. The modern paradigm has shifted away from prolonged, rigid immobilization toward early functional rehabilitation, which has been shown to stimulate collagen synthesis, improve fiber alignment, and reduce the risk of tendon elongation.
Phase 1: Protection and Healing (Weeks 0-2)
Immediately postoperatively, the patient is placed in a well-padded, short-leg plaster splint or a rigid cast with the ankle immobilized in 20 to 30 degrees of plantarflexion (equinus). The patient is strictly non-weight-bearing (NWB) on the operative extremity, utilizing crutches or a knee scooter. The primary goals during this phase are wound healing, edema control (strict elevation), and protection of the nascent, fragile suture construct.
Phase 2: Early Mobilization and Controlled Loading (Weeks 2-6)
At the two-week mark, the surgical wounds are inspected. If healed, the patient is transitioned into a removable controlled ankle motion (CAM) boot equipped with a series of heel wedges (typically 3 wedges, elevating the heel by approximately 3 cm). Weight-bearing is initiated and progressed as tolerated, utilizing crutches for support. The patient is instructed to remove the boot multiple times daily to perform active, non-resistance range of motion exercises. Crucially, active plantarflexion is encouraged, but dorsiflexion is strictly limited to neutral (0 degrees) to prevent stretching the healing tendon.
Phase 3: Progressive Strengthening and Proprioception (Weeks 6-12)
During this phase, the heel wedges are systematically
