Osteotomy for Femoral Malunion in Children: Comprehensive Surgical Guide
Key Takeaway
Femoral malunion in children presents complex biomechanical challenges requiring precise surgical correction. This guide details the indications, preoperative planning, and step-by-step surgical techniques for corrective osteotomy. Emphasizing both modern internal fixation methods—such as intramedullary nailing and plating—and historical two-stage osteoclasis techniques, it provides orthopedic surgeons with an evidence-based framework to restore anatomic alignment, optimize limb length, and ensure robust osseous union in pediatric patients.
INTRODUCTION TO PEDIATRIC FEMORAL MALUNION
Femoral shaft fractures are common pediatric orthopedic injuries. While the robust osteogenic potential of the pediatric periosteum allows for rapid union, it also permits malunion if fractures are inadequately reduced or if fixation fails. The pediatric skeleton possesses a remarkable capacity for spontaneous remodeling, particularly in the plane of adjacent joint motion (sagittal plane). However, remodeling is highly limited for rotational deformities and coronal plane (varus/valgus) angulations.
When a femoral malunion exceeds the remodeling potential of the child—typically dictated by the child's age, distance of the fracture from the physis, and the plane of deformity—surgical intervention via corrective osteotomy becomes indicated. The primary goals of osteotomy are to restore the mechanical axis of the lower extremity, correct rotational malalignment, equalize limb length, and prevent long-term joint arthrosis secondary to abnormal biomechanical loading.
Clinical Pearl: Spontaneous remodeling follows Wolff’s Law and the Hueter-Volkmann principle. A general rule is that angular deformities remodel best if the child is under 10 years of age, the deformity is in the sagittal plane, and the fracture is near a rapidly growing physis. Rotational deformities do not remodel and must be corrected surgically if clinically significant.
PREOPERATIVE PLANNING AND BIOMECHANICS
Thorough preoperative planning is the cornerstone of a successful corrective osteotomy. The surgeon must quantify the deformity in all three planes (coronal, sagittal, and axial) and assess for limb length discrepancy (LLD).
Radiographic Evaluation
- Full-Length Standing Radiographs: Essential for calculating the Mechanical Axis Deviation (MAD) and joint orientation angles, including the mechanical Lateral Distal Femoral Angle (mLDFA) and the mechanical Medial Proximal Femoral Angle (mMPFA).
- Center of Rotation of Angulation (CORA): Identifying the CORA is critical. The osteotomy should ideally be performed at the CORA to achieve pure angular correction without inducing secondary translation.
- CT Scanogram / Rotational Profile: A CT scan is the gold standard for quantifying rotational malunion (femoral anteversion/retroversion) and precise limb length measurements.
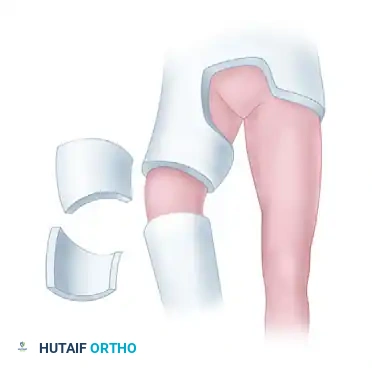
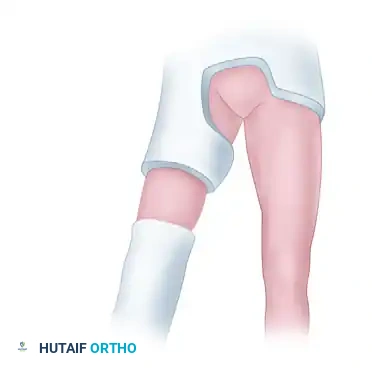
SURGICAL APPROACH TO THE FEMUR
The choice of surgical approach depends on the level of the malunion and the planned fixation method. For most diaphyseal and subtrochanteric malunions, a lateral or anterolateral approach is preferred.
The Lateral Approach
- Positioning: Place the patient supine on a radiolucent operating table. A bump may be placed under the ipsilateral hip to internally rotate the leg to a neutral position.
- Incision: Make a longitudinal incision along the lateral aspect of the thigh, centered over the apex of the deformity.
- Superficial Dissection: Incise the fascia lata in line with the skin incision.
- Deep Dissection: Elevate the vastus lateralis anteriorly off the lateral intermuscular septum. Ligate or cauterize the perforating branches of the profunda femoris artery as they are encountered near the linea aspera.
- Periosteal Exposure: Incise the periosteum longitudinally and carefully strip it from the lateral, anterior, and posterior surfaces of the proximal and distal fragments. Preserving a robust periosteal sleeve is vital for postoperative callus formation.
Surgical Warning: Proceed cautiously during deep dissection and periosteal stripping to avoid injuring important neurovascular structures on the medial side of the femur, particularly the superficial femoral artery and vein in the adductor canal.
MODERN SURGICAL TECHNIQUE: DIRECT CORRECTIVE OSTEOTOMY
When modern fluoroscopy and rigid internal fixation are available, a direct single-stage corrective osteotomy is the standard of care.
Step-by-Step Osteotomy Execution
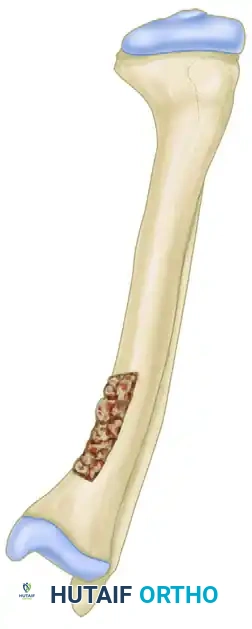
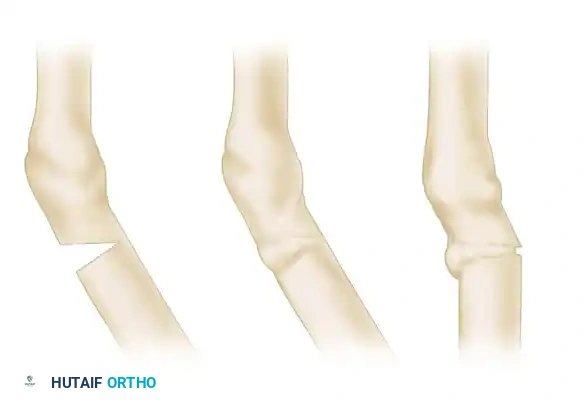
- Inspection and Correlation: Inspect the old fracture carefully. Compare the gross anatomy directly with the preoperative radiographs to ensure the osteotomy is placed as near to the original fracture site (and the CORA) as possible. In malunions of 6 to 12 months' duration, the proximal fragment is usually located lateral and anterior to the distal fragment and can be easily identified.
- Osteotomy Cut:
- Method A (Motorized Saw): Use a reciprocating or oscillating motor saw to separate the fragments directly through the plane of union.
- Method B (Drill and Osteotome): Outline the plane of union with a motor-driven drill, creating multiple unicortical or bicortical holes. Divide the bone by connecting these holes with a narrow osteotome. This method generates less thermal necrosis than a saw.
- Note: If union is far advanced and the original fracture line is obliterated, an oblique or transverse osteotomy can be made based on preoperative CORA calculations, without regard to the historical plane of fracture.
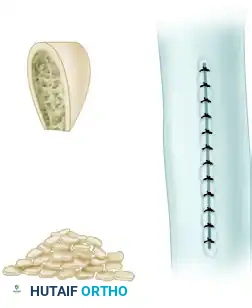
- Bone Resection: Resect 0.6 to 1.3 cm of bone from each fragment using a saw. This specific resection is critical for three reasons:
- The ends of the malunited fragments are typically sclerotic and avascular; they must be resected back to bleeding, comparatively normal bone to ensure union.
- The newly created flat surfaces permit more stable and accurate apposition.
- Apposing the fragments is significantly less difficult, and recurrence of deformity is less likely. In long-standing malunions, the soft tissues (muscles, fascia, neurovascular bundles) have contracted; shortening the bone slightly reduces soft tissue tension, preventing neurovascular compromise upon realignment.
Fixation Strategies
Once the deformity is corrected and the bone ends are apposed, rigid fixation is required.
- Plate Osteosynthesis: If apposing and firmly interlocking the fragments is possible, apply a broad dynamic compression plate (DCP) or locking compression plate (LCP). This provides absolute stability and allows for early mobilization.
- Intramedullary Nailing: In older children and adolescents (typically >10 years with closed or closing physes), a rigid, interlocking intramedullary nail is the preferred fixation method. It provides load-sharing biomechanics and excellent control of alignment.
- External Fixation: If the deformity is severe, apposing the fragments may be impossible without excessive stripping of soft tissues or resecting too much bone. In such instances, a circular (Ilizarov) or monolateral external fixator is preferable. This allows for gradual correction of the deformity and limb lengthening if necessary.
Clinical Pearl: Fibrous Dysplasia: Malunions occurring in patients with fibrous dysplasia present a unique challenge due to poor screw purchase in pathological, "ground-glass" bone. Plate and screw fixation frequently fails. In these cases, reconstruction with a rigid intramedullary nail is highly recommended. The nail effectively splints the entire femur, bypassing the pathological bone and preventing delayed angulation or stress fractures at the ends of the implant.
HISTORICAL AND ALTERNATIVE TECHNIQUES (RESOURCE-LIMITED SETTINGS)
In scenarios where adequate fluoroscopy, interlocking intramedullary nailing equipment, or modern internal fixation implants are unavailable, older, time-tested techniques can still provide excellent clinical results. These techniques rely heavily on the biological healing capacity of the pediatric skeleton.
The Ferguson, Thompson, and King Two-Stage Osteotomy
Ferguson et al. described a highly effective two-stage osteotomy designed to correct angular deformities in long bones (such as the femur or tibia) while minimizing the risk of nonunion or catastrophic displacement. The technique utilizes the body's natural callus formation to stabilize the correction.
Stage 1: Defect Creation and Grafting
A rectangular segment, consisting of approximately one-half the width of the bone, is removed from the concave side of the deformity.
This resected cortical segment is then morselized into small cancellous and cortical chips. These bone chips are packed tightly back into the created defect to stimulate local osteogenesis.
Stage 2: Deformity Correction
The second stage is delayed for several weeks (typically 3 to 6 weeks) until sufficient, sticky callus has formed across the first defect. If necessary, additional bone grafts can be placed over the first defect before proceeding. Once the medial callus is deemed stable, the osteotomy is completed on the convex side of the deformity by resecting a wedge exactly opposite the middle of the first defect.
The limb is then manually manipulated to close the lateral wedge, thereby correcting the varus or valgus deformity. The previously formed callus on the concave side acts as a biological hinge, providing immense stability. The limb is immobilized in a cast until solid union is achieved.
The Moore Osteotomy-Osteoclasis Technique
Moore described an ingenious method for correcting deformities of long bones, including malunited fractures, which minimizes soft tissue stripping and relies on delayed manual osteoclasis. Irwin later adapted a similar method for trochanteric osteotomies, genu valgum/varum, and coxa vara.
Surgical Execution:
At the level of maximal deformity, approximately three-fourths of the circumference of the bone is divided with an osteotome. A wedge of bone is resected from the normal bone distal to the malunion, leaving the cortex on the concave side of the deformity intact. The proximal cut is made perpendicular to the long axis of the proximal fragment, and the distal cut is perpendicular to the distal fragment.
The excised wedge of bone is reduced to small chips and returned to the defect. The periosteum is then meticulously and carefully approximated over the bone chips to contain the graft and promote rapid vascularization.
Postoperative Casting and Osteoclasis:
Following the initial surgery, the limb is placed in a rigid cast. At 3 to 4 weeks postoperatively, once early callus has consolidated the grafts but remains malleable, a circular segment of the cast is removed at the level of the osteotomy.
With the cast windowed, the remaining intact cortex is broken via manual osteoclasis, and the deformity is acutely corrected. The intact, newly formed callus acts as a robust hinge, preventing translation of the fragments.

Once the desired alignment is achieved, the cast is repaired with fresh plaster to hold the limb in the corrected position until definitive osseous union occurs.
POSTOPERATIVE PROTOCOL AND REHABILITATION
The postoperative rehabilitation protocol is dictated by the stability of the fixation achieved during surgery.
- Rigid Internal Fixation (Plates/IM Nails):
- 0-2 Weeks: Non-weight-bearing. Focus on pain control, edema management, and gentle active-assisted range of motion (ROM) of the hip and knee to prevent stiffness.
- 2-6 Weeks: Toe-touch to partial weight-bearing, progressing as radiographic evidence of callus formation appears.
- 6-12 Weeks: Advance to full weight-bearing once bridging callus is seen on at least three out of four cortices on orthogonal radiographs.
- External Fixation:
- Pin site care is paramount to prevent superficial infections.
- Weight-bearing is often permitted earlier due to the load-sharing nature of circular frames, which stimulates osteogenesis through micromotion.
- Cast Immobilization (Osteoclasis Techniques):
- Strict non-weight-bearing until the cast is removed.
- Serial radiographs are required every 2-3 weeks to ensure alignment is maintained within the cast.
COMPLICATIONS AND PITFALLS
- Nonunion/Delayed Union: Risk is minimized by resecting sclerotic bone back to bleeding margins and ensuring rigid fixation. Smoking (in older adolescents) and poor nutrition must be addressed.
- Neurovascular Injury: The medial structures (superficial femoral artery) are at risk during deep dissection and osteotomy. Always protect the medial soft tissues with blunt retractors (e.g., Hohmann retractors) during saw or osteotome use.
- Infection: Meticulous soft tissue handling and prophylactic antibiotics are mandatory. Pin tract infections in external fixators should be treated aggressively with oral antibiotics and local care.
- Recurrence of Deformity: Often due to premature weight-bearing or inadequate initial fixation. Utilizing load-sharing devices like IM nails in older children reduces this risk significantly.
By adhering to strict biomechanical principles, executing precise surgical techniques, and selecting the appropriate fixation strategy based on the patient's age and pathology, orthopedic surgeons can reliably correct pediatric femoral malunions, restoring both function and anatomy.
You Might Also Like